Cloud Virtual Machine (CVM) provides you with secure and flexible computing capabilities. You can enable CVM in the cloud in just minutes to meet your diverse computing needs. Through (CVM)[https://www.tencentcloud.com/products/cvm?from_social=dev_9] , you can easily scale up or down your computing resources as your business needs change. Billed based on your actual resource consumption, CVM reduces your computing costs and simplifies IT-related OPS.
introduce
Ghost is a lightweight JavaScript blogging platform, open source under the MIT license Ghost is designed to simplify the process of publishing personal websites and publishing online. Ghost is a personal blogging system, which is developed using Node.jslanguage and MySQL database, and supports MySQL , MariaDB , SQLite and PostgreSQL . Users can use their own blogs on servers that supportNode.js.Ghost officially supports the version, and there are third-party Chinese Chinese versions developed by fans, such as Ghost's Chinese Chinese version. Ghost provides an API for developing plugins and customizable Handlebars theme template styles.
In this tutorial, you will use the official ghost-cli Ghost instance to install on Ubuntu 16.04. We'll install Ghost, configure Nginx to proxy requests to Ghost, secure it with a Tencent Cloud free SSL certificate , and configure Ghost to run as a system service in the background.
Prepare
To complete this tutorial, you will need:
- An Ubuntu 16.04 server, we recommend that you use Tencent Cloud's free developer lab to experiment.
- Install Node.js on your server, how to install Node.js please refer to this article
- Install Nginx on your server, how to install Nginx please refer to this article
- Install MySQL on your server, how to install MySQL please refer to this article
- Configure a domain name pointing to the server. You need to use the Tencent Cloud SSL certificate to enable SSL support through the installation of Ghost .
Step 1: Install the Ghost CLI application
ghost-cli We will install Ghost using the official program. The program installs Ghost, creates MySQL users and databases, configures Nginx as a reverse proxy, and secures the site with SSL/TLS encryption.
First, npm download with ghost-cli :
sudo npm i -g ghost-cli copy
We put Ghost in the var/www/ghost directory, which is the recommended installation location. Create this directory:
mkdir /var/www/ghost copy
Then make sure your user owns this directory.
sudo chown $USER:$USER /var/www/ghost copy
/var/www/ghost The directory must have all permissions for your user, and read and execute for everyone else, so set the permissions with:
sudo chmod 775 /var/www/ghost copy
After installing the CLI and mounting the directory, we can set up our blog.
The second step, install and configure Ghost
Ghost CLI The application has an installation wizard that will walk you through all the steps to configure a working Ghost blog.
Change to /var/www/ghost/ directory .
cd /var/www/ghost/ copy
Then ghost install Ghost with that command. It will configure Ghost to use MySQL as the default database. While you can use other databases, MySQL is the recommended choice.
ghost install copy
The installer will first make sure you have the necessary preparations installed, then download and install Ghost:
✔ Checking system Node.js version
✔ Checking logged in user
✔ Checking current folder permissions
✔ Checking operating system compatibility
✔ Checking for a MySQL installation
✔ Checking memory availability
✔ Checking for latest Ghost version
✔ Setting up install directory
✔ Downloading and installing Ghost v1.22.2
✔ Finishing install process
copy
Once the installation process is complete, you will be prompted to enter your blog URL along with MySQL database information. Provide the root username and password in this step . You can use the default ghost_prod as the database name.
? Enter your blog URL: http://example.com
? Enter your MySQL hostname: localhost
? Enter your MySQL username: root
? Enter your MySQL password: [hidden]
? Enter your Ghost database name: ghost_prod
copy
The configuration wizard will create a ghost system user and ask if a ghost MySQL user should be created, you should allow:
✔ Configuring Ghost
✔ Setting up instance
Running sudo command: useradd --system --user-group ghost
Running sudo command: chown -R ghost:ghost /var/www/ghost/content
✔ Setting up "ghost" system user
? Do you wish to set up "ghost" mysql user? Yes
✔ Setting up "ghost" mysql user
copy
Next, it will ask you if you want to configure Nginx. Click OK and the installer will create the appropriate reverse proxy server block for your blog:
? Do you wish to set up Nginx? Yes
✔ Creating nginx config file at /var/www/ghost/system/files/example.con.conf
Running sudo command: ln -sf /var/www/ghost/system/files/example.com.conf /etc/nginx/sites-available/example.com.conf
Running sudo command: ln -sf /etc/nginx/sites-available/example.com.conf /etc/nginx/sites-enabled/example.com.conf
Running sudo command: nginx -s reload
✔ Setting up Nginx
copy
Next, you will be prompted to set up SSL support. If you are using a registered domain name and have configured your DNS settings to point to your server's IP address, press N to continue.
Output? Do you wish to set up SSL? NO
First select NO here, and then we will apply for Tencent Cloud's SSL certificate for installation
Next, the configuration wizard will prompt you to set up the systemd service. Press Y continue and the wizard will create a ghost_example-com new systemd service called and make it start on boot:
? Do you wish to set up Systemd? Yes
✔ Creating systemd service file at /var/www/ghost/system/files/ghost_example-com.service
Running sudo command: ln -sf /var/www/ghost/system/files/ghost_example-com.service /lib/systemd/system/ghost_example-com.service
Running sudo command: systemctl daemon-reload
✔ Setting up Systemd
copy
Finally, the wizard will configure your database and ask if it should start Ghost, you should press Y :
Running sudo command: /var/www/ghost/current/node_modules/.bin/knex-migrator-migrate --init --mgpath /var/www/ghost/current
✔ Running database migrations
? Do you want to start Ghost? Yes
Running sudo command: systemctl is-active ghost_example-com
✔ Ensuring user is not logged in as ghost user
✔ Checking if logged in user is directory owner
✔ Checking current folder permissions
Running sudo command: systemctl is-active ghost_example-com
✔ Validating config
✔ Checking folder permissions
✔ Checking file permissions
✔ Checking content folder ownership
✔ Checking memory availability
Running sudo command: systemctl start ghost_example-com
✔ Starting Ghost
Running sudo command: systemctl is-enabled ghost_example-com
Running sudo command: systemctl enable ghost_example-com --quiet
✔ Starting Ghost
copy
Before enabling the configuration, we need to install the SSL certificate. The specific operation process is as follows:
Apply for Domain Name (DV) SSL Certificate
Apply for entrance
Enter the SSL certificate management console
Click【Apply for Certificate】
View the model of the domain name certificate applied for, and click [OK]
fill out the application
Fill in the application domain name, such as qcloud.com, cloud.tencent.com, demo.test.qlcud.com.
Manual DNS verification method
The certificate supports receiving DNS verification by default, and the verification method can be viewed for details.
Verify identity after submitting application
After the application is submitted successfully, the pop-up window prompts as follows, you need to go to the [Certificate Details Page] to obtain the CName record and add analysis:
To obtain the CName record as shown in the Tips, you need to successfully add the resolution as soon as possible before it can be reviewed by the CA agency:
Install the certificate
Download the certificate as follows:
cert.crt privkey.key copy
We need to copy the certificate file that needs to be downloaded after the application is successful to nginx the directory in the configuration file certs . Here you need to switch to root privileges, use the following command to switch to the root user.
sudo su copy
Next we find the nginx directory
cd /etc/nginx/ copy
Next, create a directory for the SSL certificate, we name it certs
mkdir certs
cd certs
copy
Then copy the certificate you downloaded in Tencent Cloud to this directory, note that the name must be cert.crt privkey.key .
Next please open ghost the configuration file in the directory
nano /var/www/ghost/system/files/example.con.conf copy
Add the following configuration
ssl_certificate /etc/ssl/certs/cert.crt;
ssl_certificate_key /etc/ssl/private/privkey.key;
copy
Next, restart the nginx service to use the Tencent Cloud certificate normally.
service nginx restart copy
Your Ghost blog is now installed and ready to use. You can http://example.com visit your blog at . Now let's create an account so you can create your first article.
Step 3. Create an account and configure your blog
To log in and configure your blog, visit http://example.com/login . You will see the following page:

Press the " Create Account" button to get started.
You'll see the " Create Account" page, which will let you set a blog title, as well as your name, email address, and password:

Fill in the details and press the " Final Step: Invite Your Team" button.
The wizard will ask you to enter another author's email address, but you can choose the link I'll do this **later** at the bottom of the screen .
You will then see a list of posts, called "Stories" in Ghost:
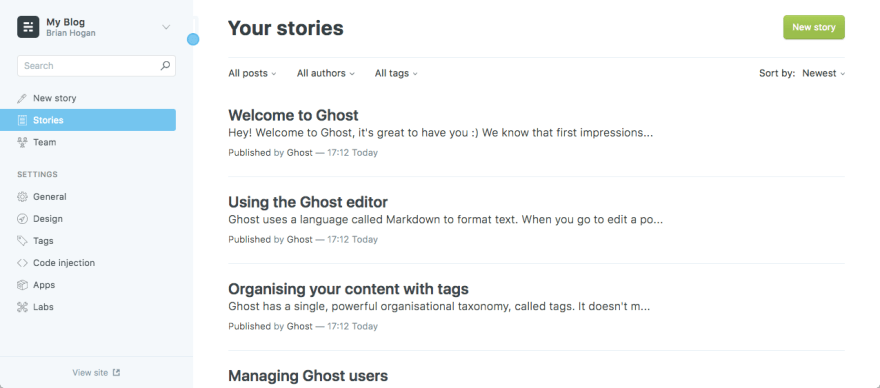
You can create new stories or manage other settings for your blog from the menu on the left.

Top comments (0)