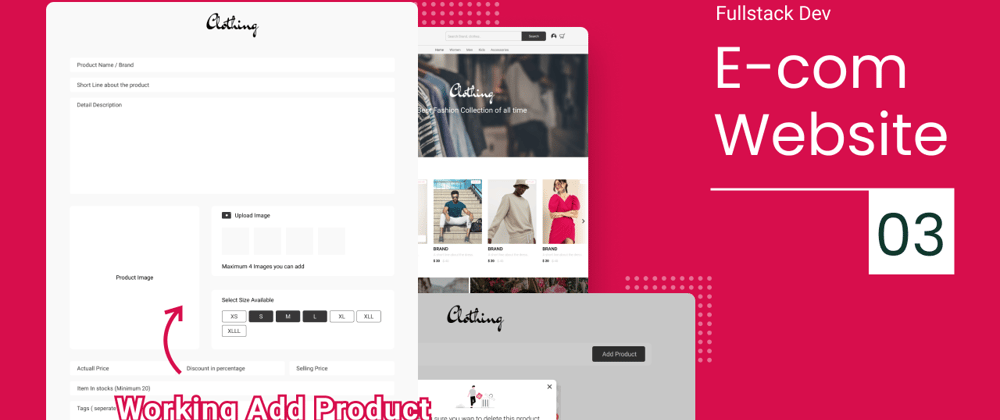
Hello, hope you'll are good. In previous part, we have made login/log out feature and a seller dashboard, where user can apply as a seller and can get his/her dashboard to manage his products. In today's blog, we'll make a product adding feature, which is very big feature. We'll see how to validate forms before storing to database, we'll see how to upload image on aws from front end, and we also add delete product, edit product, and much more.
If you haven't watched previous parts. Watch now
To see demo or you want full coding tutorial video for better understanding. You can watch the tutorial below.
Video Tutorial
I appreciate if you can support me by subscribing my youtube channel.
Access Full Fullstack E-com Website video series, Source Code, Download Images
Code
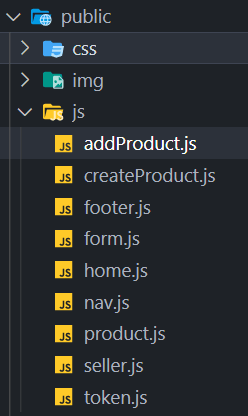
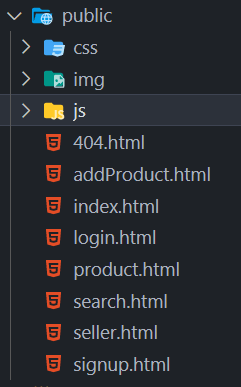
Before start coding, you can see the folder structure, as we have a lot, a lot of code files, that I can't even make a file structure design as I do in my blogs. But you can see the screenshots below.


So let, start coding. Let's first make /add-product route to serve addProduct.html page.
Server.js
// add product
app.get('/add-product', (req, res) => {
    res.sendFile(path.join(staticPath, "addProduct.html"));
})
Make sure you add this route before
404route, as I said earlier, if you add any route after404route, you'll always get404page.
After that, let's make add product page, where we can fill the product details.
Add Product Page - Design
First, start with HTML 5 template and make loader, alert element, link all the CSS and JS files.
<head>
    // other head tags
    <link rel="stylesheet" href="css/signup.css">
    <link rel="stylesheet" href="css/addProduct.css">
</head>
<body>
    <img src="img/loader.gif" class="loader" alt="">

    <div class="alert-box">
        <img src="img/error.png" class="alert-img" alt="">
        <p class="alert-msg"></p>
    </div>

    <script src="js/token.js"></script>
    <script src="js/addProduct.js"></script>
</body>
After done with basic structure make form, of course.
<img src="img/dark-logo.png" class="logo" alt="">

<div class="form">
    <input type="text" id="product-name" placeholder="product name">
    <input type="text" id="short-des" placeholder="short line about the product">
    <textarea id="des" placeholder="detail description"></textarea>

    <!-- product image -->
    <div class="product-info">
        <div class="product-image"><p class="text">product image</p></div>
        <div class="upload-image-sec">
            <!-- upload inputs -->
            <p class="text"><img src="img/camera.png" alt="">upload image</p>
            <div class="upload-catalouge">
                <input type="file" class="fileupload" id="first-file-upload-btn" hidden>
                <label for="first-file-upload-btn" class="upload-image"></label>
                <input type="file" class="fileupload" id="second-file-upload-btn" hidden>
                <label for="second-file-upload-btn" class="upload-image"></label>
                <input type="file" class="fileupload" id="third-file-upload-btn" hidden>
                <label for="third-file-upload-btn" class="upload-image"></label>
                <input type="file" class="fileupload" id="fourth-file-upload-btn" hidden>
                <label for="fourth-file-upload-btn" class="upload-image"></label>
            </div>
        </div>
        <div class="select-sizes">
            <p class="text">size available</p>
            <div class="sizes">
                <input type="checkbox" class="size-checkbox" id="xs" value="xs">
                <input type="checkbox" class="size-checkbox" id="s" value="s">
                <input type="checkbox" class="size-checkbox" id="m" value="m">
                <input type="checkbox" class="size-checkbox" id="l" value="l">
                <input type="checkbox" class="size-checkbox" id="xl" value="xl">
                <input type="checkbox" class="size-checkbox" id="xxl" value="xxl">
                <input type="checkbox" class="size-checkbox" id="xxxl" value="xxxl">
            </div>
        </div>
    </div>

    <div class="product-price">
        <input type="number" id="actual-price" placeholder="actual price">
        <input type="number" id="discount" placeholder="discount percentage">
        <input type="number" id="sell-price" placeholder="selling price">
    </div>

    <input type="number" id="stock" min="20" placeholder="item in sstocks (minimum 20)">

    <textarea id="tags" placeholder="Enter categories here, for example - Men, Jeans, Blue Jeans, Rough jeans (you sholud add men or women at start)"></textarea>

    <input type="checkbox" class="checkbox" id="tac" checked>
    <label for="tac">clothing take 30% from your total sell</label>

    <div class="buttons">
        <button class="btn" id="add-btn">add product</button>
        <button class="btn" id="save-btn">save draft</button>
    </div>
</div>
That's a lot of HTML at once, you can refer video for step by step guide, as we mainly focus on Javascript in the blog, but if you have any doubt with the any part feel free to ask me in discussions.
addProduct.css
body{
    display: block;
    padding: 0 10vw;
}

.logo{
    margin: 20px auto 50px;
}

input, textarea{
    font-weight: 500;
}

input:not(input[type="checkbox"]){
    width: 100%;
}

textarea{
    width: 100%;
    height: 270px;
    resize: none;
    padding: 10px 20px;
}

.product-info{
    width: 100%;
    height: 500px;
    display: grid;
    grid-template-columns: .75fr 1.25fr;
    grid-template-rows: repeat(2, 1fr);
    grid-gap: 20px;
    margin-bottom: 20px;
}

.product-image{
    display: flex;
    justify-content: center;
    align-items: center;
    background: #fff;
    background-size: cover;
    border-radius: 10px;
    grid-row: span 2;
    text-shadow: 0 0 10px #fff;
}

.text{
    text-transform: capitalize;
    color: #383838;
    font-size: 20px;
    font-weight: 500;
}

.upload-image-sec, .select-sizes{
    background: #fff;
    border-radius: 10px;
    padding: 20px;
}

.text img{
    height: 20px;
    margin-right: 10px;
}

.upload-catalouge{
    width: 100%;
    margin: 20px 0;
    display: grid;
    grid-template-columns: repeat(4, 100px);
    grid-gap: 10px;
}

.upload-image{
    width: 100%;
    height: 100px;
    background: #f5f5f5;
    cursor: pointer;
    background-size: cover;
}

.upload-image:hover{
    background: rgba(0, 0, 0, 0.2);
    background-size: cover;
}


.sizes{
    margin-top: 30px;
}

.size-checkbox{
    -webkit-appearance: none;
    width: 100px;
    height: 40px;
    border-radius: 5px;
    border: 1px solid #383838;
    cursor: pointer;
    margin-bottom: 10px;
    margin-right: 10px;
    position: relative;
    color: #383838;
}

.size-checkbox::after{
    content: attr(value);
    position: absolute;
    top: 50%;
    left: 50%;
    transform: translate(-50%, -50%);
    font-size: 16px;
    text-transform: uppercase;
}

.size-checkbox:checked{
    background: #383838;
    color: #fff;
}

input::-webkit-outer-spin-button,
input::-webkit-inner-spin-button{
    -webkit-appearance: none;
    margin: 0;
}

.product-price{
    display: grid;
    grid-template-columns: repeat(3, 1fr);
    grid-gap: 20px;
}

.product-price input{
    margin: 0;
}

.buttons{
    margin: 20px 0 50px;
}

.btn{
    padding: 10px 30px;
    text-transform: capitalize;
    color: #fff;
    background: #383838;
    border-radius: 5px;
    border: none;
    outline: none;
    margin-right: 10px;
    cursor: pointer;
}

#save-btn{
    background: #a9a9a9;
}
You maybe notice one new CSS selector input::-webkit-outer-spin-button. If so, then this is simply select inputs arrow buttons, in this case, we want to hide our number input's arrows. That's why I used this.
input::-webkit-outer-spin-button,
input::-webkit-inner-spin-button{
    -webkit-appearance: none;
    margin: 0;
}
And if you are following the series from the start, make to make a little change in signpu.css file.
input[type="text"],
input[type="password"],
input[type="email"],
input[type="number"], // add this new line
textarea{
    // properties
}
or you can simply replace whole selector with this.
input:not(input[type="checkbox"]),
textarea{
    // properties
}
Output

Great! Now, make form functional.
Form Submission
Before submitting form to backend, we have to lot of JS to validate the form and to add specific triggers to the elements.
So first, as this is for only sellers, first check whether user is logged in or not on accessing the page. And of course if he/she is not logged in then redirect user to login page.
let user = JSON.parse(sessionStorage.user || null);
let loader = document.querySelector('.loader');

// checknig user is logged in or not
window.onload = () => {
    if(user){
        if(!compareToken(user.authToken, user.email)){
            location.replace('/login');
        }
    } else{
        location.replace('/login');
    }
}
accessing user from
sessionStorageas I am storing user there.
After done with this, let's start with adding dynamic pricing. What do I mean? Means let's add the feature where user add actual price and a discounted price and automatically we fill the selling price with the exact discount. And also reversible.
addProduct.js
// price inputs

const actualPrice = document.querySelector('#actual-price');
const discountPercentage = document.querySelector('#discount');
const sellingPrice = document.querySelector('#sell-price');
Select all three inputs first, then add click event to discountPercentage and there perform calculation.
discountPercentage.addEventListener('input', () => {
    if(discountPercentage.value > 100){
        discountPercentage.value = 90;
    } else{
        let discount = actualPrice.value * discountPercentage.value / 100;
        sellingPrice.value = actualPrice.value - discount;
    }
})
In the above, code i am just checking if discount percentage is more then 100 then set that to 90, as nobody really want to sell free product, right? And after that just doing simple percentage to value calculation and setting up the sellingPrice value.
After that add reverse for sellingPrice also
sellingPrice.addEventListener('input', () => {
    let discount = (sellingPrice.value / actualPrice.value) * 100;
    discountPercentage.value = discount;
})
Great! We got the feature working. After done with this. Let's work with aws to store uploaded image online. To see the aws setup refer tutorial from this point
Well we'll just see here, how to config it in server side. Before that let's understand what we'll exactly do.
First we config the aws in our server, then we make request to aws to give us a secure link. After we got the link, we'll send that link to front end. From front end, when user upload image using file input. He/she make PUT request to the generated link we got from the server to upload the image.And at last, we store that link in an array, to keep track.
So, install these two packages first.
npm i aws-sdk dotenv
aws-sdk - for aws of course
dotenv - for environment variables to secure your credentials.
Server.js
AWS Config
// aws config
const aws = require('aws-sdk');
const dotenv = require('dotenv');

dotenv.config();

// aws parameters
const region = "ap-south-1";
const bucketName = "ecom-website-tutorial-2";
const accessKeyId = process.env.AWS_ACCESS_KEY;
const secretAccessKey = process.env.AWS_SECRET_KEY;

aws.config.update({
    region,
    accessKeyId,
    secretAccessKey
})

// init s3
const s3 = new aws.S3();
S3 is the aws service which we use to store the files.
After this, make a generate link function to generate a link.
// generate image upload link
async function generateUrl(){
    let date = new Date();
    let id = parseInt(Math.random() * 10000000000);

    const imageName = `${id}${date.getTime()}.jpg`;

    const params = ({
        Bucket: bucketName,
        Key: imageName,
        Expires: 300, //300 ms
        ContentType: 'image/jpeg'
    })
    const uploadUrl = await s3.getSignedUrlPromise('putObject', params);
    return uploadUrl;
}
Make a async function, as we don;t know how much time it will take to get the response, and our other codes are dependent on this. And getSignedUrlPromise is a aws method to get a put link. You can refer their documentation also.
Now just make a /s3url route, which will deliver the link to frontend.
// get the upload link
app.get('/s3url', (req, res) => {
    generateUrl().then(url => res.json(url));
})
Great! Now we have to access this in frontend. So, let's do it.
addProduct.js
Select upload inputs
// upload image handle
let uploadImages = document.querySelectorAll('.fileupload');
let imagePaths = []; // will store all uploaded images paths;
Now loo through each upload button and add change event to them. And access the uploaded file.
uploadImages.forEach((fileupload, index) => {
    fileupload.addEventListener('change', () => {
        const file = fileupload.files[0];
        let imageUrl;

        if(file.type.includes('image')){
            // means user uploaded an image

        } else{
            showAlert('upload image only');
        }
    })
})
After this just use fetch to get the url from server, and then again use fetch make PUT request to upload the image.
if(file.type.includes('image')){
    // means user uploaded an image
    fetch('/s3url').then(res => res.json())
    .then(url => {
        fetch(url,{
            method: 'PUT',
            headers: new Headers({'Content-Type': 'multipart/form-data'}),
            body: file
        }).then(res => {
            console.log(url)
        })
    })
}
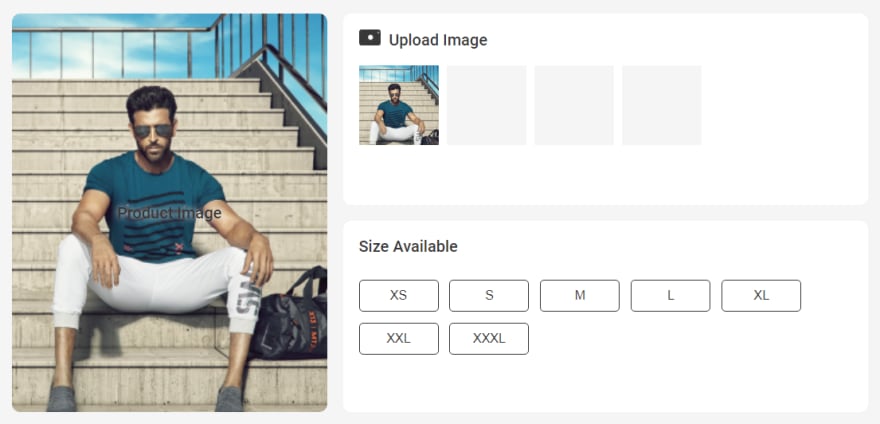
We are done, we have successfully uploaded image. Now to make it visible to user. Just use style attribute to set element's background-image,
if(file.type.includes('image')){
    // means user uploaded an image
    fetch('/s3url').then(res => res.json())
    .then(url => {
        fetch(url,{
            method: 'PUT',
            headers: new Headers({'Content-Type': 'multipart/form-data'}),
            body: file
        }).then(res => {
            imageUrl = url.split("?")[0];
            imagePaths[index] = imageUrl;
            let label = document.querySelector(`label[for=${fileupload.id}]`);
            label.style.backgroundImage = `url(${imageUrl})`;
            let productImage = document.querySelector('.product-image');
            productImage.style.backgroundImage = `url(${imageUrl})`;
        })
    })
}
Output
Now, whats left? I know a lot of things XD Now, make as we have custom checkbox, to track size stores, we have to make a function to keep track of it.
// store size function
const storeSizes = () => {
    sizes = [];
    let sizeCheckBox = document.querySelectorAll('.size-checkbox');
    sizeCheckBox.forEach(item => {
        if(item.checked){
            sizes.push(item.value);
        }
    })
}
Above code is very simple, I guess you got it. So now let's select all the form element which left.
// form submission

const productName = document.querySelector('#product-name');
const shortLine = document.querySelector('#short-des');
const des = document.querySelector('#des');

let sizes = []; // will store all the sizes

const stock = document.querySelector('#stock');
const tags = document.querySelector('#tags');
const tac = document.querySelector('#tac');

// buttons
const addProductBtn = document.querySelector('#add-btn');
const saveDraft = document.querySelector('#save-btn');
Now add click event to addProductBtn and class storeSizes function to store the size.
addProductBtn.addEventListener('click', () => {
    storeSizes();
    // validate form
})
Good, and to validate the form, we'll use separate function. But the function return true or false base on the validation.
const validateForm = () => {
    if(!productName.value.length){
        return showAlert('enter product name');
    } else if(shortLine.value.length > 100 || shortLine.value.length < 10){
        return showAlert('short description must be between 10 to 100 letters long');
    } else if(!des.value.length){
        return showAlert('enter detail description about the product');
    } else if(!imagePaths.length){ // image link array
        return showAlert('upload atleast one product image')
    } else if(!sizes.length){ // size array
        return showAlert('select at least one size');
    } else if(!actualPrice.value.length || !discount.value.length || !sellingPrice.value.length){
        return showAlert('you must add pricings');
    } else if(stock.value < 20){
        return showAlert('you should have at least 20 items in stock');
    } else if(!tags.value.length){
        return showAlert('enter few tags to help ranking your product in search');
    } else if(!tac.checked){
        return showAlert('you must agree to our terms and conditions');
    }
    return true;
}

addProductBtn.addEventListener('click', () => {
    storeSizes();
    // validate form
    if(validateForm()){ // validateForm return true or false while doing validation

    }
})
Now if you notice, in validateForm instead of returning false. I am returning showAlert, why is that, as I don't want to write return false in each if else So I just wrote it inside showAlert function.
Token.js
// alert function
const showAlert = (msg) => {
    // previous code
    return false;
}
If you run the code, you'll get the alert. But, there is an issue. We'll get the alert on the top of the page. When submitting the form from the bottom, because I didn't set its position to fixed.
Signup.css
/* alert */
.alert-box{
    // previous code
    position: fixed;
    z-index: 2;
}
The same i did with loader.
Signup.css
.loader{
    position: fixed;
}
So, doing so far, we are also done, with validations. So now, just submit the data. But to submit the data, first we need the data, right? For that make another function productData() which will return the data.
addProduct.js
const productData = () => {
    return data = {
        name: productName.value,
        shortDes: shortLine.value,
        des: des.value,
        images: imagePaths,
        sizes: sizes,
        actualPrice: actualPrice.value,
        discount: discountPercentage.value,
        sellPrice: sellingPrice.value,
        stock: stock.value,
        tags: tags.value,
        tac: tac.checked,
        email: user.email
    }
}
Now once we got the data in front end, let's submit it using our sendData().
addProductBtn.addEventListener('click', () => {
    storeSizes();
    // validate form
    if(validateForm()){ // validateForm return true or false while doing validation
        loader.style.display = 'block';
        let data = productData();
        sendData('/add-product', data);
    }
})
It's great. But do we have a /add-product POST route in our server. I don't think so, let's make that.
server.js
// add product
app.post('/add-product', (req, res) => {
    let { name, shortDes, des, images, sizes, actualPrice, discount, sellPrice, stock, tags, tac, email } = req.body;

    // validation
    if(!draft){
        if(!name.length){
            return res.json({'alert': 'enter product name'});
        } else if(shortDes.length > 100 || shortDes.length < 10){
            return res.json({'alert': 'short description must be between 10 to 100 letters long'});
        } else if(!des.length){
            return res.json({'alert': 'enter detail description about the product'});
        } else if(!images.length){ // image link array
            return res.json({'alert': 'upload atleast one product image'})
        } else if(!sizes.length){ // size array
            return res.json({'alert': 'select at least one size'});
        } else if(!actualPrice.length || !discount.length || !sellPrice.length){
            return res.json({'alert': 'you must add pricings'});
        } else if(stock < 20){
            return res.json({'alert': 'you should have at least 20 items in stock'});
        } else if(!tags.length){
            return res.json({'alert': 'enter few tags to help ranking your product in search'});
        } else if(!tac){
            return res.json({'alert': 'you must agree to our terms and conditions'});
        }
    }

    // add product
    let docName = `${name.toLowerCase()}-${Math.floor(Math.random() * 5000)};
    db.collection('products').doc(docName).set(req.body)
    .then(data => {
        res.json({'product': name});
    })
    .catch(err => {
        return res.json({'alert': 'some error occurred. Try again'});
    })
})
In the above route, I am just simply accessing the variables from the request, and performing validations on the data. Validation are same as front end, the difference is we were returning showAlert there, ans here we are returning JSON. And at last I am generating a random doc name following product's name. and adding the data to the firestore.
Now just to receive the confirmation of product add, we can edit the processData() little bit in token.js file.
token.js
const processData = (data) => {
    // previous conditions
    else if(data.product){
        location.href = '/seller';
    }
}
So, we are officially done, with doing validations to adding the product to the firsbase. Great job. Sing the blog is begin to be lengthy. I think that's enough for today guys. But of course to make delete, edit, and other features. Refer video tutorial
I hope you understood each and everything. If you have doubt or I missed something let me know in the comments.
Articles you may find Useful
I really appreciate if you can subscribe my youtube channel. I create awesome web contents.

Source Code, Donate me on Paypal
Your donation really motivates me to do more amazing tutorials like this. Support me on patreon, Buy me a coffee, Donate me on paypal
Thanks For reading.


Top comments (9)
I have a few remarks:
When working with
Promise, you do not process the rejected state almost anywhere (you do not use thecatchfunction).Again, when working with
Promise, you mix different stylesthen/catch(your style) andasync/await(obviously from the AWS documentation). Choose one of your styles and stick to it (keep in mind that when working withawaitthe rejected state is reduced to an exception so you have to use atry/catchblock).Generate "unique" identifiers with a random number generator. This seems to work but there is no guarantee that you will not duplicate a key. Usually such data is generated by the database that stores the records. However, for you this functionality is limited due to the choice of NoSql database. And this requires you to implement your own counters (which to use as an identifier).
Okay, i got it. I'll fix this and try to improve next time🙂
I'll say its very good that you are pointing the mistakes so that future comers can improve the issues. 🙂👍
@mcwolfmm Can you help us clearing this error?
what error is it? in my post I am not referring to an error made by the author, but I am pointing out implementation details that I do not like how they are implemented (because they can lead to an error).
A unique and excellent work in every detail.
Congratulations to you.
My question, please: Is it possible to terminate it without registering in the AWS Management console?
Greetings and appreciation
@kunaal438 Sir we followed your tutorial on creating the website but then we are getting error while adding the product to the product page.Can you help us with it?

hi,
when using fetch to upload the images , its showing an error that it is not able to fetch
any suggestions??
Hello,
How did you clear this error????