Yes i'm not talking about creating an angular / react / vue monorepo. There is enough material out there including official nx articles.
What if you are a 90's kid like me who love jquery and want a monorepo?
What if you are so much fond of building your own webpack / vite based webapplications using vanilla js / lit-element etc and want a monorepo?
Nope those are not articulated..
That's why i want to bring this to you.
Necessity is mother of invention
Ask me what encouraged me to do this. I built my own framework PlumeJS and thought of creating a monorepo style code base. This is what encouraged me to explore the possibility.
The outcome? Fantastic.. and know what, the steps I followed are framework agnostic. Means you too can create your own favorite UI tech stack based nx monorepo.
Freedom can be felt if you are out of the cage.
Enough quotes and blabbering. Show me real stuff.
Yea.. this is just warm up. Now lets dive 😄
For simplicity I'm using:
- Jquery for interactions,
- Vite for bundler
- Tailwind (cdn) for styling
- serve (to run static server on dist)
Steps:
Step 1: Create Shell
NOTE: By defualt @nx/js:library has tsconfig module type as commonjs. change this to ESNext for better tree shaking.
- Create nx workspace with typescript preset:
npx create-nx-workspace@latest <your-monorepo-name> --preset=ts
I'm naming the monorepo as jquery-monorepo. After you run the above command, it should roughly create the below folder structure:
jquery-monorepo/
├── nx.json
├── package.json
└── tsconfig.base.json
-
As we're using jquery, lets install it by:
- run
npm i jquery -s - run
npm i @types/jquery serve -D
- run
This will install jquery and its types for the sake of typescript.
Now lets create new
packagesfolder. the updated folder structure should be as below:
jquery-monorepo/
├── packages
├── nx.json
├── package.json
└── tsconfig.base.json
add
esModuleInterop: truetotsconfig.base.jsonNow lets create a Shell that load our web application. Shell don't hold any logic other than including common styles and libraries.
-
To create the shell, run below commands:
npx nx generate @nx/js:library shell \
--directory=packages/shell \
--publishable \
--importPath=@jquery-monorepo/shell
choose
vitestornonefor test-runners andviteas bundler. we're going to use the same options going forward. This will create a
shellfolder underpackagesand update the references innx.jsonandtsconfig.base.json. The updated folder structure should be:
jquery-monorepo/
├── packages/
│   └── shell
├── nx.json
├── package.json
└── tsconfig.base.json
Great. But one problem. @nx/js:library create a library but not a web app. In our case, shell is created as library. So we're going to make few changes to shell to make it as web app.
- navigate to
shelland
a. create folder styles with styles.css. add the below styles:
.border-b-2 {
    border-bottom-width: 2px;
}

.tab-container [data-tab-target] {
    border-color: transparent;
}
.tab-container .active-tab {
    color: rgb(63 131 248);
    border-color: rgb(63 131 248);
}
b. delete lib folder under src
c. add index.html under root with below content:
    <!DOCTYPE html>
    <html lang="en">
    <head>
        <meta charset="UTF-8" />
        <meta name="viewport" content="width=device-width, initial-scale=1.0" />
        <title>Jquery monorepo</title>
        <link rel="stylesheet" href="./styles/styles.css"/>
        <script src="https://cdn.tailwindcss.com"></script>
    </head>
    <body>
        <div class="container mx-auto py-8">
            <h1 class="text-3xl font-bold underline text-center mb-4">Hello world!</h1>
            <section id="tabs"></section>
        </div>
        <script type="module" src="./src/index.ts"></script>
    </body>
    </html>
d. delete lib section under build in vite.config.ts
e. add server section to vite config. the final vite config should be like this:
    /// <reference types='vitest' />
    import { defineConfig } from 'vite';
    import dts from 'vite-plugin-dts';
    import * as path from 'path';
    import { nxViteTsPaths } from '@nx/vite/plugins/nx-tsconfig-paths.plugin';

    export default defineConfig({
    root: __dirname,
    cacheDir: '../../node_modules/.vite/packages/shell',

    plugins: [
        nxViteTsPaths(),
        dts({
        entryRoot: 'src',
        tsConfigFilePath: path.join(__dirname, 'tsconfig.lib.json'),
        skipDiagnostics: true,
        }),
    ],

    // Uncomment this if you are using workers.
    // worker: {
    //  plugins: [ nxViteTsPaths() ],
    // },

    // Configuration for building your library.
    // See: https://vitejs.dev/guide/build.html#library-mode
    build: {
        outDir: '../../dist/packages/shell',
        reportCompressedSize: true,
        commonjsOptions: {
        transformMixedEsModules: true,
        },
        rollupOptions: {
        // External packages that should not be bundled into your library.
        external: [],
        },
    },

    server: {
        host: true,
        port: 3001,
        open: '/'
    },

    test: {
        globals: true,
        cache: {
        dir: '../../node_modules/.vitest',
        },
        environment: 'node',
        include: ['src/**/*.{test,spec}.{js,mjs,cjs,ts,mts,cts,jsx,tsx}'],

        reporters: ['default'],
        coverage: {
        reportsDirectory: '../../coverage/packages/shell',
        provider: 'v8',
        },
    },
    });
- add start script to
shellpackage.json:
// shell/package.json
{
  ...
  "scripts": {
    "start": "vite"
  }
}
- Update the scripts section in our monorepo level package.json:
// jquery-monorepo/package.json
{
  ...
  "scripts": {
    "nx": "nx",
    "start": "nx start shell",
    "graph": "nx graph",
    "build": "nx build shell",
    "serve": "serve -s dist/packages/shell"
  }
}
- Finally, navigate to our monorepo root and run
yarn start. Boom the application starts running onlocalhost:3001
Awesome. We created our own custom web application in nx monorepo. But this is just a starting step. lets create a ui lib that have Tab component using jquery. feed the tab content from products and about libs. This implies the folder structure as below:
jquery-monorepo/
├── packages/
│   ├── ui/
│   │   └── tab component
│   ├── products/
│   │   └── products component
│   ├── about/
│   │   └── about component
│   └── shell/
│       ├── src/
│       │   └── index.ts
│       └── index.html
├── nx.json
├── package.json
└── tsconfig.base.json
This inturn implies, shell will depend on ui, products and about libs.
lets create these libs one-by-one.
Step 2: UI Lib - Tab component
- To create the
uilibrary, let's run below commands:bash npx nx generate @nx/js:library ui \ > --directory=packages/ui \ > --publishable \ > --importPath=@jquery-monorepo/uiChoosevitestandvitein options.
This will create the ui folder under packages. As this is a lib, no need to make any changes to vite.config.ts.
- under
srcfolder, delete thelibfolder and createtabsfolder with below structure:
ui/
├── src/
│   ├── tabs/
│   │   ├── tabs.ts
│   │   └── index.ts
│   └── index.ts
└── package.json
- Let's create a reusable tabs component as below: ```typescript // ui/src/tabs/tabs.ts import $ from 'jquery';
function createToken(): string {
return Math.random().toString(36).substring(2);
}
export interface TabItem {
label: string;
content: JQuery | string;
}
export function Tabs(tabItems: Array) {
let lastActiveTabPanel: JQuery;
const token = createToken();
const tabId = tab-container-${token};
const container = $('').attr('id', tabId).addClass('tab-container mb-4');
const tabList = $('
- ').addClass(
'flex flex-wrap -mb-px text-sm font-medium text-center border-b border-gray-200'
);
const items = tabItems.map(({ label }, index) =>
$('
- ').append(
$('')
.addClass(
inline-block p-4 rounded-t-lg border-b-2 ${) .attr('data-tab-target',
index === 0 ? 'active-tab' : ''
}#${token}-${index}) .text(label) ) ); const tabContents = tabItems.map(({ content }, index) => { const panel = $('') .attr('id',${token}-${index}) .addClass(tab-panel ${index === 0 ? '' : 'hidden'}); typeof content === 'string' ? panel.html(content) : panel.append(content); return panel; }); lastActiveTabPanel = tabContents[0]; tabList.append(items); container.append(tabList); container.append($('').attr('id', '').append(tabContents)); container.find('[data-tab-target]').on('click', (e) => { container.find('[data-tab-target]').removeClass('active-tab'); const targetTabPanelId = $(e.target).attr('data-tab-target') || ''; $(e.target).addClass('active-tab'); lastActiveTabPanel.addClass('hidden'); lastActiveTabPanel = $(targetTabPanelId).toggleClass('hidden'); }); return container; }// ui/src/tabs/index.ts
export * from './tabs';// ui/src/index.ts
export * from './tabs';* Cool now in our shell, lets update the index.ts: ```typescript // shell/src/index.ts import $ from 'jquery'; import { Tabs, TabItem } from '@jquery-monorepo/ui'; const tabItems: TabItem[] = [ { id: 'tab-1', label: 'Tab 1', content: 'Tab content 1', }, { id: 'tab-2', label: 'Tab 2', content: 'Tab content 2', }, ]; $(() => { $('#tabs').append(Tabs(tabItems)); });now run
yarn starton our monorepo. Boom our tabs component is liveWith this, we created our own jquery
uilibrary with tabs component and used that library in ourshell. As you seeshellis the dummy consumer.
Step 3: Products & About Libs
This step is very simple.
- Create 2 libs with names
productsandaboutwith below commands:
# products npx nx generate @nx/js:library products \ --directory=packages/products \ --publishable \ --importPath=@jquery-monorepo/products # about npx nx generate @nx/js:library about \ --directory=packages/about \ --publishable \ --importPath=@jquery-monorepo/about- delete
libfolder in those 2 above packages and update their index.ts files as below:
// about/src/index.ts import $ from 'jquery'; export function About() { const aboutContainer = $('<div>').html('About Container'); return aboutContainer; } // products/src/index.ts import $ from 'jquery'; export function Products() { const productsContainer = $('<div>').html('Products Container'); return productsContainer; }- Now in shell: ```typescript // shell/src/index.ts import $ from 'jquery'; import { Tabs, TabItem } from '@jquery-monorepo/ui'; import { About } from '@jquery-monorepo/about'; import { Products } from '@jquery-monorepo/products';
const tabItems: TabItem[] = [
{
label: 'About',
content: About(),
},
{
label: 'Products',
content: Products(),
},
];$(() => {
$('#tabs').append(Tabs(tabItems));
});Excellent. `shell` is now able to display tabs component from `ui` populated by `about` and `product` libs. For instance, if you run `yarn graph` on monorepo this is what you see: 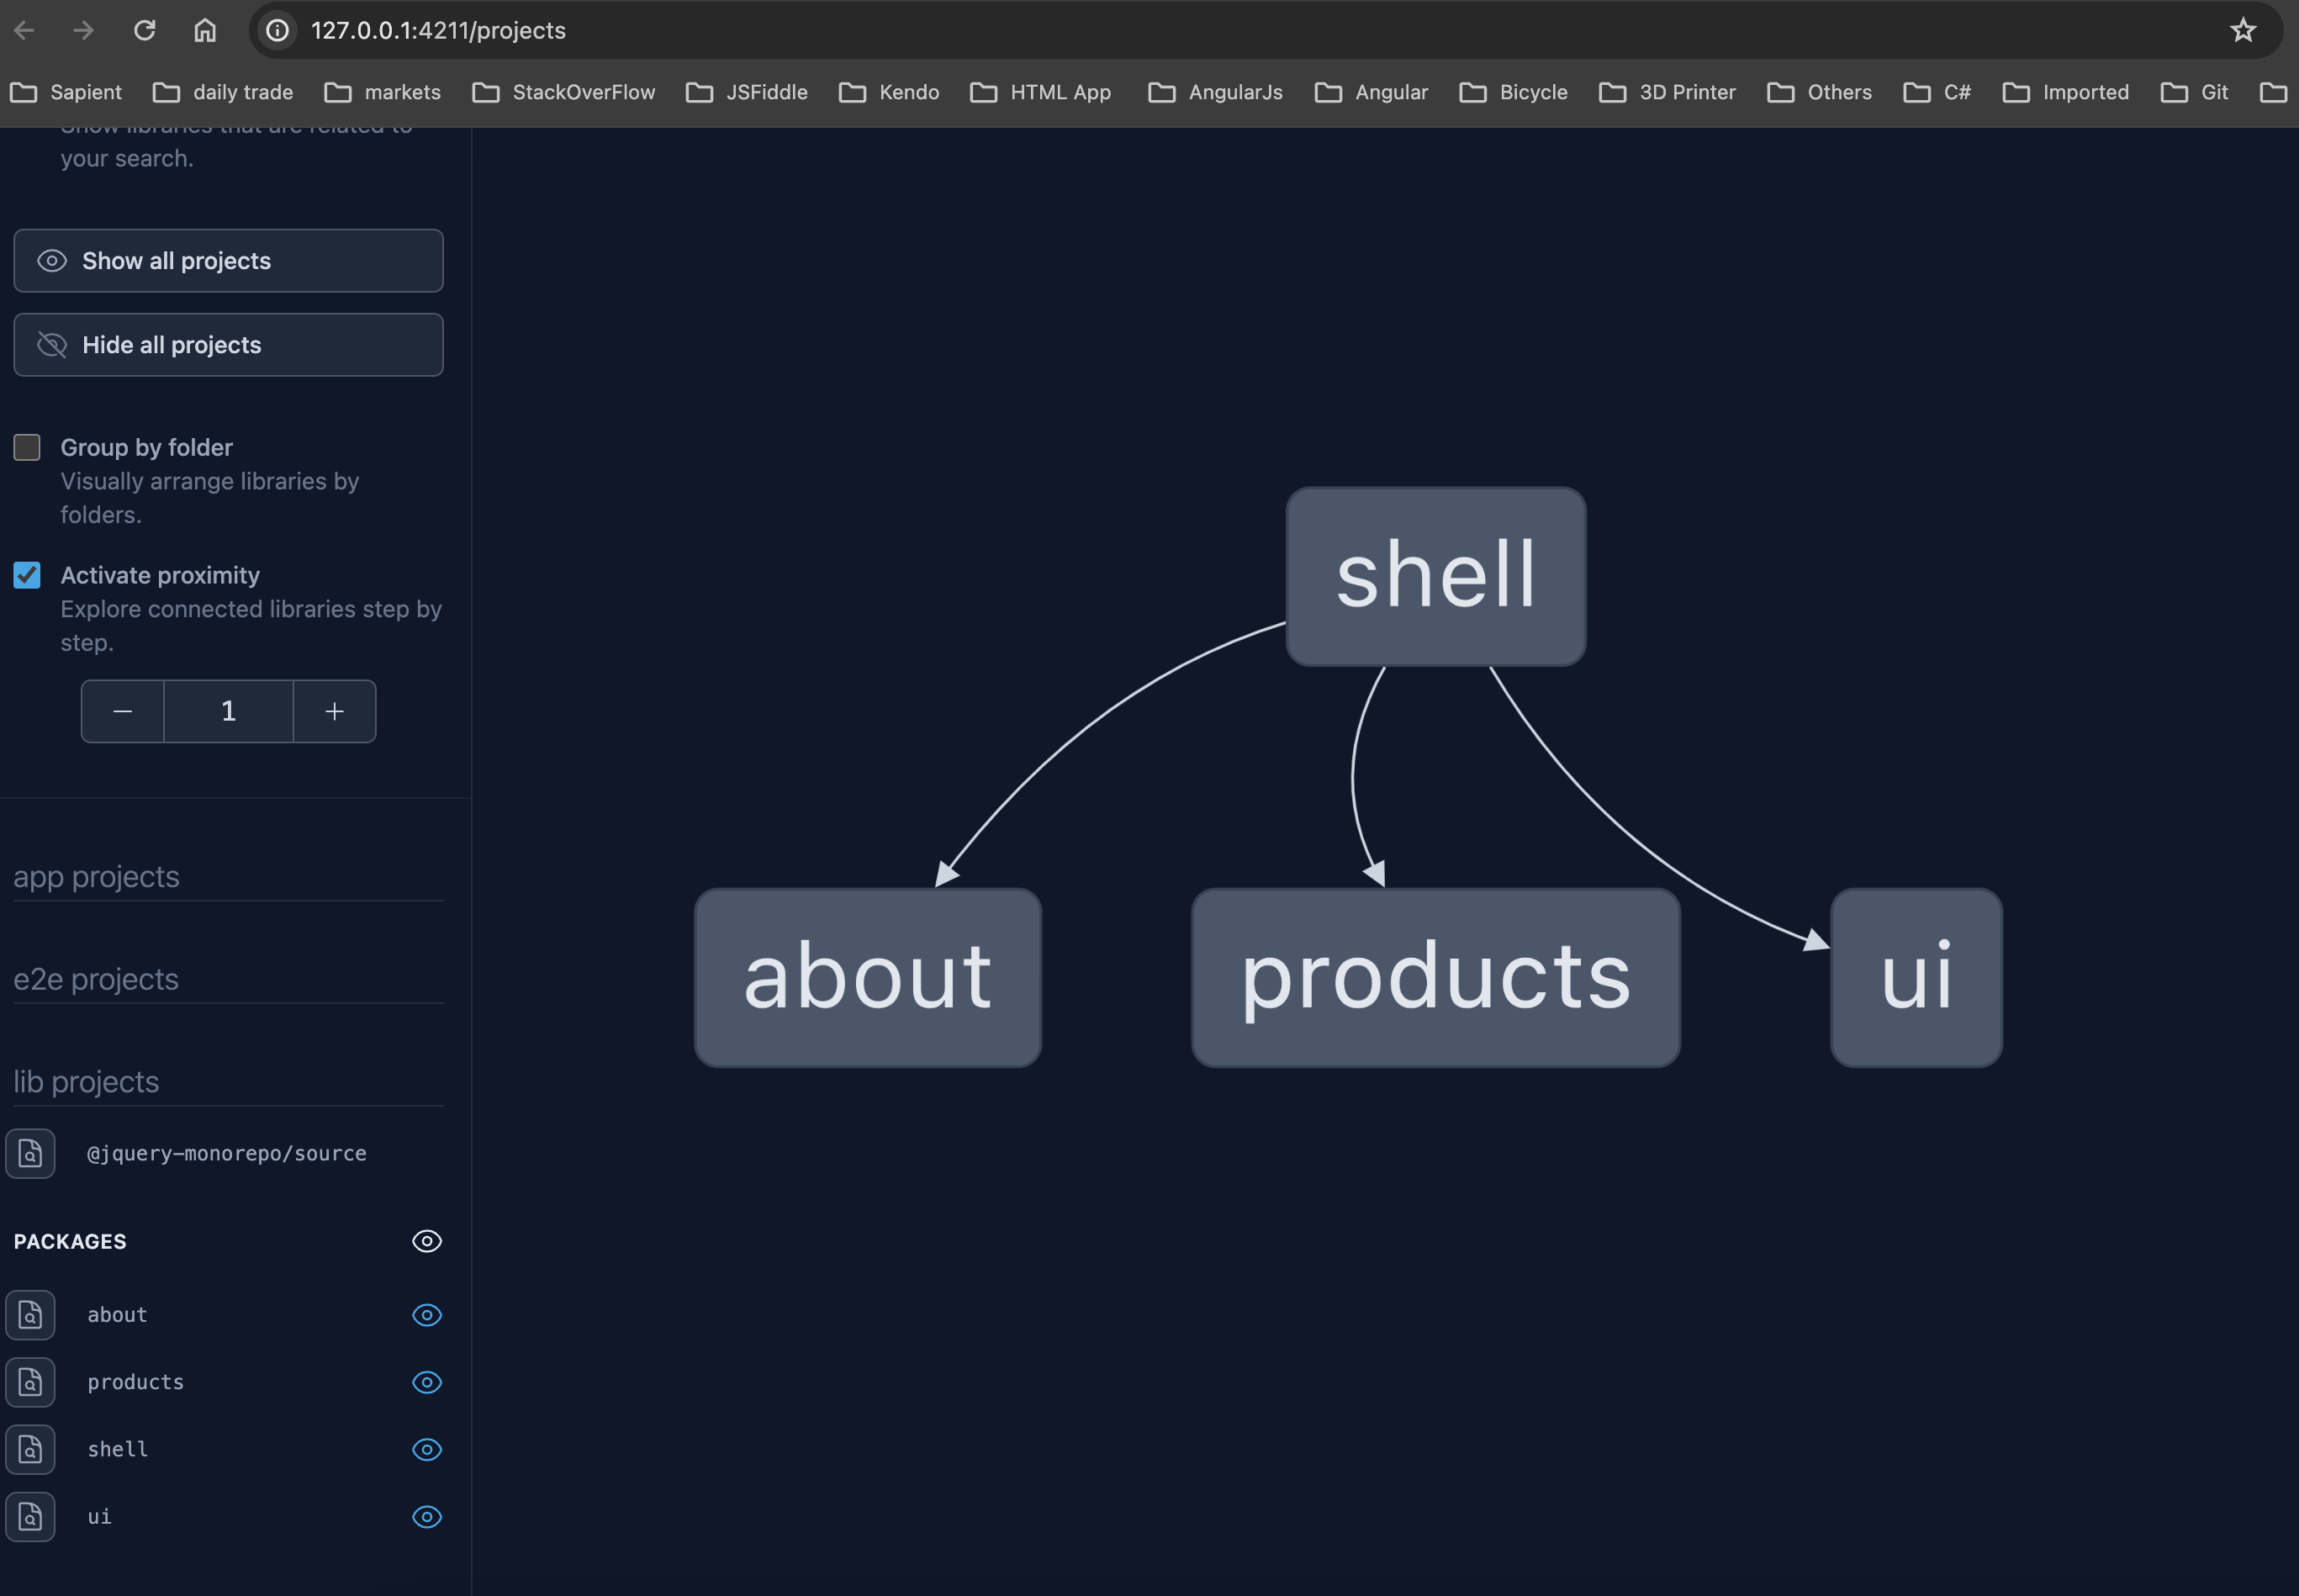 But we need to ensure when we build this monorepo and deploy, it should work. How to check this? If you remember, we have `build` and `serve` scripts in our monorepo package.json. Run `yarn build && yarn serve` and navigate to `localhost:3000`. Marvelous, our distribution package worked :smile: > NOTE: If the build is success and you see a message _Cannot call a namespace ("$")._ then change the module type in all tsconfig.json files to ESNext and set esModuleInterop to true in tsconfig.base.json Qudos if you make this far. As you see we created a nx monorepo for our jquery project. Now in place of JQuery, use `lit-element` or `web-components` or anything. The process is same. You can fine tune the folder structure by splitting `packages` into `apps` and `libs` where `apps` hold multiple `shell` folders and `libs` have all the common logic. Checkout the source code [here](https://github.com/KiranMantha/jquery-monorepo). Post your comments after experimenting or facing any issues. Thanks for reading and see you next time, Happy coding, Kiran :wave: :wave:


Top comments (0)