
While working with a major theater chain, I was tasked with implementing Analytics into their Xamarin app. Part of that work included implementing Google Tag Manager. At a later date, I was again tasked with implementing Google Tag Manager but this time, into their Flutter app. I expected the implementation to be similar and definitely easier the second time around, but I found that to be false. The setup had some major twist and turns that I didn't expect.
Although this was sometimes a frustrating challenge, I had fun figuring it out. Most companies running their apps with Xamarin will be moving their apps to a newer SDK like Flutter at some point. Flutter allows cross platform development for Android, iOS, Linux, macOS, Windows, Google Fuchsia, and Web from a single codebase and shared languages. So this move is almost inevitable.
This is where the idea for this blog came from. The transition is complicated, and I could have used a blog like this one to explain the transition to Flutter. Plus, even if you haven’t been faced with this shift yet, there’s a good chance you will in the future. Hopefully, whether it’s now or at a later date, this post will save some of you from spending painful time and effort transitioning.
In this post, I’ll take you through a step-by-step tutorial of transferring from Xamarin to Flutter. By the end, GTM will be in your Flutter app! Before we get started, I’ve listed a brief overview of the steps below.
This post was originally published on the Keyhole Software blog by Andy Link on 4/22/2022.
Android
- Grab the Container Files from Xamarin
- Copy the Environment Container Files into Flutter
- Add the Default Container File
- Create the Python Copy Script for Prod
- Add the GTM Dependency
iOS
- Grab the Container Files from Xamarin
- Copy the Environment Container Files into Flutter
- Add the Default Container File
- Create the Xcode Build Phase (prod Run Script)
- Add the GTM Dependency
No matter how daunting a task this may seem, together, we’ll get through it. This blog should seriously help ease your pain when moving your current GTM setup in Xamarin to Flutter. Let’s get started!
Android
We’ll begin with Android.
Step 1: Grab the Android Container Files from Xamarin
First, let's grab all the GTM-XXXXXXX.json container files from your Droid Xamarin project. The files will be located in Droid\Assets\containers.

Copy these files to your Desktop, so you can easily access and copy them later.

Great, you now have your Android container files ready to copy into your Flutter app!
Step 2: Copy your Android Environment Container Files into Flutter
You can place these container files anywhere inside the android\app folder. For my app, I’ve placed them under android\app\google_services\dev\containers and android\app\google_services\prod\containers.
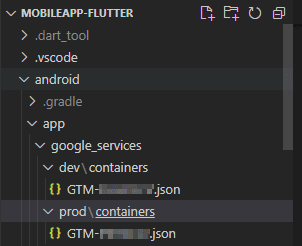
The new android folders will act as a storing location for each environment's container file. These files won’t directly be used during runtime, but one of these will be copied into the proper runtime folder during app build.
Step 3: Add the Default Android Container File
If you need/want GTM setup for local android development, you’ll still need to add the dev container file inside android\app\src\main\containers as the default file. This way, Flutter can always reference a file during runtime without any file movement.

Note: The official documents state you’ll need your container file inside the android\app\assets\containers folder during runtime. My setup was a tad different since my app requires this file be in the android\app\src\main\assets\containers folder. You’ll have to confirm which location works for you.
For my setup, I not only wanted GTM working locally for Android, but I also wanted to use the same dev container file for every environment outside of the prod environment. Adding the dev container file into android\app\src\main\containers as the default file has kept me from needing to create multiple copy scripts for each environment. There’s only a need for one copy script for prod!
Step 4: Create the Android Prod Copy Script
In Xamarin, the environment container files existed side by side in the Droid\Assets\containers folder. This was only possible because the Droid.csproj file controlled which file the project included based on the project's current configuration (ex. Debug, Dev, Test, Prod).
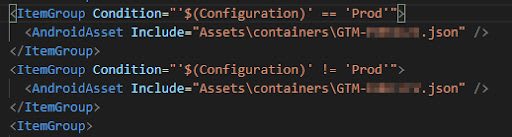
In Xamarin and Flutter, it's REQUIRED that only a single Android container file is included in the containers folder during runtime. Otherwise, the app doesn’t know which file to use and will use the first container file it finds. This is a no go if you care about your test data being logged in production and vice-versa!
Since Flutter doesn’t have a Droid.csproj file to accomplish the Xamarin solution, we’ll need to create another solution to swap the container file inside Flutter’s android\app\assets\containers folder.
For my Flutter app, the easiest solution was to create a python script that Jenkins would execute. Inside my Jenkins folder, I added a new android_prod.py file.

Then, I added this code:
import os
import shutil

## Override Google Tag Manager container file with the PROD version
# Deletes GTM file in containers folder
os.remove("android/app/src/main/assets/containers/GTM-XXXXXXX.json")
# Copies Prod GTM File to the needed containers folder
shutil.copyfile("android/app/google_services/prod/containers/GTM-XXXXXXX.json", "android/app/src/main/assets/containers/GTM-XXXXXXX.json")
Note: Replace the GTM-XXXXXXXX.json with your appropriate dev and prod container file names.
Your setup should now work for both dev and prod environments. We’re almost done with the Android setup. The last step is to install the GTM packages.
Step 5: Add the Android GTM Dependency
Add…
compile "com.google.android.gms:play-services-tagmanager:17.0.0"
…as a dependency to your app\build.gradle file like so.

And now the Android setup is complete! Nice work. Let’s move to the iOS setup.
iOS
Step 1:Grab the iOS Container Files from Xamarin
First, let's grab all the GTM-XXXXXXX.json container files from your iOS Xamarin project. The files will be located in iOS\container.

Copy these files to your Desktop so you can easily access and copy them later. Now, on your Desktop, create a folder called container and create subfolders called dev and prod inside.
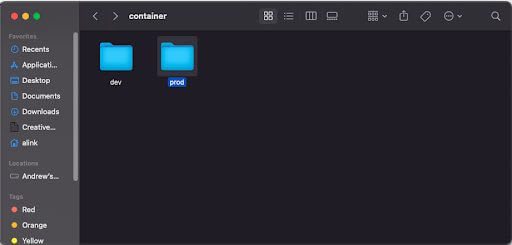
Copy the iOS dev and prod GTM container files you pulled from Xamarin into each subfolder.
Great, you now have your iOS container files ready to copy into your Flutter app!
Step 2: Copy the iOS Environment Container Files into Flutter
First, open your project in Xcode.
Next, you’ll copy that new container folder you created on your Desktop into the Xcode project navigator. Copy it inside to the Runner\Runner folder.
Note: It’s required that you add the container folder through Xcode. Xcode won’t see the folder reference if you add it through the Mac Finder file explorer.

The new ios folders will act as a storing location for each environment's container file. These files won’t directly be used during runtime, but one of these will be copied into the proper runtime folder during app build.
Step 3: Add the Default iOS Container File
If you need/want GTM setup for local iOS development, you’ll still need to add the dev container file inside Runner\Runner\container as the default file. This way, Flutter can always reference a file during runtime without any file movement.

Note: The official documents state you’ll need to put your container file inside the ios\Runner\container folder during runtime.
For my setup, I not only wanted GTM working locally for iOS, but I also wanted to use the same dev container file for every environment outside of the prod environment. Adding the dev container file into ios\Runner\container as the default file has kept me from needing to create multiple copy scripts for each environment. There’s only a need for one copy script for prod!
Step 4: Create the iOS Xcode Build Phase (prod Run Script)
In Xamarin, the environment container files existed side by side in the iOS\container folder. This was only possible because the iOS.csproj file controlled which file the project included based on the project's current configuration (ex. Debug, Dev, Test, Prod).
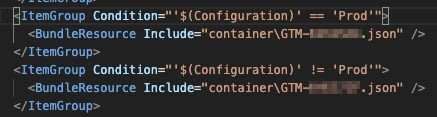
In Xamarin and Flutter it's REQUIRED that only a single iOS container file is included in the container folder during runtime. Otherwise, the app doesn’t know which file to use and will use the first container file it finds. This is a no go if you care about your test data being logged in production and vice-versa!
Since Flutter doesn’t have a iOS.csproj file, to accomplish the Xamarin solution, we’ll need to create another solution to swap the container file inside Flutter’s ios\Runner\container folder.
For my Flutter app, the easiest solution was to create a Build Phase (Run Script) inside Xcode.
In Xcode, go to Runner -> Targets Runner -> Build Phase and click the + button to create a new Run Script. Call it Copy environments GoogleTagManager config file.

Inside the new Run Script add this code:
# Removes all GTM-#######.json files inside only the parent container folder. This does not delete the GTM-#######.json files inside the dev and prod subfolders. We need the subfolder GTM-#######.json files intact so we can grab them during the copy process farther down the file
rm -vf ${PROJECT_DIR}/Runner/container/GTM*

# Environment Constants
PRODUCTION_ENVIRONMENT=Release-production
PRODUCTION_GTM_FILE_NAME=GTM-XXXXXXX.json
PROD_ENVIRONMENT_FOLDER=prod
DEV_GTM_FILE_NAME=GTM-XXXXXXX.json
DEV_ENVIRONMENT_FOLDER=dev

# Variables are adjusted if CONFIGURATION is equal to the PRODUCTION_ENVIRONMENT
ENVIRONMENT=$DEV_ENVIRONMENT_FOLDER
GTM_FILE_NAME=$DEV_GTM_FILE_NAME
if [[ "$CONFIGURATION" == "$PRODUCTION_ENVIRONMENT" ]]; then
    GTM_FILE_NAME=$PRODUCTION_GTM_FILE_NAME
    ENVIRONMENT=$PROD_ENVIRONMENT_FOLDER
fi

#Once the ENVIRONMENT and GTM_FILE_NAME are set we build the file location for that environment file
GTM_INFO_FILE=${PROJECT_DIR}/Runner/container/${ENVIRONMENT}/${GTM_FILE_NAME}

# Make sure the GTM_FILE_NAME exists
echo "Looking for ${GTM_FILE_NAME} in ${GTM_INFO_FILE}"
if [ ! -f $GTM_INFO_FILE ]; then
    echo "No ${GTM_FILE_NAME} found. Please ensure it's in the proper directory."
    exit 1
else
    echo "${GTM_FILE_NAME} config file was found"
fi
# Get a reference to the destination location for the GTM-XXXXXXX.json
# This is the default location where Firebase init code expects to find GTM-XXXXXXX.json file
GTM_DESTINATION=${PROJECT_DIR}/Runner/container/${GTM_FILE_NAME}

echo "Will copy ${GTM_FILE_NAME} to final destination: ${GTM_DESTINATION}"

# Copies GTM_INFO_FILE into the GTM_DESTINATION
cp ${GTM_INFO_FILE} ${GTM_DESTINATION}
Note: Replace the GTM-XXXXXXXX.json with your appropriate dev and prod container file names.
Your setup should now work for both dev and prod environments. We’re almost done with the iOS setup. The last step is to install the GTM dependencies.
Step 5: Add the iOS GTM Dependency
Navigate to the iOS folder and look for a Podfile. If the Podfile already exists, skip these next steps.
- Open the terminal
- Run
sudo gem install cocoapods - Change to the iOS project directory
- Run
pod init
Once you’ve created or located your Podfile, you’ll add the dependency into the Podfile.

In the terminal, change directories to the ios folder and run pod install.
iOS setup is complete.
Great job! Android and iOS are now set up to use GTM.

Wrapping Up
Transitioning to Flutter allows you to take advantage of writing code a single time, in the same languages. It also overcomes the traditional limitations of cross-platform work.
After walking through this post, you now have GTM in your new Flutter app! It's a big accomplishment and one that'll benefit you for the foreseeable future.
Thank you for reading! If you found this helpful, check out some of the other posts on the Keyhole Dev Blog.

Top comments (0)