Introduction
If you're a Rails developer, I bet you have already heard of or used devise. If you really don't know it, I guess you're reading this article in the far future 😅. devise is a very comprehensive user authentication library for Rails and it's still true in 2023.
devise is very powerful but it's also notorious for being difficult to learn. It has too many features and there isn't a entry point to cut in. Despite that, I'd like to introduce devise starting from its 10 modules. These modules encapsulate 10 common features an authentication system may have. In addition, almost all functionalities of devise are built around these 10 modules. I believe by knowing more about them, it will easier for anyone to harness devise.
In this article, I will enable all 10 modules on the User model one by one. I suggest reading this article sequentially and also following the codes in each chapter. You will build an application with the 100% released devise. If you're totally new to devise or even Rails, you can take a look at my other article to setup a simplest environment and play around with it first.

Devise Modules
Let's have a brief view of all 10 modules.
- Database Authenticatable: storing user's password as hash digest and allowing users to sign in
- Registerable: allowing new users to register
- Confirmable: new users need to click the confirmation link in a confirmation email to activate their accounts.
- Validatable: check the username and password validity
- Recoverable: "Forgot Password?" feature
- Rememberable: the user session will be remembered so the users don't need to log in again after restarting the browser
- Timeoutable: the user session will expire after a period of time
- Lockable: lock/unlock users
- Trackable: track how users use the system, such as how many times a user has signed in
- Omniauthable: add Omniauth support
Preparation
Environment
- Ruby 3.1.2p20
- Rails 7.0.5
- devise 4.9.2
Installation
Create a new rails project and install devise. Then execute the command below to initialize devise.
rails generate devise:install
Add Mailer's default_url_options
Many features will send mails out and this is a required configuration.
# config/environments/development.rb
config.action_mailer.default_url_options = { host: 'localhost', port: 3000 }
Add User model
We will use User model for authentication and we want to use the email field as the identifier.
To create the table in the database, execute:
rails g migration create_users email:index
It will create a migration file in db/migrations, please open that file and edit it like below to add some extra constraints like NOT NULL and UNIQUE:
class CreateUsers < ActiveRecord::Migration[7.0]
  def change
    create_table :users do |t|
      t.string :email, null: false
      t.timestamps
    end
    add_index :users, :email, unique: true
  end
end
Run rails db:migrate to make the changes.
Add the User model:
# app/models/user.rb
class User < ApplicationRecord
end
Warning
Please be aware that in practice you should use
rails generate devise User
to create User with a basic devise configuration. However, this article's purpose is to introduce devise's modules and enable them progressively.
Add a root page
Let's add a root page so it can make testing more smooth.
- Add a
PagesControllerwith anindexaction ```ruby
app/controllers/pages_controller.rb
class PagesController < ApplicationController
def index
end
end
2. Add the view for `index`
```html


<!-- app/views/pages/index.html.erb -->
<h1>Pages#index</h1>
<% if user_signed_in? %>
  <%= link_to 'Sign out', destroy_user_session_path, data: { turbo_method: :delete }
<% else %>
  <%= link_to 'Sign in', new_user_session_path %>
<% end %>
- Modify the
<body>of the layout so it can show flash messages ```html
<%= notice %>
<%= alert %>
<%= yield %>
### Routes
Modify the routes like below.
```ruby


# config/routes.rb
Rails.application.routes.draw do
  root "pages#index"
  devise_for :users
end
devise_for :users will generate route paths for devise in the scope of users. It doen't do anything right now because we haven't enabled any module yet. We'll see more examples while introducing each module.
Export Devise views
The last step is to export devise views. This is usually for customization. In fact, we don't have to do this now because we're not going to modify them. It could be helpful to see those pages in code for better understanding.
rails generate devise:views
We have done all the prerequisites. At this point, if you start the rails server and go to http://localhost:3000, it should be a crashed page 😆. There's nothing to concern about. Let's start enabling those modules on User!
Database Authenticatable
The :database_authenticatable module provides 2 main functionalities to the User model:
- Store the users' passwords in a hash digest format in the column,
encrypted_password. - Verify whether a user's input matches the password digest stored in the database.
It should be a required module. To be honest, I don't know what will happen if you don't include this module but others. Why do you want to do that? If you really need to not include this module, you'd better think twice before using devise.
Enable the module
To enable :database_authenticatable, we need to add one column to the users table, encrypted_password. Execute
rails g migration add_encrypted_password_to_users encrypted_password
It will create a new migration file in db/migrations. Although it's a magic command, it's not magical enough😅 Please open the file and add null: false for the database NOT NULL constraint.
class AddEncryptedPasswordToUsers < ActiveRecord::Migration[7.0]
  def change
    add_column :users, :encrypted_password, :string, null: false
  end
end
Run rails db:migrate to make the changes
We can enable our first module in User by using the devise method:
# app/models/user.rb
class User < ApplicationRecord
  devise :database_authenticatable
end
Usage
Headless usage
:database_authenticatable will introduce a method #password= for setting users password. Open the rails console:
user = User.new(email: 'kevin@taiwan.com')
user.password = '123456'
user.save!
If you check user.encrypted_password, it'll be a gibberish string which is exactly the hash digest of bcrypt so no one knows the true password except you.
user = User.last
user.encrypted_password
# "$2a$12$j.tv091dn9OQPV4seF74Z.PIlohxesFxMGuQh0l39hH4mFS5XyDTi"
We can use the method #valid_password? to verify if a password is correct.
user.valid_password? '123456'
# => true
user.valid_password? 'abcde'
# => false
Testing in browsers
:database_authenticatable module will unlock 3 paths for users to log in and log out. (It really feels like playing a game🎮) You can check them by executing rails routes
    new_user_session GET    /users/sign_in(.:format)  devise/sessions#new
        user_session POST   /users/sign_in(.:format)  devise/sessions#create
destroy_user_session DELETE /users/sign_out(.:format) devise/sessions#destroy
-
devise/sessions#newis for the sign-in page -
devise/sessions#createis create the login session -
devise/sessions#destroyis for logging out
- Now, you can start the rails server by
rails serverand go tohttp://localhost:3000/on a browser. You'll find the page is fixed now and can display successfully.
- Click the Sign In link and you will be led to
http://localhost:3000/users/sign_inand you should see a Login page provided bydevise
- You can then input the user's credentials you just created in the rails console. You should log in successfully and be redirected to the root page.

- You can try to click Sign Out and sign out.
Customization
- modify settings in
config/initializers/devise.rb - modify the exported
app/views/devise/sessions/new.html.erbwhich is for displaying the login page. - execute
rails generate devise:controllers users -c sessionsto exportSessionsController.
Checkpoint - encrypted_password
encrypted_password is a misleading name because it actually uses bcrypt to calculate the hash digest of the password and stores that digest. I didn't check the git log but I guess it's a historical result.
Again, it's okay if you don't understand what the previous paragraph means. I don't think a web developer has to know how the hash algorithm is implemented. However, knowing the difference between an encrypted password and a hashed password is more important. A very easy way to understand them is: you can decrypt an encrypted password to the original password but you cannot revert a hashed digest of a password. As a result, we usually think hashing a password is more secure.
Registerable
The :registerable module is for new users to sign up and manage their data. I think this one is the most confusing one. It sounds like you need to include this module to create users but the fact is that you don't need this module to do that. We just created a new user in the previous chapter, right?
:registerable only adds some extra routing endpoints and makes some views show the links to go to the signup page. Even though we include this module in User, it doesn't add any feature to the model itself.
:registerable can save you some time by preventing you from building a similar workflow again.
Enable the module
Unlike :database_authenticatable, we can just enable :registerable module directly.
# app/models/user.rb
class User < ApplicationRecord
  devise :database_authenticatable, :registerable
end
Usage
After enabling :registerable, a series of user_registration paths will be generated:
cancel_user_registration GET    /users/cancel(.:format)  devise/registrations#cancel
   new_user_registration GET    /users/sign_up(.:format) devise/registrations#new
  edit_user_registration GET    /users/edit(.:format)    devise/registrations#edit
       user_registration PATCH  /users(.:format)         devise/registrations#update
                         PUT    /users(.:format)         devise/registrations#update
                         DELETE /users(.:format)         devise/registrations#destroy
                         POST   /users(.:format)         devise/registrations#create
I think showing examples is easier for you to understand what these paths do.
Create a user
If you go to http://localhost:3000/users/sign_up, you can see a Sign-Up page provided by devise:

You can create a new user if you submit the form with valid input values.
Update or Delete a user
If you logged in, you can go to http://localhost:3000/users/edit to edit your information.

Customization
If you want to customize it:
- modify settings in
config/initializers/devise.rb - modify the exported views of
app/views/devise/registration/*.html.erb - execute
rails generate devise:controllers users -c registrationsto exportRegistrationsController.
Checkpoint - links on pages
If you go to the Log-in page http://localhost:3000/users/sign_in now, you'll find a Sign up link that wasn't there.

It feels like magic. What's happening? This is because the partial, app/views/devise/shared/_links.html.erb checks which modules are enabled and displays the required links. You can check it out to see the details.
Confirmable
I think :confirmable is the second most frequently used module of devise. It provides a very common behaviour: users need to validate their email addresses by clicking a confirmation link sent with a confirmation mail. It can prevent malicious users from signing up with fake emails.
Enable the module
We need to add some required columns on users table for this module.
Execute
rails g migration add_confirmation_to_users confirmation_token:index confirmed_at:datetime confirmation_sent_at:datetime unconfirmed_email
and it should create a migration file like below
class AddConfirmationToUsers < ActiveRecord::Migration[7.0]
  def change
    add_column :users, :confirmation_token, :string
    add_index :users, :confirmation_token, unique: true
    add_column :users, :confirmed_at, :datetime
    add_column :users, :confirmation_sent_at, :datetime
    add_column :users, :unconfirmed_email, :string
  end
end
It will add 4 columns:
-
confirmation_token: A randomly generated token will be stored in this column and it will be embedded in the confirmation link sent to the user. -
confirmation_sent_at: it records the time the confirmation mail was sent -
confirmed_at: it records the time after a user clicks the confirmation link and is confirmed. A user has been confirmed if this column is not NULL. -
unconfirmed_email: If a user wants to update his/her email address, it will store the new email address.
Run rails db:migrate to make the changes. Then add :confirmable in User to enable the module:
class User < ApplicationRecord
  devise :database_authenticatable, :registerable, :confirmable
end
Usage
Headless
:confirmable adds an array of methods. We're going to try some of them. Open the console:
user = User.first
# check if the user is confirmed
user.confirmed?
# => false
You can call #send_confirmation_instructions
user.send_confirmation_instructions
A confirmation mail with the confirmation link will be sent to the user's email address:
Date: Mon, 19 Jun 2023 12:37:09 -0400
From: please-change-me-at-config-initializers-devise@example.com
Reply-To: please-change-me-at-config-initializers-devise@example.com
To: kevin@taiwan.com
Message-ID: <6490843547bc2_f396c1c90348@F2XWD4WR0C.mail>
Subject: Confirmation instructions
Mime-Version: 1.0
Content-Type: text/html;
 charset=UTF-8
Content-Transfer-Encoding: 7bit

<p>Welcome kevin@taiwan.com!</p>

<p>You can confirm your account email through the link below:</p>

<p><a href="http://localhost:3000/users/confirmation?confirmation_token=uyMSehFApDiMs_-yjcT7">Confirm my account</a></p>
Check the user's attributes now:
user.confirmation_token
# => "uyMSehFApDiMs_-yjcT7"
user.confirmation_sent_at
# => Mon, 19 Jun 2023 16:37:09.185202000 UTC +00:00
user.confirmed_at
# => nil
user.unconfirmed_email
# => nil
-
user.confirmation_tokenmatches theconfirmation_tokenembedded in the email's confirmation link. -
user.confirmation_sent_atwas filled -
user.confirmed_atisnilbecause the user hasn't clicked the confirmation link yet -
user.unconfirmed_emailisnilbecause we're not doing a reconfirmation
You can confirm the user by calling #confirm:
user.confirm
user.confirmed?
# => true
If you want to do the reconfirmation for the user, you can save the new email in the unconfirmed_email first.
user.email
# => "kevin@taiwan.com"
user.update! unconfirmed_email: 'kevin@taipei.tw'
user.pending_reconfirmation?
# => true
user.send_reconfirmation_instructions
# an email with the reconfirmation link will be sent
user.confirm
user.email
# => 'kevin@taipei.tw'
user.unconfirmed_email
# => nil
Use in browsers
- You will not be able to log in as an unconfirmed user. You'll be rejected with a message saying you need to confirm the email first.

- If the user wants the system to send the confirmation mail again, they can click "Didn't receive confirmation instruction?" which will lead them to
http://localhost:3000/users/confirmation/newto resend the mail.
- You can log in as normal after you click the confirmation link in the mail
Customization
You can customize :confirmable by
- modify settings in
config/initializers/devise.rb - modify the mail template
app/views/devise/mailer/confirmation_instructions.html.erb - modify the resend mail page,
app/views/devise/confirmations/new.html.erb - run
rails generate devise:controllers users -c confirmationsto exportConfirmationsController
Validatable
:validatable module provides validations for:
-
email: check if the input email complies with the email's regex -
password: check the length of the input password is 6~128
That's it. It's a very simple module.
Enable the module
:validatable adds model validations for email and password so users needs to have both methods. We've already done that when enabling :database_authenticatable so we can just enable the module in User.
class User < ApplicationRecord
  devise :database_authenticatable, :registerable, :confirmable, :validatable
end
Usage
This is a very straightforward module. Please check the example below:
user = User.new email: 'test-user'
user.password = '1234'
user.save
# => false
user.errors.count
# => 2
user.errors.each { |error| puts error.full_message }
# Email is invalid
# Password is too short (minimum is 6 characters)
Customization
Please forgive me but I personally think it's meaningless to customize this module 😆. Adding validations is way too easy in Rails. For example, the code below can do exactly the same thing as :validatable does.
validates :email, format: { with: URI::MailTo::EMAIL_REGEXP }
validates :password, length: { in: 6..128 }
If you want to customize the :validatable, I suggest you just stop using it. Use Rails validation instead and customize it by yourself.
Recoverable
:recoverable is another module that I use frequently in different projects. In a nutshell, it's the "Forget Password?" feature. Users can reset their passwords via a reset link sent to their email addresses.
Enable the module
:recoverable needs some required columns. Execute
rails g migration add_recoverable_to_users reset_password_token:index reset_password_sent_at:datetime
to create a migration file:
class AddRecoverableToUsers < ActiveRecord::Migration[7.0]
  def change
    add_column :users, :reset_password_token, :string
    add_index :users, :reset_password_token, unique: true
    add_column :users, :reset_password_sent_at, :datetime
  end
end
It's pretty similar with :confirmable. When a user wants to reset a password, a randomly generated token will be stored in reset_password_token and it will be embedded in the link in the reset password mail sent to the user's email address. reset_password_sent_at will record the time the mail is sent.
We can enable :recoverable now:
class User < ApplicationRecord
  devise :database_authenticatable, :registerable, :confirmable, :validatable,
         :recoverable
end
Usage
Headless
You can call #send_reset_password_instructions to create a reset_password_token and it will be embedded in the reset password mail.
user.send_reset_password_instructions
# => 's5ZkHwPHQGAc7DSGCpR_'
Below is a sample of reset password mail. You can find the reset_password_token embedded in the link.
Date: Mon, 19 Jun 2023 21:21:18 -0400
From: please-change-me-at-config-initializers-devise@example.com
Reply-To: please-change-me-at-config-initializers-devise@example.com
To: kevin@taipei.tw
Message-ID: <6490ff0e7179_df83c1c193c8@F2XWD4WR0C.mail>
Subject: Reset password instructions
Mime-Version: 1.0
Content-Type: text/html;
 charset=UTF-8
Content-Transfer-Encoding: 7bit

<p>Hello kevin@taipei.tw!</p>

<p>Someone has requested a link to change your password. You can do this through the link below.</p>

<p><a href="http://localhost:3000/users/password/edit?reset_password_token=s5ZkHwPHQGAc7DSGCpR_">Change my password</a></p>

<p>If you didn't request this, please ignore this email.</p>
<p>Your password won't change until you access the link above and create a new one.</p>
Use in browsers
After enabling :recoverable, you'll get new series of routes endpoints for /passwords
new_user_password  GET    /users/password/new(.:format)  devise/passwords#new
edit_user_password GET    /users/password/edit(.:format) devise/passwords#edit
     user_password PATCH  /users/password(.:format)      devise/passwords#update
                   PUT    /users/password(.:format)      devise/passwords#update
                   POST   /users/password(.:format)      devise/passwords#create
We can open a browser to check what these paths do.
- Go to
http://localhost:3000/users/sign_in, and you'll find a new link shows up, Forgot your password?
- Click that link and you'll be led to
http://localhost:3000/users/password/new
- If you input a valid email of the users you created in the system and submit the form. A
POSTrequest tohttp://localhost:3000/users/passwordwill be made. Then a reset password mail as described in the previous section will be sent out. You can find that mail in the terminal runningrails server. If you have a gem like letter_opener, you can see that mail shown in your browser. - Click or copy-paste the reset password link to open the reset password page
http://localhost:3000/users/password/edit?reset_password_token=xxxxxxxxxx
- Input a new password and submit the form. A
PATCH/PUTrequest will be made towardhttp://localhost:3000/users/password. It will then check thereset_password_tokenand then update the user's password.
Customization
To customize the pages and workflow:
- modify settings in
config/initializers/devise.rb - Modify the views in
app/views/devise/passwords/*.html.erb - Modify
app/views/devise/mailer/reset_password_instructions.html.erbfor the reset password mail - Execute
rails generate devise:controllers users -c passwordsto exportPasswordsController
Checkpoint - reset password token
If you're a scrupulous person, you might find one interesting thing. I mentioned above that the token will be stored in reset_password_token and will be embedded in the reset password link. However, if you really check their values, you'll find they're different. Take the example we used in this section,
- the token embedded in the reset password link is
s5ZkHwPHQGAc7DSGCpR_ - but if you check
user.reset_password_token, it'll beaab3acb2a7dc13e835394c85a14c37417bbd5837692ee67853961bbc6863ee01
Why? How can devise verify the token if they are totally different?
The answer is that the value stored in reset_password_token is also a hash digest, like how devise stores passwords. Furthermore, it will use HMAC-SHA256 hash algorithm to calculate the hash digest. You can run the commands below to check the result.
salt = Devise.token_generator.send(:key_for, :reset_password_token)
OpenSSL::HMAC.hexdigest('SHA256', salt, 's5ZkHwPHQGAc7DSGCpR_')
# => "aab3acb2a7dc13e835394c85a14c37417bbd5837692ee67853961bbc6863ee01"
Why does :database_authenticatable use bcrypt and :recoverable use HMAC-SHA256? The usage is pretty similar. It may be because of the speed, bcrypt is the most secure way to do hashing.
To be frank, the true answer is I don't know. I don't think speed is that critical for resetting passwords. I guess this inconsistency may be common in an open-source project. Different groups of volunteers chose different approaches.
Rememberable
If you've logged in to the system, try restarting your browser. You'll be logged out. It's inconvenient. To solve this issue, :rememberable is introduced. This module provides the ability to keep the user session even if the browser is closed.
How does it do that? Cookies! Generally speaking, :rememberable records the current user's id in a cookie field when a user logs into the system. For instance, if a user with id 10 is logging in, it will record user_id => '10' in the cookie. When the system detects a cookie with user_id => '10', it will assume that the user with id 10 is logged in. How long can it last? It depends on the cookie's expiration time. If the cookie expires after 1 week, then the user's session can be kept for 1 week.
Of course, we don't use a cookie just like that because anyone can modify a cookie's value. You don't want a user to change that user_id to an admin's id and suddenly become an admin. Don't worry. :rememberable also consider how to make it tamperproof and verify the cookie's value.
Enable the module
:recoverable requires one more column. Execute
rails g migration add_rememberable_to_users remember_created_at:datetime
to create a migration file:
class AddRememberableToUsers < ActiveRecord::Migration[7.0]
  def change
    add_column :users, :remember_created_at, :datetime
  end
end
remember_created_at is used for storing the time a user logging with the "Remember me" checkbox checked.
We can enable :rememberable now:
class User < ApplicationRecord
  devise :database_authenticatable, :registerable, :confirmable, :validatable,
         :recoverable, :rememberable
end
Usage
:rememberable utilizes cookies to realize its functionality. Although it does add many methods for the User model, it doesn't make sense if we only call those methods in the rails console. Therefore, I only demonstrate how it works in browsers in this article.
- Go to
http://localhost:3000/users/sign_in, you'll find there's a new Remember me checkbox
- Logging in with the checkbox checked, a parameter
rememeber_mewill be sent with the form and that will trigger:rememberablemechanism to remember your session in the cookie. ```ruby
"remember_me"=>"1"
3. After logging in, open your browser's devtools (I'm using Chrome) and you can find there a new key, `remember_user_token`, is added to the cookie. It should expire in 2 weeks because that's the default setting. The cookie value seems gibberish. It's actually a **signed message** and it's the **key** of the whole `:rememberable` functionality. It records the currently logged-in user's id and other helpful information. The rails system can take advantage of that information to **remember** the user's session.
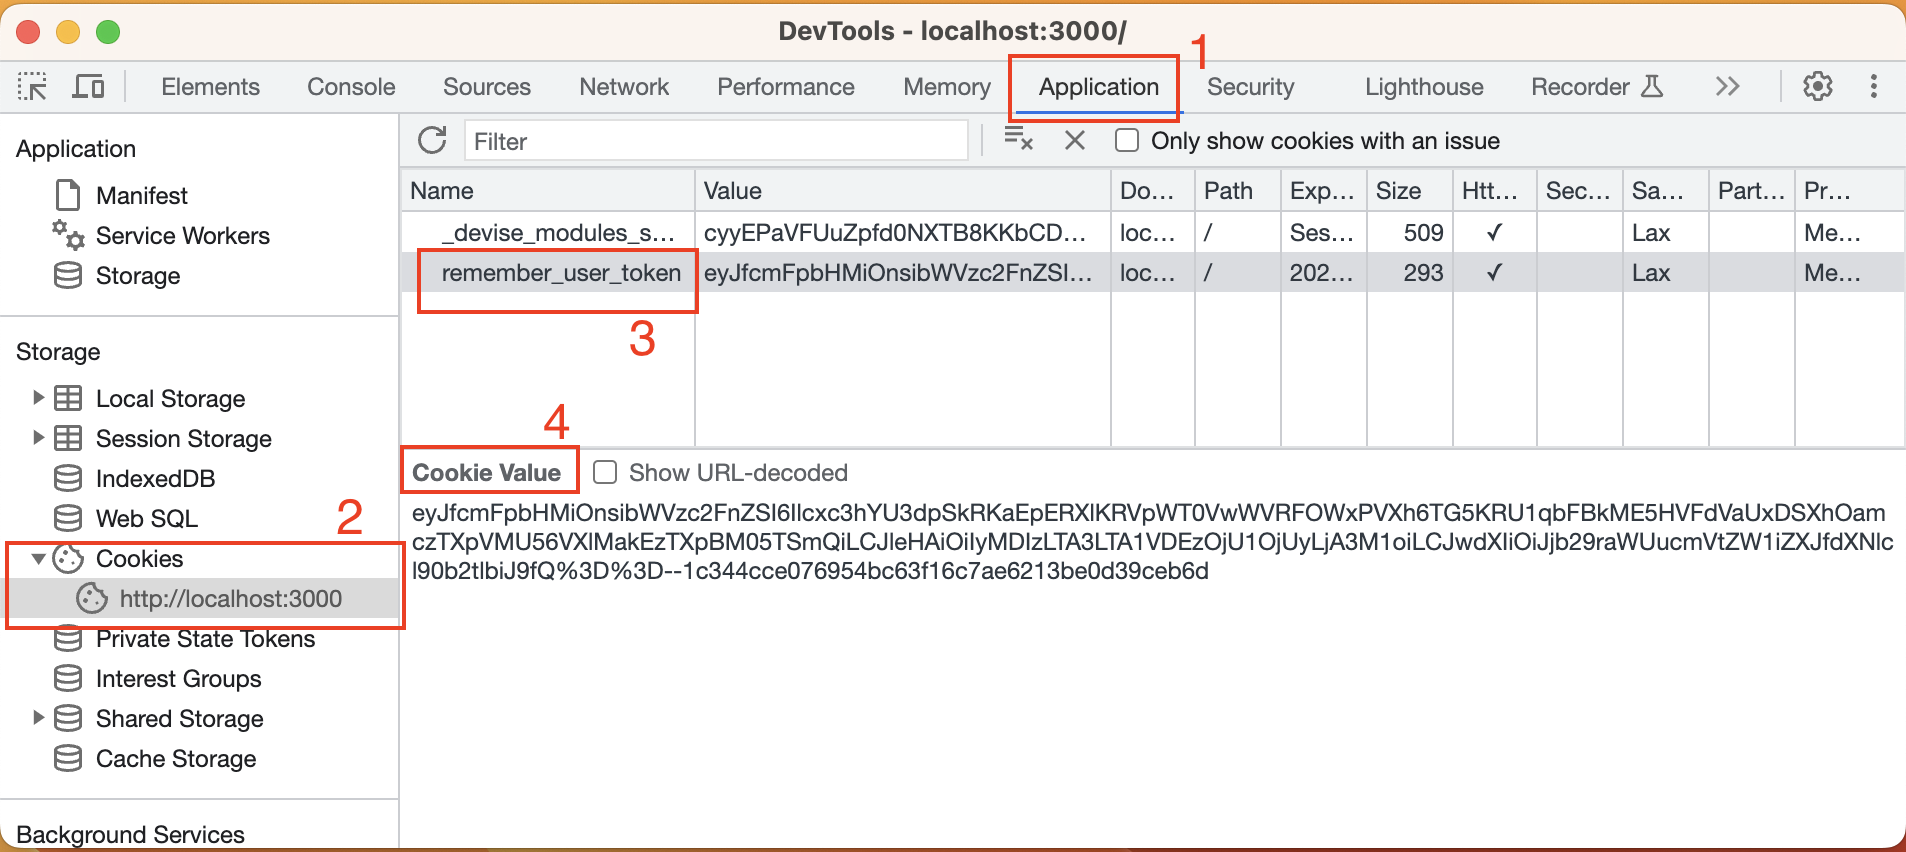
4. With this key-value pair, you can try close and start your browser again. You'll find your session is kept. Nice! 🎉
### Customization
You can change the configuration of `:rememberable` in the initializer, for example, changing the longevity of the cookie to another time. The default is 2 weeks and you can change it to any length you want.
```ruby
# config/initializers/devise.rb
config.remember_for = 1.weeks
Even though there is some stuff devise allows us to customize :rememberable, I don't think it's meaningful to do that. The whole logic of :rememberable is encapsulated well and I can't see the need to change them.
Checkpoint1 - Signed message
For a curious mind like you, I think you must want to know what kind of message is really stored in remember_user_token. First, we copy-paste the gibberish cookie value from our previous example:
eyJfcmFpbHMiOnsibWVzc2FnZSI6Ilcxc3hYU3dpSkRKaEpERXlKRVpWT0VwWVRFOWxPVXh6TG5KRU1qbFBkME5HVFdVaUxDSXhOamczTXpVMU56VXlMakEzTXpBM05TSmQiLCJleHAiOiIyMDIzLTA3LTA1VDEzOjU1OjUyLjA3M1oiLCJwdXIiOiJjb29raWUucmVtZW1iZXJfdXNlcl90b2tlbiJ9fQ==--1c344cce076954bc63f16c7ae6213be0d39ceb6d
Let's demystify it. This message can be split into 2 parts, the true message and the signature, and they're separated by -- in the string. The string before -- is the message itself and the string after -- is the signature. You can try to stop the program by binding.break (this is a functionality from debug gem)
def index
  binding.break
end
The message is not encrypted, it's just encoded by base64 twice so we can decode it easily.
cookie_value = cookies['remember_user_token']
#=> eyJfcmFpbHMiOnsibWVzc2FnZSI6Ilcxc3hYU3dpSkRKaEpERXlKRVpWT0VwWVRFOWxPVXh6TG5KRU1qbFBkME5HVFdVaUxDSXhOamczTXpVMU56VXlMakEzTXpBM05TSmQiLCJleHAiOiIyMDIzLTA3LTA1VDEzOjU1OjUyLjA3M1oiLCJwdXIiOiJjb29raWUucmVtZW1iZXJfdXNlcl90b2tlbiJ9fQ==--1c344cce076954bc63f16c7ae6213be0d39ceb6d
msg, signature = cookie_value.split('--')
rememberable_msg = Base64.decode64(msg)
# => "{\"_rails\":{\"message\":\"W1sxXSwiJDJhJDEyJEZVOEpYTE9lOUxzLnJEMjlPd0NGTWUiLCIxNjg3MzU1NzUyLjA3MzA3NSJd\",\"exp\":\"2023-07-05T13:55:52.073Z\",\"pur\":\"cookie.remember_user_token\"}}"
Base64.decode64(JSON.parse(rememberable_msg)['_rails']['message'])
# => "[[1],\"$2a$12$FU8JXLOe9Ls.rD29OwCFMe\",\"1687355752.073075\"]"
The result
[[1],"$2a$12$FU8JXLOe9Ls.rD29OwCFMe","1687355752.073075"]
is exact the
[user_id, salt_of_password_hash_digest, timestamp]
My user's id was 1 so it recorded 1 in the first element of the message.
In fact, this signed cookie message is a functionality provided by Rails. You can get the value directly by cookies.signed[]. It parses the message correctly and also verifies the signature.
cookies.signed['remember_user_token']
# => [[1], "$2a$12$FU8JXLOe9Ls.rD29OwCFMe", "1687355752.073075"]
The signature is generated based on the message's content. If anyone tries to change the message but doesn't know how to create the corresponding signature, the verification will be failed and it will return nil
cookies['remember_user_token'] = cookies['remember_user_token'][2..-1]
cookies.signed['remember_user_token']
# => nil
Checkpoint2 - SessionCookie
Did you notice there's also another cookie value, _devise_modules_session? That's used for storing the session data. It feels strange. Why do we need another cookie value to remember the session? Isn't the session already kept by that cookie value?
You can check the Expires column and it says _devise_modules_session is a Session Cookie. A session cookie will be destroyed after you close the browser.
https://developer.mozilla.org/en-US/docs/Web/HTTP/Headers/Set-Cookie#session_cookie
It's designed to be like this so developers can choose to enable :rememeberable depending on the requirements.
Timeoutable
Users can keep their session forever if they don't close their browsers. That's a problem for some systems. :timeoutable will revoke a user's session if the user doesn't do anything for quite a while. For example, if a user doesn't do anything in the application for 30 minutes, he'll be signed out and redirected to the sign-in page if it's needed.
I felt difficult to imagine how to realize this feature. Surprisingly, it turned out to be simple to do. For every request, devise records the current time in cookies. Therefore, when Rails gets a new request, it can compare the last request's time and the current time to see if the difference is over the threshold. If it's over, then just revoke the user's session.
Enable the module
:timeoutable doesn't need any database migration either because it only uses cookies to realize the feature. Thus, we can enable it directly.
class User < ApplicationRecord
  devise :database_authenticatable, :registerable, :confirmable, :validatable,
         :recoverable, :rememberable, :timeoutable
end
There aren't many things you can customize for this module. The only one may be the timeout time. The default timeout time is 30 minutes. You can change it in the initializer. Later for testing, I'm going to change it to 1 minute.
# config/initializers/devise.rb
# config.timeout_in = 30.minutes
config.timeout_in = 1.minute
Usage
- Log into the system in a browser.
- You can print
sessionand you should see there's a new key calledwarden.user.user.sessionwith a nested JSONlast_request_atrecording a timestamp of the request's time. ```ruby
puts session.to_json
{
# ignore other keys
"warden.user.user.session": {
"last_request_at": 1687446153
}
}
3. Wait for 1 minute and refresh the page, you will be redirected to the root page.

In my opinion, this module conflicts with `:rememberable`, for example, even if the "remember me time" is 2 weeks long, if the "timeout time" is 30 minutes, you'll lose your session after 30 minutes. The only benefit it has when you enable both modules is that **you can keep the session if you restart your browser within the timeout time** but it's not practical 😅.

## Lockable <a name="Lockable"></a>
`:lockable` implements methods for you to lock and unlock users. A locked user cannot log into the system. There are some reasons for you to want to lock users:
- You can lock a user if he/she enters the wrong password several times. It could be a malicious user trying to hack the account
- You want to lock a user because that person already left your organization
- ~~based on your mood~~

### Lockable strategies
`:lockable` has already designed some strategies. You can choose under what kind of situation should you lock or unlock a user. You can configure them in the `config/initializers/devise.rb`

#### Locking strategies
1. `:failed_attempts`: a user will be locked if the wrong password was entered several times
2. `:none`: you have to lock the user manually
The default is `:failed_attempts`

#### Unlocking strategies
1. `:email`: Send an unlock link to the user's email
2. `:time`: A locked user will be unlocked automatically after a certain amount of time
3. `:both`: Enables both strategies
4. `:none`: You have to unlock a user manually
The default is `:both`

### Eanble the module
`:lockable` requires some more columns. Execute
rails g migration add_lockable_to_users failed_attempts:integer unlock_token locked_at:datetime
to create a migration file:
```ruby


class AddLockableToUsers < ActiveRecord::Migration[7.0]
  def change
    add_column :users, :failed_attempts, :integer, default: 0
    add_column :users, :unlock_token, :string
    add_column :users, :locked_at, :datetime
  end
end
-
locked_atstores the time a user is locked. A user isn't locked when it's NULL. -
failed_attemptsdefault value is 0, it will increase 1 whenever a user try to log in with wrong password -
unlock_tokenis a token embedded in the unlock link sent to the user if you allow users to unlock by themself.
We can enable :lockable now:
class User < ApplicationRecord
  devise :database_authenticatable, :registerable, :confirmable, :validatable,
         :recoverable, :rememberable, :lockable
end
Usage
Headless
We can check how to lock a user manually in the rails console.
user = User.first
user.lock_access!
# => 'ZxmxUFVX579zNgpBJftN' This is the unlock_token
user.access_locked?
# => true
When you do that, an unlock mail with a unlock link will be sent to the user's email
Date: Thu, 22 Jun 2023 13:14:42 -0400
From: please-change-me-at-config-initializers-devise@example.com
Reply-To: please-change-me-at-config-initializers-devise@example.com
To: kevin@taipei.tw
Message-ID: <64948182289b0_eb89c1c317fd@F2XWD4WR0C.mail>
Subject: Unlock instructions
Mime-Version: 1.0
Content-Type: text/html;
 charset=UTF-8
Content-Transfer-Encoding: 7bit

<p>Hello kevin@taipei.tw!</p>

<p>Your account has been locked due to an excessive number of unsuccessful sign in attempts.</p>

<p>Click the link below to unlock your account:</p>

<p><a href="http://localhost:3000/users/unlock?unlock_token=ZxmxUFVX579zNgpBJftN">Unlock my account</a></p>
unlock_token will be embedded in the link. By the way, just like :recoverable, the token in the link is the real token and user.unlock_token stores its HMAC digest.
You can unlock the user by
user.unlock_access!
user.access_locked?
# => true
user.locked_at
# => nil
user.unlock_token
# => nil
Use in browsers
:lockable will add 3 more paths:
new_user_unlock GET    /users/unlock/new(.:format) devise/unlocks#new
user_unlock     GET    /users/unlock(.:format)     devise/unlocks#show
                POST   /users/unlock(.:format)     devise/unlocks#create
-
devise/unlocks#showis for the unlock link -
devise/unlocks#newanddevise/unlock#createare for asking for resending the unlock mail
We can try entering the password several times to see how this really works. Before the test, let's modify the threshold to 3 times so we don't need to do that too many times.
# config/initializers/devise.rb
config.maximum_attempts = 3
- Go to
http://localhost:3000/users/sign_inand try to log in with the wrong password for 3 times - Your user account will be locked and you cannot log in even if you enter the correct password.

- You can find the unlock link in the unlock mail displayed in your rails server's logs. If you can't find it. You can also click the new link, "Didn't receive unlock instructions?", which leads you to
/users/unlock/newto ask for a new unlock mail.
- Before you unlock your user account, you can go to the rails console and you'll find
user.failed_attemptshas increased. ```ruby
user.failed_attempts
=> 4
5. After you click the unlock link, your user will be unlocked. All related columns will be reset
```ruby


user.locked_at
# => nil
user.unlock_token
# => nil
user.failed_attempts
# => 0
Customization
You can customize :lockable by
- You can choose lock/unlock strategies and customize other options in
config/initializers/devise.rb - modifying the mail template
app/views/devise/mailer/unlock_instructions.html.erb - modify the resend instructions page,
app/views/devise/unlocks/new.html.erb - run
rails generate devise:controllers users -c unlocksto exportUnlocksController
Trackable
:trackable provides you the ability to track some information related to the use of devise. I think it'll be very straightforward if you just see the columns required by this module which are also the information that will be tracked. There are 5 of them:
-
sign_in_count: how many times this user has signed in -
current_sign_in_at: the time the current session began -
current_sign_in_ip: the IP address of the user when the current session created -
last_sign_in_at: the time the last session began -
last_sign_in_ip: the IP address of the user when the last session created
You can use that information to detect suspicious actions or see statistics for the use of the system.
Enable the module
We need to add those columns first for :trackable. Execute
rails g migration add_trackable_to_users sign_in_count:integer current_sign_in_at:datetime current_sign_in_ip last_sign_in_at:datetime last_sign_in_ip
and
class AddTrackableToUsers < ActiveRecord::Migration[7.0]
  def change
    add_column :users, :sign_in_count, :integer, default: 0
    add_column :users, :current_sign_in_at, :datetime
    add_column :users, :current_sign_in_ip, :string
    add_column :users, :last_sign_in_at, :datetime
    add_column :users, :last_sign_in_ip, :string
  end
end
After db:migrate, we can enable :trackable:
class User < ApplicationRecord
  devise :database_authenticatable, :registerable, :confirmable, :validatable,
         :recoverable, :rememberable, :timeoutable, :lockable, :trackable
end
Usage
- Before opening your browser, open the rails console and check the current information ```ruby
user.sign_in_count
=> 0
user.current_sign_in_at
=> nil
user.current_sign_in_ip
=> nil
user.last_sign_in_at
=> nil
user.last_sign_in_ip
=> nil
2. Open your browser and sign in. Back to the rails console to check the data. You'll find the current_sign_in_x and last_sign_in_x are identical. The IP address is `::1` because you connect to the server locally.
```ruby


user.sign_in_count
#=> 1
user.current_sign_in_at
#=> Thu, 22 Jun 2023 22:02:03.818027000 UTC +00:00
user.current_sign_in_ip
#=> "::1"
user.last_sign_in_at
#=> Thu, 22 Jun 2023 22:02:03.818027000 UTC +00:00
user.last_sign_in_ip
#=> "::1"
- If you want to see different IP addresses being recorded, you can use your mobile or other laptops to connect to your development server. You can do that by starting the server with
-bargument ```shell
rails s -b 0.0.0.0
4. Sign in on your other devices and then go back to the console to check. `user.sign_in_count` increased by 1 and `current_sign_in_x` information is also updated.
```ruby


user.sign_in_count
#=> 2
user.current_sign_in_at
#=> Thu, 22 Jun 2023 22:06:57.822208000 UTC +00:00
user.current_sign_in_ip
#=> "192.168.1.107"
user.last_sign_in_at
#=> Thu, 22 Jun 2023 22:02:03.818027000 UTC +00:00
user.last_sign_in_ip
#=> "::1"
Checkpoint - IP
How do we know the origin IP address of a request? It's actually a Rails feature provided by Actionpack. It uses ActionDispatch::Request#remote_ip. #remote_ip is smart enough that it will ignore the proxy server's IP addresses and find the original IP address of the request.
request.remote_ip
Omniauthable
:omniauthable is a special module in devise but it's also in charge of a very common feature: letting users log in by using a user's session from another website, e.g. Facebook, Google, Twitter, Github, etc. It's kind of delegating authentication work to those big tech companies. Nowadays, most companies follow OAuth's standards to build the authentication workflow (OAuth always means OAuth 2.0 in this article). However, each company may have different dialects when you communicate via OAuth. This module is called :omniauthable because devise has integrated with the gem omniauth, which provides a unified interface to realize the login process via OAuth.
The root logic of :omniauthable is totally different from traditional authentication, which makes it feel like a social outcast in devise. Therefore, the steps to enable :omniauthable are pretty different. If you aren't familiar with OAuth, don't worry, it's fine to read this chapter. I'll make changes step by step.
I'll use Facebook as the OAuth provider. The main steps we're going to go through are:
- [[#Setup the Omniauth environment]]
- [[#Connect to Facebook to grant the access]]
- [[#Callback from Facebook]]
- [[#Use returned user's information to create/find the user and sign him/her in]]
Setup the Omniauth environment
Install assistance gems
Although we know devise has integrated with the gem omniauth, it just defines a unified interface without any functionalities. It will be easier if we just use other gems that implement the customized OAuth workflow for specific providers. For example, I'm going to use Facebook's OAuth login so I add the gems below in the Gemfile and do bundle install:
# Gemfile
gem 'omniauth-facebook', '~> 9.0'
gem 'omniauth-rails_csrf_protection', '~> 1.0.1'
You can find gems for other platforms by googling gems name omniauth-[Provider's name]
Database migration
:omniauthable needs 2 additional string columns:
-
provider: it stores provider's name,facebook,google, -
uid: it stores the user's unique identifier on the provider's website. For instance, you can see it as the id of your Facebook account
Execute
rails g migration AddOmniauthToUsers provider uid:index
and it will produce the migration file like below:
class AddOmniauthToUsers < ActiveRecord::Migration[7.0]
  def change
    add_column :users, :provider, :string
    add_column :users, :uid, :string
    add_index :users, :uid
  end
end
Run rails db:migrate to make the changes.
Enable modules
I assume you already have an App on Facebook for performing OAuth. If you don't know how to create an App on Facebook, you can check out their documentation: https://developers.facebook.com/docs/development/create-an-appso
You can put the corresponding App's ID and App's secret in the devise initializer.
# config/initializers/devise.rb
config.omniauth :facebook, "APP_ID", "APP_SECRET"
Anyway, I think we'd better not commit confidential information in git. I suggest using the Rails credentials to do that. First, edit the credentials YAML:
EDITOR=vim rails credentials:edit
Add credentials:
facebook:
  app_id: "APP_ID"
  app_secret: "APP_SECRET"
We can access the values via Rails.application.credentials in the initializer.
# config/initializers/devise.rb
config.omniauth :facebook, Rails.application.credentials.facebook.app_id, Rails.application.credentials.facebook.app_secret
We can enable the module now. There's a special attribute omniauth_providers to configure, too.
class User < ApplicationRecord
  devise :database_authenticatable, :registerable, :confirmable, :validatable,
         :recoverable, :rememberable, :timeoutable, :lockable, :trackable,
         :omniauthable, omniauth_providers: [:facebook]
end
Connect to Facebook to grant the access
The first step of OAuth is to tell Facebook that you, a Facebook user, agree this web application is going to access your information on Facebook. Let's add the following code:
# config/routes.rb
Rails.application.routes.draw do
  root "pages#index"
  devise_for :users, omniauth_providers: %i[facebook]
end
This will add 2 more routing endpoints:
user_facebook_omniauth_authorize GET|POST /users/auth/facebook(.:format)          devise/omniauth_callbacks#passthru
 user_facebook_omniauth_callback GET|POST /users/auth/facebook/callback(.:format) devise/omniauth_callbacks#facebook
-
/users/auth/facebookis used to redirect the user to Facebook to grant the access -
/users/auth/facebook/callbackis used to receive the callback request from Facebook with the asked information. In our case, that should be data including the user's email on Facebook.
Add a link to the /users/auth/facebook which is the user_facebook_omniauth_authorize_path. We use button_to because we want to trigger a form submission to send a POST request. We also add turbo: false to disable Turbo because we'd like to have a full-page reload
<h1>Pages#index</h1>
<% if user_signed_in? %>
  <%= link_to 'Sign out', destroy_user_session_path, data: { turbo_method: :delete } %>
<% else %>
  <%= link_to 'Sign in', new_user_session_path %>
  <%= button_to "Sign in with Facebook", user_facebook_omniauth_authorize_path, data: { turbo: :false } %>
<% end %>
Maybe it's worth mentioning that button_to is a convenient way to create a form with only a submit button. It's almost identical to this:
<%= form_with url: user_facebook_omniauth_authorize_path, data: { turbo: false } do |f| %>
  <%= f.submit "Sign in with Facebook" %>
<% end %>
Callback from Facebook
If you grant access, Facebook will send back the requested information. I didn't mention that but the URL of the path, /users/auth/facebook/callback, was embedded in the previous request. Facebook will redirect the users to that callback URL with the requested information.
If you take a look at rails routes again, you'll find that it's devise/omniauth_callbacks#facebook handling /users/auth/facebook/callback. For other modules, exporting controllers is part of the customization. However, we have to export the OmniauthController for enabling :omniauthable. Execute
rails generate devise:controllers users -c omniauth_callbacks
and make devise use of this exported controller in routes:
# config/routes.rb
Rails.application.routes.draw do
  root "pages#index"
  devise_for :users, omniauth_providers: %i[facebook], controllers: { omniauth_callbacks: 'users/omniauth_callbacks' }
end
You should add the action #facebook in the controller because it doesn't exist yet.
# app/controllers/users/omniauth_callbacks_controller.rb
class Users::OmniauthCallbacksController < Devise::OmniauthCallbacksController
  def facebook
    # you will get the requested information from Facebook here
  end
end
Use returned user's information to create/find the user and sign him/her in
We now know Facebook will return the requested information, a.k.a the user's data, to Users::OmniauthCallbacksController#facebook so we can use that information to create or find the user in the rails application. How do we do that?
It's where the omniauth gem shines. It defines a shared schema for all providers. You can check it at https://github.com/omniauth/omniauth/wiki/Auth-Hash-Schema. omniauth will put all the information in a specific header and you can access that via request.env["omniauth.auth"]. By looking up the schema page, we know this is the data schema
{
  provider: "facebook",
  uid: "uid of user's Facebook account"
  info: {
    email: "user's email"
  }
  // Other fields are ignored
}
The next step is to create or find the user based on that information in #facebook action. We can utilize User.find_or_create_by to do that and then sign in the user by sign_in_and_redirect
class Users::OmniauthCallbacksController < Devise::OmniauthCallbacksController
  def facebook
    auth = request.env["omniauth.auth"]
    @user = User.find_or_create_by(provider: auth.provider, uid: auth.uid) do |user|
      user.email = auth.info.email
      user.password = Devise.friendly_token[0, 20] # give it a random password
    end
    @user.confirm unless @user.confirmed? # add this line if :confirmable is enabled
    sign_in_and_redirect root_path, event: :authentication # :event is for warden to execute callbacks for :authentication
    set_flash_message(:notice, :success, kind: "Facebook")
  end
end
I usually see people encapsulate the logic of user creation and finding in a class method called .from_omniauth so it can be used by multiple providers in the future.
# app/models/user.rb
def self.from_omniauth(auth)
  find_or_create_by(provider: auth.provider, uid: auth.uid) do |user|
    user.email = auth.info.email
    user.password = Devise.friendly_token[0, 20] # give it a random password
  end
end
so the #facebook can be refactored into
# app/controllers/users/omniauth_callbacks_controller.rb
class Users::OmniauthCallbacksController < Devise::OmniauthCallbacksController
  def facebook
    @user = User.from_omniauth(request.env["omniauth.auth"])
    @user.confirm unless @user.confirmed? # add this line if :confirmable is enabled
    sign_in_and_redirect @user
    set_flash_message(:notice, :success, kind: "Facebook")
  end
end
Test
- Go to the root page, you'll see the new button, Sign in with Facebook

- Click the button, and you'll be redirected to Facebook granting access page. My Facebook app name is "develop only" so it says "develop only is requesting access to:"

- After granting access, you will find you have already logged in

- Open the rails console, you'll find a new user is created and
provideranduidare filled ```ruby
user = User.last
user.provider
=> 'facebook'
user.uid.present?
=> true
I only showed the general idea here. You can find more information on `devise`'s wiki page for OmniAuth: https://github.com/heartcombo/devise/wiki/OmniAuth:-Overview. You can read [OAuth RFC](https://datatracker.ietf.org/doc/html/rfc6749) if you are eager to know the details.

## Conclusion
What a journey! We made it 😭! To be honest, I didn't expect I would spend so much time on this article because I've used every module more or less in the past. I thought I was pretty familiar with `devise`. It turned out there are still many things that are different from what I imagined when starting digging deeper.

I tried to write this article as a tutorial for beginners to enable each module. Therefore, I demonstrate them step by step. In practice, you should execute the macro
```bash


rails generate devise User
and all migrations and related configurations will be there for you (except :omniauthable so I say it's an outcast😆). You can then opt-in to what you want. Whatever, I think it's still valuable if you just took over an existing project that uses devise.
Thank you for reading this article. I hope this article makes you understand more about devise and the authentication of web applications🙏. Maybe after reading this article, you may find you don't need devise at all due to its complexity. If that's true, you can read my other article, building your own authentication system in Rails.
If you think this article is helpful, you can buy me a coffee to encourage me 😉

Code Repo
https://github.com/kevinluo201/devise_modules

Top comments (2)
Wow! Thank you so much for this article, Kevin. This is just what I needed.
oh! I'm happy this helps you!