
Overview
This is the first of two part articles. In this article, I explain how you can start creating your first LINE Bot in C#. The series covers followings.
- How to register LINE bot to LINE Platform
- How to create C# solution for LINE Bot
- How to deploy to Cloud
- Natural Language Understanding
Prerequisites
- Basic understanding of C# and ASP.NET Core
- Basic usage of Visual Studio Code
- dotnet core SDK Windows/Linux/Mac
- Azure Subscription
- Azure CLI
- Node.js: For solution template and simulator.
- git
Agenda for this article
- Create LINE Bot account in LINE Developer Console. I call the registered bot as "Channel" in this article.
- Develop LINE Bot in C# and deploy to Azure Web App.
- Set the channel and test it from physical device.
- Setup simulator to implement the rest of the code.
- Deploy the completed bot to Azure.
Language Understanding and Dialog will be covered in Part 2.
What does this bot do?
You cannot create "general purpose" bot as user cannot easily figure out what it can do. As best practice, I strongly recommend to set scope for the bot so that user knows what it should do from the first place. In this article, let's imagine we develop a bot for "Contoso Burger", which takes order and deliver to your house.
Steps
Create Channel
1. To create a channel, you need to be LINE Developer. Go to LINE Developer Console and login by using your LINE account. You have to have at least one LINE Account and install LINE client to your smart phone. Follow the instruction and register yourself as a developer.
2. Create a provide if you don't have any yet or need new one. The provider can have multiple Bots. In my case.

3. To demonstrate, I click "Add new provider". Enter provider name and click "Confirm", then "Create". Avoid using name contains "LINE".

4. Once the provider created, click "Messaging API". "LINE Login" is different feature and I will write an article about login in separate article. Then enter name and description. The image is optional.

5. For Plan, select "Developer Trial". Set appropriate categories and click "Confirm". You need to enter real email address.

6. Agree on terms of use and click "Create".
7. Once created, you see the screen below. Click "Configuration not yet complete".

8. Scroll down to Channel access token section and click "Issue".

9. Click "Issue" with 0 hours. Then the issued token won't be expired.

10. Set other related settings as follows.
- Use webhooks: Enabled
- Auto-reply messages: Disabled
- Greeting messages: Disabled
11. Almost done! As we need the issued token and channel secret, keep the window open.
Solution template and simulator
There is yeoman package for LINE Bot and LINE Client simulator for LINE Developer.
Run following command to install them.
Windows
npm install -g yo
npm install -g generator-line-bot
npm install -g line-simulator
macOS
sudo npm install -g yo
sudo npm install -g generator-line-bot
sudo npm install -g line-simulator
Setup Azure Resource
I assume you already know how to use Azure Portal, so let's do it via Azure CLI this time.
1. Install Azure CLI first.
2. Then login to Azure.
az login
3. Follow the instruction to complete the login.
4. Once logon completed, select appropriate subscription if you have more than one. "list" command shows all subscription, whereas "show" command showing currently set subscription.
az account list
az account set -s 'subscription id'
az account show
5. Create a resource group first. In the following example, "contosoburgerbot" resource group is created in East US region. You can specify any name.
az group create -n contosoburgerbot -l eastus
6. Then create a storage account on the resource group. The name should be unique
globally. We store the status information in this storage. The g option is used to specify resource group.
az storage account create -n contosoburgerbotstorage -g contosoburgerbot --sku Standard_LRS
7. Once completed, run the command to get the connection string key.
az storage account show-connection-string -n contosoburgerbotstorage -g contosoburgerbot
8. Next, create WebApp. To do so, we need to create a service plan first. I specify sku as F1 which is free. Please use globally unique name for WebApp.
az appservice plan create -n contosoburgerbotplan -g contosoburgerbot --sku F1
az webapp create -n contosoburgerbot -g contosoburgerbot -p contosoburgerbotplan
9. We use git deploy, so that we need to setup username and password first. This is your subscription wide setting, so if you already set this up before, you can skip the first command. The second command enable the local git deployment to the web app you just created. Change user name and password to your own.
az webapp deployment user set --user-name kenakamu --password Pa$$w0rd
az webapp deployment source config-local-git -n contosoburgerbot -g contosoburgerbot
Note the returned address as it is remote address for git deploy.
Develop Bot in C
1. Open command prompt or terminal, and change directory to your choice. I moved to Desktop.
2. Run the following command to generate solution. While you run the command, it prompts you for Channel Secret, Token and Storage Key. You can change the bot name if you really want, but this affects all the steps below, so please use the same name this time. The specified name is used for folder name and namespaces in the generated solution.
yo line-bot contosoburgerbot --csharp --webapi
3. move to the created folder.
cd myfirstbot
Deploy the bot to Azure
1. To use git deply, initialize it first.
git init
2. Then add remote.
git remote add azure https://kenakamu@contosoburgerbot.scm.azurewebsites.net/contosoburgerbot.git
3. Open the solution in Visual Studio Code
code . --locale=en
4. Add ".gitignore" file in root, then specify the files/folders you don't want to push to remote. Don't forget to save the file.
.vscode
bin
debug
5. Then add and commit all.
git add .
git commit -m "Initial"
6. Run the following command to deploy. It will take time as this is the initial push. If you prompted, enter username and password.
git push -u azure master
Set Webhook URL
When LINE Platform receives a message from user to your bot, it redirect the request to URL which you specified in Webhook. Therefore, we set the URL to our Azure address. The template uses /api/linebot as endpoint, so the URL should look like this. Change the host name to your own.

Once you set the Webhook, use the QR code on the bottom of the page to add the bot to your own LINE Account as a friend.
Now you can play with your bot. The solution template contains sample code which reply to any types of LINE message. Try sending text, image, location, sticker, etc.
Kudu
Azure WebApps provides a tool called Kudu. You can use the tool to confirm which files are actually deployed as well as useful logs.
1. Open the browser and enter the git URL host address.
i.e.) https://contosoburgerbot.scm.azurewebsites.net
2. Click Debug console -> CMD/PowerShell.
3. Go to site -> wwwroot and you see the files.
Kudu provides many useful features. If you are interested in, please play with it.
Reply to user message.
Let's implement your own code now.
1. Open LineBotApp.cs. All the bot logic sample code is here. HandleTextAsync will be triggered when user send text message and reply to user. Replace the entire code with following.
LineBotApp.cs
using Line.Messaging;
using Line.Messaging.Webhooks;
using System;
using System.Collections.Generic;
using System.IO;
using System.Linq;
using System.Threading.Tasks;
using contosoburgerbot.CloudStorage;
using contosoburgerbot.Models;

namespace contosoburgerbot
{
    internal class LineBotApp : WebhookApplication
    {
        private LineMessagingClient messagingClient { get; }
        private TableStorage<EventSourceState> sourceState { get; }
        private BlobStorage blobStorage { get; }

        public LineBotApp(LineMessagingClient lineMessagingClient, TableStorage<EventSourceState> tableStorage, BlobStorage blobStorage)
        {
            this.messagingClient = lineMessagingClient;
            this.sourceState = tableStorage;
            this.blobStorage = blobStorage;
        }

        protected override async Task OnMessageAsync(MessageEvent ev)
        {
            switch (ev.Message.Type)
            {
                case EventMessageType.Text:
                    await HandleTextAsync(ev.ReplyToken, ((TextEventMessage)ev.Message).Text, ev.Source.UserId);
                    break;
            }
        }

        private async Task HandleTextAsync(string replyToken, string userMessage, string userId)
        {
            var replyMessage = new TextMessage($"You said: {userMessage}");
            if(userMessage.ToLower() == "hello"){
               replyMessage.Text = "Hi!!";
            }

            await messagingClient.ReplyMessageAsync(replyToken, new List<ISendMessage> { replyMessage });
        }
    }
}
2. Deploy to Azure again.
git commit -am update
git push
3. Send "hello" to your bot and you should get "Hi!!" as a reply.
Debugging using simulator.
There are several ways to debugged deployed environment, but it is not super easy nor super first. That's why we use simulator here.
1. Open Controllers/LineBotController.cs, and update the constructor to let your bot know where the simulator is.
LineBotController.cs
public LineBotController(IOptions<AppSettings> options)
{
    appsettings = options.Value;
    #if DEBUG
    lineMessagingClient = new LineMessagingClient(appsettings.LineSettings.ChannelAccessToken,
        "http://localhost:8080");
    #else
    lineMessagingClient = new LineMessagingClient(appsettings.LineSettings.ChannelAccessToken);
    #endif
}
5. Enter F5 key. Check the address of the service. By default it should run at localhost:5000. You can ignore the error message on the screen.
6. Put break point at line 39 of LineBotApp.cs.

7. Open new command prompt or terminal and run the following command to launch simulator
line-simulator
8. Open Chrome and connect to http://localhost:8080
9. You should see the connection page. Enter the values and click Connect.
- UserId can be found in the bottom of LINE Bot registration page.
- Bot API Server Address is http://localhost:5000/api/linebot
10. Enter "hello" from the chat bar, and confirm the break point hit.

11. Enter F5 key to keep debugging.

Next Step
Develop a LINE Bot in C# for Beginner Part 1 : Add intelligence to your bot

Top comments (18)
Hello Kenichiro,
If I want to split the Blob Storage out from this project, It's will be run perfectly like the past ?
I'm apologize for my stp question , I'm just a beginner of this. lol
Regards.
Yes you can delete all the dependencies of storage as it merely stores user information :)
Thanks a lot Mr.Kenichiro N.
Hi, thank you for making this tutorial, I'm a beginner, I follow the tutorial, but I get an error.
System.FormatException: No valid combination of account information found.
Did I miss anything?
Could you let me know where exactly you see the error?
Sure
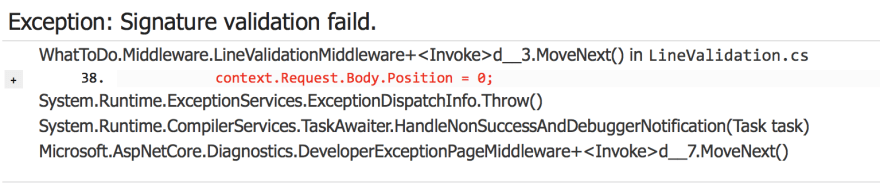
First when I run the project and I get this error message on web site, I think this is what you want me to ignore.
And when I user simulator to send message, there is no reply but I get error message on terminal
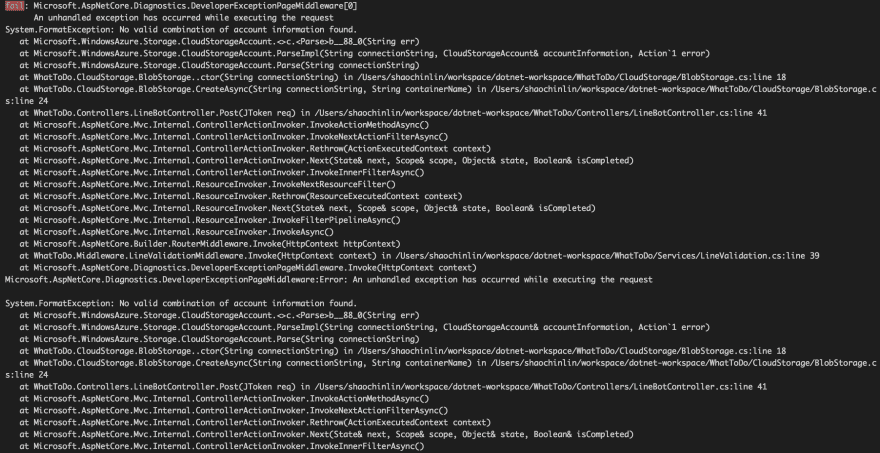
Btw, the StorageConnectionString I use my cosmo DB connect string.
Thanks
It's for Azure Storage, not CosmosDB. Please provision Storage Account and give the bot storage connection.
It works now, thanks.
Mr.Kenichiro, Do you have a topic about LIFF ?
I can write a post but what kind of topic you are interested in?
Just a sample of LIFF with C# MVC to guided the beginner like me.
Best Regards.
dev.to/kenakamu/use-line-front-end...
MVC or not doesn't matter much as its HTML/Javascript
Solution template and simulator
Where is this option, where I have to do this.
Okay I get it.
Sorry for delay. I wrote blog articles regarding to this. But now i have new simulator and I will write a blog about it soon.
Hi, i am still beginner
and I want to create a .NET application (ex. console application) that send messages to LINE Group.
What do i need to do the job?
Regards
Hi @kusumy !
If you are talking about BOT (Line Messaging API), I recommend you to grab C# SDK for Messaging API and write console app, but the thing is you need to know the "group id" where the bot resides. Therefore you still need to create a web api to receive bot message to garb those group id. What is your plan exactly?
Some comments may only be visible to logged-in visitors. Sign in to view all comments.