
This post was originally published on the Codeship Blog and is posted here with the author's permission.
In the first part of this series, I walked through developing a simple todo API using NodeJS, Express, and PostgreSQL using Docker Compose. In this post, I will cover creating a CI/CD pipeline using Codeship Pro.
Requirements for This Tutorial
This tutorial requires you to have a few items before you can get started:
- Install Docker Community Edition
- Install Docker Compose
- Download Todo App Example - Dockerized branch from our Codeship Library
- Codeship account
- Codeship Jet CLI
- Heroku account
- GitHub, Bitbucket, or GitLab account
- You have read Part 1: Using Docker Compose for NodeJS Developmment
In our example, we are deploying our code directly into Heroku without Docker. While we will be using Docker locally and in CI/CD, Codeship Pro allows us to deploy Docker apps to production even when production is not using Docker, such as classic Heroku. The deployment in this case can be exchanged with any other server, image repository, or Docker host.
Essentially, you can modify this example to suit your needs, by using any Docker image that does what you need, eg, deploy to AWS. Our documentation has examples that you can review.
Once you have everything set up, you can move on to the next section.
Testing NodeJS Apps with Codeship
Continuous integration is defined as follows:
In software engineering, continuous integration (CI) is the practice of merging all developer working copies to a shared mainline (like a master branch) several times a day.
We want to automate all of this with Codeship so every pushed commit will be built and tested prior to allowing a merge. Let’s set up the necessary files and test our pipeline locally.
Codeship services file
The first file we need to create is the Codeship services definition file. This will instruct Codeship as to the services we need during the build.
/> touch codeship-services.yml
The codeship-services.yml syntax is directly influenced by Docker Compose syntax, and the docker-compose.yml file created in the last post gets us most of the way there. Open the codeship-services.yml in your editor, copy the following code, and paste there.
web:
  build: .
  links:
    - postgres
  environment:
    DATABASE_URL: postgres://todoapp@postgres/todos
  cache: true
postgres:
  image: postgres:9.6.2-alpine
  environment:
    POSTGRES_USER: todoapp
    POSTGRES_DB: todos
The differences from the original docker-compose.yml file to define the codeship-services.yml file are quite minimal here. Next we can define the actual steps to run during the build and automated tests.
Codeship steps file
The next file to create is the codeship-steps.yml file, which will tell Codeship what steps to run and in what order. You can learn more about the codeship-steps.yml file in our documentation. Go ahead and create the new steps file and open it up in your editor.
/> touch codeship-steps.yml
Each step defined in the codeship-steps.yml file is based on what you define as your pipeline. This example starts with a lint test and integration test, and eventually will deploy the code as well. Your pipeline can be completely customized to suit your specific needs.
- type: parallel
  steps:
  - name: lint
    service: web
    command: npm run lint
  - name: tests
    service: web
    command: npm test -- --forceExit
The steps here run in parallel: lint and tests. Running our tests simultaneously works great here, because if either of these tests fail, the build will fail, and saves us some time overall. You can find more information on Codeship Pro step types here.
Bin scripts
Now that things are more automated, we end up introducing a small race case that we can easily get around with some simple scripts. As the project is built, the integration tests require that Postgres is running to perform the migrations. We can't guarantee that will happen with the codeship-services.yml file alone. One approach is to check that the database is available before starting the migration.
/> mkdir bin && touch bin/{wait-for-postgres,ci}
/> chmod +x bin/**
wait-for postgres
The contents of the wait-for-postgres script are the following:
#!/bin/sh
# wait-for-postgres
set -e

TIMEOUT=60
COUNT=0

until pg_isready -h "postgres" -p "5432" || [ $COUNT -eq $TIMEOUT ];
do
  echo $COUNT
  echo $TIMEOUT
  sleep 1
  COUNT=$((COUNT+1))
done
I am relying on the pg_isready function to check for the readiness of the postgres database. If it isn't ready, we sleep for a second and try again. We need to make a small change to the Dockerfile to add the pg_isready function.
RUN apk update && apk add postgresql
The function times out after 60 seconds, but you can tweak that if you see it taking longer. It typically takes only a few seconds to connect.
ci
The ci script is as follows:
#!/bin/sh
set -e

bin/wait-for-postgres
time npm run migrate

time $1
Not too much heavy lifting here. This script runs the wait-for-postgres script to finish up, then it will perform the migration, and the last line takes the first parameter and will run that. This allows me to change a line in codeship-steps.yml to run this script first.
- name: tests
  service: web
  command: bin/ci "npm test -- --forceExit" # you only need to change the command here
Local testing with Codeship Jet CLI
We are able to test our setup locally using Codeship Jet CLI. If you haven’t done it yet, check out our Getting Started with Codeship Jet CLI documentation. Codeship Jet CLI will run through the steps file just as it would on Codeship. This is a quick way to catch errors early before committing and pushing to your repository.
/> jet steps
## build stuff, run tests ##
{StepFinished=step_name:"tests" type:STEP_FINISHED_TYPE_SUCCESS}
If you see the final result above, you have set everything up correctly. If you receive instead type:STEP_FINISHED_TYPE_ERROR, something didn't go right and you should check some things. Codeship Jet CLI will produce a log that you can review to try to locate the problem. Having the ability to catch any errors prior to pushing to your repository makes this a particularly powerful tool in the Codeship arsenal.
The finished version of this project is also available on GitHub, in case you get stuck and want to skip ahead.
Setting Up Your Codeship Pro Project
The next phase is to set up the Codeship project, so that new pushes into your repository will kick off the build. In this step, we will make sure you have a repository set up, create the project, and push a build.
Source code management setup
Log into your GitHub, Bitbucket, or GitLab account and create a new repo there that you have admin access to. Grab the clone URL and switch to the Codeship application.
Create project
When your repo is ready to go, you can now set up the Codeship project.
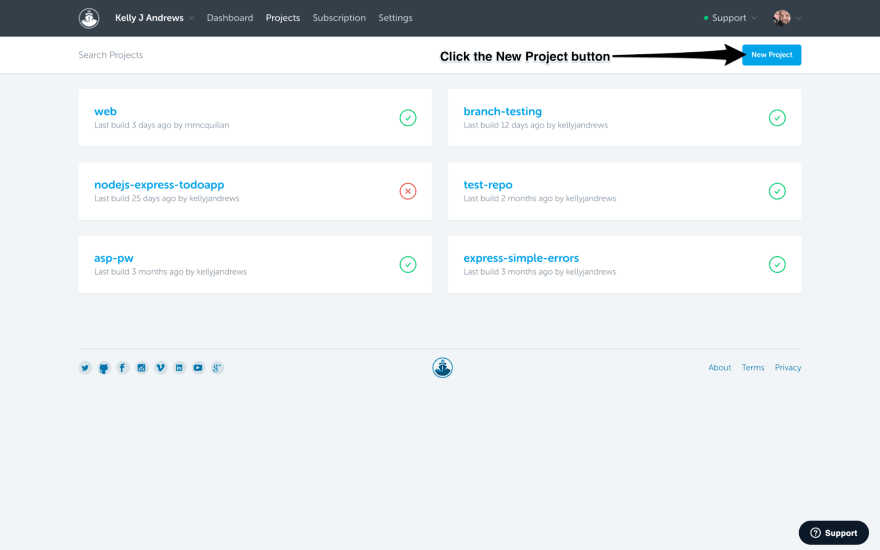
- Navigate to Projects, then click the "New Project" button.
- Connect your SCM by selecting the source code management (SCM) tool you set up in the previous step.

If you originally signed up with an SCM different than above, we will connect to the service during this step.
- Choose your repository by copy/pasting the Repository Clone URL link from the previous step. Click the Connect button.


- Configure your project by clicking the "Select Pro Project" button.

Your project is set up at this time, and any code committed and pushed to the repository will now run builds automatically.
Push your first build
Let's run a build now. In your command line, or using your favorite git tool, make sure the repo is initialized, connect the remote, add the files, commit, and push.
/> git init
/> git remote add origin <<YOUR_REPOSITORY_CLONE_URL>>
/> git add .
/> git commit -am "initial build"
/> git push -u origin master
If you head back to Codeship and click into your project, you should see the build running. Make sure at this point you get a green build. Otherwise you may need to go back and check some things:
- Make sure you have added all of your files to your repo.
- Review your
codeship-services.ymlandcodeship-steps.ymlfiles. - Run
Codeship Jet CLIlocally to double-check it works locally.
Once you have the CI working, you can move on to the deployment section, where we will automatically deploy our code to Heroku.
Continuous Deployment to Heroku with Codeship Pro
So far, we have the integration steps running, and every new commit will run tests to make sure that the code is ready to merge.
When the branch is master, however, we want to run another step to actually deploy the application when the tests are passing.
Creating the Heroku app
You can create an application using the Heroku UI, which is the simplest way to get started. If you are familiar with the Heroku CLI, you can also perform these steps using that as well. Once you have the application created, there are a some steps to get everything Codeship needs for the deployment.
Heroku PostgreSQL add-on
These steps will set up the Heroku PostgreSQL add-on for your app to use as its database when deployed.
- Click Resources.
- Under Add-ons, search for
postgres. - In the results dropdown, click Heroku Postgres.
- Leave the selection as Hobby Dev - Free, then click Provision.
Get your Heroku API key
- Click on your avatar in the upper right, then click Account Settings.
- Near the bottom of the settings page, you will find an API key. Click Reveal.
- Copy the API key.
Set this up in a deployment.env file with your terminal:
/> echo "HEROKU_API_KEY=YOUR_API_KEY_HERE" > deployment.env
Create the Heroku procfile
This is a simple one-liner, but it’s required for Heroku to run the application:
/> echo "web npm start" > Procfile
Encrypting with Codeship Jet CLI
Since we have some sensitive keys that we will need to use, Codeship Jet CLI provides some encryption tools to secure your keys. In this instance, it’s an environment variable needed for the deployment, however you can encrypt all of your secrets. For more information, you can read the Codeship documentation on Encrypting Environment Variables.
In the Codeship UI, follow these steps:
- Click Projects, then the project you are currently working in.
- Click Settings, then click General.
- Locate and copy the
AES Key.
In your terminal, include:
/> echo "YOUR_AES_KEY" > codeship.aes
NOTE: Make sure that both
codeship.aesanddeployment.envare ignored in your.gitignorefile. Since they contain sensitive data, you don't want these to be pushed into your repository.
All that's left to do is encrypt the deployment.env file. We do this using Codeship Jet CLI.
/> jet encrypt deployment.env deployment.env.encrypted
The deployment.env.encrypted will then be included in your repository and decrypted in Codeship.
Adding the Heroku deployment service
In Codeship Pro, we are able to create any service we need using Docker. What this means to you is that if it runs on Docker, it runs on Codeship. In this example, we are using a service that Codeship provides specifically for Heroku deployment. Let's add the service to the end of our codeship-services.yml file.
web:
  build: .
  links:
    - postgres
  environment:
    DATABASE_URL: "postgres://todoapp@postgres/todos"
  cached: true
postgres:
  image: postgres:9.6.2-alpine
  environment:
    POSTGRES_USER: todoapp
    POSTGRES_DB: todos
deploy: # added this service
  image: codeship/heroku-deployment
  encrypted_env_file: deployment.env.encrypted
  volumes:
    - ./:/deploy
Note that we add the encrypted_env_file here. This instructs Codeship as to which file to use to find the Heroku API key used inside the container.
Adding the deployment step
The only step left is to tell Codeship when to use the deploy service. Open up the codeship-steps.yml file and add the following:
- type: parallel
  steps:
  - name: lint
    service: web
    command: npm run lint
  - name: tests
    service: web
    command: bin/ci "npm test -- --forceExit"
- name: deploy # added this step
  tag: master
  service: deploy
  command: codeship_heroku deploy /deploy nodejs-express-todoapp
What this codeship-steps.yml file indicates now is that if the branch, listed as tag, is equal to master, it will run the deploy service. If we push to any other branch, everything will run except the deployment. You can read more about the tag and exclude attributes and limiting steps in Codeship Pro.
The image codeship/heroku-deployment has the command codeship_heroku deploy, which accepts two parameters: the path of the files and the name of the Heroku app. In this case, these are /deploy and nodejs-express-todoapp. As long as all tests pass and the branch is master, our code will be deployed to Heroku.
The codeship/heroku-deployment image is running several commands to test for proper access to the application, tarball the code, and deploy to Heroku with their API. Just to reiterate, this can be anything you need it to be, eg, deployment to AWS. If it runs in a Docker container, Codeship Pro can run it.
Starting the build on Codeship Pro
Now we can push these changes into our SCM and let Codeship take it from here.
Make sure you have added your
codeship.aesanddeployment.envfiles to.gitignore. You want to ignore these files so you are not publicly exposing secrets in your repository. Do that now if you haven't already.
/> git add .
/> git commit -am "adding deployment"
/> git push
Head over to your Codeship Pro project and watch your build and deployment from the dashboard.
Conclusion
The two posts in this series cover quite a bit. Initially, we are tasked with testing and deploying our application manually. This process is not only tedious, it takes up someone’s time and is error prone. The first post covered setting up our local development and testing workflow using Docker Compose. In this post, we then used Codeship Pro and Jet CLI to automate our steps even further. Now we are able to push a new commit to master, which then runs our tests and deploys to Heroku all through Codeship Pro.
Here are some of the resources for you from the two posts:
Docker
Docker Images Used
Codeship Pro
- Codeship Pro Documentation
- Codeship Jet CLI Docs
- Encrypting Environment Variables
- Codeship Steps Docs
- Codeship Services Docs
Article Resources
- Using Docker Compose for NodeJS Development
- NodeJS Express Todo App Repo
- Alpine Based Docker Images Make a Difference in Real World Apps

Top comments (0)