
Kubernetes
Kubernetes is a portable, extensible, open-source platform for managing containerized workloads and services, that facilitates both declarative configuration and automation. It has a large, rapidly growing ecosystem. Kubernetes services, support, and tools are widely available.
The name Kubernetes originates from Greek, meaning helmsman or pilot. Google open-sourced the Kubernetes project in 2014. Kubernetes combines over 15 years of Google’s experience running production workloads at scale with best-of-breed ideas and practices from the community.
Steps for Installing Kubernetes on CentOS
We will be creating a cluster of 3 machines,
One master node
Two worker nodes
Perform the following steps on Master:
-
SETTING UP KUBERNETES REPOSITORY
Create a file named kube.repo or file_name.repo inside the directory structure i.e. /etc/yum.repos.d/kube.repo.
Note: The filen_name doesn’t matter but the extension must be repo mandatorily.
[kubernetes]
name=Kubernetes
baseurl=https://packages.cloud.google.com/yum/repos/kubernetes-el7-x86_64
enabled=1
gpgcheck=1
repo_gpgcheck=1
gpgkey=https://packages.cloud.google.com/yum/doc/yum-key.gpg https://packages.cloud.google.com/yum/doc/rpm-package-key.gpg
-
DISABLING SELINUX
To do this, you will first need to turn it off directly
[root@master ~]# setenforce 0

[root@master~]# sed -i --follow-symlinks 's/SELINUX=enforcing/SELINUX=disabled/g' /etc/sysconfig/selinux
-
SWITCH OFF SWAP
Comment out the reference to swap in /etc/fstab. Start by editing the file:
[root@master ~]# swapoff -a

[root@master ~]# vi /etc/fstab
Then comment out the appropriate line, as in:
# /etc/fstab: static file system information.
# Use 'blkid' to print the universally unique identifier for a
# device; this may be used with UUID= as a more robust way to name devices
# that works even if disks are added and removed. See fstab(5).
# <file system> <mount point>   <type>  <options>    <dump>  <pass>
# / was on /dev/sda1 during installation
UUID=1d343a19-bd75-47a6-899d-7c8bc93e28ff /            ext4 errors=remount-ro 0    1
# swap was on /dev/sda5 during installation
#UUID=d0200036-b211-4e6e-a194-ac2e51dfb27d none         swap sw           0    0
-
ENTERING 1 INTO IPTABLES
Now we will configure iptables to receive bridged network traffic. First edit the sysctl.conf file:
[root@master ~]# vi /etc/sysctl.conf
And add these lines at the end of the file
net/bridge/bridge-nf-call-ip6tables = 1
net/bridge/bridge-nf-call-iptables = 1
net/bridge/bridge-nf-call-arptables = 1
OR
Run these 2 simple commands:
[root@master ~]# echo '1' > /proc/sys/net/bridge/bridge-nf-call-iptables

[root@master ~]# echo '1' > /proc/sys/net/bridge/bridge-nf-call-ip6tables
-
INSTALLING DOCKER AND KUBEADM
Once the package repositories are configured, run the given command to install kubeadm and docker packages.
[root@master ~]# yum install kubeadm docker -y
-
STARTING AND ENABLING DOCKER AND KUBELET SERVICE
Start and enable kubectl and docker service:
[root@master ~]# systemctl restart docker && systemctl enable docker

[root@master ~]# systemctl restart kubelet && systemctl enable kubelet -
KUBEADM INITIALIZATION
Run the given command to initialize and setup kubernetes master.
[root@master ~]# kubeadm init
Output:
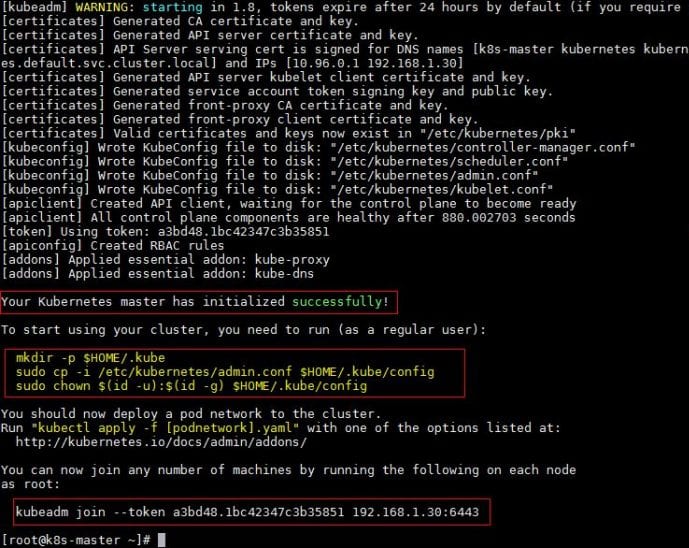
Note: Take note of the following lines that are inside the red block. You have to execute these three commands on your master.
[root@master ~]# mkdir -p $HOME/.kube

[root@master ~]# cp -i /etc/kubernetes/admin.conf $HOME/.kube/config

[root@master ~]# chown $(id -u):$(id -g) $HOME/.kube/config
-
DEPLOY POD NETWORK TO THE CLUSTER
[root@master ~]# kubectl get nodesThis will show the master as not ready. To make the cluster status ready and kube-dns status running, deploy the pod network so that containers of different hosts can communicate with each other. POD network is an overlay network between the worker nodes.
Run the given commands to deploy the network.
[root@master ~]# export kubever=$(kubectl version | base64 | tr -d '\n')

[root@master ~]# kubectl apply -f

"https://cloud.weave.works/k8s/net?k8s-version=$kubever"
serviceaccount "weave-net" created
clusterrole "weave-net" created
clusterrolebinding "weave-net" created
daemonset "weave-net" created
Now again execute the same command:
[root@master ~]# kubectl get nodes
This time you will see the master is Ready.
[root@master ~]# kubectl get nodes
NAME           STATUS    AGE       VERSION
master                  Ready     2h        v1.7.5
Now let’s add worker nodes to the Kubernetes master nodes.
Perform the following steps on each worker node:
-
DISABLE SELINUX
Before disabling SELinux set the hostname on both the nodes as ‘worker-node1’ and ‘worker-node2’ respectively for understanding purposes.
[root@worker-node1 ~]# setenforce 0

[root@worker-node1 ~]# sed -i --follow-symlinks 's/SELINUX=enforcing/SELINUX=disabled/g' /etc/sysconfig/selinux
-
CONFIGURE KUBERNETES REPOSITORIES ON BOTH THE WORKER NODES
Create a file named kube.repo or file_name.repo inside the directory structure i.e. /etc/yum.repos.d/kube.repo.
Note: The filen_name doesn’t matter but the extension must be repo mandatorily.
[kubernetes]
name=Kubernetes
baseurl=https://packages.cloud.google.com/yum/repos/kubernetes-el7-x86_64
enabled=1
gpgcheck=1
repo_gpgcheck=1
gpgkey=https://packages.cloud.google.com/yum/doc/yum-key.gpg https://packages.cloud.google.com/yum/doc/rpm-package-key.gpg
-
SWITCH OFF SWAP
Comment out the reference to swap in /etc/fstab. Start by editing the file:
[root@worker-node1 ~]# swapoff -a

[root@worker-node1 ~]# vi /etc/fstab
Then comment out the appropriate line, as in:
# /etc/fstab: static file system information.
# Use 'blkid' to print the universally unique identifier for a
# device; this may be used with UUID= as a more robust way to name devices
# that works even if disks are added and removed. See fstab(5).
# <file system> <mount point>   <type>  <options>    <dump>  <pass>
# / was on /dev/sda1 during installation
UUID=1d343a19-bd75-47a6-899d-7c8bc93e28ff /            ext4 errors=remount-ro 0    1
# swap was on /dev/sda5 during installation
#UUID=d0200036-b211-4e6e-a194-ac2e51dfb27d none         swap sw           0    0
-
ENTERING 1 INTO IPTABLES
Now we will configure iptables to receive bridged network traffic. First edit the sysctl.conf file:
[root@worker-node1 ~]# vi /etc/sysctl.conf
And add these lines at the end of the file
net/bridge/bridge-nf-call-ip6tables = 1
net/bridge/bridge-nf-call-iptables = 1
net/bridge/bridge-nf-call-arptables = 1
OR
Run these 2 simple commands:
[root@worker-node1 ~]# echo '1' > /proc/sys/net/bridge/bridge-nf-call-iptables

[root@worker-node1 ~]# echo '1' > /proc/sys/net/bridge/bridge-nf-call-ip6tables
-
INSTALLING DOCKER AND KUBEADM ON BOTH WORKER NODES
Once the package repositories are configured, run the given command to install kubeadm and docker packages.
[root@worker-node1 ~]# yum install kubeadm docker -y
-
STARTING AND ENABLING DOCKER AND KUBELET SERVICE
Start and enable kubectl and docker service:
[root@worker-node1 ~]# systemctl restart docker && systemctl enable docker

[root@worker-node1 ~]# systemctl restart kubelet && systemctl enable kubelet
-
NOW JOIN WORKER NODES TO MASTER
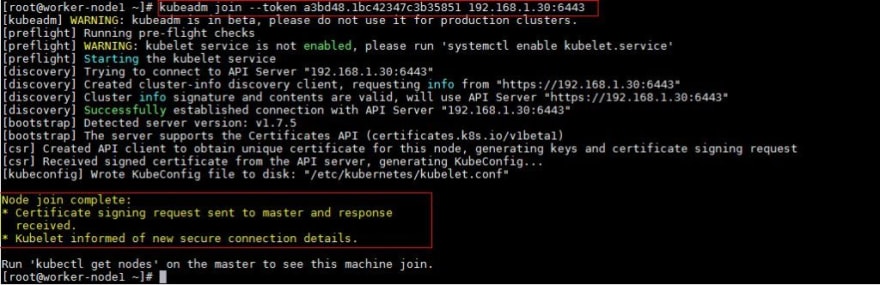
To join worker nodes to Master node, a token is required. Whenever kubernetes master is initialized then in the output we get the required commands and token.
Copy that command and run on both nodes: (We've noted the commands while installing Kubernetes on Master)
[root@worker-node1 ~]# kubeadm join --token a3bd48.1bc42347c3b35851 192.168.1.30:6443
Output of above command would be something like below
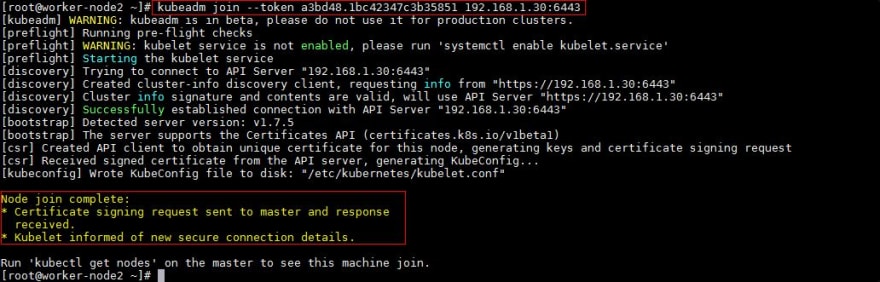
[root@worker-node2 ~]# kubeadm join --token a3bd48.1bc42347c3b35851 192.168.1.30:6443
Output
- Now verify status of Nodes from Master node using kubectl command
[root@master ~]# kubectl get nodes
NAME           STATUS    AGE       VERSION
master         Ready     2h        v1.7.5
worker-node1   Ready     20m       v1.7.5
worker-node2   Ready     18m       v1.7.5
As we can see master and worker nodes are in ready status. This concludes that kubernetes has been installed successfully and also we have successfully joined two worker nodes. Thus we say our Kubernetes Cluster is Ready! Now we can create pods and services.
Do comment and let me know if I've missed any step or if any modifications are needed. Pointers are always welcomed!;)

Top comments (0)