
Introduction✍️
Before moving forward directly to our main topics let's recall the sub-topics which is crucial for the next ones. So that you can grasp the context in a much more clear way.
Every other Relationship👀
First, let's talk about every relationship which we have to keep in mind forever from now onward.
POD -> CONTAINER -> NODE -> CLUSTER

Are you thinking of the same as what I am thinking?
Dabbe pe dabba, uske upper phir se ek dabba...🤪
No?? Ok ok! Forgive me:)
(translation: don't mind it, please. Thank you!)
So basically you got the idea of how pods are encapsulated into the containers which are placed inside the node and the group of nodes becomes a cluster.
And we have already covered their workings in the previous articles.
Pre-requisites👉
So a must-have pre-requisite topic is ReplicaSets.
Now be serious guys and let's start the conversation on replicaset aka rs
ReplicaSets🗂️
Continuing the imagination from the previous blog of your application deployment...
You have your application running into a pod. Now suddenly your application traffic grows and you didn't prepare your app for this huge number and due to this it crashes.
Or imagine another scenario where you have to update your app version from 1.0 to 2.0 ie v1 to v2 and in doing so your app stops running and the users fail to access the application.
In case of application failure, you need another instance of your application that saves you from crashes and running at the same time. So that the users cannot lose access to the application.
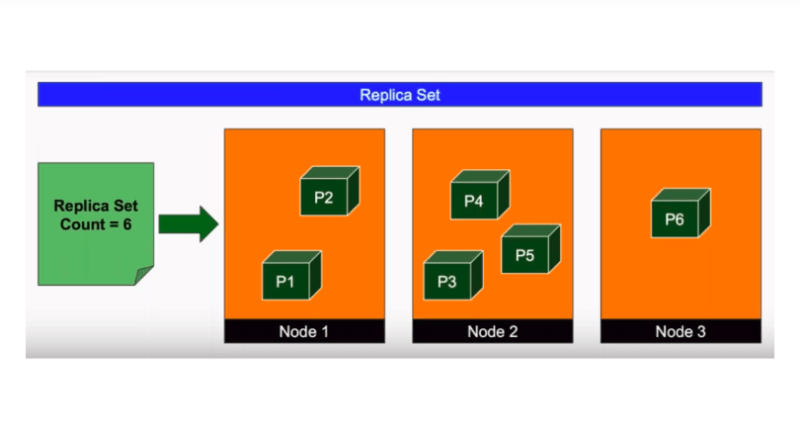
This is where the replication controller (now as replicaset the upgradation version) comes in as a savior. ReplicaSets always takes care of running multiple instances of a single pod running in the k8s cluster.
It helps us to automatically bring up the new pod when the existing ones fail to run.
You can set it to either one or hundreds, it's totally up to your choice.
It also helps us to balance the load in our k8s clusters. It maintains the load balance when the demand increases by creating instances of the pod in other clusters too.
So, it helps us to scale our application when the demand increases.
A simple Replica Yaml file:
---
apiVersion: apps/v1
kind: ReplicaSet
metadata:
  name: replicaset-demo
spec:
  replicas: 2
  selector:
    matchLabels:
      tier: nginx
  template:
    metadata:
      labels:
        tier: nginx
    spec:
      containers:
      - name: nginx
        image: nginx
Then run:
kubectl create -f /root/replicaset-demo.yaml
To scale up or down your replicas, you can use kubectl scale command.
run:
kubectl scale rs replicaset-demo --replicas=5
To check the replicasets use get command:
kubectl get rs
This will show you all the previous and newly created replicas by you in the system.
This is how you can create replicas of your pods.
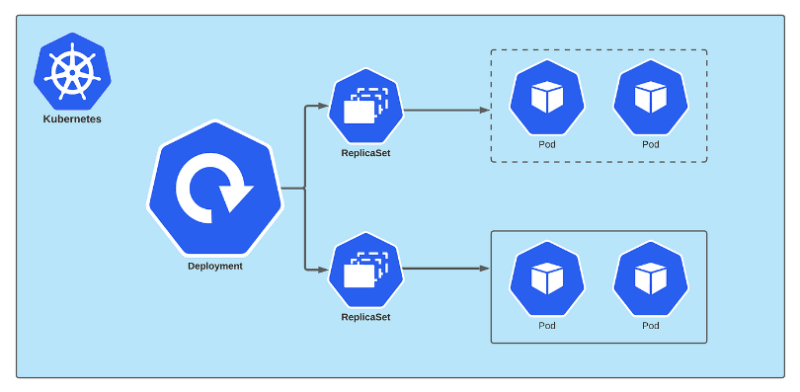
Deployments🏗️
This comes to the highest in the hierarchy level of deploying our applications to production.
When you have many instances running into the k8s cluster and want to update the version of your application then the rolling updates do their job one after the other instead of making it down at the same time and then up altogether for obvious reasons.
These rolling updates and rollback performance is done by the k8s deployment.
As we know that every pod deploys single instances of our application and each container is encapsulated in the pod and then such pods are deployed using replica sets.
Then comes Deployment with all the capabilities of doing upgradation of the whole set of environment production.
A simple deploymentyaml file deployment-definition-httpd.yaml:
---
apiVersion: apps/v1
kind: Deployment
metadata:
  name: httpd-frontend
spec:
  replicas: 3
  selector:
    matchLabels:
      name: httpd-frontend
  template:
    metadata:
      labels:
        name: httpd-frontend
    spec:
      containers:
      - name: httpd-frontend
        image: httpd:2.4-alpine
Then run
kubectl create -f deployment-definition-httpd.yaml
To check the deployments you have created use get command, deployment aka deploy :
kubectl get deploy
You can also check for the specific one by giving its name:
kubectl get deploy httpd-frontend
To get more detailed information regarding the deployment, run the describe command:
kubectl describe deploy httpd-frontend
To check all the workloads you have created till now, use get all commands:
kubectl get all

This is how you can deploy your pods.
StatefulSets🏗️📑
Some topics will repeat themselves but for the sake of connecting them to the next one, it is necessary to do so. So bear with me.
The use of Deployment is to deploy all the pods together to make sure every pod is up and running, all these things we have seen above.
But what if you have many servers in the form of pods that you want it to run in order? For this, deployment will not help you because there is no order specified in it for running pods in the k8s cluster.
For that, you need StatefulSet. It ensures to run the pods in the sequential order which you want to run. First, the pod is deployed and it must be in a running state then only the second one will be deployed.
Stateful set is similar to deployment sets, they create pods based on the templates.
They can scale
upand scaledownas per the requirements. And can perform rolling updates and rollbacks.Like, you want to deploy the
master-nodefirst then theworker-node-1up completely then starts running and after thatworker-node-2will be up and run itself into the k8s cluster. StatefulSet can help you to achieve this.As in the deployment sets, when a pod goes down and a new pod comes up, it is with a different pod name and different IPs come in.
But in StatefulSets when a pod goes down and a new pod comes up, it will be the same name that you have specifically defined for that pod.
So the StateulSets maintain an identity for each of its pods that helps to maintain the order of the deployment of your pods.
If you want to use StatefulSets just for the sake of identity purposes for the pods and not for the sequential deploying order then you can manually remove the commands of the order maintenance, just you have to make some changes in the YAML file.
Though It is not necessary for you to use this StatefulSet. As it totally depends on your need for the application. If you have servers that require an order to run or you need a stable naming convention for your pods. Then this is the right choice to use.
You can create a StatefulSet yaml file just like the deployment file with some changes like the main one is
kindas StatefulSet. Take a look:
---
apiVersion: apps/v1
kind: StatefulSet
metadata:
  name: mysql
  labels:
        app: msql
spec:
  template:
    metadata:
      labels:
        app: mysql
    spec:
      containers:
      - name: mysql
        image: mysql
  replicas: 3
  selector:
      matchLabels:
          app: mysql
  serviceName: mysql-h
than run:
kubectl create -f statefulset-definition.yml
To scale up or down use the scale command with the numbers you wanted to scale:
kubectl scale statefulset mysql --replicas=5
This is how you can work with StatefulSets.
DaemonSets🤖
Till now, we have deployed the replicasets as per the demand so the required number of pods is always up and running.
Daemon sets are like replica sets. It helps you to deploy multiple instances of the pod.
So what's the difference?
It runs one copy of your pod on each node of your cluster.
Whenever you add a new node, it makes sure that a replica of the pod is automatically added to that node. And removed automatically when the node is removed.
The main difference is, the daemon sets make sure that one copy of the pod is always present in all the nodes in the k8s cluster. On the other hand replica set runs a specified number of replicas of the pod which you defined in the YAML file.
It is also used to deploy the monitoring agent in the form of a pod.
Creating a daemon file is much similar to the replica file which we have already created above. You just have to make some changes and you are done.
The main difference is of course the kind ie ReplicaSet to DaemonSet
Take a look fluentd.yaml is the name of the file with the content below:
---
apiVersion: apps/v1
kind: DaemonSet
metadata:
  labels:
    app: elasticsearch
  name: elasticsearch
  namespace: kube-system
spec:
  selector:
    matchLabels:
      app: elasticsearch
  template:
    metadata:
      labels:
        app: elasticsearch
    spec:
      containers:
      - image: registry.k8s.io/fluentd-elasticsearch:1.20
        name: fluentd-elasticsearch
Then run the following command:
kubectl apply -f fluentd.yaml
To get the daemonstate with all the namespace which you have created, run:
kubectl get daemonsets --all-namespaces

This is how you can create DemonSets
JOBS🧑💻
As we all know, Kubernetes ensures that our application is always up and running no matter what.
Let's say we perform work in our application and when it successfully completed it shows the successful message and then again comes in a running state because that's the nature of k8s.
Jobs in k8s does the work in your application and when it becomes successful it shows the completed message and then stops the work as it is no longer in use.
But why do we need JOBS?
Let's assume you are using your camera and clicked some pictures. So this enabling of camera work is going on in your application, k8s is running your app in the pod and after use, you disabled your camera. But k8s again starts running it as it always looks up for the application up and running. And you are unaware of this pod running.
Then isn't it a dangerous task?
That's why we need JOBS so that in a specific work when the task is completed it does not go into a running state again.
So a task you may not want to run continuously, then using a Job would be appropriate. Once the task is complete, the Job can be terminated, and the pod will not start again unless a new Job is created.
It is done so because a spec member ie restartPolicy is set as always by default.
So in the creation of the JOBS yaml file, we set it to never
Run the command to create a job definition file.
kubectl create job throw-dice-job --image=kodekloud/throw-dice --dry-run=client -o yaml > throw-dice-job.yaml
Use the following YAML file to create the job:
apiVersion: batch/v1
kind: Job
metadata:
  name: throw-dice-job
spec:
  backoffLimit: 15 # This is so the job does not quit before it succeeds.
  template:
    spec:
      containers:
      - name: throw-dice
        image: kodekloud/throw-dice
      restartPolicy: Never
In the above file, we have created a JOB to throw the dice until it gets six and the chances offered is 15 times to play.
kubectl apply -f throw-dice-job.yaml
This is how you can create your own job file.
CronJob🥸
A CronJob is a JOB that will perform the task on a given time period.
You can schedule your job to do a task at a specific time you want.
It supports complex scheduling, with the ability to specify the minute, hour, day of the month, month, and day of the week.
It can be used to create one-off Jobs or Jobs that run multiple times.
It can be used to run parallel processing tasks by specifying the number of pods to be created.
Example,
Updating the phone at midnight to avoid interruptions while using the phone.🤳
Email scheduling, you schedule an email using cronjob to perform this task. periodically.🧑💻
Let us now schedule a job to run at 21:30 hours every day.
Create a CronJob for this.
Use the following YAML file:
apiVersion: batch/v1
kind: CronJob
metadata:
  name: throw-dice-cron-job
spec:
  schedule: "30 21 * * *"
  jobTemplate:
    spec:
      completions: 3
      parallelism: 3
      backoffLimit: 25 # This is so the job does not quit before it succeeds.
      template:
        spec:
          containers:
          - name: throw-dice
            image: kodekloud/throw-dice
          restartPolicy: Never
This is how you can use the CronJob file.
Every example I have given above is just for the sake of explanation. Don't take that seriously.
Now we have deployed every workload of the Kubernetes cluster. It takes practice to make hands-free in creating replicas, deployments, jobs etc. So do the practice.
Thank you!🖤

Top comments (0)