
If you can understand the path from brewing beer in your kitchen to starting your very own microbrewery, then you can understand the basics of web servers.
When I got started with learning web development, I first learned how to use HTML, CSS and JavaScript on the front-end. After that, I was ready to learn node.js and write my first server-side code. Unfortunately, I had absolutely 0 understanding of how a web server worked with a browser to display a website to visitors.
I could not understand how I was running a server from my laptop. My laptop is a personal computer. How could it also be a test web server? So, I bumbled along as I tried to understand what IP addresses, ports and HTTP requests were.
So here is an analogy I used to help understand the different parts.
Localhost, which you use to test out your first web app, is kind of like brewing beer in your house as you test out different recipes. You can brew the beer, bottle it, refrigerate it and distribute it from your house, technically. But it is not meant for scaling to thousands of gallons of beer- it is just a testing environment.
When you want to take everything to the next level, you need to rent space in a warehouse and prepare to deliver thousands of bottles of beer. Every part of the system needs to be prepared for this effort. You need a real bottling line, a big vat for brewing, someone to take orders, and a large truck for distribution. It is the same general function- brewing your beer- but ready for thousands of customers.

Understanding Localhost
Before you put your site live in production, you need to be able to test it locally and ensure all the parts will work together. This is kind of like testing your brewing setup at your house. You might only test the beer yourself, or invite a few friends over to test it as well. You mainly want to see if the final product tastes good. After that, you can figure out how to scale up the operation. Because if you can’t get the recipe right, there is no point in scaling up!
First, let’s understand all the parts of brewing beer at your house.

- You need the right ingredients in the right combination to complete your recipe
- You need to buy equipment that will fit in your house
- You need a truck to carry all of it
- You need bottles to store your beer in a fridge
At the same time, you like to brew three different types of beer
- A stout
- A light beer
- An IPA
Each recipe requires a different setup and ingredients. Hoppy beers require different temperatures and mixes of hops and malt compared to dark beers, for example. This will be important in a moment.
When you are using localhost, everything is local to your laptop or desktop computer. The client-side requests are local, and the server-side code that determines the response is local as well. (If you need a refresh on requests and responses, check out my guide here.)
So let’s go through a scenario: You want to try a new recipe for an IPA with grapefruit.
The client-side (you) submits a request for a new grapefruit IPA.
The server-side (also you) creates the beer based on server-side code and
submits a response: a few gallons of grapefruit IPA. Yes, in this case you are both sides!

Here is what I mean by that: You have written both the client and server-side code to turn an IPA recipe into a few gallons of beer. And, you have complete control over the original request.
Let’s look at it from a technical perspective.
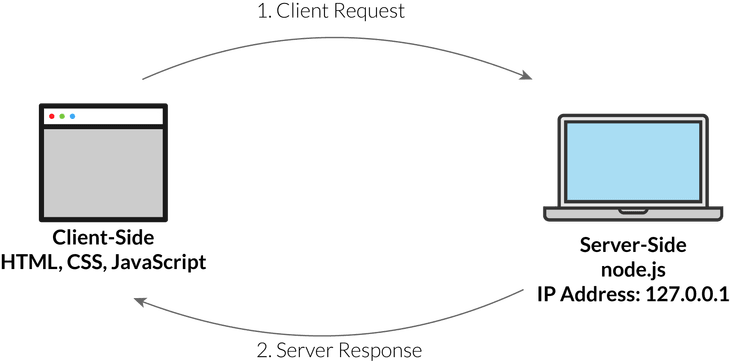
Although I have the client-side appear as a browser, it is obviously on the same laptop or desktop as the server! Since you are making the request… and you wrote the server-side code… it is all happening on the same machine.
Here is one hint on how this scales up: the IP address. The IP address is the unique identifier of the computer. But, localhost is actually the same as the IP address of 127.0.01, which points back to your own computer! So, no matter what computer you use, the same IP address will always signify that you are using your own machine as localhost. When we look at the next section, the IP address will change based on where your code is hosted.
Now, I will make the assumption that you are using Express.js while learning how to set up your first Node server. Express uses the
app.listen() statement, like this, to start your node server:
app.listen(3000);
But 3000 is not the IP address above, so what is it? It is actually the
port. Web servers have 65535 possible ports, but here are a few common ones:
All of these are different types of requests that web servers can handle. HTTP is a common one at port 80. POP/IMAP are related to email, for example. DNS is related to domain name. Anyways, this helps the server quickly understand what kind of request is coming in so it can work most efficiently.
Think of the port like the specific types of beer we listed above. Your server is preconfigured to handle different requests, just like we know we will need to change our equipment and procedure for each type of beer we want to brew.
So, here is an updated version of the diagram to reflect that port 3000 aligns with our grapefruit IPA recipe. Even though this is an HTTP request, we don’t want to use port 80, because we do not want to interfere with requests that our browser is making as we use the Internet for our personal use.
So, if you type http://localhost:3000 into your browser, here is what happens on your computer:
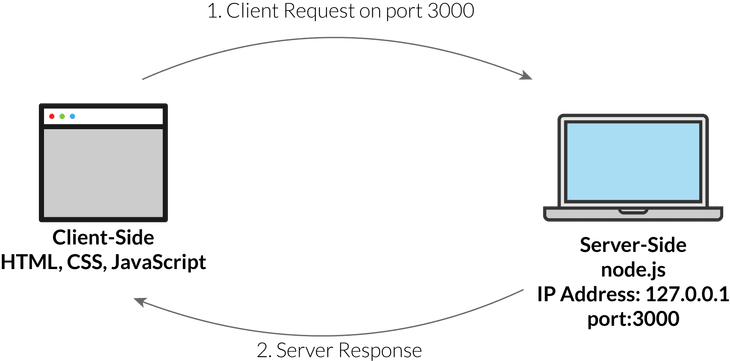
- Http:// means that this is an HTTP request
- Localhost points to the IP Address 127.0.0.1, which means we need to look in our own computer
- :3000 is the port, which means that we will look for the required server-side code at that port.
There aren’t 65,000+ pre-programmed ports, of course. We are just using 3000 as an arbitrary number to make sure we avoid the common ports listed above. We could use port 3001 to handle a light beer request, and port 3002 for a stout request.
Putting Your Code Live On A Web Server
Let’s say that you now want to mass-produce all three recipes. You need to rent space in a warehouse, buy some professional equipment and get ready to handle much more demand.
There are two major changes that will happen.
- The server, or warehouse, is no longer located at your home! It is in a remote location that can be accessed over the Internet. Heroku, a popular tool for launching your first web app, has servers all over the world.
- The requests are going to come from all over the country, or all over the world. It is no longer just a couple of friends trying beer at home! Requests will come in from individuals, restaurants and distributors, and you need to meet that demand.
Let’s say you have 100 customers that are ordering a 6-pack of your grapefruit IPA. Here is what that looks like.

This is the same thing as having 100 visitors on a website submit a request, and having your server send a response to each one.
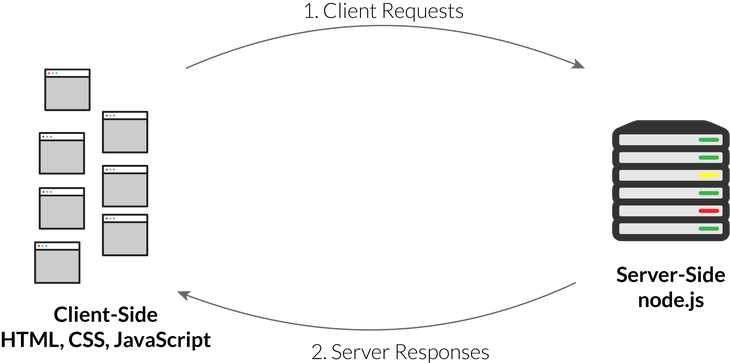
Let’s say your domain is mybrewery.com. When those 100 site visitors type that into their browser, they get connected to a specific server with an** IP address** that is hosting the site. The server then sends the appropriate response to their individual browser.
In the localhost version, we had a one-one relationship. One browser requesting one server. Now, we have a many-one relationship. Many client-side requests to one server.
Let’s move on to the port. Heroku actually abstracts this by asking you to add a conditional statement so they can set the port on their end.
Like this:
var port = process.env.PORT || 3000;
So, we do not know which individual port Heroku uses, but we know it is one port. And, this means that we cannot easily configure multiple ports using Heroku. If you use a service with more configurability, you can set up multiple ports manually, but Heroku takes care of this to simplify the process.
Renting One Part Of A Sever
The last part of using a remote server is scalability. In the past (okay, like 10 years ago), you had a couple expensive options:
- You could buy the server and manage it yourself.
- You could rent a whole server at once at a remote location.
In our microbrewery example, this is kind of like renting or buying a massive warehouse when you are just getting started. You have no idea if the whole thing will be necessary.
Fortunately, you can now rent capacity within a server! Servers run software that allow them to be partitioned and run apps within containers. This is kind of like renting one part of the warehouse to start your brewery.

Heroku calls their containers “dynos“. Let’s say that you are only getting 100 orders for your microbrewey, like in the example above. You would only need to rent a small part of the warehouse. But, if demand suddenly skyrockets, and you now need to produce 1000 orders a week, you will need to scale up your operation. You can easily rent more containers within the server to meet this demand. And, since it is virtual space, you can scale quickly, unlike renting physical space. So, you do not need to go and rent a whole new server and configure it.
Interested In More Visual Tutorials?
If you enjoyed this tutorial, check out the main CodeAnalogies site or sign up for my newsletter below for more
tutorials on basic web development topics.


Top comments (2)
Thanks for sharing this, Kevin!
I recently started learning more about NodeJS and how efficient it can be. I'm 101% sure this post will also help others like me :)
Thanks Christian!