If you’ve ever tried to open a file c:\example\my_web_page.html in a web browser by putting file:///C:/example/webserver/my_web_page.html, you might have noticed that HTML <FORM>...</FORM> tags don’t work like they’re supposed to.
To get an HTML form’s submit button to actually work, you need to visit my_web_page.html at a http://localhost/-style URL, not a file:///C:/-style URL.
On Windows, with the help of Python, you can do this.
(You can see that the submit button does nothing when using a file:///C:/-style URL by opening your browser’s developer tools, going to the Network tab, and clicking the button. Nothing new appears, even though you’d expect a GET request to appear in the logs.)
Here’s the content of my file c:\example\my_web_page.html that refuses to work locally:
<html>
  <head>
    <meta http-equiv="content-type" content="text/html; charset=utf-8" />
    <link rel="icon" href="data:image/svg+xml,%3Csvg%20xmlns='http://www.w3.org/2000/svg'%20viewBox='0%200%2016%2016'%3E%3Ctext%20x='0'%20y='14'%3E❓%3C/text%3E%3C/svg%3E" type="image/svg+xml" />
    <title>I'm a little web page</title>
  </head>
  <body>
    <h1>I'm a little web page</h1>
    <p>short and stout</p>
    <hr />
    <form method="get" action="/the_confirmation_page.html">
      <input type="radio" id="form_yes" name="yesno_answer" value="yes" required />
      <label for="yesno_answer">Yes</label><br />
      <input type="radio" id="form_no" name="yesno_answer" value="no" />
      <label for="yesno_answer">No</label><br />
      <input type="radio" id="form_maybe" name="yesno_answer" value="maybe" />
      <label for="form_maybe">Maybe</label><br /><br />
      <input type="submit" value="Submit" />
    </form>
    <hr/>
  </body>
</html>
And here’s the content of my file c:\example\the_confirmation_page.html. This is a second web page where I’d like the first web page to send my “yes/no/maybe” choice whenever I click the submit button.
<html>
  <head>
    <meta http-equiv="content-type" content="text/html; charset=utf-8" />
    <link rel="icon" href="data:image/svg+xml,%3Csvg%20xmlns='http://www.w3.org/2000/svg'%20viewBox='0%200%2016%2016'%3E%3Ctext%20x='0'%20y='14'%3E☑️%3C/text%3E%3C/svg%3E" type="image/svg+xml" />
    <title>What you chose</title>
    <script>
      const urlSearchParams = new URLSearchParams(window.location.search);
      const params = Object.fromEntries(urlSearchParams.entries());
      const get_h1 = function () {
        if (!!params && !!params["yesno_answer"]) {
          return `I'm so happy you were able to make up your mind that your answer is "${params["yesno_answer"]}."`;
        } else {
          return "Looks like you couldn't make up your mind.";
        }
      };
      const fill_in_h1 = function () {
        document.getElementById("fill_me_in").innerHTML = get_h1();
      };
      window.onload = fill_in_h1;
    </script>
  </head>
  <body>
    <h1 id="fill_me_in"></h1>
  </body>
</html>
You might notice that if you visit file:///C:/example/the_confirmation_page.html?yesno_answer=maybe and play with the value of yesno_answer in the URL, everything works as expected.
It’s not the JavaScript in the confirmation page that doesn’t work with file:///C:/-style URLs.
It’s literally just getting the submit button to work in my_web_page.html’s <FORM>...</FORM> that’s the problem.
To get the submit button in my_web_page.html to work, you have to deliver it to your web browser at an actual URL starting with http://. Which means you have to put it on a web server.
Luckily, with Python, you can run a web server on your own computer, and you don’t even need administrator rights to the computer.
Python prerequisites
- You need to get all the way through the “Using our IDE to program” part of my article “Setting up Windows Store Python with Pandas in VSCode” (or have installed Python your own way).
- You need to be comfortable running a script called
c:\example\hello.pywhose source code isprint('Hello World')on your computer and validating that you see your computer say “ Hello World ” to you in the script execution environment’s “system output.”
Code the web server
Once you know how to create and run Python files, create one at c:\some_other_folder\webserver.py. I chose a folder called “some_other_folder” to demonstrate that the Python script and the HTML files don’t have to live in the same place on your computer.
Its contents should be:
# Credit to Max Shvedov at https://stackoverflow.com/questions/51189628/simple-http-server-in-python-how-to-get-files-from-dir-path
# Forgot where else I picked up code

import http.server
import socketserver
from os import path

my_host_name = 'localhost'
my_port = 8888
my_html_folder_path = 'c:\\example\\'

my_home_page_file_path = 'my_web_page.html'

class MyHttpRequestHandler(http.server.SimpleHTTPRequestHandler):

    def _set_headers(self):
        self.send_response(200)
        self.send_header('Content-Type', 'text/html')
        self.send_header('Content-Length', path.getsize(self.getPath()))
        self.end_headers()

    def getPath(self):
        if self.path == '/':
            content_path = path.join(
                my_html_folder_path, my_home_page_file_path)
        else:
            content_path = path.join(my_html_folder_path, str(self.path).split('?')[0][1:])
        return content_path

    def getContent(self, content_path):
        with open(content_path, mode='r', encoding='utf-8') as f:
            content = f.read()
        return bytes(content, 'utf-8')

    def do_GET(self):
        self._set_headers()
        self.wfile.write(self.getContent(self.getPath()))

my_handler = MyHttpRequestHandler

with socketserver.TCPServer(("", my_port), my_handler) as httpd:
    print("Http Server Serving at port", my_port)
    httpd.serve_forever()
Start and stop the web server
Run the script (“Run Python File in Terminal”, if using the VSCode play button in the upper right corner).
If Windows Firewall pops up a dialog box, un-check all the checkboxes and click Cancel.
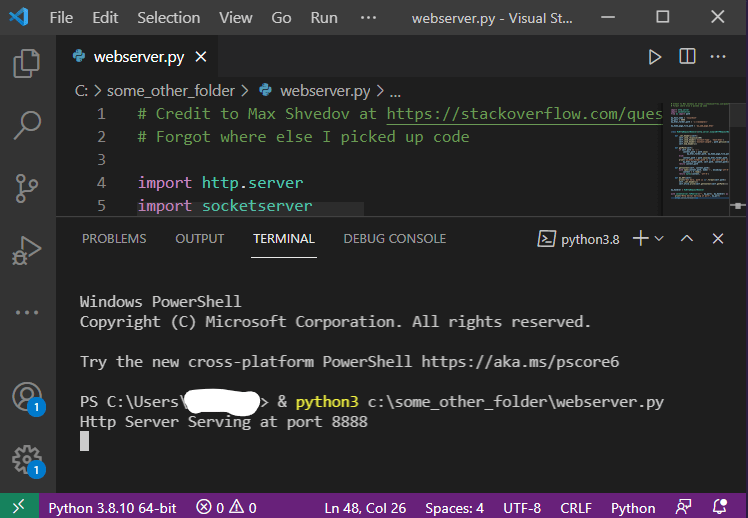
In the “ Terminal ” tab of a panel below your code, you should see the words:
Http Server Serving at port 8888
It should appear below a command prompt that says:
PS C:\Users\YOUR_USERNAME>
Note that unlike the print('Hello World') script, this one won’t have a trailing PS C:\Users\YOUR_USERNAME> after the program’s output.
That’s because the Python program is still running! A web server wouldn’t be very useful if it didn’t run all the time and wait around for people to visit its web pages.
To stop the Python code from running, click in the Terminal pane at the bottom of VSCode and do a Ctrl + C combination on your keyboard (yes, I know that’s usually “copy” in Windows).
In the terminal output, there will be a bunch of text starting with the word “Traceback” and ending with the word “KeyboardInterrupt.” Most importantly, though, you’ll see that you’re back at a fresh PS C:\Users\YOUR_USERNAME> command prompt as the last thing in the terminal.
If for any reason you can’t get this to work, right-click on your Windows taskbar, click Task Manager , click the Details tab, sort the Name column (the first one) alphabetically by clicking on its heading, and scroll down into the P’s looking for a .exe starting with the word “python.” Right-click it and click End task , then End process in the confirmation popup. Close out of Task Manager and head back to VSCode. You should see a fresh PS C:\Users\YOUR_USERNAME> prompt at the end of your terminal output, although without the Tracebak...KeyboardInterrupt content.
Visit your web page
Now that you know how to start and stop the web server, run the Python script in the terminal again to start it.
Open Firefox and visit http://localhost:8888.
(I seem to have written sample Python code that gets into an infinite loop, waiting for the web page to load, with Chrome. Not sure why. Sorry.)
If you’d like, open up the web browser’s developer tools ( Ctrl + Shift + i ) and click on the “ Network ” tab, making sure that under the gear-shaped settings icon at right, “ Persist Logs ” is checked.
Pick one of the radio buttons and click Submit.
Now your web browser should take you to http://localhost:8888/the_confirmation_page.html?yesno_answer=yes (or “no” or “maybe” at the end, depending what you picked) – you’ll see the URL bar has changed – and the web page should tell you it’s so happy you picked “yes” (or “no” or “maybe”).
If you were watching the developer tools Network tab, you should see that you made a request with a method of GET to a domain of localhost:8888 and a file of the_confirmation_page.html?yesno_answer=yes (or “no” or “maybe”), and that the response’s status code was 200.
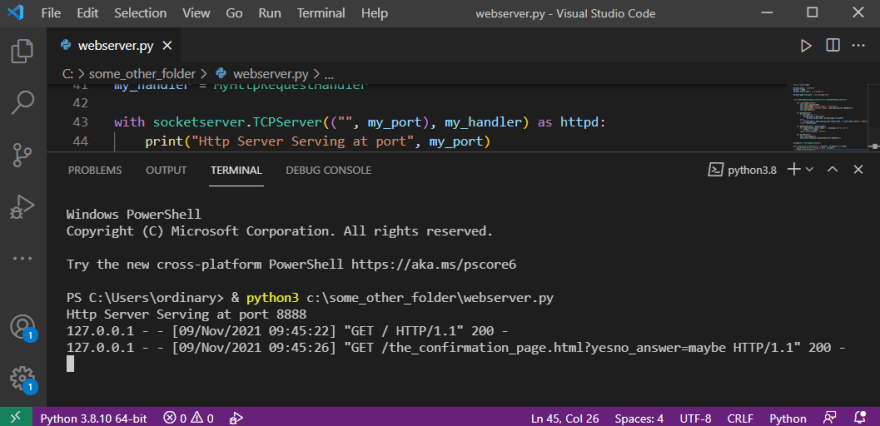
Back in VSCode, you’ll see two more lines below Http Server Serving at port 8888, followed by the outlined box that indicates your Python program is still running:
-
127.0.0.1(or some other IP address)- - [(a timestamp)] "GET / HTTP/1.1" 200 - -
127.0.0.1(or some other IP address)- - [(a timestamp)] "GET /the_confirmation_page.html?yesno_answer=maybe HTTP/1.1" 200 -
Clean up
Don’t forget to stop your web server with Ctrl+C in the VSCode terminal.
(It doesn’t work if the last part of VSCode you clicked into was the code editor – the key combination is just plain old “copy” up there.)
You’ll see a fresh PS C:\Users\YOUR_USERNAME> prompt at the end of your terminal output when you’ve successfully stopped your server.
Code your web page
I’ll leave the hard part up to you – actually coding my_web_page.html and the_confirmation_page.html to do whatever it was you wanted to test!


Top comments (0)