
My Dygma Raise Keyboard.
Introduction
I have been using Microsoft Natural Keyboard 4000 for several years and it has served my programming and writing needs pretty well with my Ubuntu laptop .Xkeymap configurations (more about that later). But last spring I followed Koodiklinikka Slack’s “nappaimistot” (“keyboards” in English) channel in order to read experiences regarding mechanical keyboards. There I read some experiences regarding the Dygma Raise Keyboard. I ordered the Dygma Raise keyboard while the company was manufacturing the second batch of the keyboard. I ordered the keyboard in May and I got the keyboard a couple of days ago. Now that I have spent a couple of days configuring the keyboard and using it I thought that it might be beneficial for other programmers to write a bit about my experiences regarding the Dygma Raise - because I fell in love with it immediately.
Build Quality
The build quality of the Dygma Raise Keyboard seems to be really good. The chassis is very rigid and sturdy. All keys feel very consistent and there is an overall feeling of premium quality when using the keyboard.
Ergonomics
You can split the keyboard into two halves and place the halves on your table as you wish. I keep some space between the halves and also have a small angle between the halves so that my shoulders and wrists are in a pretty natural position on my table. I also have a large elbow support on my table. All these together provide pretty good ergonomics for my programming. Not to talk about the ergonomics regarding the key presses but more about that in the following chapters. Dygma provides in its website a more detailed description regarding the Dygma Raise Ergonomics.
Led Lights
I haven’t found any real use for the various colors - I do programming. I type with all my ten fingers - I took a typing lesson in the Finnish Elementary school about 40 years ago and have been typing with 10 fingers ever since - so, I don’t look at my keyboard at all when typing. But the colors are kind of nice anyway. Maybe gamers use these colors for some real tasks or they just “look cool”, I don’t know. Anyway, I don’t mind the colors. I did use the Bezecor to categorize certain buttons with consistent colors (see the two pictures below). And it is also kind of nice that the Shift to 1 button also changes the color in the frame of the halves - a visual aid that we are now in the next layer.
Layout
One of the most important reasons to buy Dygma Raise was that I could order it with the Nordic layout. There are other split keyboards in the market but some of them provided just ANSI layout, and the rest didn’t provide the kind of programmability of the keyboard like Dygma Raise. The keyboard layout itself is really important to me. There are certain special characters in the Nordic languages (e.g. Ä and Ö) and I want those keys to be in their right places so that I can write Finnish text fluently both using the laptop keyboard and my external keyboard and I don’t need to remember that those letters are in different positions in different keyboards. There are many different ANSI and ISO layouts available for the Dygma Raise - consult the Dygma Raise website for the options.
Switches
Dygma Raise is a mechanical keyboard and you can order the kind of mechanical switches you like. Dygma Raise is my first mechanical keyboard for recent years so I ordered rather standard switches not to have too extreme experience to start with: Cherry MX Brown. Dygma Raise provides a good introduction to the mechanical switches - I really recommend reading it before placing the order for your Dygma Raise. All Dygma Raise switches are swappable so you can change the switches later on if you think that you want to experiment with different switches. I kind of like the “clicky” touch of the Cherry MX Brown switches but I might next try a bit “lighter” touch (but with a tactile feeling with a clear click sound).
My Linux Keymap
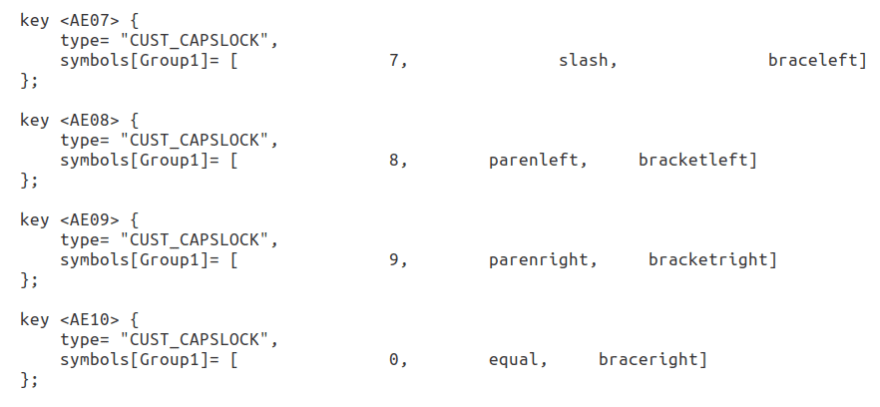
Before understanding how I configured Dygma Raise I need to tell the reader a bit about my Linux key mapping. For a programmer, the CapsLock key is a totally useless key. In the Nordic layout the various parentheses ( {, [, [, }) are in the first row behind 7, 8, 9 and 0 keys when you press Alt-Gr key at the same time. The problem is that this Alt-Gr key is in a really awkward position in the last row behind your right thumb - practically impossible to press this Alt-Gr and 7, 8, 9 and 0 keys without getting a Carpal Tunnel Syndrome in your wrists after a few years. Therefore many Nordic programmers tend to configure these special parentheses in new positions. My solution was to keep the special character keys where they are but to configure CapsLock key as Alt-Gr key since hitting the CapsLock key with my left little finger and at the same time hitting 7, 8, 9 and 0 keys with my right hand fingers to produce {, [, [, } was relatively easy. Since I could now configure keys with CapsLock for special functions, I also configured I, J, K and L keys to be arrow keys with CapsLock, D to be delete with CapsLock (as Ctrl+D is delete in Emacs) etc.
A screenshot regarding some of these configurations (.Xkeymap file):
Configuring Dygma Raise: The Bazecor Software
Ok, let’s go back to Dygma Raise and how my Linux Keymap works now with Dygma Raise. It turned out that Linux Keymap and Dygma Raise is a match made in heaven.
The configurability of the Dygma Raise keyboard is just superb. This is something that I’m just beginning to realize after configuring the keyboard for a couple of days. You can use your imagination as much as you like and it seems that Dygma does not restrict you in any way.
Every key is programmable. And there are ten layers and in all of those layers, you can program every key or configure the key to be “transparent” - meaning it will function as the key in the previous layer. I have configured two layers using a rule of thumb that I want all special characters to be as near the base row (ASDF & JKLÖ) where I keep my fingers while resting.
One very neat feature is also that there are eight “thumb keys” instead of one big spacebar. You really should give some thought on how to use these thumb keys since they can be really powerful. Let’s start with the thumb keys. Below you can see my Layer 0 configuration in the Bazecor application:
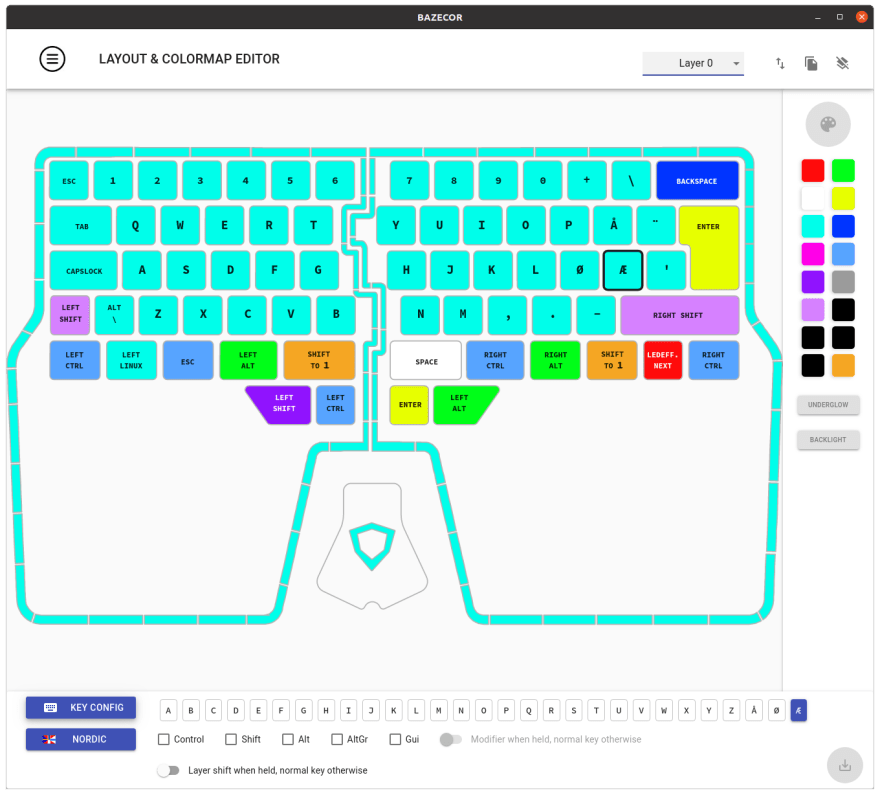
I have played classical guitar some 20 years and now that I look at that picture I realize something regarding the hotkeys I tend to use. Like playing the guitar one has different functions for the left hand and for the right hand: left hand fingers press the strings in various positions on the guitar neck, and right hand fingers pick the strings. The same way I tend to use my keyboard: I press some combination of the Shift, Ctrl, Alt and CapsLock (remember: my CapsLock is the Alt-Gr key) with my left hand fingers, and then I click some key on the right side of the keyboard with my right hand fingers. Therefore I configured my new Dygma Raise so that I have all relevant modifiers in the lefthand side four thumb keys: Alt, Shift, Ctrl and Shift-to-1. Some examples of how I use these combinations may shed some light to the importance of these new left hand side thumb keys. I program Clojure and I use either IntelliJ IDEA with excellent Cursive plugin or Emacs editor with Cider plugin (mostly IDEA/Cursive, though). In Clojure you program quite a lot with REPL and to make the Clojure programming workflow fluent one needs good hotkeys e.g. to reload stuff into the REPL, send namespace to the REPL for evaluation, evaluate certain S-expression in the Clojure code or edit the code, e.g. kill S-expression, slurp/barf, etc. I’m not going to explain the meaning of those manipulations but let’s just say that I do a lot of them when programming Clojure and there needs to be fast hotkeys for them. Some examples of those hotkeys:
- Kill text from cursor position till the end of line (Emacs kill):
Ctrl+K. Easy, now I don’t stretch my left hand little finger to theCtrlkey: I haveCtrlas a thumb key on both sides. - Kill S-expression in Clojure code:
Shift+Ctrl+K. AddingShiftsince it is logical because it´s kind ofkilllike the previous one. Now very easy with Dygma Raise: Just press with left hand thumb the lower thumb keys (Left ShiftandLeft Ctrl- at the same time) and with right hand middle finger pressK. This used to be a bit awkward before Dygma: I had to press the left sideShiftandCtrlkeys with my left hand little finger… - Send Clojure form for evaluation to REPL:
Alt+L: Now very easy:Left Altwith left hand thumb andLwith right hand ring finger. - Move cursor to right:
CapsLock+L(remember:CapsLockisAlt-Grand I have configuredI,J,KandLas arrow keys). - Because move the cursor to right is
CapsLock+Lit is logical that Slurping right isCapsLock+Alt+L: easy, left hand: just pressAltwith thumb andCapsLockwith little finger. - Send text to Slack:
Ctrl+Enter: Now very easy: left hand thumb and right hand thumb in the lower thumb keys.
And so on, and so on… I could write a whole series of blog posts regarding these hotkeys - I have a bunch of them for various IDEs, editors, tools, and terminals, but I guess you got the point. I now realize that I play my keyboard a bit like the guitar: both hands tend to have certain functions: I use modifiers with my left hand and give the actual commands with my right hand. (With some exceptions, like CapsLock+D for delete, but that´s because it is logical to do so, since Ctrl+D is delete in emacs and CapsLock and D are so close to each other that it is easy to do so…).
Ok, let’s move on. What’s that Orange Shift to 1 thumb button in the left upper row? It’s the beauty of Dygma Raise: You can shift to the next layer when pressing this key (you can also configure some key so that you move to the next layer instead of activating it only when this key is pressed, but it is better for my personal workflow to have it as “shift”). Let’s see what´s there in the Layer 1:
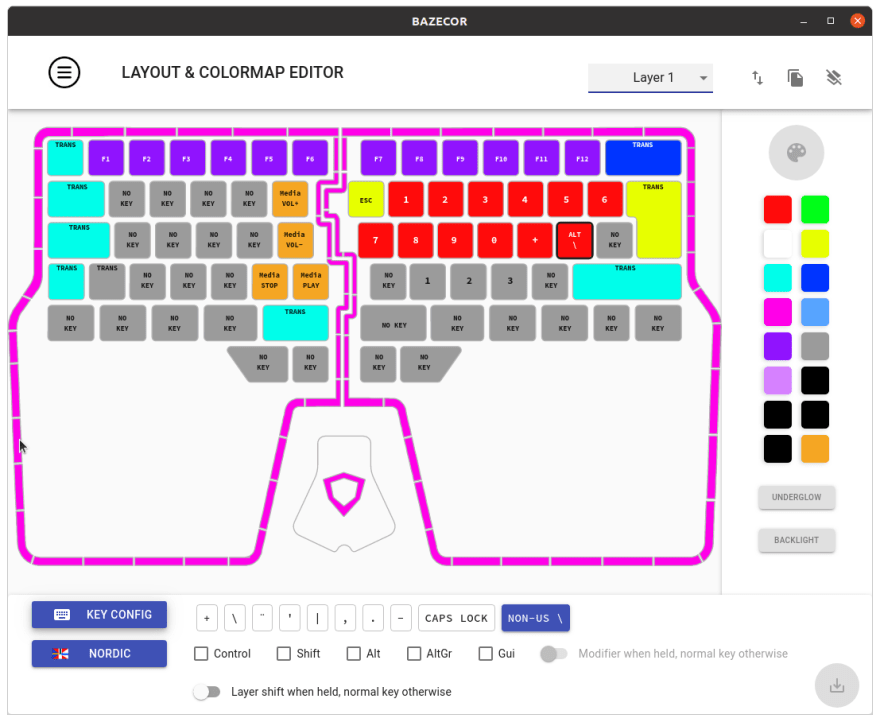
In this layer I have some Media controllers on the left side just to make playing Spotify easier and also to control volume in meetings: I.e. I press the Shift to 1 with my left hand side thumb and then some media buttons also with my left hand side. This is a bit awkward since I have to use the same hand but as a guitarist, I have pretty flexible fingers and I don’t use these buttons that often. But then the actual beef: Why do I have the numbers on the right hand side in two rows?. The actual reason is not the numbers per se but what’s behind the numbers. The most important row in this layer is the resting position row J, K, L, Ö => 8, 9, 0, +. The reason is that I have mapped the various parentheses behind these numbers, for example: { => Alt-Gr+7, and because Alt-Gr is Caps-Lock it is Caps-Lock+7, and because in Layer 0 I can shift to the next Layer 1 with the left hand side button key, and the number 7 is not in the upper row in this layer but in the resting row, it is very easy to get { => Shift to 1+CapsLock with my left hand fingers (thumb and little finger, I use this very often so it is very easy for me) + H (layer 0) (which is 7 in layer 1). Therefore:
-
{=>Shift to 1+CapsLock+H -
[=>Shift to 1+CapsLock+J -
]=>Shift to 1+CapsLock+K -
}=>Shift to 1+CapsLock+L -
\=>Shift to 1+CapsLock+Ö -
(=>Shift to 1+Shift+J -
)=>Shift to 1+Shift+K
Every programmer knows that various parentheses are very much used in any programming language, and Clojure is no exception. On the contrary, you use parentheses very much in Clojure programming: every S-expression needs to be in parenthesis, all literal vectors are inside brackets, all literal maps are inside curly braces, etc. Now with Dygma, I can write all of these parentheses in my right hand resting position.
How about the upper number row with smaller numbers. The special characters:
-
!=>Shift to 1+Shift+U -
"=>Shift to 1+Shift+I -
#=>Shift to 1+Shift+O -
%=>Shift to 1+Shift+Å -
&=>Shift to 1+Shift+~ -
@=>Shift to 1+CapsLock+I
So, just the same characters behind those numbers in the Nordic keyboard layout but now just added to the right hand side near the resting row for easier access.
And Esc is now Shift to 1+CapsLock+Y, what a relief. Since e.g. in IntelliJ IDEA when going to the embedded terminal I haven’t found any other way to return to the editor than clicking Esc twice and Esc used to be so far away… not anymore with Dygma.
When I read this article for proof-reading purposes I also realized that I tend to prefer combinations with near the resting positions (like the Shift to 1+CapsLock+Y I told earlier) over just one keypress but farther away (like Esc in the upper left side of the keyboard). This is personal, of course. Maybe the reason is that I write with all 10 fingers and it is faster to write when you don’t have to stretch your fingers far away.
BTW. If you are wondering why I don’t have e.g. Delete and Backspace keys configured, I have but not using Bazecor. I have a lot of keys mapped with my custom CapsLock key using Linux .Xkeymap configuration, e.g:
-
D: Delete -
F: Backspace -
I,J,KandL: arrow keys. -
U: Page up -
O: Page down -
H: Home -
Ö: End
… and it is pretty easy to hit CapsLock with my left little finger and one of those keys with my right hand fingers (except D and F using left hand, of course). These key mappings work the same way if I use my laptop keyboard or Dygma Raise - which is a good thing: they can be in my muscle memory for any keyboard I use with my Ubuntu (in fact, I have these mappings in all my Ubuntu machines at home).
What Next?
Who knows? Maybe I realize that there is a way to make my new Dygma Keyboard even more ergonomic with some new astounding realization how to configure it using the Bazecor.
One thing that I have been thinking about with the split keyboard is to use a trackpad instead of the mouse - I could use my thumbs with a trackpad positioned between the keyboard halves now that I have space for it there - thanks to Dygma Raise split keyboard.
Update 2020-10-03
I have now used my brand new Dygma Raise about a week. I have forced myself to use the new key mappings I configured and I have done some fine-tuning. This chapter is an update to the original blog post.
Forcing oneself to use the new key mappings. Learning the new key mappings will take some time. After one week I’m still stumbling to find the numbers in the new place in layer 1. The parenthesis I learned pretty quickly - probably because in programming one uses the parenthesis a lot more than numbers. I realized that one just have to force oneself to use the new key mappings even though it would be faster to use the old keys father away. But I believe that in a few weeks the new key mappings will go to the muscle memory and then it is a lot faster to use the new keys near the home row.
Some tweaking with layer 0. I did some modifications to layer 0 regarding the thumb buttons. The new key mapping is below.

Changes:
- I changed the right lower thumb buttons as in the left side. I realized that it is easier to remember and use them this way. Now
ShiftandCtrlkeys are mirror images just like in their standard positions. - I moved
Enterkey next toSpacekey. It is a bit awkward to twist the right hand thumb to this key but I sacrifice a bit in ergonomics to have theShiftandCtrlkeys in more logical positions. - Then a bit later I realized that I can utilize the double action key functionality: I configured
Enterin the left side but with double action: when hit once it isEnterbut when hold down it isShift to layer 1as previous.
Some tweaking with layer 1. I did some modifications to layer 1. The new key mapping is below.
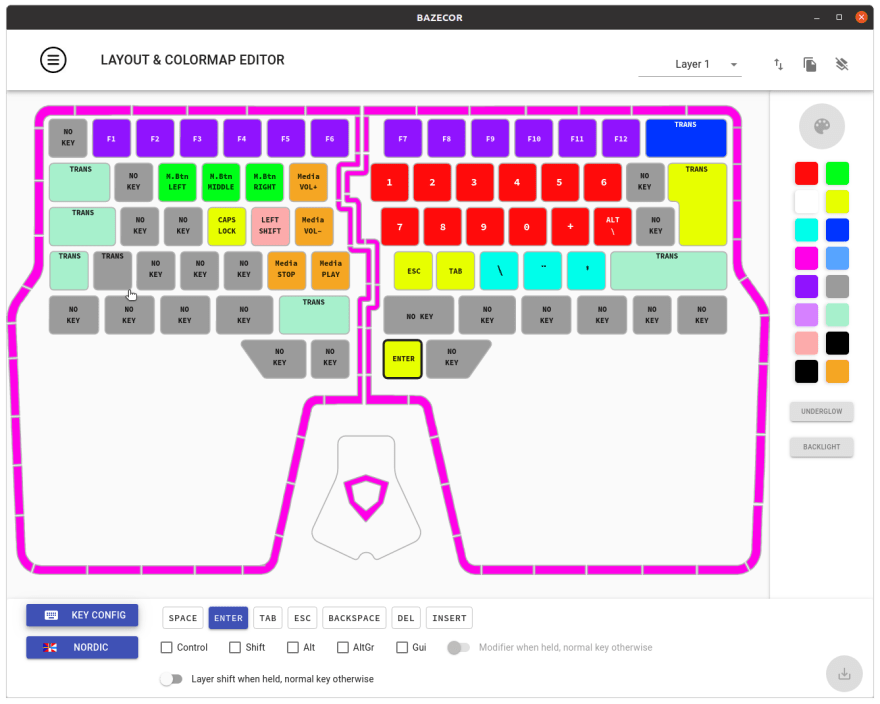
Changes:
- I moved the
Esckey below the home row. The reason was to have a more logical layout for the numbers. - I realized that the keys below the right home row are empty and I can utilize that row. So:
-
Tabadded next toEsc. - I moved
\key next totab.\key provides the ``character that I need in Slack to provide code snippets without formatting. - The weird two dots key provides the precious tilde key (~) that a programmer needs in terminal when referring to the user home directory. This key is in standard position really far a way in second upper row nearEnterkey. -'key actually provides the asterisk (*) when used withShift. The asterisk key is used in terminal to represent any number of characters - also used quite often. This key is in standard position next to theEnterkey and therefore a bit far away. - I addedEnteralso here in the second layer in the lower right thumb. After some experimentation I realized that it is actually easier to hitShift to Layer 1andEnterin this new position than theEnterkey in layer 0 (I hit Enter quite often and I began to feel uncomfortable to twist my thumb to the newEnterkey next toSpacekey). This is actually not important anymore when I realized to utilize the double action key (see previous layer). Well, maybe sometimes when adding a lot of numbers it might be easier to have theEnterkey also in this layer. - I also addedCapsLockandLeft Shift` keys to this layer since I’m planning to start learning to hit these keys as modifiers for the various parentheses (possibly, let’s see). - I also added the mouse buttons in this layer since I realized that sometimes it is nice to paste something that I painted earlier using the mouse.
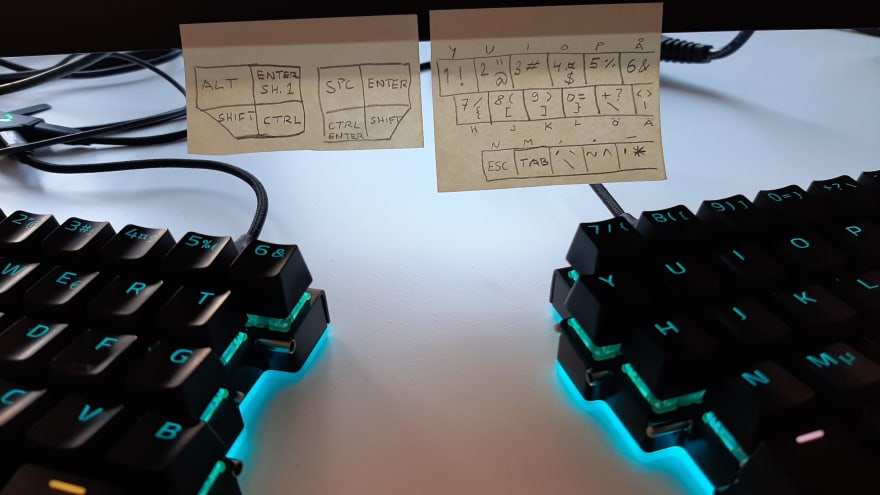
Cheat sheet. I created a cheat sheet for myself to learn the new key mappings with Dygma Raise faster. On the left side note are the thumb buttons, on the right side note are layer 0 key mappings.
Ordered new switches. I experimented with the test switches Dygma kindly added to the box. First I thought that I would order Kailh Speed Silver switches (Linear, 40 cN, Pretravel 1.1 mm, Travel 3.5 mm) since I feel that the Cherry MX Brown (Tactile, 55 cN, Pretravel 2 mm, Travel 4 mm) switches that I ordered with my Dygma are a bit too heavy and Kailh Speed Silver switches were really easy to press. I also tried the Kailh Speed Copper (tactile, 50 cN, Pretravel 1,1 mm, Travel 3,5 mm) - it was a nice switch also, a bit more consistent feeling that with Cherry MX Brown. But then I surprised myself. I tried Kailh Speed Bronze (clicky, 60 cN, Pretravel 1.1 mm, Travel 3.5 mm) - and I immediately fell in love with the feeling and the “click” which is really sharp and provides a really nice haptic and auditory feedback regarding a key press without being too heavy. I ordered Kailh Speed Bronze switches and also Kailh Low Profile Choc White switches for the lower thumb buttons.
Conclusions
If you are a programmer and you are looking for a top-quality mechanical keyboard with absolute configurability - look no further: you want Dygma Raise. With Dygma Raise your imagination is your limit on how you can configure your new keyboard.
The writer is working at Metosin using Clojure in cloud projects. If you are interested to start a Clojure project in Finland or you are interested to get Clojure training in Finland you can contact me by sending email to my Metosin email address or contact me via LinkedIn.
Kari Marttila
- Kari Marttila’s Home Page in LinkedIn: https://www.linkedin.com/in/karimarttila/


Top comments (0)