Clojure Re-Frame Exercise in IntelliJ IDEA / Cursive IDE.
Introduction
I created a simple frontend for my SimpleServer exercise a couple of years ago: SimpleFrontend. In that exercise I used Reagent library which is a minimalistic React wrapper for ClojureScript - I have documented the exercise in Become a Full Stack Developer with Clojure and ClojureScript! blog post. At my company, Metosin, we also use quite a lot another ClojureScript framework that provides some additional utilities like state management - Re-Frame. In this blog post I describe my recent Clojure exercise when I re-implemented the SimpleFrontend using Re-Frame.
The exercise can be found in my Clojure repo in directory re-frame.
What is ClojureScript?
I wrote this frontend exercise using ClojureScript. ClojureScript is a Clojure dialect that transpiles to Javascript. So, if you are a Clojurian, you love functional paradigm, immutable data structures, and clean code - you can use your favorite functional language both in the backend (Clojure) and frontend (ClojureScript).
And what is Clojure? Possibly the most beautiful language in the world. Once you learn it, you never go back.
What are Reagent and Re-Frame?
Reagent library is a minimalistic React wrapper for ClojureScript. With Reagent you can easily create React components using Hiccup which provides a very “Clojurian” way to represent HTML code. Reagent also introduces its own version of the Clojure Atom - any component that dereferences a Reagent atom will be automatically re-rendered when there are changes in that atom.
Re-Frame provides a framework that uses Reagent internally. The Re-Frame framework adds various capabilities e.g. an application database into which you can store the application state and an easy way to subscribe to the elements in the application database and get automatic re-rendering when those elements change in the application database. I’m not going to explain the Re-Frame framework in more detail - the Re-Frame website provides excellent documentation for the framework.
Tooling
I did most of the tooling as I have learned to use them in the Metosin frontend projects (by the way, if you are a Clojurian and you want to learn from the best - join Metosin).
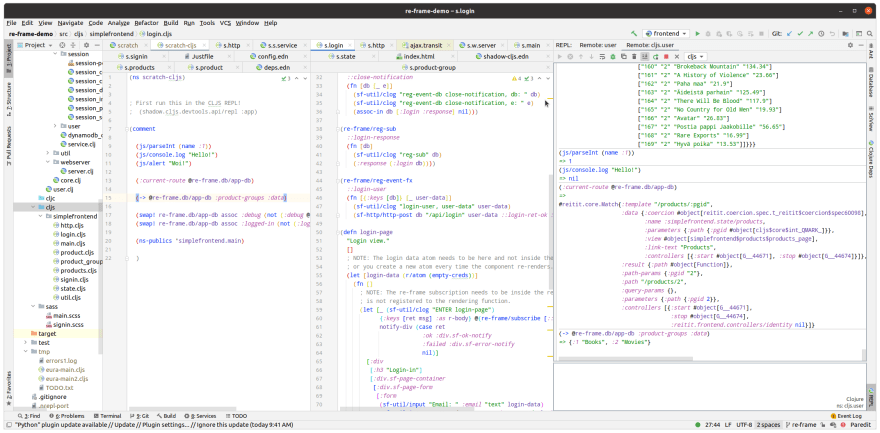
- Shadow-cljs. Shadow-cljs is a build tool for ClojureScript. Shadow-cljs is really nice to use - you get to see your changes both in the ClojureScript code and Sass code in real-time in the browser. You can also get a REPL which runs your ClojureScript code in the browser (see the example in the picture above - I have a scratch file in which I have written some ClojureScript code and I send the forms for evaluation to the REPL running in the browser - you can e.g. examine the re-frame app db using the REPL). Shadow-cljs configuration, see: shadow-cljs.edn.
-
Justfile. I use Just to provide commandline interface to setup the project fixture before development, e.g.
just postgres: start the PostgreSQL development database,just backend-kari: start backend repl with my own Clojure config,just frontend-kari: start frontend etc. Justfile configuration, see: Justfile. - Npm. Shadow-cljs integrates nicely with Npm. See package.json for a list of npm packages I’m using in this exercise.
- Sass. I’m using Sass which is an extension language for CSS. The Sass in this exercise is pretty minimalistic - the purpose of this exercise was not to create a beautiful frontend but to learn to use the tooling and re-frame. See example in main.scss.
-
Deps.edn. In the deps.edn file you can find the
frontendalias which gives the dependencies for the frontend in this exercise. - Metosin Reagent-dev-tools. I used quite a lot the excellent Metosin Reagent-dev-tools (as you can see in the picture below). I tried the re-frame-10x tool as well, but I liked more the Metosin Reagent-dev-tool’s visual layout (and I’m a company man - you eat your own dog food). The Metosin Reagent-dev-tool was one of the most important development and debugging tools during this exercise. Once you configure the tool to show the Re-frame application db state you get a nice tree view to the app-db:
(defn ^:export init []
  (js/console.log "ENTER init")
  (re-frame/dispatch-sync [::initialize-db])
  (dev-tools/start! {:state-atom re-frame.db/app-db})
  (dev-setup)
  (start))
Routing
For routing, I used Reitit both in the backend and in the frontend.
(def routes-dev
  ["/"
   [""
    {:name ::sf-state/home
     :view home-page
     :link-text "Home"
     :controllers
     [{:start (fn [& params] (js/console.log "Entering home page"))
       :stop (fn [& params] (js/console.log "Leaving home page"))}]}]
   ["signin"
    {:name ::sf-state/signin
     :view sf-signin/signin-page
     :link-text "Sign-In"
     :controllers
...
Since I’m a company man I’m using Metosin libraries, of course. I examined Metosin Reitit + re-frame example and based my work on it. The example provides a simple solution for frontend routing based on the Reitit library
Using Re-Frame
I created a dedicated ClojureScript namespace for every view (see directory simplefrontend ). Using Hiccup, Reagent and Re-frame you can quickly create React application even though you know almost nothing of React itself. Example products.cljs:
(defn products-page
  "Products view."
  [match] ; NOTE: This is the current-route given as parameter to the view. You can get the pgid also from :path-params.
  (let [_ (sf-util/clog "ENTER products-page, match" match)
        {:keys [path]} (:parameters match)
        {:keys [pgid]} path
        pgid (str pgid)
        _ (sf-util/clog "path" path)
        _ (sf-util/clog "pgid" pgid)]
    (fn []
      (let [products-data @(re-frame/subscribe [::products-data pgid])
            product-group-name @(re-frame/subscribe [::product-group-name pgid])
            _ (if-not products-data (re-frame/dispatch [::get-products pgid]))]
        [:div
         [:h3 "Products - " product-group-name]
         [:div.sf-pg-container
          (products-table products-data)]
         [:div
          [:button.sf-basic-button
           {:on-click (fn [e]
                        (.preventDefault e)
                        (re-frame/dispatch [::sf-state/navigate ::sf-state/home]))}
           "Go to home"]
          ]
         (sf-util/debug-panel {:products-data products-data})]))))
In the page, you can subscribe to re-frame subscriptions (example: products-data @(re-frame/subscribe [::products-data pgid]) ). Whenever that data change the React component gets re-rendered. The paradigm is really easy to understand and work with.
You can trigger co-effects to populate data in your app-db, example:
(re-frame/reg-event-fx
  ::get-products
  (fn [{:keys [db]} [_ pg-id]]
    (sf-util/clog "get-product, pg-id" pg-id)
    (sf-http/http-get db (str "/api/products/" pg-id) nil ::ret-ok ::ret-failed)))
In this code snippet we are sending a get request to the backend to get the products for a given product group id. Then the ::ret-ok handler gets triggered when we get the response from the server:
(re-frame/reg-event-db
  ::ret-ok
  (fn [db [_ res-body]]
    (sf-util/clog "reg-event-db ok: " res-body)
    (let [pgid (:pg-id res-body)]
      (-> db
          (assoc-in [:products :response] {:ret :ok :res-body res-body})
          (assoc-in [:products :data pgid] (:products res-body))))))
As you can see we are storing the data in the re-frame app-db. The actual data needed is stored in map in hierarchy [:products :data pgid] but I’m storing the whole response there also just for development, learning and debugging purposes.
Ok, now we have the data in the re-frame application database. Then in the view you just make a subscription for that data: products-data @(re-frame/subscribe [::products-data pgid]). The actual subscription registration is:
(re-frame/reg-sub
  ::products-data
  (fn [db params]
    (sf-util/clog "::products-data, params" params)
    (let [pgid (second params)
          data (get-in db [:products :data])
          _ (sf-util/clog "products-data" data)]
      (get-in data [pgid]))))
So, we just fetch the data from the re-frame application database and return it to anyone who subscribes to that data. When the data changes in the re-frame application database the React component that uses that data gets re-rendered.
Development Flow
ClojureScript REPL. I’m an old backend programmer and I haven’t done that much frontend development, not to speak of Single Page Application development. But using ClojureScript, Hiccup, Reagent, Re-Frame, and Shadow-cljs made the journey quite effortless. In the picture at the beginning of this article, you can see a screenshot of my IntelliJ IDEA / Cursive setup. When I’m implementing some Clojure application I always keep a Clojure REPL running (as all Lisp programmers - the REPL is an integral part of Lisp programming). In this exercise I kept two REPLs running: the backend REPL (running in the JVM, state managed by Integrant, see my other blog post about that: Clojure Integrant Exercise ) and the frontend REPL (running in the browser). I guess most of the Javascript/Typescript programmers can’t understand how powerful a Lisp REPL can be in frontend development, you just have to use it yourself to understand it fully. If you look at the scratch file and the REPL output window you can see that you can use any Javascript commands (console, alert…) and also examine and modify the running state of the frontend application.
Metosin Reagent-dev-tools. I already mentioned the Metosin Reagent-dev-tools in the Tooling chapter. Reagent-dev-tools was an integral part of the development workflow. You could see in real-time the current state of the application in the re-frame application database using the tool tree view. An excellent tool for development and debugging, I highly recommend it.
Chrome DevTools. I’m not that fluent with the Chrome DevTools but I used it quite a lot. The tool is really nice: you can print in the console log various debugging information, you can inspect elements and debug various CSS related issues, you can inspect the http requets and responses etc. But I guess all frontend developers already know this stuff.
The following picture shows the Metosin Reagent-dev-tools (bottom part of the picture) and the Chrome DevTools (right side).

Browser view and development tools.
Because it was so easy I also implemented a very simple Debug panel for my own debugging purposes:
(defn debug-panel
  "Debug panel - you can use this panel in any view to show some page specific debug data."
  [data]
  (let [debug @(re-frame/subscribe [::sf-state/debug])]
    #_(js/console.log (str "ENTER debug-panel, debug: " debug))
    (if debug
      [:div.sf-debug-panel
       [:hr.sf-debug-panel.hr]
       [:h3.sf-debug-panel.header "DEBUG-PANEL"]
       [:pre.sf-debug-panel.body (with-out-str (clojure.pprint/pprint data))]])))
Then you can use this debug-panel in any view adding it as a React component e.g. to the bottom of the page:
(defn login-page
  "Login view."
  []
...
         (sf-util/debug-panel {:login-data login-data
                               :ret ret
                               :msg msg
                               :r-body r-body})]))))
… and show there whatever data is important for debugging purposes in that view.
The following picture shows debug panel in action in that page:
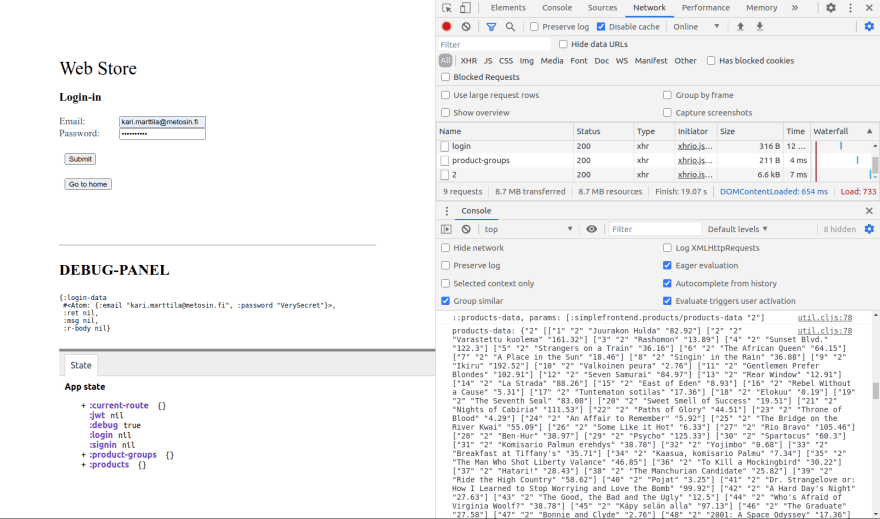
Custom Debug Panel.
Styles
I’m using raw CSS with Sass. I considered using some React UI library like Ant Design or Material UI but then decided to use raw CSS/Sass instead - the rationale being that this is a re-frame exercise and I didn’t want to spend time in this exercise learning some UI library. I might do another exercise later on in which I convert this frontend to use e.g. Ant Design which has a nice ClojureScript wrapper (syn-antd).
A Sass example giving the style for the custom debug panel:
.sf-debug-panel {
  .hr {
  margin-top: 100px;
  }
  .header {
    font-size: 28px;
  }
  .body {
    font-size: 12px;
  }
}
Issues
Some issues I need to fix later.
index.html in uri. I’d like to get rid of the index.html in uri, e.g. http://localhost:6161/index.html#/products/1 should be http://localhost:6161/#/products/1.
edn data in http requests. I tried passing edn instead of json in http requests but I had some issues with it (e.g. the response body came just fine as edn, but re-frame error handler got triggered even though the reply was 200).
Live Reloading
Live reloading worked really well. If you make any changes to any cljs or sass file, you could see the changed React components re-rendering in that view in realtime. Using the tooling and libraries mentioned in this exercise was a really nice experience.
Conclusions
It was an interesting journey to do this exercise. As an old backend developer frontends have always been my Achilles’ heel. When implementing this frontend exercise I needed to learn about the ClojureScript tooling, React (just a bit), Reagent and Re-Frame and the overall workflow related to the frontend development - very beneficial for my future frontend projects. If you are an old backend programmer like me and you would like to have an easy environment to start working with Single Page Application frontends - ClojureScript with Reagent and Re-frame is a good choice.
The writer is working at Metosin using Clojure in cloud projects. If you are interested to start a Clojure project in Finland or you are interested to get Clojure training in Finland you can contact me by sending email to my Metosin email address or contact me via LinkedIn.
Kari Marttila
- Kari Marttila’s Home Page in LinkedIn: https://www.linkedin.com/in/karimarttila/

Top comments (0)