
This quick tutorial outlines the process of creating an AI Code Translator in under 10 minutes using ToolJet and OpenAI. This translator will support translation between 15 popular programming languages and include a feature to optimize translated code for peak performance.
What you'll build:
- An app that translates code between 15 popular programming languages.
- An optimization feature to improve the code quality.
Prerequisites:
- ToolJet: An open-source, low-code platform designed for quickly building and deploying internal tools. Sign up for a free ToolJet cloud account here.
- OpenAI Account: Register for an OpenAI account to utilize AI-powered features in your ToolJet applications. Sign up here.
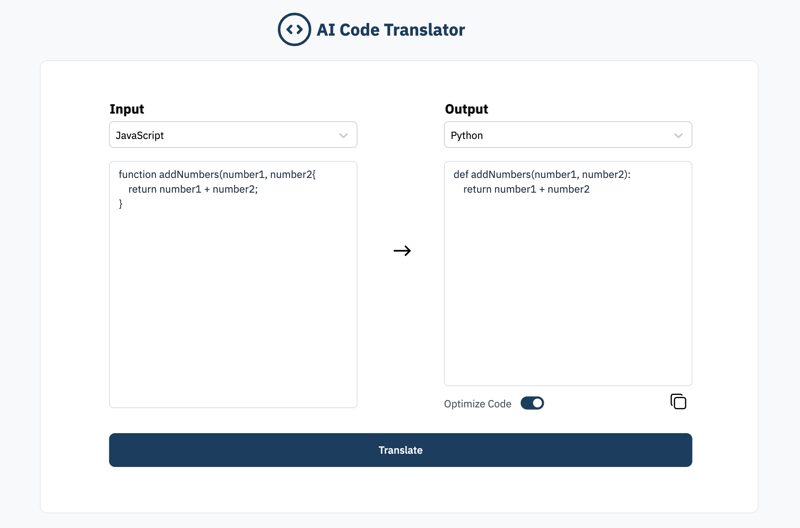
Here's a preview of what the final app will look like:
We'll build the AI Code Translator in four simple steps:
Setup: We'll connect the OpenAI API key to ToolJet and create a new app.
Building the UI: Using ToolJet's visual app-builder and pre-built components, we'll craft a UI for selecting languages and entering code.
Using OpenAI to Translate the Code: Here's where the AI comes in! We'll create a query that uses OpenAI to translate between your chosen languages.
Advanced Features: We'll add a copy button, code optimization feature, and other minor refinements.
Let's begin!
Setup
Setting up a data source in ToolJet is as easy as filling up a form. We will do just that and create a new app using the steps below.
Access the OpenAI Console and generate a new secret key. Remember to copy this key for later use.
If you haven't already, sign up for a free ToolJet cloud account and log in.
On the ToolJet dashboard, locate the Data Sources section on the left sidebar. Here, click on the +Add button under the OpenAI plugin.
Now in the API Key field, paste the API key you copied from OpenAI Console and click on the Save button.

Use the Test Connection button to ensure the OpenAI plugin is correctly connected to your ToolJet account.
Finally, click on the Apps icon in the left sidebar and select Create new app. Name your application AI Code Translator, and click on Create app to finalize the app-creation.
Now that we are ready with a basic setup, let's start building the UI.
Building the UI
1. Designing the Header
Drag and drop an Icon component from the components library.
Click on the Icon component, navigate to its Properties Panel on the right and select the code symbol under its Icon property.
Place a Text component next to it and enter AI Code Translator under its Data property.
Next, change its font size to 23 and font weight to bold.

This tutorial uses a regal blue(#1C3D5F) and white(#FFFFFF) color scheme. Update the colors of your components accordingly in the upcoming steps. Feel free to use a different color scheme.
2. Code Input and Output UI
Add a Container component on the canvas.
Drag and drop two Dropdown components on the container and place them side by side.
Rename the first Dropdown component to inputLanguage, and second one to outputLanguage - renaming the components will help in easily accessing their data during development.
Add the below items in
Option valuesandOption labelsfor both the Dropdown components:
{{["Python", "Java", "C", "C++", "JavaScript", "C#", "Ruby", "Swift", "PHP", "TypeScript", "Kotlin", "Go", "Rust", "Scala", "Dart"]}}
Set the Default value of the inputLanguage dropdown to {{"JavaScript"}} and for the outputLanguage dropdown to {{"Python"}}.

In ToolJet, double curly braces {{}} can be used to pass custom code and access data related to components and queries.
Place two Text Area components below the Dropdown components.
Rename the left dropdown to inputCode and the right dropdown to outputCode.
Place an Icon component between the two dropdowns and select the arrow symbol under its Icon property.
For the inputCode component, add the below code as the Default value:
function addNumbers(number1, number2) {
return number1 + number2;
}

3. Translate Button
Place a Button component below the two Text Area components and rename it to translate.
Under its Button Text property, enter Translate.

The UI of the app is ready. Time to build the functionality of the AI code translator.
Using OpenAI to Translate the Code
One of ToolJet's strengths is its simplified approach to connecting UI elements with data sources. We will observe that as we create a query to perform code translation using OpenAI and display the translated code within the outputCode component in next steps.
1. Adding a Query
Expand the Query Panel at the bottom of the screen and click on + Add button to create a new query - rename this query to translateCode.
Select OpenAI as the Data Source and select Chat as the Operation.
In the Message as input field, enter the following prompt:
Could you translate the following {{components.inputLanguage.value}} code into {{components.outputLanguage.value}}? Please provide only the translated code, without comments or additional explanations.

Here's the code:
{{components.inputCode.value}}

This prompt requests code translation from one language (selected in inputLanguage component) to another (selected in outputLanguage component), for the code provided in the inputCode component.
Click on the Run button on the top right of the query panel, you can now see the translated code in the Preview section of the Query Panel.
2. Binding the Query to Translate Button
Select the Translate Button and go to its Properties Panel on the right.
Under Events, add a New Event Handler.
For the new event, select On click as the Event and Run Query as the Action.
Select translateCode as the Query (the query created in the previous step).

- Under the Default value property of the outputCode component, enter the below code:
{{queries.translateCode.data.length > 1 ? queries.translateCode.data : "" }}
The above code returns the translated code (if available) otherwise returns an empty string.
The AI Code Translator is now complete with basic functionalities. To test it out, click on the Translate button to get the translated code.

Advanced Features
With the foundation in place, we can improve the code translator with ToolJet's customization options.
1. Optimize Code Toggle
Resize the outputCode component and place a Toggle Switch component below it.
Rename the Toggle Switch component to optimizeCode.

Next step is to tweak the code to ensure that when the Optimize Code toggle is on, the output code is optimized during translation.
Open the Query Panel, go to the translateCode query, and update the prompt to add the below code:
{{components.optimizeCode.value ? "The translated code should also be optimized for performance." : "" }}

According to the above code, if the Optimize Code toggle is on, the prompt will instruct the AI to optimize the translated code.
You can now enter some complex, poorly written code in the input, and the output code will be fully optimized after translation.

2. Copy Button
Drag and drop an Icon component next to the Optimize Code toggle, and select the copy symbol under its Icon property.
Under Events, add a New Event Handler.
For the new event, select On click as the Event and Copy to clipboard as the Action.
Under the Text property of the event, add
{{components.outputCode.value}}to copy the value from the outputCode component.

With this configuration done, the output code can be easily copied with a single click on the Copy icon.
3. Refining the Translate Button
Select the Translate button, navigate to its Properties Panel and click on fx next to the Loading state property - fx allows us to dynamically set the properties of components.
Add the below code in the code input field that is visible after clicking on fx:
{{queries.translateCode.isLoading ? true : false}}

- Navigate to the Disable property of the button, click on fx and use the following code to disable the translate button when no code is entered in the inputCode component:
{{components.inputCode.value.length > 0 ? false : true}}
Now if the translateCode query is running, the Translate button will show a loader. Additionally, the Translate button will remain disabled if no code is entered. These small tweaks will improve the overall user experience.
Your AI Code Translator Is Ready! What's Next?
Congratulations! You've built a production-ready AI code translator in record time. Continue building more apps and explore a whole new world of customization and innovation possibilities by combining ToolJet's flexibility with OpenAI. For continued learning and collaboration, check out the ToolJet docs and connect with us on Slack.


Top comments (0)