What is AWS Cloudformation?
AWS CloudFormation is a service that gives developers and businesses an easy way to create a collection of related AWS and third-party resources, and provision and manages them in an orderly and predictable fashion.
A virtual network in the AWS cloud
When you provision a service within a public cloud, it is effectively open to the world and can be at risk of attacks from the internet. In order to secure resources against attacks from the outside, you lock them within a VPC. VPC restricts what sort of traffic, IP addresses, and also the users that can access your resources. In other words, VPC is your network but in the cloud.
Just to be clear, AWS has already created a default VPC for you to use so that you don’t have to create and configure your own VPC. But, by default, its subnet in each AZ is a public subnet, because the main route table sends the subnet’s traffic that is destined for the internet to the internet gateway.
This tutorial walks through how to create a fully functional custom VPC from scratch with a pair of public and private subnets using AWS CloudFormation.
Here are the core components that we are going to create:
VPC
Internet Gateway
Custom route table for the public subnet
Public subnets
NAT Gateway attached to the public subnet
Custom route tables for the private subnet
Private subnets
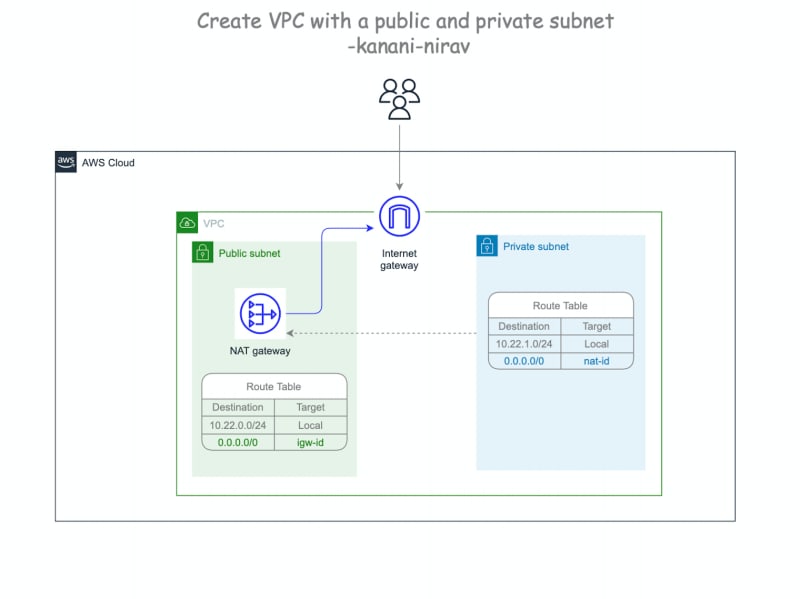
At the end we will get the following architecture:
Let’s get started!
Step 1. Create VPC and Internet Gateway
we start by creating a VPC with a size /16 IPv4 CIDR block. This provides up to 65,536 private IPv4 addresses. We might hard code the CIDR block for VPC but it’s better to define it as an input parameter so a user can either customize the IP ranges or use a default value.
CidrBlock — the IP address range available to our VPC
EnableDnsSupport — if set to true, AWS will resolve DNS hostnames to any instance within the VPC’s IP address
EnableDnsHostnames — if set to true, instances get allocated DNS hostnames by default
we need to create an Internet Gateway. An Internet Gateway is a logical connection between a VPC and the Internet. If there is no Internet Gateway, then there is no connection between the VPC and the Internet.
And finally, let’s attach the Internet Gateway to the VPC
With that, we have already built a very basic VPC.
Step 2. Create a public route table and public subnet
let’s create a custom route table for the public subnet and name it the public route table. We need it to control the routing for the public subnet which we are about to create.
we need to add a new route to the public route table that points all traffic (0.0.0.0/0) to the Internet Gateway.
DestinationCidrBlock — it specifies which traffic we want this route to be applied to. In this case, we apply it to all traffic using the 0.0.0.0/0 CIDR block
GatewayId — it specifies where traffic matching the CIDR block should be directed
Note, when you add a DependsOn attribute to a resource, that resource is created only after the creation of the resource specified in the DependsOn attribute.
once we are done with the public route table, time to create a public subnet with a size /24 IPv4 CIDR block. This provides up to 256 addresses per subnet, a few of which are reserved for AWS use.
It’s better to define CIDR blocks for both subnets as input parameters so a user can either customize the IP ranges or use a default range.
Subnets must exist within a VPC, so this is how we associate this subnet within our VPC:
By setting MapPublicIpOnLaunch to true instances launched into the subnet will be allocated a public IP address by default. This means that any instances in this subnet will be reachable from the Internet via the Internet Gateway attached to the VPC.
And finally, it’s important to associate the route table with both public subnets:
At that point, we are done with public subnets, now let’s create private subnets
Step 3. Create NAT Gateway, private route table, and private subnet
We don’t want instances within our private subnets to be reachable from the public internet. But we do want these instances to be able to initiate outbound connections. Also, we want them to be able to do this without having public IP addresses. That is when NAT gateway comes into the picture.
NAT gateway enables instances in a private subnet to connect to the internet or other AWS services but prevents the internet from initiating a connection with those instances. It will have a public IP address and will be associated with a public subnet. Private instances in private subnets will be able to use this to initiate outbound connections. But the NAT will not allow the reverse, a party on the public internet cannot use the NAT to connect to our private instances.
Thus, we need an Elastic IP (EIP) address and a NAT gateway.
In the sample above, we created and specified an Elastic IP address to associate with the NAT gateway. After creating a NAT gateway, we created and updated the route table associated with the private subnet to point internet-bound traffic to the NAT gateway. This enables instances in our private subnet to communicate with the internet.
And our final step is to create private subnets with a size /24 IPv4 CIDR block. And then associate the private route table with the private subnet.
Optionally, we can add an Output section to get the list of newly created private and public subnets
Complete CloudFormation Template:
Note, If you choose to create a NAT gateway in your VPC, you are charged for each “NAT Gateway-hour” that your gateway is provisioned and available. Data processing charges apply for each gigabyte processed through the NAT gateway regardless of the traffic’s source or destination. Each partial NAT Gateway hour consumed is billed as a full hour. You also incur standard AWS data transfer charges for all data transferred via the NAT gateway. If you no longer wish to be charged for a NAT gateway, simply delete your NAT gateway using the AWS Management Console, command-line interface, or API.
For more details : https://aws.amazon.com/vpc/pricing/
If you want to create multi-AZ Architecture you need to add the AvailabilityZone parameter to each subnet and copy past public and private subnet resources.
Note, With the DeletionPolicy the attribute you can preserve, and in some cases, backup a resource when its stack is deleted. You specify a DeletionPolicy attribute for each resource that you want to control. If a resource has no DeletionPolicy attribute, Amazon CloudFormation deletes the resource by default. If you Want to keep your all resource then add DeletionPolicy: Retain in each resource
For more details: AWS doc
Conclusion
Using this template you can create VPC with the public, and private subnets using AWS CloudFormation. It builds a private networking environment in which you can securely run AWS resources, along with related networking resources.
If this guide has been helpful to you and your team please share it with others!

Top comments (0)