Deploying Python websites is hard. I don't care what anybody says, it's always been the hardest part about Python development in my opinion.
So today I'm going to show you how to deploy your Wagtail website to Heroku fairly easily and for free.
We will be launching a website using:
- Wagtail 2.16
- Python 3.10
- Django 4.0
- Heroku
By the end of this tutorial you will have deployed your Wagtail CMS website to the web.
Quickly creating a new Wagtail website on your computer
Ultra fast steps to creating a Wagtail 2.16 website on your computer.
pip install wagtail
wagtail start your_app
This will give you most of the file you need. If you already have a Wagtail project then please ignore the above code snippet 😎
New project files
You will need a couple files for Heroku to read. The first one is the runtime.txt file which tells Heroku which version of Python to use.
runtime.txt 👇
python-3.10.2
Looking for other Python versions? Check them out here.
Then we need a Procfile. This is going to tell Heroku's dynos how to run your website.
Procfile 👇
web: gunicorn your_app.wsgi --log-file -
Note that your_app.wsgi is mapping to the your_app/ folder and the wsgi.py file. If your project is called my_awesome_app, then change:
your_app.wsgi 👉 my_awesome_app.wsgi
Updating your dependencies
We need a few new dependencies for this to work. Open up your requirements.txt file and add these three packages:
requirements.txt 👇
django-toolbelt
psycopg2
whitenoise
Update Wagtail setting files
base.py
In your base.py settings, add the whitenoise middleware below your security middleware, like so:
base.py 👇
MIDDLEWARE = [
    # ...
    'django.middleware.security.SecurityMiddleware',
    'whitenoise.middleware.WhiteNoiseMiddleware',
]
Note: You could overwrite your
production.pysettings instead of using whitenoise in inbase.py- any settings that go intobase.pyare also used in local development, and that's not always what you want to do.
production.py
By default your production.py file is relatively empty. That's because Wagtail doesn't know what tools you'll be using in production, so it makes no assumptions.
We can make some assumptions now that we know we're deploying to Heroku.
production.py 👇
from __future__ import absolute_import, unicode_literals
from .base import *

import os

import dj_database_url

DEBUG = False

env = os.environ.copy()

# It's a GOOD idea to lock this down.
ALLOWED_HOSTS = ['*']

DATABASES['default'] =  dj_database_url.config()

# Honor the 'X-Forwarded-Proto' header for request.is_secure()
SECURE_PROXY_SSL_HEADER = ('HTTP_X_FORWARDED_PROTO', 'https')

SECRET_KEY = env['SECRET_KEY']

STATICFILES_STORAGE = 'whitenoise.storage.CompressedManifestStaticFilesStorage'

COMPRESS_OFFLINE = True
COMPRESS_CSS_FILTERS = [
    'compressor.filters.css_default.CssAbsoluteFilter',
    'compressor.filters.cssmin.CSSMinFilter',
]
COMPRESS_CSS_HASHING_METHOD = 'content'

try:
    from .local import *
except ImportError:
    pass
Working with Heroku
You'll need the Heroku CLI tool. Once you've downloaded and installed the Heroku CLI, open your command line tool and write:
heroku login
Login to your Heroku account and you'll be ready to start creating new Heroku apps.
Next, you'll need Git. If you don't have Git, make sure you download and install it. Git is the version control system we'll be using to tell Heroku we have new code for our future website. Continue once you have Git installed.
If you are not using git for your project already, initialize a new local repo with (ignore if you are already using git):
git init
git add .
git commit -m "First commit"
That will create a new local repository, add all your files, and create a commit message.
Then create a new Heroku app and connect it to your new git repo with:
heroku create
Then push your committed codebase to Heroku with:
git push heroku master
Now at this point your Wagtail site is in the cloud, but it needs a couple things for the rest of this to work. And this is absolutely vital.
In Heroku, open your app settings and reveal you config vars.

Then add your Django settings module and secret key.
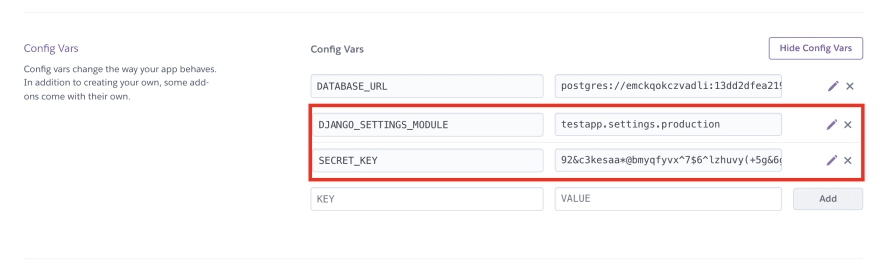
The DJANGO_SETTINGS_MODULE should point to your production settings. In the image above you see testapp.settings.production. That would map to testapp/settings/production.py - your path will certainly be different from mine.
Also you can click here to generate a secret key.
I usually restart all my dynos after this just to make sure these environment variables become available to the website.
Lastly, you can run each of these commands one by one:
heroku plugins:install heroku-config
heroku config:push
heroku run python manage.py migrate
heroku run python manage.py createcachetable
heroku run python manage.py createsuperuser
heroku ps:scale web=1
Now your website is available on the internet! Here's the example website I deployed.
Anytime you need to deploy new changes, all you need to do is:
git add yourfile.ext
git commit -m "Some new commit message"
git push heroku master
Media is not included
Media (files uploaded by the users through the Wagtail admin) are not supported in this tutorial. Heroku doesn't come with file storage and it's best to use something like AWS S3 for that purpose. All your static assets will be served using whitenoise, but your uploaded files won't work - here's a blog post on getting started with S3 on Heroku with Wagtail
Did you find this helpful?
If you found this article helpful please let me know on Twitter @KalobTaulien - I'm always interested in hearing from the Wagtail community.

Top comments (0)