
Let's say your company has been using the Google Cloud Platform for a very long time.
And suddenly, one day, your company's Solutions Architect decided to switch to AWS cause Amazon offers more services (maybe it sounds like an unrealistic situation but let's just imagine)

Because of that, you've been given a task to migrate all the data from GCS (Google Cloud Storage) to AWS S3
You started exploring different possible solutions and found something called AWS DataSync

It is actually a good question.
So, DataSync is one of many AWS Services and it allows you to simplify, automate and secure the data transfer process between different storage systems
Sounds good, right?
But why would you use it and pay for it, when you can build your own solution for that purpose.
Let's start with that building such solution will require a lot of time, and even if you will accomplish that, there is no guarantee that your solution will be cheap, secure and easy to scale.
Therefore, maybe it will be just easier and better not to reinvent the wheel and use DataSync that already has such features as data encryption, validation, monitoring, task scheduling, auditing, and scaling. Also, I think it is important to mention that DataSync is available at 24 AWS Regions!
Hopefully, I convinced you to use DataSync.
The next question you probably want to ask me is how it works.
And before I will answer this question, I want to introduce you to a few very important concepts that I will refer to in the rest of this article.
One of them is DataSync Agent which is a VM (virtual machine) owned by you and used to access your self-managed storage and read data from or write data to it (self-managed storage can refer to on-premises or in-cloud storage systems. Transfers with these kinds of systems require using a DataSync agent)
It can be deployed on VMware, Hyper-V, KVM or as an AWS EC2 instance.
AWS DataSync provides several types of agents for different storage environments.
For example, you can use a VMware agent to transfer data from an on-premises file system.
And if you're copying data from a cloud-based file share that isn't an AWS storage service, you must deploy your DataSync agent as an Amazon EC2 instance (which is our case)
If you are copying data between AWS storage services, you do not need DataSync agent at all.
The other important concept I need to mention is a location which basically identifies where you're copying data from or to.
Each DataSync transfer has a source and destination location.
And last but not least is the task which is simply a DataSync transfer that identifies a source and destination location along with details about how to copy data between those locations.
Task execution is just one individual run of a DataSync task.
And now, when we are all familiar with the terminology, I am ready to answer the question - "how does DataSync work", and I'll do that by going through the process of migrating data from GCS to AWS S3.

First, we need to launch an EC2 instance which will be used to deploy the DataSync agent (we do this as we use an in-cloud storage system - GCS, otherwise we would use an on-premises hypervisor such as Hyper-V or VMware)
As we know, the EC2 instance requires AMI to be chosen.
(for those, who do not know, AMI stands for an Amazon Machine Image and it is a template that contains the software configuration (operating system, application server, and applications) required to launch your instance. But we are not here to talk about AMI, therefore here is the link if you want to know more about it)
The reason I mentioned AMIs is that we will launch our EC2 instance based on the image provided by DataSync. This image contains the DataSync VM image.
Agent AMIs vary by region, thus you have to choose the right one for your region.
In order to get the data about the latest DataSync AMI for a specified region, run this command (AWS CLI has to be installed on your machine)
aws ssm get-parameter --name /aws/service/datasync/ami --region yourRegion
The result of running this command will be an object containing information about the DataSync image - AMI ID (value), version, ARM, etc.
Now, use the following link and replace 2 parameters - source-region and ami-id with your source file system region and AMI ID that we got by running the previous command
https://console.aws.amazon.com/ec2/v2/home?region=source-region#LaunchInstanceWizard:ami=ami-id
By going through this link, "Launch an instance" page will be opened
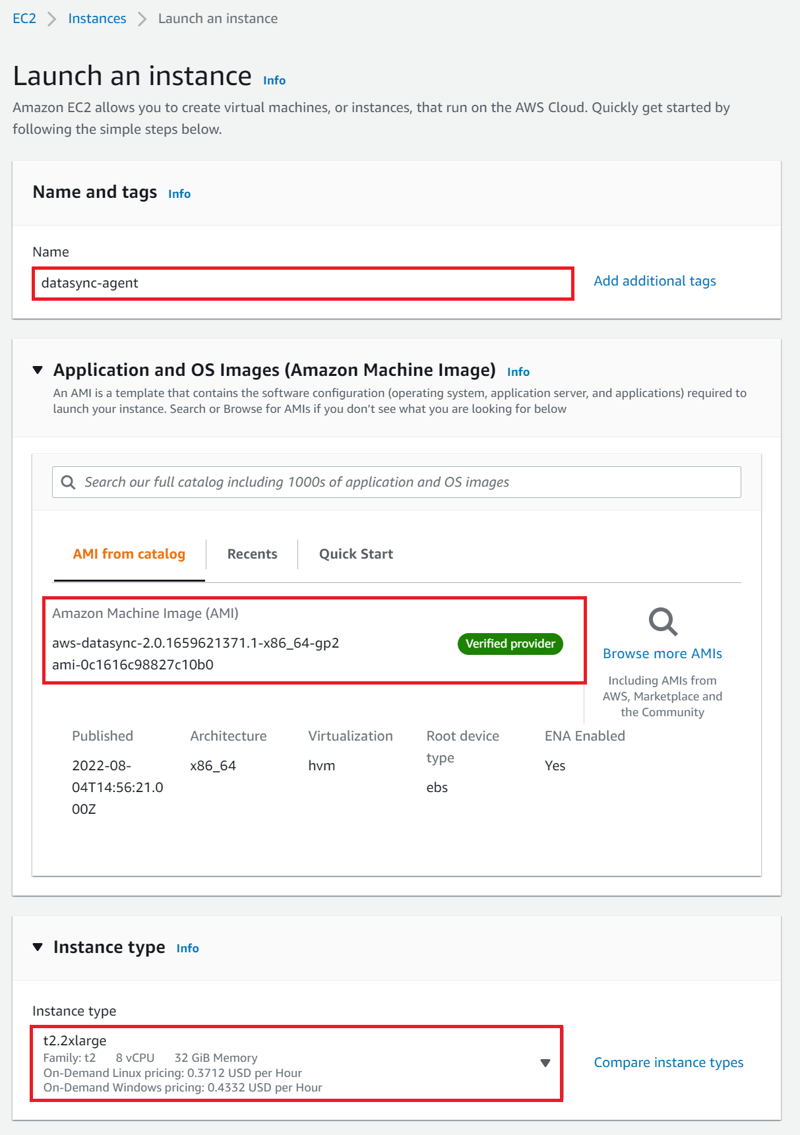
Enter the name of your EC2 instance.
Do not modify the "Application and OS image" section as AMI has already been chosen
For the "Instance type", you have to remember that the instance size must be at least 2xlarge (recommended ones are m5.2xlarge (for tasks to transfer up to 20 million files) or m5.4xlarge (for tasks to transfer more than 20 million files)
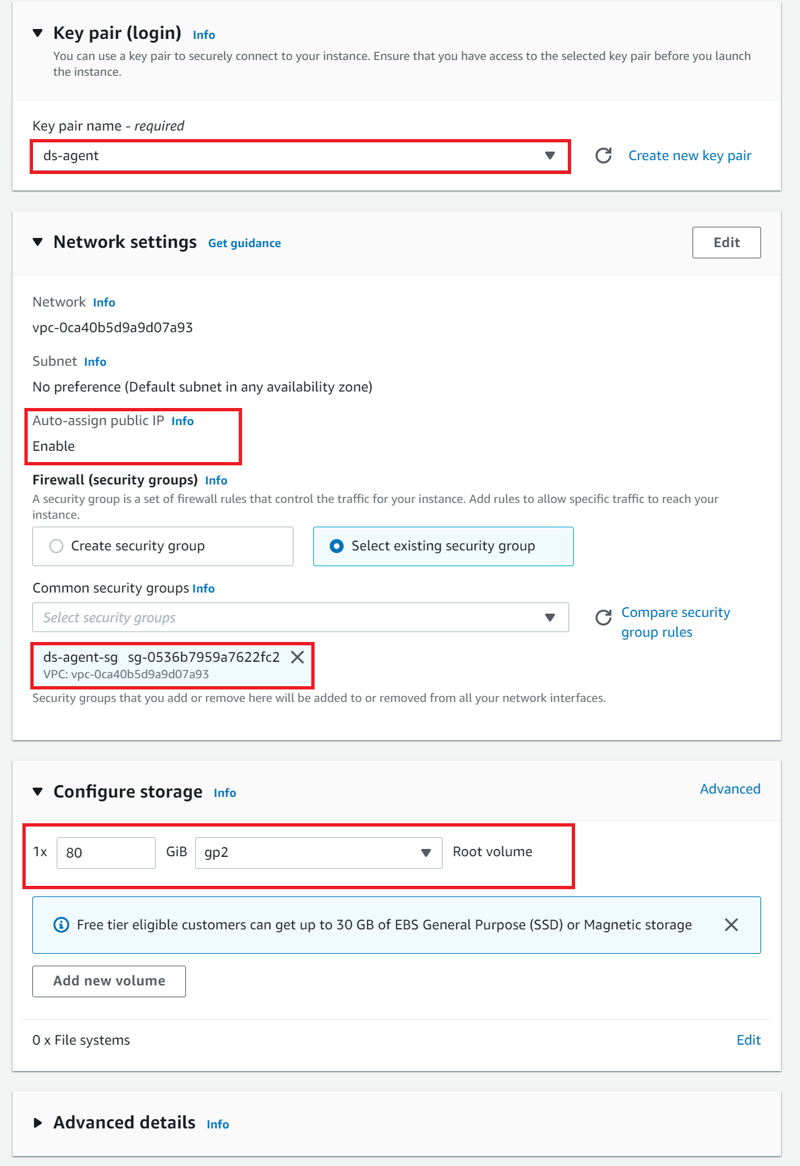
I will choose t2.2xlarge (32 GiB, 8vCPUs, 64-bit)Create a new key pair and save it
In the "Network settings" section, you can edit your VPC and subnet.
Enable Auto-assign Public IPFor the "Security group" section, make sure that the selected security group allows inbound access to HTTP port 80 from the web browser that you plan to use to activate the agent
In "Configure storage" section, ensure that there is at least 80 GB of disk space
Click the "Launch Instance" button
The initial state of the EC2 instance will be pending.
You have to wait until its status changes to running.
When your instance is running, it's assigned a public DNS and IP address that we will need later
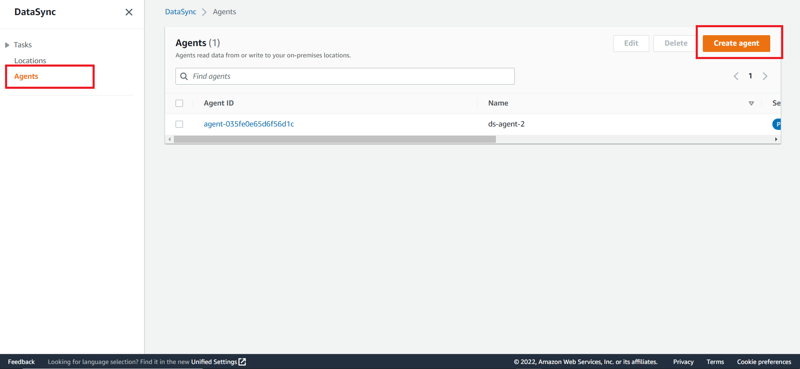
Now, as we deployed our DataSync agent, we need to activate it cause activation securely associates the agent that you deployed with your AWS account
In order to do that, go to the AWS DataSync console, choose Agents on the left-side bar and then click the "Create agent" button.
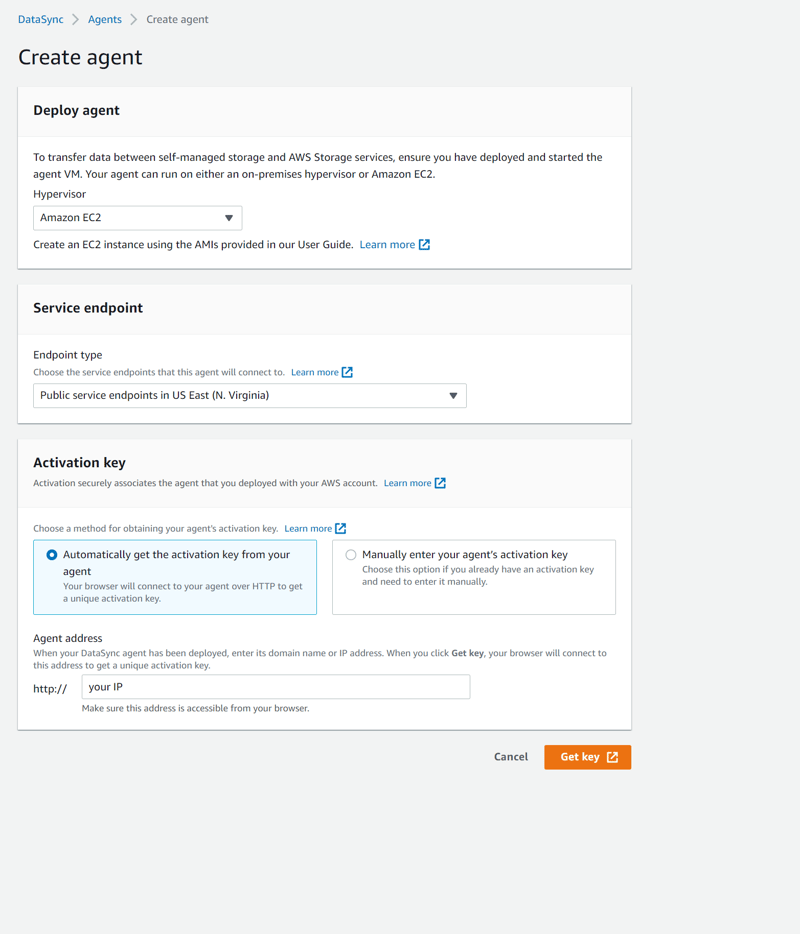
On the "Create agent" page the first section you see is "Deploy agent"
As we deployed our DataSync agent as an EC2 instance, choose "Amazon EC2"
The second section is the "Service endpoint" that the DataSync agent uses to communicate with AWS.
You have 3 options - public, VPC or FIPS.
Also, I need to mention that after you choose a service endpoint and activate the agent, you won't be able to change the endpoint
For simplicity, I am going to choose the public service endpoint.
It means that all communication from your DataSync agent to AWS occurs over the public internet
- The last section of this page is called "Activation key"
To obtain the agent's activation key, you have 2 options - do it automatically or manually.
We will do this automatically, and thus we need to specify the agent's address (to get the IP address, go to your EC2 running instances, choose the one we deployed earlier in this tutorial, and copy its public IP address)
Put copied IP to the "agent address" field.
After that, you can press the "Get key" button.
Your browser will connect to the IP address and get a unique activation key from your agent
If activation succeeds, you will see a "Successfully retrieved activation key from agent" message with the activation key itself.
Then just type the agent name (not required) and press the "Create agent" button
The DataSync agent was successfully activated!
We are almost done, guys!
Just a few small steps left - creating source & destination locations and creating the task itself.
Let's start with the configuration of a source location.
On the DataSync console, go to "Locations", and click the "Create location" button
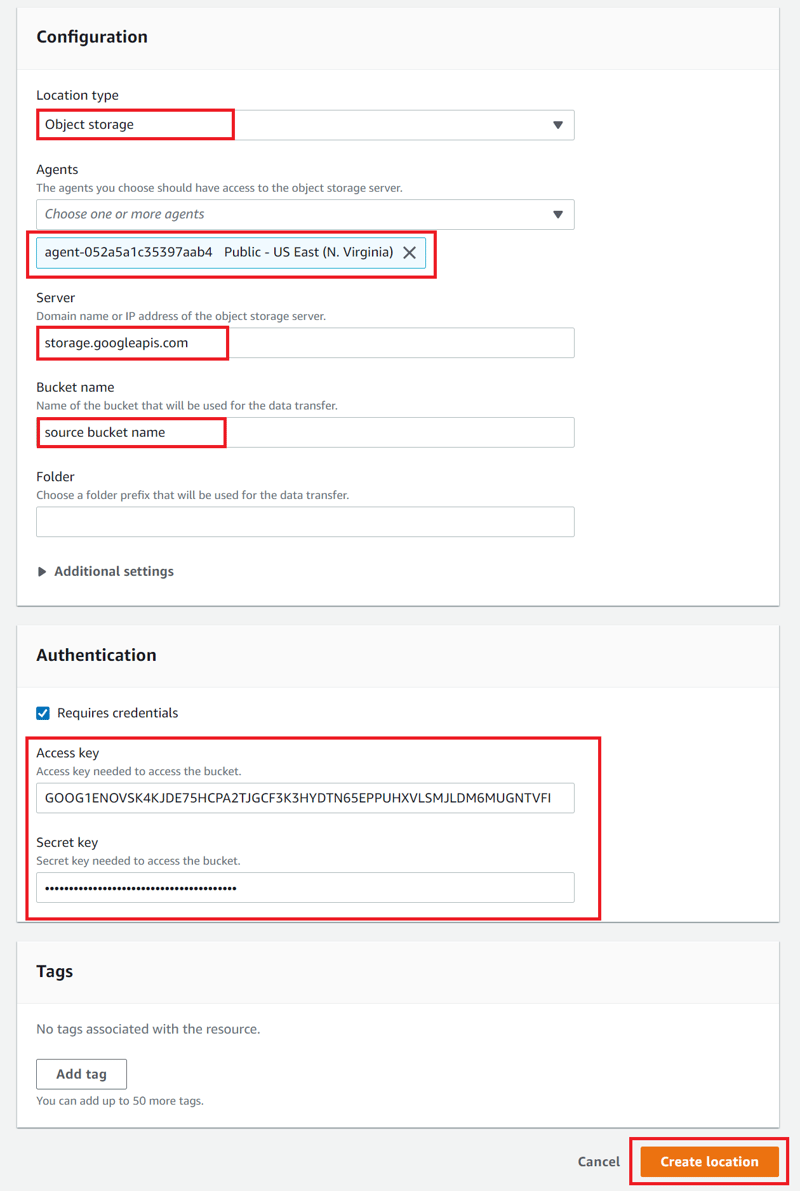
- For the location type, choose "Object storage"
A lot of new fields appeared.
Choose our previously activated agent in the "Agents" field
For "Server", type “storage.googleapis.com”
For "Bucket name", type the name of the GCS source bucket
If you want, you can specify the folder that will be used for the data transfer (I will leave it empty)
In the "Authentication" section, you have to specify HMAC credentials that include access and secret keys.
DataSync agent uses an HMAC credential to authenticate to GCP and manage objects in the Cloud Storage bucket
We are not going to talk about HMAC keys but here is the link to how you can create one
Enter your access & secret keys, and you are ready to press the "Create location" button
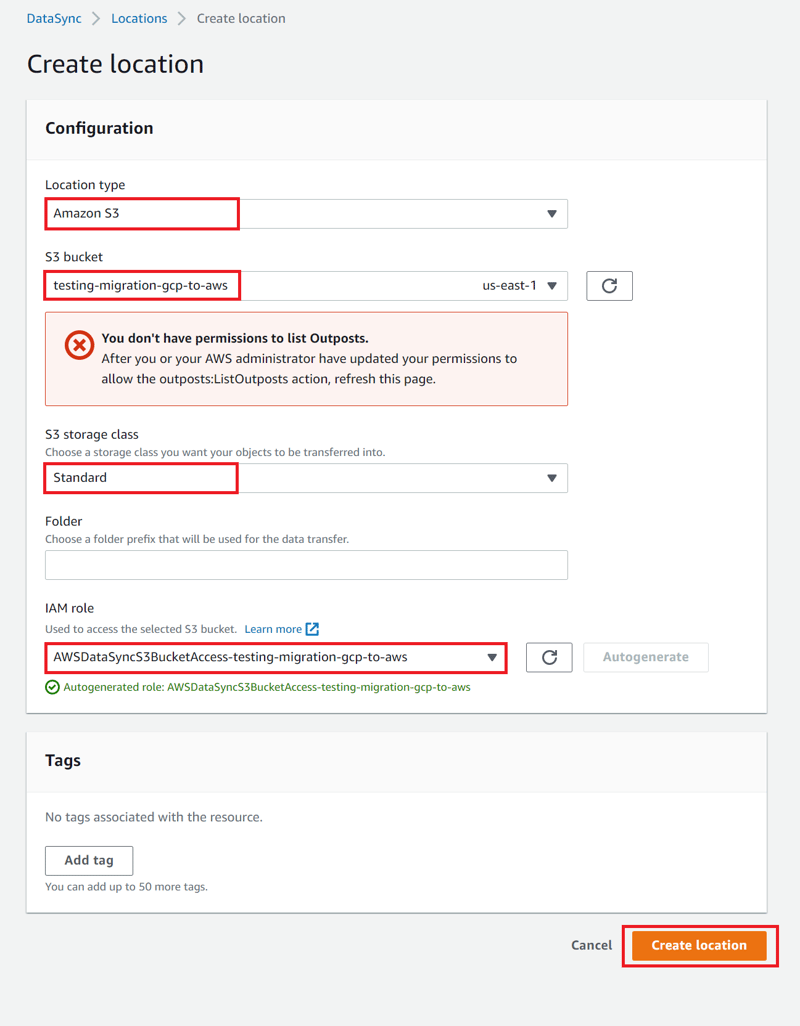
Now, let's go through the same process and create a destination location which is our AWS S3 Bucket.
Click the "Create location" button on the "Locations" page.
For the "Location type" field, choose "Amazon S3"
For the "S3 bucket", select the destination AWS S3 bucket
For the "Storage class" you can leave the default value - Standard.
In the "IAM role", choose a role with appropriate permissions
(DataSync needs to access the AWS S3 bucket in order to transfer the data to the destination bucket. This requires DataSync to assume an IAM role with appropriate permission and a trust relationship - here is the link)
And finally, we just need to create the AWS DataSync task
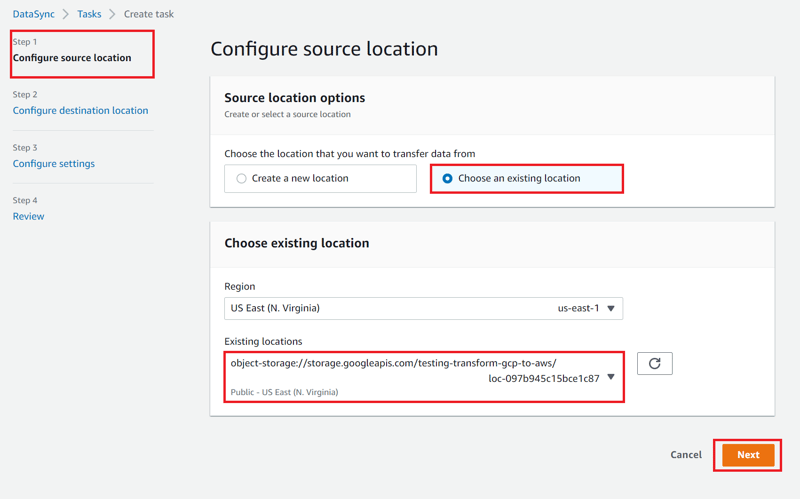
On the DataSync console, go to "Tasks", and click the "Create task" button
- In step 1 - "Configure source location", select "Choose an existing location"
For "Existing locations", choose our previously created GCS location
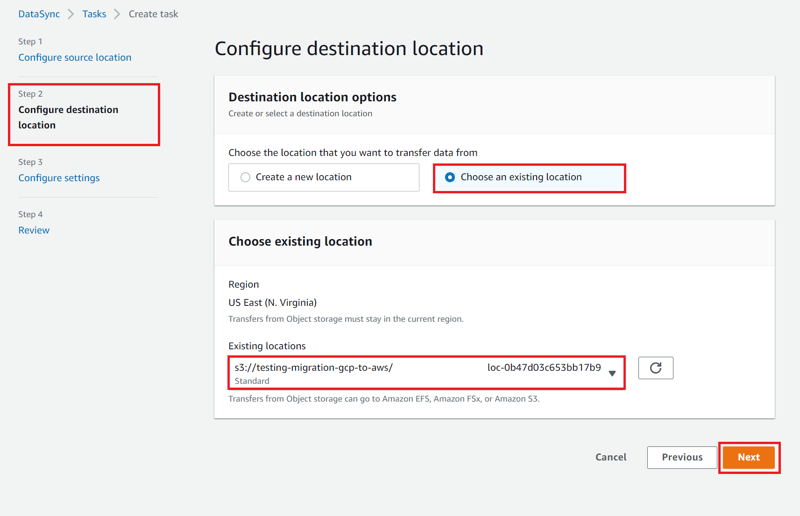
- In the second step - "Configure destination location" do the same as in the previous step, but for "Existing locations" choose the S3 location
- In the third step - "Configure settings", enter the task name
In the "Task execution configuration" section, for "Verify data" choose the needed option (I will leave the default one)
In the "Data transfer configuration" section, leave everything as default values (but you can adjust it if needed)
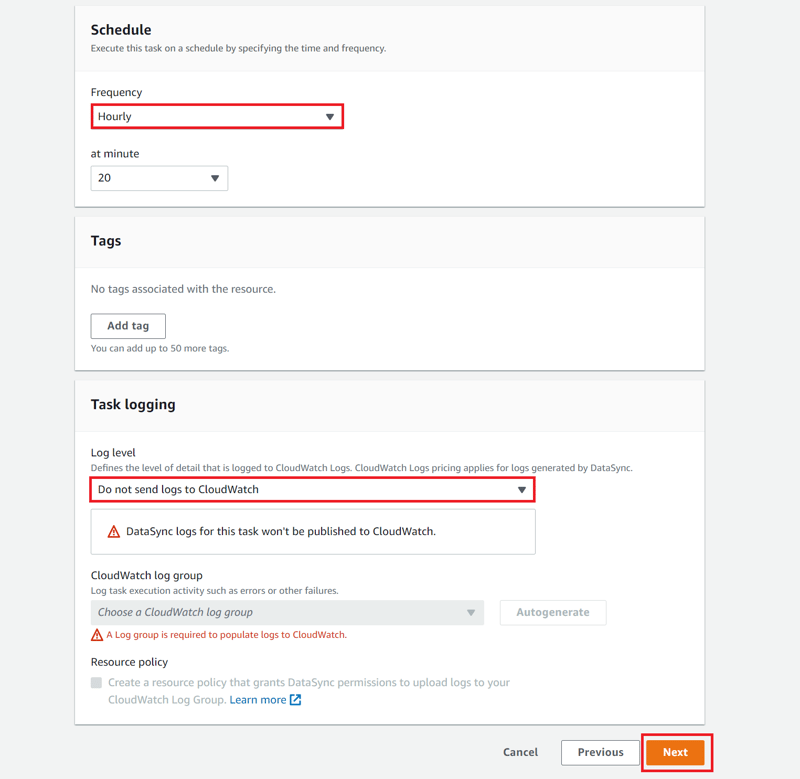
In the "Schedule" section, choose a schedule you want this task to be executed on

Go to step 4 - "Review", and click the "Create task" button (wait for Task status to be Available)
And that's it, guys.
It was really long article but I hope you made it to the end and were able to successfully run your first AWS DataSync task!
I would appreciate it if you could like this post or leave a comment below!
Also, feel free to follow me on GitHub and Medium!
Adios, mi amigos)


Latest comments (1)
Nice article about a pretty niche AWS Service.. curious why you decided to dive in so deep? Is this a real problem you've had to deal with or just something you decided to learn about?