
Introduction
When you create a new ASP.NET Core Razor Pages project, the new project comes bundled with Bootstrap CSS framework and jQuery Javascript library. Files for both Bootstrap and jQuery are placed in a wwwroot/lib folder. The lib folder contains both compressed and un-compressed versions of all files your project may require.
During development, you add more CSS to customize the design of your final application. At times, the CSS you add may end up duplicating formatting under different class names. Coming up with these CSS class names at times also prove to turn out to be a challenge. This is where Tailwind CSS comes in handy. Tailwind CSS is a highly customizable, low-level CSS framework that gives you all of the building blocks you need to build bespoke designs. Each Tailwind CSS class (w-16) maps to a single CSS declaration (width: 4rem;). By combining these classes, you can freely apply any CSS declarations to a page without ever thinking about coming up with CSS class names. Tailwind does not contain any predefined components and this is where Bootstrap comes in handy. You let Bootstrap provide the components like buttons, cards, and more while enhancing these components using Taiwind CSS.
Combining both Bootstrap and Tailwind CSS will however result in a huge increases the size of the CSS files. ParcelJS to our rescue. Parcel is a web application bundler which offers blazing fast performance and requires zero configuration. Using Parcel will allow us to compress and combine the CSS files into a single file. Now we get the best from both Bootstrap and Tailwind CSS and end up with manageable minimized CSS files.
In this post, we create an ASP.NET Core razor web application, add Tailwind CSS to the project, bundle the project asset files with Parcel and finally add the bundling process to our project build process.
Prerequisites
Your development environment should already be set up to create ASP.NET Core applications and have Node JS installed.
If however you are starting from a clean slate, you can run the following installations to follow along:
Install Visual Studio Code
Install .NET Core SDK
Install C# for Visual Studio Code extension
Install Node.js.
Create ASP.NET Core Razor Project
Open a terminal or console window and run the following command dotnet new razor -o ParcelBootstrapTailwind and wait for the project creation process to complete. razor is the template of the project. To see a list of available templates, run dot new --help command. -o creates a folder for our project.
Open the project by running code ParcelBootstrapTailwind command.
Click Yes when the Required assets to build and debug are missing from ParcelBootstrapTailwind'. Add them? dialog is displayed.
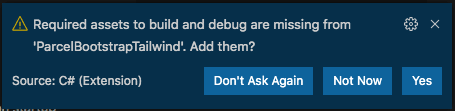
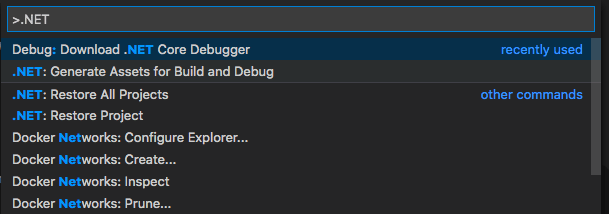
If the dialog closes before you press the Yes button, select View > Command Palette.., type .NET and click on .NET: Generate Assets for Build and Debug.
From the main menu, select Run > Run Without Debugging and a browser page should open with a Welcome message.
Now that our project runs using the bundled CSS library, we can move to the next phase. Back in the text editor, stop the running project by selecting Run > Stop Debugging.
Prepare Project To Use Parcel
We need to do a bit of re-organization before using ParcelJS to bundle our asset files.
Create an assets folder in the root of the project. Your are free to name the folder differently.
Within the assets folder, create a file and name it main.js. You can use a different name for the file. This file will be the entry point for Parcel.
Copy or move js and css folders from wwwroot to the assets folder
Delete the wwwroot folder
Open Pages/Shared/Layout.cshtml file and replace
<link rel="stylesheet" href="~/lib/bootstrap/dist/css/bootstrap.min.css" />and<link rel="stylesheet" href="~/css/site.css" />with<link rel="stylesheet" href="~/dist/css/main.css" />. Scroll down the file and replace<script src="~/lib/jquery/dist/jquery.min.js"></script>,<script src="~/lib/bootstrap/dist/js/bootstrap.bundle.min.js"></script>and<script src="~/js/site.js" asp-append-version="true"></script>with<script src="~/dist/js/main.js"></script>From the main menu, select View > Terminal.
We need to create a package.json: file at the root of the project. Run
npm init -ycommand from the Terminal window.-ywill make the command run using the default options without prompting us. If you want to supply the values for any of the required options, then omit the-yfrom the command.Install Bootstrap and jQuery. Run
npm install bootstrap jquery jquery-validation jquery-validation-unobtrusive popper.jsfrom the Terminal.We will include the jQuery validation Javascript files into our build process. Therefore, Pages/Shared/_ValidationScriptsPartial.cshtml file is no longer needed and can be deleted.
Run
npm i -D parcel-bundler parcel-plugin-purgecss parcel-plugin-custom-dist-structurecommand to install Parcel and plugins we will require in our build process. Bothparcel-plugin-purgecssandparcel-plugin-custom-dist-structureplugins are optional and may be omitted. However, we will configureparcel-plugin-purgecssto remove any unused CSS classes. Parcel.js outputs all built resources in the same folder. We will therefore useparcel-plugin-custom-dist-structureto move files to custom folders within the output folder.-
Open main.js and add code to import Bootstrap and jQuery as follows:
-
Open package.json file at the root of the project and add scripts to build Parcel. Replace the
scriptssection with the following:
Scroll down and add the following code to move files to custom folders. Add the code below"devDependencies"or any other location: -
To remove any un-used CSS class during deployment, create a purgecss.config.js. We will update this file with the content files that contain CSS class names and the location of our CSS files.
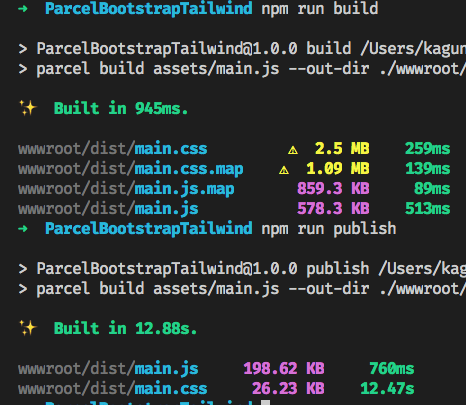
From the terminal window, let us test that Parcel build works as expected. From the Terminal window, run
npm run buildandnpm run publish. If the builds run to completion, you should output similar to the following:

To complete this section, let's run the the application. Select Run > Run Without Debugging from the main menu and a browser page should open with a Welcome message similar to the way it was before using Parcel to bundle our CSS and Javascript files.
Add Tailwind CSS
Open the Terminal window and run npm install tailwindcss. This command will add the Tailwind CSS package to our project.
Create assets/css/tailwind.css file and update with the following:
@tailwind base; is commented out to avoid conflicting with Bootstrap.
Some CSS class are common to both Bootstrap and Tailwind. We are therefore going to use a prefix for Tailwind CSS to differentiate between Bootstrap and Tailwind classes. Create a tailwind.config.js file within the root of the project by running npx tailwindcss init command from the terminal window. Open the file and add prefix: 'tw-' prefix to use for Tailwind classes. Also, as we are using a Parcel parcel-plugin-purgecss plugin for purging un-used classes, we will therefore add purge: false to disable the purge feature within Tailwind. After these changes, your tailwind.config.js file should look similar to the following:
Add an import import './css/tailwind.css' statement for the tailwind.css within main.js just before the import './css/site.css'.
The final step for adding Tailwind to our project is by adding a PostCSS plugin to our Parcel build chain. Create postcss.config.js file at the root of the project.
If we now run npm run build, we should see that there is an increase in size on the main.css. The size however reduces drastically when we run the npm run publish.
To test whether the Tailwind CSS classes are being used, open Pages/_Layout.cshtml and change the background color of the tag by adding a class="tw-bg-gray-200" class. Also add a gradient to the nav bar by adding tw-bg-gradient-to-r tw-from-teal-400 tw-to-blue-500 CSS classes to the tag. Run npm run build command and select Run > Run Without Debugging from the main menu. You should observe that the home page and the nav bar are now displayed using our new changes.

When working with Tailwind CSS classes in Visual Studio Code, the Tailwind CSS IntelliSense extension will come in handy.This extension provides features such as autocomplete, syntax highlighting, and linting. To install the extension, open your Extensions and search for Tailwind CSS IntelliSense.
Also, if you have some CSS code and cannot remember out its equivalent class name in Tailwind CSS, Tailwind CSS class search will be there to assist. Type a CSS style name and the website will display both the Tailwind CSS class name and style properties for you.

Add Parcel To Project MsBuild Process.
To integrate Parcel build process to the project build process, we make some modifications to our project file. This will ensure that the npm run commands run before the project build and publish process is performed.
The Microsoft Build Engine (MSBuild) tool uses properties, items, tasks, and targets to build a project. Properties are key-value pairs which direct MSBuild what to do. You define properties using <PropertyName>Value</PropertyName> elements. MSBuild has its own reserved properties. You reference property values using $(PropertyName) syntax. Items are inputs into the build system while tasks are commands which are executed in order to complete a Target. Targets group tasks together.
In our project, we require properties for assets, nodemodules, and wwwroot folders. Open ParcelBootstrapTailwind.csproj and add these properties within <ProjectGroup> as follows:
Next we create our Targets. The first Target will check whether NodeJS is installed and that the node_modules folder exists. If NodeJS is not installed, it will not be possible to proceed with with the build and we request the user to first install NodeJS. If node_modules folder does not exist, we first start by re-installing NPM packages before proceeding with the build. The other two targets will be called depending on whether we are doing a normal build or publishing our application. If we are running a normal build, the build process will invoke npm run build otherwise npm run publish will be invoked. The updated ParcelBootstrapTailwind.csproj should be similar to the following:
From the main menu, select Run > Run Without Debugging and if we typed everything without errors, a browser page should open with a Welcome message. To test for the project publishing, run dotnet publish -c Release -o ./publish from the terminal. You will observe the project will build and create a publish folder at the root of the project. The size of the CSS file within the publish/wwwroot/dist/css/main.css will be much smaller than the one within wwwroot/dist/css/main.css.
Conclusion
Not all of us are good at CSS and designing websites. By using CSS frameworks such as Bootstrap, we can use existing predefined components to create good looking websites. Using the low-level classes provided by Tailwind CSS enhances the look and feel of our websites without having to create custom classes. And when our websites are ready for deployment, we can bundle our website assets with no configuration using Parcel.
In this post, we set up a new project in Visual Studio Code, added Bootstrap and Tailwind and finally bundled our asset files using Parcel. As a final step, we automated the assets bundling commands into the project build process thereby ending up with minified asset files ready for deployment.
Thank you for reading this far and I hope you picked something along the way that can be of use in your current or next project.
Happy Bootstraping and Tailwinding with Parcel!

Latest comments (0)