I have my first NAS in 2016, it is a DS215J from Synology. But for a long time, I didn't use it so much, because I didn't have a lot of data, and most of them are in the cloud.
Until recently, I start to store some large files in NAS, so I decided to do some upgrades. But Synology has a very low cost-effective ratio, and I succeeded to build a router with vanilla Linux last year, so I decided to DIY a NAS, I hope it can satisfy my storage needs for the next 10 years.
I still choose Ubuntu as the operating system, and Ansible as configuration management tool, so you can find most of the configuration files on my GitHub.
Disclaimer: I didn't pay much attention to compatibility and portability, so you probably can't run it directly, just for reference only.
File system
File system is the most important part of NAS. After not so much research, I found ZFS, is probably the file system that makes the most effort on data reliability at this time.
ZFS is a file system and also a RAID manager, so it has some special features:
- ZFS calculates a checksum for every block and will scan the entire disk periodically, recover from the byte flip by cosmic ray.
- You can specify some directories to store more copies in addition to the RAID configuration. Allow you to recover those data even if the RAID is broken.
ZFS also supports data encryption, compression, and deduplication. Those features work in a smart way, would not disturb each other. All those features can configure at the directories (dataset) level and can be changed anytime (only apply to new data).
ZFS supports snapshots of course, snapshots can be exported into a binary stream, and store to anywhere. With this feature, you can backup, transfer, and restore your ZFS file system without losing any metadata.
Hardware
I don't have much knowledge about hardware, so I choose MicroServer Gen10 from HPE, it is a 4-bay micro server solution, use AMD X3421 CPU, 8G ECC memory, standard x86 hardware. I think it can decrease troubles with hardware maximally.
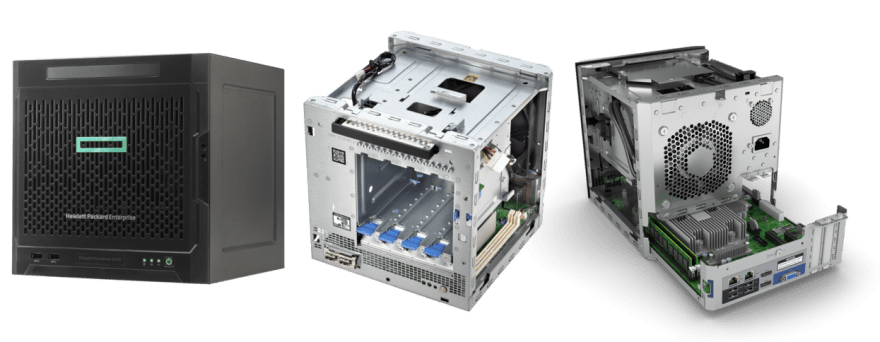
I installed an NVME SSD on PCI-E slot by an adapter card, used for system partition and ZFS read cache (L2ARC, but significant effect due to later testing), data disks are using my old disks temporarily, I will upgrade them to 4T finally. It should be noted here that ZFS is not able to change the raidz configuration, so must configure enough disks at the start, then upgrade its capacity later. Actually, I connected a USB hard disk to meet the quantity.
ZFS
I chose the raidz (RAID5) configuration because I have 4 disks, One of them is parity disk. if I upgrade them to 4T, I got 12T real capacity.
root@infinity:~# zpool status
  pool: storage
 state: ONLINE
config:
    NAME                                 STATE     READ WRITE CKSUM
    storage                              ONLINE       0     0     0
      raidz1-0                           ONLINE       0     0     0
        sda                              ONLINE       0     0     0
        sdb                              ONLINE       0     0     0
        sdc                              ONLINE       0     0     0
        sdd                              ONLINE       0     0     0
    cache
      nvme0n1p4                          ONLINE       0     0     0

root@infinity:~# zpool list
NAME      SIZE  ALLOC   FREE  CKPOINT   FRAG    CAP  DEDUP    HEALTH
storage  7.27T  3.52T  3.75T        -    10%    48%  1.00x    ONLINE
People believe RAID5 has a high risk of losing data during data recovery, like the second disk broken during the first disk replacing, or data rots causing recovery failure as the time goes on. However ZFS will check the data integrity periodically, and think over the disk quantity and capacity synthetically, I think the risk is acceptable. And I will cover my offsite backup lately.
I enabled the encryption feature, but there is a problem: I should not store the plaintext password on the system disk —— otherwise the confidentiality will be broken. because the password and the ciphertext are stored in the same place. So I decided to re-enter the password and mount the data set manually every time after the NAS restarted.
I also enabled the compression feature, the default lz4 algorithm only uses a small amount of CPU but may increase the IO performance significantly —— because there are fewer data need to be read after compression. I didn't enable the deduplication feature, because deduplication needs a lot of memory to index the entire disk to find duplicated blocks.
Some people believe ZFS needs a large amount of memory and ECC memory is required. But I think it is a misunderstanding: more memory can increase the performance, and ECC can help all programs to avoid memory corruption, but neither of them is required. ZFS still has a good performance and data integrity even without ECC and more memory.
Storage service
Fun fact: SMB is the most popular file sharing protocol, all major operating systems have built-in support for it. CIFS is the Microsoft (Windows) version of implementation to SMB, and Samba is another implementation of SMB that I will use it following.

Providing file storage service through SMB protocol is the core feature of a NAS. All of the banded NAS have a powerful and friendly interface to configure SMB shares, but we can only edit the configuration file of Samba manually. Samba directly adopted the users and permissions from Linux, which can be very simple:
# Use a placeholder in `path` to provide a split home directory for every user
# Use user groups in `valid users` to control accessible users
[Home]
path = /storage/private/homes/%U
writeable = yes
valid users = @staff

# Samba creates files as login user by default, since NextCloud is running as www-data, we need to override the file user by `force user`
[NextCloud]
path = /storage/nextcloud/data/%U/files
writeable = yes
valid users = @staff
force user = www-data

# Those settings make macOS's Time Machine work through SMB
# See https://www.reddit.com/r/homelab/comments/83vkaz/howto_make_time_machine_backups_on_a_samba/
[TimeMachine]
path = /storage/backups/timemachines/%U
writable = yes
valid users = @staff
durable handles = yes
kernel oplocks = no
kernel share modes = no
posix locking = no
vfs objects = catia fruit streams_xattr
ea support = yes
inherit acls = yes
fruit:time machine = yes

# For shared folder, use `force group` to override the group of files, and use `create mask` to override the permission of files
[VideoWorks]
path = /storage/shares/VideoWorks
writeable = yes
valid users = @staff
force group = staff
create mask = 0775

# Only allowed the specific group to write, enable guests to read
[Resources]
path = /storage/public/Resources
guest ok = yes
write list = @staff
force group = +staff
create mask = 0775
As you can see above, those shares folders are distributed in different paths. That because I planned several data sets due to different types of data, make it easy to manage by dictionary:
-
dbDatabase of applications,recordsizeset to 8k (128k by default). -
nextcloudNextCloud's data dictionary, can also access by SMB. -
privatePersonal data for every user. -
sharesFiles shared by family, like video shotted by ourself. -
publicResources that can be downloaded from the Internet, didn't participated in offsite backup. -
backupsBackups like Time Machine, didn't participate in offsite backup.
root@infinity:~# zfs list
NAME                USED  AVAIL     REFER  MOUNTPOINT
storage            2.27T   286G      169K  /storage
storage/backups     793G   286G      766G  /storage/backups
storage/db          741M   286G      339M  /storage/db
storage/nextcloud   207G   286G      207G  /storage/nextcloud
storage/private    62.2G   286G     62.2G  /storage/private
storage/public      648G   286G      613G  /storage/public
storage/shares      615G   286G      609G  /storage/shares
Applications
I installed Netdata firstly, it is a monitoring tool that can work out of the box, provide a lot of useful metrics at 1-second precision, and only cost a small number of resources, very suitable for monitoring a single server's performance.

All of the other applications are running inside Docker and managed by docker-compose, so we can isolate the environments between each other and improve the stability of the host, install, upgrade and uninstall processes also very easy.
The most important of those is NextCloud, which is an open source file storage application. NextCloud has a pretty nice iOS app and has some integration with the system, like syncing LivePhoto correctly or accessible in the Files app.

NextCloud will read or write files directly to the filesystem on server side, rather than store files into database. That means NextCloud's storage directory can also access by SMB, very convenient (but required a cronjob to refresh metadata inside NextCloud's database).
I also run some other applications inside Docker:
- Miniflux, A RSS reader server, supports most RSS readers through Fever API.
- Bitwarden (Not officialy version), A password manager, provides browser extensions and clients on all platforms.
- Transmission, A BitTorrent client, provides Web UI to manage downloads.
Public access
In order to use it as a personal cloud drive alternative, the NAS should be able to access outside of my home network.
The usual way is to use DDNS (dynamic DNS) to resolve a domain to the IP of your home network, but it requires your home network to have a public IP, and ISP allows you to provide Web service through 80 or 443 port. I don't want to rely on that, so I turn to using frp as a reverse proxy. If you do have a public IP, you can use the DDNS, it doesn't need a relay server and has a faster speed.
In order to make NextCloud has a fixed address (like https://nextcloud.example.com), I resolve the domain on my router separately: resolve to NAS's private IP inside my home; resolve to relay server outside my home. Both cases are over SSL (from Let's Encrypt), so don't need to worry about confidentiality on the relay server.
Although I don't need to dial a VPN before accessing my NAS outside, but expose NextCloud on public network is not safe. There are already some people request NextCloud add support for client-side certificate authentication on their app, I am also very interested in this feature, it will improve the security of public network access.
I also installed WireGuard on my NAS, it is a VPN module built-in to Linux, also exposed to public network via frp. I can access other services like SMB, SSH, and Netdata through WireGuard outside home.
If you don't insist to use open source software, you can also try ZeroTier, it provides NAT traversal ability, allow your devices directly access to your NAS, and improve the transfer speed.
Backups and data integrity
In addition to raidz, I setup a cronjob that creates a snapshot every day, and writes a script to simulate Time Machine: keep everyday backups for one week; keep every week backups for one month; keep every month backups for one year, and every year backups.
root@infinity:~# zfs list storage/nextcloud -t snapshot
NAME                           USED  AVAIL     REFER  MOUNTPOINT
storage/nextcloud@2020-09-05  83.9M      -      182G  -
storage/nextcloud@2020-09-15  35.2M      -      207G  -
storage/nextcloud@2020-09-21  30.2M      -      207G  -
storage/nextcloud@2020-09-23  29.7M      -      207G  -
storage/nextcloud@2020-09-26  29.3M      -      207G  -
storage/nextcloud@2020-09-27  28.2M      -      207G  -
storage/nextcloud@2020-09-28  28.2M      -      207G  -
storage/nextcloud@2020-09-29  29.1M      -      207G  -
storage/nextcloud@2020-09-30  33.5M      -      207G  -
Snapshots are used to restore from human error, some of them can be realized immediately, but others may be realized after a long time (like you believe that you don't need this file anymore).
And another cronjob backups to Backblaze B2 as an offsite backup using restic. Backblaze B2 is a low-cost object storage provider, it is a good choice for backup. restic is an incremental backup tool that also supports encryption. For cost consideration, offsite backups only include data created by myself, not including public and backups directories.
I also thinked about that run a ZFS system remotely as offsite backup, zfs send and zfs recv support transfer a snapshot through a binary stream - doesn't need any other programs installed, just use shell's pipe operator redirects the binary stream to ssh command. This idea is very neat on the technical view, but I give up it because the price of block storage is 10 times higher than object storage.
Calculate the cost
My budget for the hardware is not so tight, if replace with some cost-effective parts, the cost will be much lower:
- The server (motherboard, CPU, RAM, system disk) - 3500 CNY (521 USD)
- Harddrive (4 x 4T) - 2200 CNY (327 USD)
If I can use it for 10 years:
- Hardware - 570 CNY every year (84 USD)
- Electricity (35W) - 110 CNY every year (16 USD)
- Relay server - 110 CNY every year (14 USD)
- Offsite backup - 415 CNY every year for 1T data (Charger by usages, 61 USD)
To sum up, it cost 1195 CNY (177 USD) every year for 12T of capacity, converted to 8 CNY (1.2 USD) / 1T, if exclude remote access and offsite backup, then just 5 CNY (0.7 USD) / 1T.
Why self-hosting
Compared to cloud service, the first reason is the control of data, although no credible evidence says that cloud service is not secure, but some people just like to keep their data private.
Also, a technical reason is, NAS inside home network able to support online editing over SMB, like load media files directly from NAS, even putting entire project on NAS. Cloud service doesn't support SMB, even if it is supported, the latency is unacceptable.
And we must talk about the cost, we only consider the services which charge by storage capacity here. iCloud, Google Drive, and Dropbox have similar price plan, if your storage is over 200G (about $3 per month), then the next plan jumps to 2T (about $10 per month), with no intermediate plan. At this time, cloud service no longer has the advantage that allows you to pay as you use, it is a good timing turn to self-hosting, you can get back your investment in 2 or 3 years.
After all, the most important thing is your interest, you will need to make many decisions, encounter many difficulties in the DIY process, and finally build a unique self-hosting solution. It's worth if you can enjoy in the process; otherwise it will be a waste of your time.

Top comments (0)