
This article is intended to speed up and simplify the process of mastering the Postman tool basic functionality.
The company positions its product as an API development platform.
But why does everyone love Postman platform?
— This is a powerful API testing and development tool, which at the same time has a simple and intuitive interface. If this is the first time you open this program and know the difference between POST and GET, then you can easily send your first request. However, there are some nontrivial tricks which make life much easier.
Postman requests
So let’s start ( get postman app ).
We look for the necessary button (1) in the upper central part and create a workspace (or select from the existing ones as I do). The notion of a workspace comprises grouping of your projects —it may be a folder or desktop, if you want.
Then we click plus (2) and create a request tab.

Everything is extremely simple with a GET request: we set the url, add parameters (you can «turn on» and «turn off» the parameters), press send and see the answer in the bottom half of the screen (on the server, I just return the html page and present all the incoming parameters in json format). Switching between tabs in the response area, we can find any information and even switch between views and output formats.

To the right of the Send button there is a Save button. At the attempt of saving, postman will ask you to specify/create a collection. A collection is a group of requests in the workspace (sorted, for example, by project). I created a test_collection collection. We save your request there.
Postman environment
Let’s proceed further.
There is the concept of environment in postman — it’s a set of variables that can be assigned a value and used during your work. The environments may be multiple (for sales, for stages, for different versions — for anything). The environment is tied to the operational environment: each operational environment has its own postman environment.
We click on the gear in the upper right corner and create an environment.

I have created a local_test_env environment with 2 variables: host and username. There are 2 columns for the variable value. The only difference is that if you share your project with your team, then the value from the first column will be shared, and the queries that you make on your PC will use the second column. Your postman account synchronization also occurs from the first column.
I usually duplicate them — it’s better to make it a habit to fill everything in, and replace the data in case of necessity.
We select our environment as active (there is a drop-down list to the left of the gear).
Let’s send POST using variables. We should add a tab and select the type of POST request. We want to use the host variable from our environment. Variables are written in double curly braces. We put the braces and begin to write the name of the variable, postman will suggest us to select a variable from the current environment. Let’s choose. Since this is a POST request, we proceed to the body tab (under the address bar) and add the username parameter, the value for which will be a variable. I added several more parameters for illustrative purposes, the server will return the sum of them.

The server returned a json line to us.
In Postman, we can interact with the received result, programmatically send requests, and write tests.
Some words about tests
We open the console with a combination of cmd + alt + c (ctrl + alt + c for Windows). I made one request and see its logs. In addition, you can output something to the console with the following command:
console.log("something")

Tests are written on the Tests tab. I will give you a few examples of simple tests, and then we’ll see how to work with them.
pm.test("Status code is 200", function () {
    pm.response.to.have.status(200);
});
This is a common anonymous function. In this case, we say that the answer should have a status of 200.
Due to the fact that we get a json line in the server response, we can parse this into a variable. Let’s do it with the following line:
var jsonData = pm.response.json();
Then we use a new variable:
pm.test("check number equal 9 ", function () {
pm.expect(jsonData.total).to.eql(9);
});
In this example, we expect that total in jsonData will be equivalent to 9.
Now let’s try to compare the received value of the field «name» from jsonData with the username variable we have in our environment.
You can get a variable from the environment like this:
pm.environment.get('username')
Now an equivalence test:
pm.test("check name equal variable username", function () {
    pm.expect(jsonData.name).to.eql(pm.environment.get('username'));
});
You can not only read, but also write in the environment.
We are trying to get the variable “total” from the environment (it is not there yet).
var sum = pm.environment.get('total');
Since we did not get anything from the environment, there will be nothing in «sum» either. We create a «total» in the environment and write in there the value obtained from jsonData.total.
if (!sum) {
    pm.environment.set('total', jsonData.total);
}
Now let's see what has happened:

All the tests except the first one have passed. The server returns the code 201 to us, while we expect 200. Our variable is in the environment, so everything works.
Now, when you have some understanding of postman, let’s try to send a request, or rather a few.
Task: to send a certain number of requests, each time changing a parameter.
- First we create a new collection of loop requests,
- Then we create a POST request,
- After that body we add the parameter «digit», which will change into the request (we take the value from the environment).
- In the pre-request Script tab, we add the following code:
var digits = pm.environment.get('digits');
if (!digits) {
digits = ["2", "4", "5", "22", "13", "6"];
}
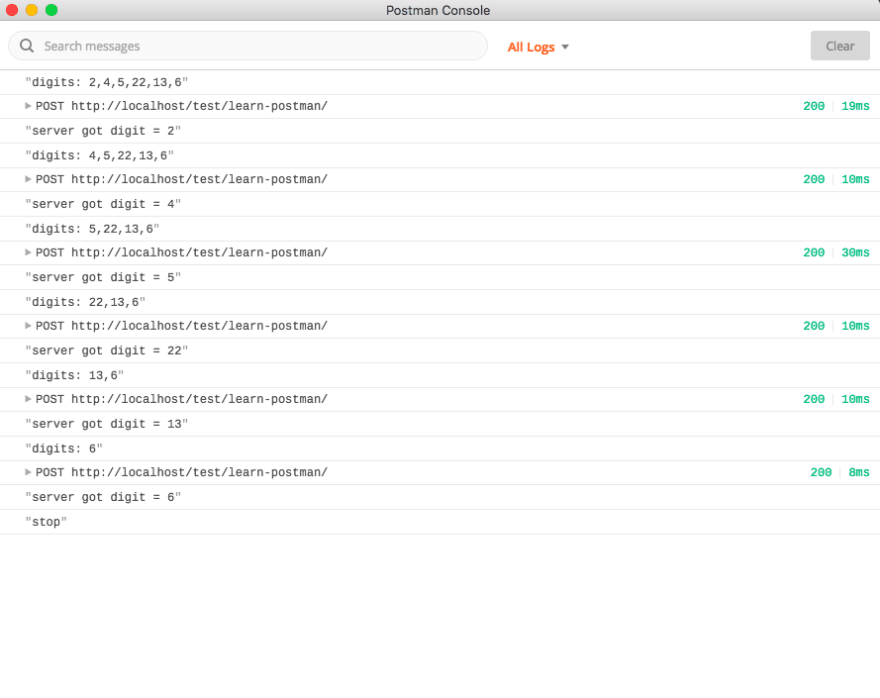
console.log("digits: " + digits);
var currentDigit = digits.shift();
pm.environment.set('digit', currentDigit);
pm.environment.set('digits', digits);
(We check if there is a variable «digits» in the environment, and create it, if there is no such a variable. We output the array «digits» to the console before the request. Next, we take the first element from «digits», removing the value from the array itself. And set the value in the environment for «digit» and «digits». There is one first element less in digits already.)
In the tab «Tests», we write the following:
var digits = pm.environment.get('digits');
var digit = pm.environment.get('digit');

console.log("server got digit = " + pm.response.json().digit);

if (digits && digits.length > 0) {
    postman.setNextRequest("loop request");
} else {
    postman.setNextRequest(null);
    console.log("stop");
    pm.environment.unset("digits");
    pm.environment.unset("digit");
}
(We take «digit» and «digits» from the environment and put some information into the console. If «digits» is not empty, we specify the following request setNextRequest and pass the current request as a parameter. Otherwise, we say that nothing else should be done, clear the environment variables and print the line «stop» in the console.)
After all that we open Runner (in the upper left corner), select our new collection and our loop request, select the environment and click Run loop.
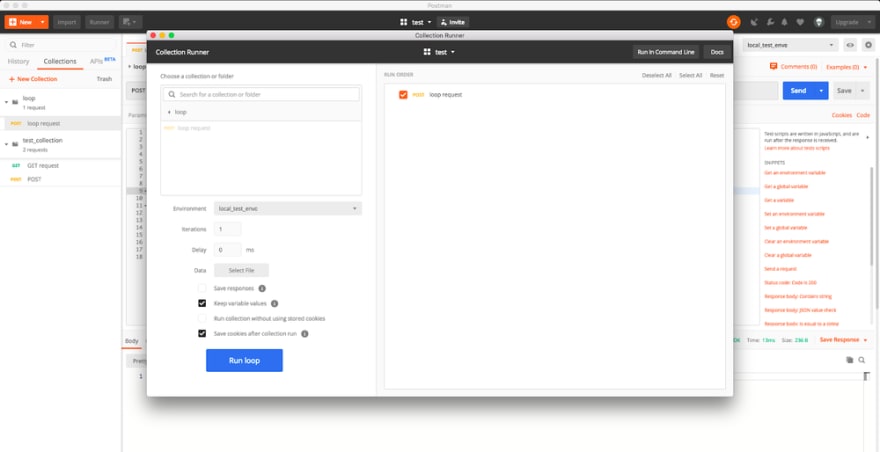
In the runner, we see that 6 requests have been completed.

We then open the console and watch the logs:
Conclusion
We tested some of the of Postman’s features in practice, made sure that it’s really a very convenient and multi-functional development platform that simplifies the processes of development and API testing.
Comprehensive documentation can be found here .
Originally published at Stfalcon.com


Top comments (0)