This post was originally posted on my personal blog. It's been unexpectedly popular there (which isn't really saying much), so I thought I'd share the post on The DEV Community as well.
This is and entry in a series about Starting Out In Development. The goal of this series is to provide brief introductions to critical tools, concepts, and skills you'll need as a developer.
By now you should be familiar with what version control is. If you're unsure, check out my article introducing it.
Now that you know what version control is in general, it's time to get familiar with some of its specific implementations. In this article, we'll discuss Subversion, it's take on version control, and how to use it.
![]()
Subversion: What is it?
Subversion (often abbreviated as SVN) is a software implementation of version control. It was created by CollabNet and is now a major Apache project. It's been around since the year 2000 and is fairly actively developed and updated. There are also many tools that can make using SVN a bit easier and more convenient. Among the most popular of those tools is TortoiseSVN. I'll be using that later in the examples that follow.
Subversion: Its Paradigm
The first thing to talk about is what I'll call the paradigm of SVN. What I mean by that is how it approaches and solves the problem of version control. There are two main approaches to version control: centralized and decentralized. Subversion is a centralized version control system. What that means is that there's one machine or server set up with one copy of the entire repository that keeps track of everything. What that means is, if you ever need to know anything about anything in the repository, you need to ask that server for that information.
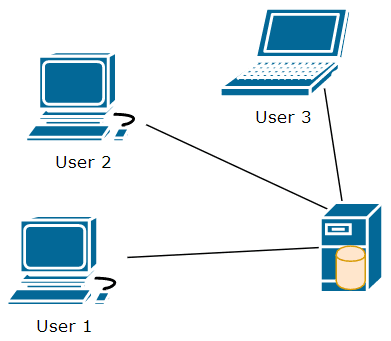
In the above image, we have three users and one server. On the server, the cylinder indicates the SVN repository. Notice that the server is the only one with the repository. If any user wants anything that's in the repository, they need to ask the server for it. If a user wants to have a file that's in the repository, the user will ask the server and the server will give them a copy of that file. As the user makes changes to that file, they'll need to send their changes to the server if they want the changes to be available in the repository. If the user wants to see the history of a file, they'll need to ask the server for that history.
Long story short, in a centralized version control system, there are very few things a user can do without talking to the server that holds the repository. Most activities that you'll do in SVN will require network access to the server.
This has some pros and cons. On the plus side, it makes it easy to manage who has access to what in the repository as well as who even has access to the server. It also makes the footprint on the user's machines very small as they only have a copy of the files (plus a small amount of metadata) instead of a copy of the entire repository. The first time the user requests a copy of the repository (this action is called "checking out" the repository), it goes fairly quickly since the user is only receiving copies of the files.
There are some negative aspects to it, though. Nearly all you do requires internet or network access. This means you cannot view logs, run a blame, change branches, or commit without access to the network the server is on. This also means that committing, viewing logs, switching branches, and other activities take time as the actions are sent across the network and performed on the server. The general configuration of SVN also is slightly limited in the workflows it enables when compared to decentralized version control systems.
As you can probably imagine, Subversion is appealing to some corporations. Having a centralized system means the corporation can generally keep it as secure as they want to. The corporation may feel more control over their source code which can be a very comforting and appealing aspect of centralized systems.
Subversion: How to Use It
Enough of the theoretical stuff, let's get down to business! How do we use this Subversion I speak of? I'm glad you asked! Let's get to it. Before we start, make sure you (1) have access to a server with SVN configured on it and (2) have TortoiseSVN installed on your local machine. If you don't have access to a server with SVN on it, you can set it up locally on your machine (Linux or Windows). Once you have a machine with an SVN repository on it and Tortoise SVN installed on your local machine, we're ready to get started!
First thing you'll want to do is find the place in your file system that you want the files from the SVN repository to be. I generally make a folder called "dev" somewhere and make subfolders in there to keep things organized. Once you have your location chosen, you'll then want to "check out" the SVN repository you want. To do this, open your file explorer and right-click in the folder you've chosen. You should see something like this:
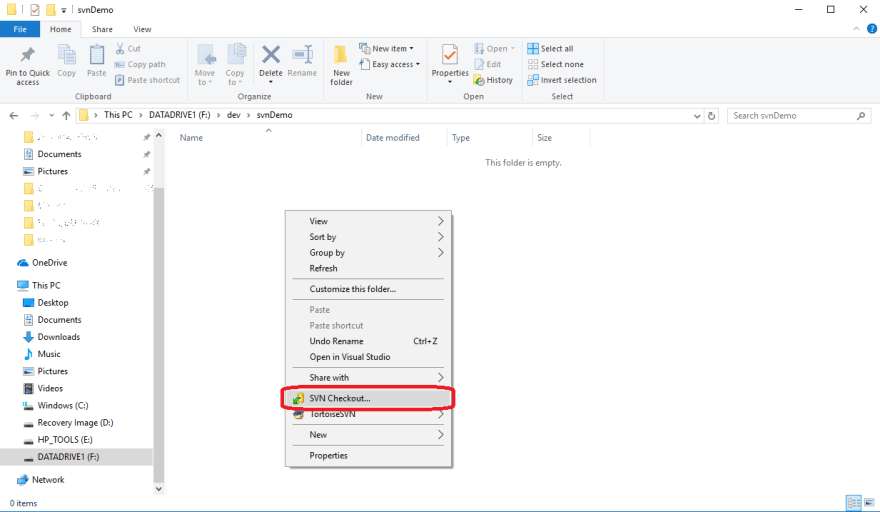
Click on "SVN Checkout..." and you should see a window like this:
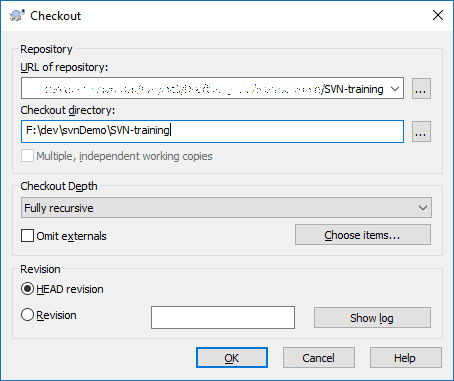
In the "URL of repository" field, enter the URL for the repo or folder you have set up for you to use. When you've done that, make sure the "Checkout directory" field is correct. Normally it should match the folder you're checking out, but it as long as it has meaning to you, anything is fine. Once you've filled in those fields, click "OK." This will then checkout all the contents of the folder you entered and put them in the directory you specified. When it's done, go ahead and click "OK" on the window that opened.
There you go! Step 1 is done! You now have a local copy of the files in the SVN repo you chose! In my case, the folder I checked out was blank, so I'm going to create a new file and add it to the repository for tracking.

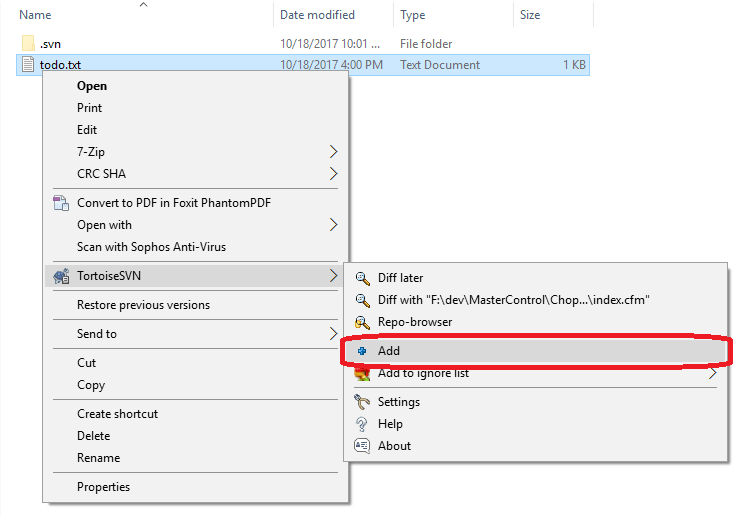
In the above image, you'll see that I now have a file in the my local copy of the SVN folder that I checked out. Right now, SVN doesn't really care about that file. I haven't told it to do anything with it, so it's not going to do anything with it. However, I do want SVN to keep track of this file. So, I'll "Add" this file to SVN. To do this, just right click on the file, find "TortoiseSVN," and click "Add."
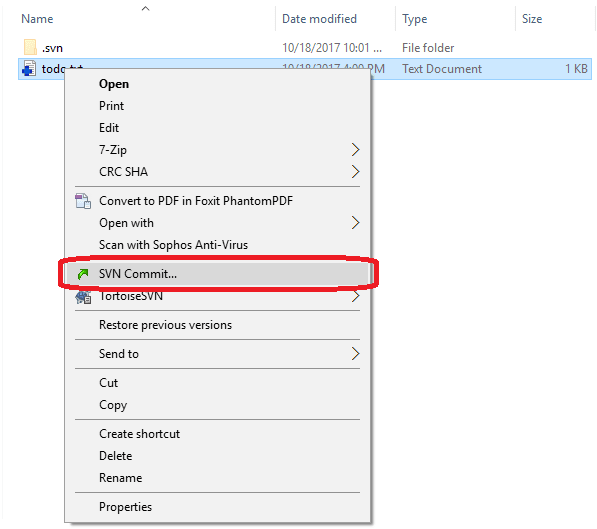
This will tell SVN that it needs to track this file. SVN still hasn't stored the file, but it's prepared to track it the next time I "commit." So, let's commit this thing! Right click anywhere in the folder and choose "SVN Commit..."
This will open up the commit dialog box shown below:
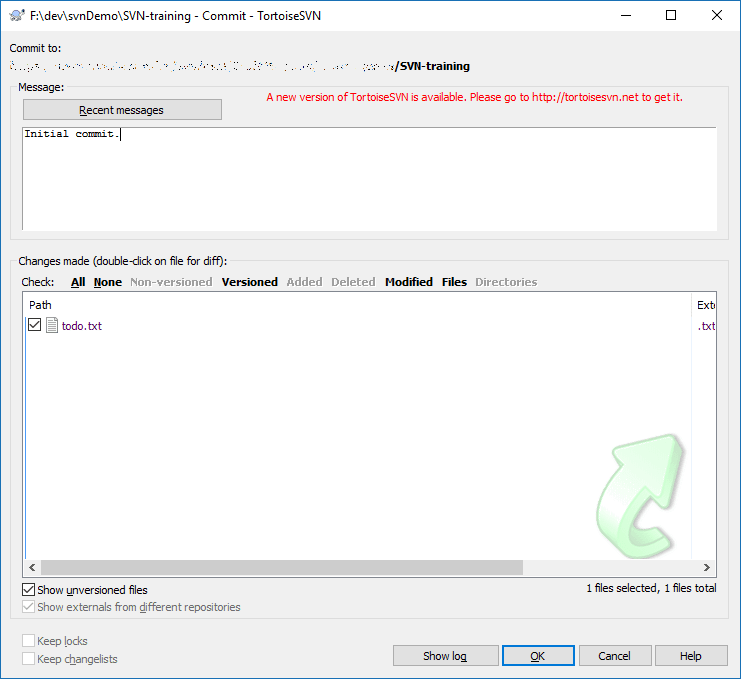
There's a few things to note here. First, there's a "Commit to:" field at the very top. Always make sure this is what you expect it to be. If it's not, something's wrong and you shouldn't commit. You've probably switched to a branch and haven't switched back yet. Grab someone who knows a bit more about SVN and have them guide you through what to do here. I'm not going to cover that in this post but might in a later one.
If the URL is what you'd expect it to be, the next thing I normally do is jump down to the "Changes made..." section. This is a list of files that could be committed to SVN for it to track. In this case, we have a very simple list of one file. In a larger, application, this list may be pretty long. Take care to scroll through it and ensure that you're only committing what you intend to commit. If a checkbox is checked and it shouldn't be, now is the time to un-check the box to ensure it's not committed with this commit. Also, you might take a moment to right-click and "Compare with base" to review the changes you've made. This will show the original file on the left and your changes on the right. Any differences will be clearly highlighted. If you notice anything amiss, now is the time to go back and fix anything that's out-of-place.
After ensuring I'm committing to the right place and I'm committing only what I intend to commit, I now fill in the "Message" text area. In some cases, I'll click on the "Recent Messages" button to reuse a message I've recently used. In most cases, I'll try to write a meaningful message. At work, this usually means a reference to the issue in our issue tracker followed by a one line description of the changes or the issue that's being fixed. For personal stuff, it's usually just a meaningful summary of the changes in this commit.
Once that's all done, I quickly double-check everything and then press "OK." And there you have it! You've now committed something to SVN! If someone else were to check out the repository, they'd now see your changes. If someone else already had this repo checked out, they can run an "SVN Update" to get your changes.
Wrapping Up
So, there you go! You now have the very basics of SVN under your belt. I'd encourage you to keep going from here! Get a friend and have both of you commit things to the repo. See how it handles it when you make changes to the same lines of the same file. Look into branching and merging and how to do that in SVN. SVN really is a powerful tool. I feel like it's gotten a bad rap because many enterprises have set it up poorly and had a lot of struggles with it. That being said, there are some disadvantages to SVN that make other options worth pursuing.
Once you've gotten your feet wet with SVN and had some time to play around with it, I'd encourage you to take some time to get familiar with Git! You might even check out my next post in this series: Starting Out In Development - Git.

Top comments (0)