
Hello! This week I'll be giving you a brief introduction to the Node.js HTTP module. I'll give ya a little background into Node.js, supply some info into what is the Node.js HTTP module, and I'll get into how to use it with some examples. Alright here we go!
So you may be wondering what is this Node.js everybody keeps talking about? It's an open sourced, cross platform, JavaScript run-time environment that executes JavaScript code outside of a web browser. It allows you to use JavaScript to write command lines for server-side scripting essentially allowing you to produce web page content before the page is sent back to the user. It was created in 2009 by Ryan Dahl, thirteen years after the first server-side JavaScript environment, Netscape's LiveWire Pro Web, was created. Node.js combines google's V8 JavaScript engine, an event loop, and an input/output API. Dahl saw issues with the popular web server of 2009, the Apache HTTP server, so his creation of Node.js was in response to that.
Node.js has four main core modules and the HTTP server is one of those. It allows Node.js to transfer data over the HTTP(Hyper Text Transfer Protocol). It can create an HTTP server that listens to server ports and gives a response back to the client. It's great for creating networking apps because it allows for back end service for client applications.
The HTTP module has three properties: http.Methods, http.STATUS_CODES, and http.globalAgent. The HTTP module Methods property contains a large array of methods but it mainly contains the REST verbs we are all familiar with( GET, POST, PUT, PATCH, DELETE). The Status codes property contains a large object of all the status codes which are responses sent back to the client from the server. These usually indicate if a successful request was made or if an error occurred but can represent different information as well. For example status_code 418 sends back 'I’m a teapot'. You can find a full list of both the methods and the status codes in the Node docs at this website: https://nodejs.dev/the-nodejs-http-module/#methods . The globalAgent property deals with performance and manages connection persistence. The HTTP module also has five classes: http.Agent, http.ClientRequest, http.Server, http.ServerResponse,and http.IncomingMessage. In addition to these properties and classes, the module contains three methods: http.CreateServer, http.Request, and http.Get. The CreateServer method returns a new instance of the server class. The Request method makes an HTTP request to the server which creates an instance of the ClientRequest class. The Get method is similar to Request but sets the HTTP method to GET and automatically calls request.end.
Alright lets get into how to use the module. The first step is you need to include the HTTP module in your application. This can be done by importing the module using .require('http') at the top of your file. After that you need to use the CreateServer method and supply it's callback function with req(request) and res(response) parameters. Then you can chain on the .listen method with a port parameter. This will let the server know which port to listen to for incoming requests. After that you need to send a response back to the client. This can be done using the res.write method and inserting your response as the parameter. Then you need to end the response using res.end. Lets take a look at what this code would look like.

Here you can see where I imported the HTTP module which allowed me to use http.CreateServer. Inside of my res.write I inserted a message of 'cowabunga dude!' that will load to the client's web page and then followed that up with res.end. You can also see where I used .listen and used 3000 as my port argument. It's also helpful to insert a console log inside the .listen method to let you know the server is up and running successfully. Here's what the client side would look like.

Notice the ':3000' following the localhost ip address is the same port that I put in as my .listen method argument. Also my res.write message of 'cowabunga dude!' was sent back to the client!
We can also include a header so we can send status codes back to the client and declare the correct content type of the response. This is done by using the res.writeHead method and supplying your status code as the first argument and the content type as the second.
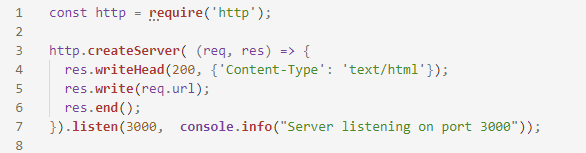
Here I used res.writeHead to send my successful status code of 200 back to the client. I also set the content type to be text/html. Inside of my res.write I inserted the req.url which should send back to the client whatever the client enters as an endpoint(the text following the port number in the url). Lets see if it worked.
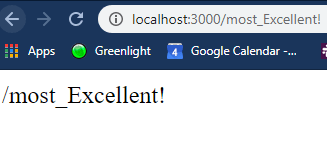
Success! Notice how the endpoint entered in the browser matches what was sent back to the client, 'Most Excellent!' indeed!
So in conclusion the Node.js HTTP module is a simple, quick, and efficient way to to provide a back-end server for client applications. I suggest trying out the Node.js HTTP server and get your 'serve on!'


Top comments (0)