
Geolocation in React Native applications is the ability to fetch the geographic position of the device when it is connected to the internet. It takes advantage of an API that provides the current location of the device in the form of Longitude and Latitude coordinates. It can be used to add features such as fetching simple location coordinates of a device or getting the current location of the device. Ultimately, Geolocation provides support to the development functionalities seen in delivery or ride-hailing applications.
In this tutorial, let's learn how you can implement a feature to get the current location of a device in a React Native app. To do this we’ll be using an API provided by Expo in the form of a package called expo-location. We will then convert the location coordinates into human-readable postal address format.
The source code is available at this GitHub repo.
Prerequisites
To follow this tutorial, please make sure you are familiarized with JavaScript/ES6 and meet the following requirements in your local dev environment:
- Have Node.js version >=
12.x.xinstalled. - Have access to one package manager such as npm or yarn or npx.
- Have expo-cli installed, or use npx
Create a React Native app with expo-cli
Create a new React Native project using expo-cli and then install the dependencies required to build this demo app. Let's breakdown what we are going to implement:
- The demo app is going to mimic a food delivery app feature where when an end-user opens the app, the first thing they are prompted for is to fetch their current location. Let's call this screen a Welcome screen.
- Only once the location is fetched, will the end-user be taken to the Home screen of the app. This is a condition we are going to put in our demo.
- We will be using a stack navigator from React Navigation library. This is just an example to understand the concepts of using Geolocation data in a React Native app. You can use the same concepts in the way you want to implement the feature of fetching the current location.
Open a terminal window and execute the following commands:
npx expo init expo-geolocation-example

# navigate into that directory
cd expo-geolocation-example
yarn add @react-navigation/native @react-navigation/stack

# install dependencies with Expo specific package version
expo install expo-location react-native-gesture-handler react-native-reanimated react-native-screens react-native-safe-area-context @react-native-community/masked-view
After installing these dependencies, let's create two mock screens that are going to be the two core screens for the demo app. Create a new screens/ directory and inside it, create the first screen file Welcome.js. This screen is going to display an image, a title, and a dummy mock location address for now. Later in this post, this dummy mock location address is going to display a real address based on the current location.
Add the following code snippet to this file:
import React, { useState, useEffect } from 'react';
import { StyleSheet, Text, View, Image } from 'react-native';

const Welcome = ({ navigation }) => {
  return (
    <View style={styles.container}>
      <View style={styles.contentContainer}>
        <Image source={require('../assets/geo.png')} style={styles.image} />
        <Text style={styles.title}>What's your address?</Text>
      </View>
      <Text style={styles.text}>Mock Address</Text>
    </View>
  );
};

const styles = StyleSheet.create({
  container: {
    flex: 1,
    backgroundColor: '#070707',
    alignItems: 'center',
    paddingTop: 130
  },
  contentContainer: {
    alignItems: 'center',
    marginBottom: 20
  },
  image: {
    width: 150,
    height: 150,
    resizeMode: 'contain',
    marginBottom: 20
  },
  title: {
    fontSize: 22,
    fontWeight: '700',
    color: '#FD0139'
  },
  text: {
    fontSize: 20,
    fontWeight: '400',
    color: '#fff'
  }
});

export default Welcome;
Create the second screen file Home.js with the following code snippet:
import React from 'react';
import { StyleSheet, Text, View } from 'react-native';

const Home = ({ navigation }) => {
  return (
    <View style={styles.container}>
      <Text>Home</Text>
    </View>
  );
};

const styles = StyleSheet.create({
  container: {
    flex: 1,
    backgroundColor: '#070707',
    alignItems: 'center',
    justifyContent: 'center'
  }
});

export default Home;
Let's hook up the stack navigation container in the App.js file since we do not have multiple files and different ways to navigate in this demo app. I am not going through how to set up and use the React Navigation library. If you'd like to learn more on that subject please go through the post How to Set Up and Use Navigators in React Native.
Open up the App.js file and add the following:
import React from 'react';
import { NavigationContainer } from '@react-navigation/native';
import { createStackNavigator } from '@react-navigation/stack';

// Custom screens
import Welcome from './screens/Welcome';
import Home from './screens/Home';

const Stack = createStackNavigator();

export default function App() {
  return (
    <NavigationContainer>
      <Stack.Navigator initialRouteName='Welcome' headerMode='none'>
        <Stack.Screen name='Welcome' component={Welcome} />
        <Stack.Screen name='Home' component={Home} />
      </Stack.Navigator>
    </NavigationContainer>
  );
}
Once the navigator is set, you can open up a terminal window and run the command expo start. You can either choose an iOS simulator or an Android emulator or the Expo Go client app to view the results so far. Here is current the state of the demo app in an iOS simulator:

Check if the device's location service enabled
The first thing in the demo app we are going to implement is to check whether a device's location services are enabled or not. For this, let's create a state variable called locationServiceEnabled.
To check the status of the service let's create a new handler method called CheckIfLocationEnabled. The expo-location has an asynchronous method called Location.hasServicesEnabledAsync(). It returns a boolean value of true if the location service on the device is enabled and if otherwise, it returns false. In case of the value false, let's display an alert box indicating the same. If the location service is enabled, then update the value of the state variable using the setLocationServiceEnabled method.
The handler method is then called inside a useEffect React hook with no dependency such that it triggers only after the first render.
Modify the Welcome.js screen as shown below. Do note the placeholder message displayed in the place of the mock location address using a state variable called displayCurrentAddress. It will get an update once the current location of the device is found.
import React, { useState, useEffect } from 'react';
import { StyleSheet, Text, View, Image, Alert } from 'react-native';
import * as Location from 'expo-location';

const Welcome = ({ navigation }) => {
  const [locationServiceEnabled, setLocationServiceEnabled] = useState(false);
  const [displayCurrentAddress, setDisplayCurrentAddress] = useState(
    'Wait, we are fetching you location...'
  );

  useEffect(() => {
    CheckIfLocationEnabled();
  }, []);

  const CheckIfLocationEnabled = async () => {
    let enabled = await Location.hasServicesEnabledAsync();

    if (!enabled) {
      Alert.alert(
        'Location Service not enabled',
        'Please enable your location services to continue',
        [{ text: 'OK' }],
        { cancelable: false }
      );
    } else {
      setLocationServiceEnabled(enabled);
    }
  };

  return (
    <View style={styles.container}>
      <View style={styles.contentContainer}>
        <Image source={require('../assets/geo.png')} style={styles.image} />
        <Text style={styles.title}>What's your address?</Text>
      </View>
      <Text style={styles.text}>{displayCurrentAddress}</Text>
    </View>
  );
};

// styles remain same

export default Welcome;
To test it out in the iOS simulator, go to Settings > Privacy > Location Services.
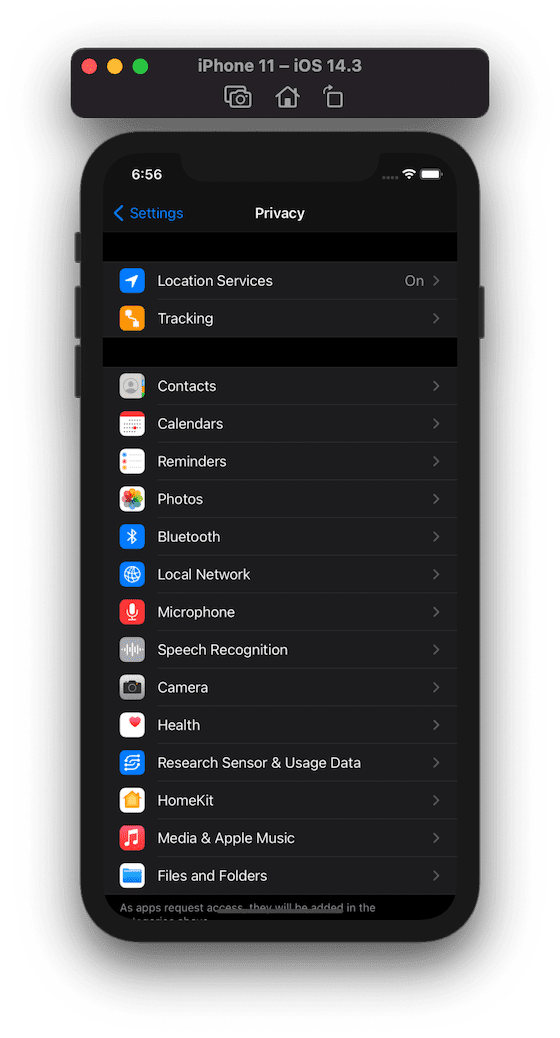
If it says on, as shown in the above image, tap it and make sure to switch off the Location Services.

Now open the app and you will notice that the alert box appears.

Similarly, on Android device, the location can be disabled from the following menu:

And the alert message will appear on the opening of the app:

Make sure to enable the location service again on the device before proceeding to the next section.
Get current location and postal address
It is necessary to request access to a device's information whether it is location or any other sensitive information. Fortunately, expo-location has methods that can be directly used when fetching the current location of the device.
Let's break down the steps on how we are going to fetch the current location of the device and obtain the information of the current address (which includes name, street name, city, and postal code) to display on the app screen.
- First, create a new asynchronous handler method called
GetCurrentLocation. Make sure to call it inside theuseEffecthook after the previous code. - Inside it, using the Location API method
requestPermissionsAsync, ask the device's user to grant permission for the location. If, in any case, the user denies it, display them an alert box stating the same. - If the permission is granted, get the current coordinates of the device's location using the Location API method
getCurrentPositionAsync. The coordinates here are an object representing the location. - Then, when the coordinates object is present, destructure the value of Latitude and Longitude. The Location API has a method called
reverseGeocodeAsyncwhich reverses the geocode of a location to a postal address. Using the result from this, we can update the value ofsetDisplayCurrentAddressto display the device's current address.
Update the code snippet in Welcome.js as shown below:
// first update the useEffect hook
useEffect(() => {
  CheckIfLocationEnabled();
  GetCurrentLocation();
}, []);

// create the handler method

const GetCurrentLocation = async () => {
  let { status } = await Location.requestPermissionsAsync();

  if (status !== 'granted') {
    Alert.alert(
      'Permission not granted',
      'Allow the app to use location service.',
      [{ text: 'OK' }],
      { cancelable: false }
    );
  }

  let { coords } = await Location.getCurrentPositionAsync();

  if (coords) {
    const { latitude, longitude } = coords;
    let response = await Location.reverseGeocodeAsync({
      latitude,
      longitude
    });

    for (let item of response) {
      let address = `${item.name}, ${item.street}, ${item.postalCode}, ${item.city}`;

      setDisplayCurrentAddress(address);
    }
  }
};
Here is the output after this step:

The complete postal address is an object in JSON format and has the following fields (some of them might be useful for various cases):
Object {
    "city": "Stockholm",
    "country": "Sweden",
    "district": "Stockholm City",
    "isoCountryCode": "SE",
    "name": "Gustav Adolfs torg",
    "postalCode": "111 52",
    "region": "Stockholm",
    "street": "Gustav Adolfs torg",
    "subregion": "Stockholm",
    "timezone": "Europe/Stockholm",
}
Once the location is fetched, we can send the current postal address as an object and navigate to the Home screen after a delay of two seconds using a setTimeout function.
Add the following code snippet after the statement setDisplayCurrentAddress(address):
if (address.length > 0) {
  setTimeout(() => {
    navigation.navigate('Home', { item: address });
  }, 2000);
}
Then, update the Home.js file to get the item object from route.params as well as its styles:
import React from 'react';
import { StyleSheet, Text, View } from 'react-native';

const Home = ({ route }) => {
  const { item } = route.params;
  return (
    <View style={styles.container}>
      <View style={styles.contentContainer}>
        <Text style={styles.title}>Home Delivery address: </Text>
        <Text style={styles.text}>{item}</Text>
      </View>
    </View>
  );
};

const styles = StyleSheet.create({
  container: {
    flex: 1,
    backgroundColor: '#070707',
    alignItems: 'center',
    justifyContent: 'center'
  },
  contentContainer: {
    paddingHorizontal: 20,
    alignItems: 'center'
  },
  title: {
    fontSize: 22,
    fontWeight: '700',
    color: '#FD0139',
    paddingBottom: 10
  },
  text: {
    fontSize: 20,
    fontWeight: '400',
    color: '#fff'
  }
});

export default Home;
Here is the final output:

Conclusion
That's it! We hope you have found this tutorial helpful. We are adding some references for you to learn more about using Location API in Expo and React Native apps, plus which different packages can be used for your particular use case:
- Reverse Geocode from expo-location
- @react-native-community/geolocation
- react-native-geolocation-service
Finally, don't forget to pay special attention if you're developing commercial React Native apps that contain sensitive logic. You can protect them against code theft, tampering, and reverse engineering by following this guide.


Top comments (0)