
Flask is a web framework for python, meaning that it provides a simple interface for dynamically generating responses to web requests. Let’s start by launching a Flask server on an Amazon Web Services EC2 instance.
1. Starting up an EC2 instance
1. Launch an EC2 instance.
- Log in to the AWS console here
- Select EC2 from AWS services.
- Click on Launch Instance.
- Select the Ubuntu Server 16.04 LTS (HVM), SSD Volume Type — ami-43a15f3e instead of the Amazon Linux. The exact versions may change with time.
- Click on Review and Launch.
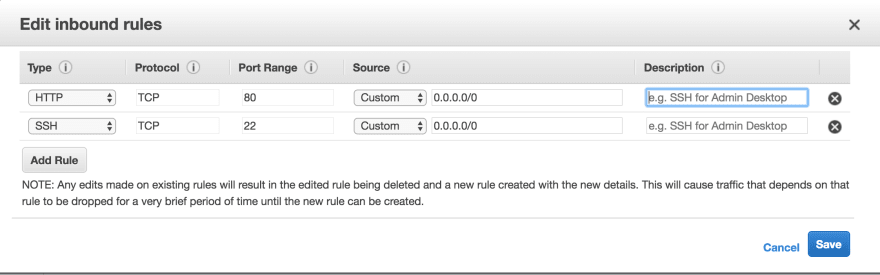
- Configure the security groups as shown below. This setting allows access to port 80 (HTTP) from anywhere, and ssh access only from any IP address.
2. Setting up the instance
Now that we’ve connected to the instance, it’s time to install some of the programs we’ll need.
1. Connect to the instance using ssh from the Terminal.
$ ssh -i "yourapp.pem" ubuntu@yourapppublicinstance.compute-1.amazonaws.com
2. Install the apache webserver and mod_wsgi.
$ sudo apt-get update
$ sudo apt-get install apache2
$ sudo apt-get install libapache2-mod-wsgi
If you point your browser at your instance’s public DNS name you should see the Apache server’s “It works!” page.

3. Install Flask using the pip tool (which also needs to be installed).
$ sudo apt-get install python-pip
$ sudo pip install flask
4. Create a directory for our Flask app.
We’ll create a directory in our home directory to work in, and link to it from the site-root defined in apache’s configuration /var/www/html by default, see /etc/apache2/sites-enabled/000-default.conf for the current value).
$ mkdir ~/flaskapp
$ sudo ln -sT ~/flaskapp /var/www/html/flaskapp
To verify our operation is working, create a simple index.html file.
$ cd ~/flaskapp
$ echo "Hello World" > index.html
You should now see “Hello World” displayed if you navigate to (your instance public DNS)/flaskapp in your browser.

3. Running a simple Flask app
1. Create an app.
We’ll use the simple “Hello world” example from the Flask documentation. Put the following content in a file named flaskapp.py:
from flask import Flask
app = Flask(__name__)
@app.route('/')
def hello_world():
  return 'Hello from Flask!'
if __name__ == '__main__':
  app.run()
2. Create a .wsgi file to load the app.
Put the following content in a file named flaskapp.wsgi:
#flaskapp.wsgi
import sys
sys.path.insert(0, '/var/www/html/flaskapp')

from flaskapp import app as application
3. Enable mod_wsgi.
The apache server displays HTML pages by default but to serve dynamic content from a Flask app we’ll have to make a few changes. In the apache configuration file located at /etc/apache2/sites-enabled/000-default.conf, add the following block just after the DocumentRoot /var/www/html line:

WSGIDaemonProcess flaskapp threads=5
WSGIScriptAlias / /var/www/html/flaskapp/flaskapp.wsgi

<Directory flaskapp>
    WSGIProcessGroup flaskapp
    WSGIApplicationGroup %{GLOBAL}
    Order deny,allow
    Allow from all
</Directory>
4. Restart the webserver.
Use this command to restart the server with the new configuration
$ sudo service apache2 restart
5. Test configuration.
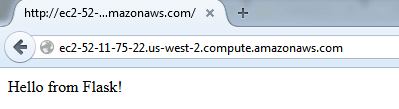
If you navigate your browser to your EC2 instance’s public DNS again, you should see the text returned by the hello_world function of our app, “Hello from Flask!”
Our server is now running and ready to crunch some data (if something isn’t working, try checking the log file in /var/log/apache2/error.log.
4. Have Flask app do work.
Now that we have a server ready to do work we’ll set up a simple service to provide letter counts from an input string.
1. Collect information from the url.
Flask allows us to route requests to functions based on the url requested. We can also get input from the url to pass into the function. Add the following to flaskapp.py:
# flaskapp.py
@app.route('/countme/<input_str>')
def count_me(input_str):
    return input_str
This count_me() function will return anything after the countme/ portion of the url. Restart the webserver to see it in action:
$ sudo service apache2 restart
2. Process information
Let’s make our count_me() function a little more interesting. Modify flaskapp.py like so:
# flaskapp.py
from collections import Counter
...
@app.route('/countme/<input_str>')
def count_me(input_str):
    input_counter = Counter(input_str)
    response = []
    for letter, count in input_counter.most_common():
        response.append('"{}": {}'.format(letter, count))
    return '<br>'.join(response)
Restart the server and view the results:
$ sudo service apache2 restart
Note that it is bad practice to format HTML responses inside these functions, templates should generally be used instead.
The entire count_me() function could be written in one logical line:
return '<br>'.join('"{}": {}'.format(let, cnt)
                   for let, cnt in Counter(in_str).most_common())
If the application throws any errors the error log can help you debug.
$ sudo tail -f /var/log/apache2/error.log
If you enjoyed this tutorial, please give me some likes. Happy coding!


Top comments (0)