What Is a Countdown Element
The countdown element is used to display the remaining time for a promotion activity and will send a notification when such time ends. This element supports:
- Time setting by day, hour, minute, and second
- Configuration of text, border, and delimiter styles
- Time delay
- Callback event for countdown ending
As shown in the following figure, the layout of the element consists of numbers and delimiters. Generally, the numbers indicate the remaining time by day, hour, minute, and second. The delimiters are used to separate numbers. Common delimiters can be words (day, hour, minute, and second) and colon (:).
<import name="countdown" src="../Countdown/countdown"></import>
<template>
  <div class="container">
    <text>General usage</text>
    <div class="example-body">
      <countdown class="countdown" day="{{this.day}}" hour="{{this.hour}}" minute="{{this.minute}}" second="{{this.second}}" splitor-color="#007AFF" border-width="{{3}}" border-style="dotted" border-color="#007AFF"></countdown>
    </div>
  </div>
</template>
Implementation Steps
Customizing Subelements
The countdown UI can be used universally, while the layout of its content may vary and therefore cannot be hardcoded. Otherwise, once any part of the content UI is changed, the subelements will also need to be modified, which violates the principle of open-source programming.
Therefore, multiple style attributes are supported in countdown.ux for you to customize the style of subelements.
Designing the Attributes and Supported Event of Subelements
Designing the Overall Layout
The text element is used to design the layout of the delimiters and numbers, as displayed in Figure 1 below.
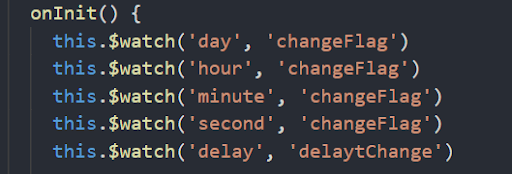
Define the related attributes in props of the subelements and pass the values when the parent element references the subelements. Call this.$watch(‘day’, ‘changeFlag’) to listen to the changes of the values and then update and process the values in the subelements, as displayed in Figure 2 below.
Implement the countdown algorithm. You need to convert days, hours, and minutes to seconds, set the timer to decrease by 1 every second, and reconvert the seconds back into days, hours, minutes, and seconds accordingly, as shown in Figure 3 and 4 below.
Define the timeup callback event in the parent element, and implement and bind the event, as displayed in Figure 5.
Trigger the timeup event of the parent element in the subelements, as displayed in Figure 6.
Summary
In this tutorial, you have learned how to:
- Design subelements, including their attributes and supported events.
- Implement data communication between the parent element and subelements.
- Convert days, hours, minutes, and seconds, and set a timer.
- Configure the style of the element.


Top comments (0)