This article aims to be an introduction to the Apollo Client. It gives an overview of its features while providing examples with TypeScript.
The most fundamental function of the Apollo Client is making requests to our GraphQL API. It is crucial to understand that it has quite a lot of features built on top of it.
Why you might not need it
An important thing about the Apollo Client is that it is more than just a tool for requesting data. At its core, it is a state management library. It fetches information and takes care of caching, handling errors, and establishing WebSocket connections with GraphQL subscriptions.
If you are adding GraphQL to an existing project, there is a good chance that you are already using Redux, Mobx, or React Context. Those libraries are commonly used to manage the fetched data. If you want to keep them as your single source of truth, you would not want to use Apollo Client.
Consider using a library like graphql-request if the only thing you need is to call your GraphQL API and put the response in your state management library.

Introducing the Apollo Client with TypeScript
Above, you can see me using a process.env.REACT_APP_GRAPHQL_API_URL variable. In this article, we use Create React App with TypeScript. It creates a react-app-env.d.ts file for us. Let’s use it to define our variable.
We need to remember that weh Create React App, our environment variables need to have the REACT_APP_ prefix.
react-app-env.d.ts

Setting up the Apollo Client
The first step in setting up the Apollo Client is installing the necessary libraries.
The first step in setting up the Apollo Client is installing the necessary libraries.
npm install @apollo/client graphql
The second step is creating an instance of the ApolloClient. This is where we need our environment variable.

One of the features of the Apollo Client is caching. Above, we are initializing the InMemoryCache(). It keeps the cache in memory that disappears when we refresh the page. Even though that’s the case, we can persist it using Web Storage by using the apollo3-cache-persist library.
The last part of setting up the Apollo Client is connecting it to React. To do so, we need the ApolloProvider that works similarly to Context.Provider built into React.
app.tsx

Performing queries
Once all of the above is ready, we can start using our GraphQL API. The most basic functionality of the Apollo Client is querying data.
In our NestJS course, we create an API for managing posts. Let’s now create a component that can display a list of them. Since we are using TypeScript, the first step would be creating a Post interface.
post.tsx

app.tsx

Since there are quite many things going on both with the query and the TypeScrip definitions, I suggest creating a separate custom hook for that. It would also make it quite easy to mock for testing purposes.
The useQuery hook returns quite a few things. The most essential of them are:
-data – contains the result of the query (might be undefined),
-loading – indicates whether the request is currently pending,
-error – contains errors that happened when performing the query.
PostsList/index.tsx

The cache mechanism
A significant thing to notice is that the usePostsQuery() hook is called every time the PostsList renders. Fortunately, the Apollo Client caches the results locally.
The 29th part of the NestJS course mentions polling. It is an approach that involves executing a query periodically at a specified interval.

Another approach to refreshing the cache is refetching. Instead of using a fixed interval, we can refresh the cache by calling a function.

Mutating data
The second core functionality in GraphQL after querying data is performing mutations. Let’s create a custom hook for creating posts.
useCreatePostMutation.tsx
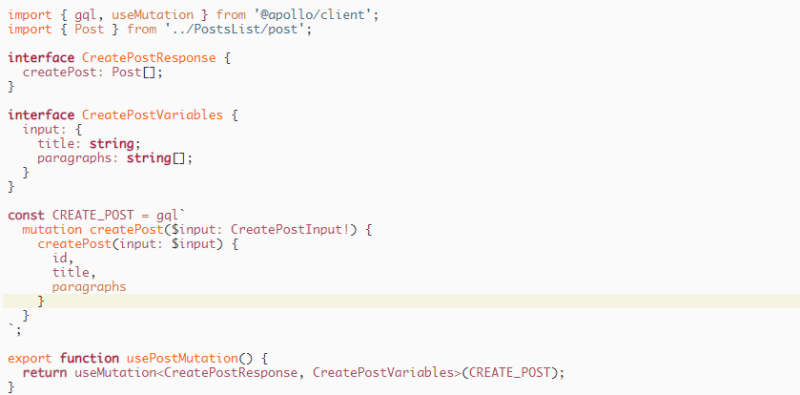
The useMutation hook also returns an array with two elements
the mutate function that triggers the mutation; it returns a promise that resolves to the mutation result,
the result of the mutation with properties such as data, loading, and error.
With that knowledge, let’s create a simple form that allows us to perform the above mutation.
useCreatePostFormData.tsx

Above, we use the useCreatePostMutation hook. As we’ve noted before, it returns an array where the first element is a function that triggers the mutation.
All that’s left is to use the useCreatePostFormData hook with a form.
PostForm/index.tsx

Authenticating with cookies
In our NestJS course, we authenticate by sending the Set-Cookie header with a cookie and the httpOnly flag. This means that the browser needs to attach the cookies because JavaScript can’t access them.
If you are interested in the implementation details of the above authentication, check out API with NestJS #3. Authenticating users with bcrypt, Passport, JWT, and cookies
To achieve this, we might need to modify our apolloClient slightly.
Apollo Client has support for communicating with GraphQL servers using HTTP. By default, it sends the cookies only if the API is in the same origin. Fortunately, we can easily customize it:

Updating the cache after the mutation
The last piece missing is updating the list after the successful mutation. One of the ways to do so is to pass the update parameter when calling the useMutation hook.
With it, we can directly access both the cache and the mutation result. By calling readQuery we get the cache’s current state, and with writeQuery, we overwrite it.
useCreatePostMutation.tsx

Another good way of keeping our application up to date is through subscriptions. It deserves a separate article, though.
Summary
Today, we’ve looked into the Apollo Client and learned its basics. We’ve also considered if we need it in the first place because it might not be the best approach for some use-cases.
Looking into the fundamentals of the Apollo Client included both the queries and mutations. We’ve also touched on the subject of cookie-based authentication. There is still quite a lot to cover, so stay tuned!


Top comments (0)