
Ever thought of time travel? Well I think I just found a cool way to achieve it. Hop into the TARDIS (Time and Relative Dimensions in space — Dr.Who…) and hold on to something, as we are about to plunge back and forth time…..
Imagine having the ability to work on projects with friends (globally ), make changes and track the changes made, even if they were made 8 months (or more)earlier. Starting our projects straight from our local machines and sharing the globally. Sounds cool? Yes?
So yes, Git is the verb and GitHub the Noun…
Git is basically a version controlling system with the ability to ;
Allow tracking changes.
Promote Decentralized version control system.
Allow creation of local and remote repositories.
Promote “time travel” you can revert back to earlier version of your system/program.
It can check who made changes last — A.K.A the ‘ whistle Blower ’.
GitHub the Noun. Is a basically like a House of shelved Codes. It saves your code and connects you with high end technologies.
Well, How do you get started?
Sign Up on GitHub.
Install git in your machine :
Depending on the Operating system you are using. .
Debian : sudo apt-get install git
Fedora : sudo yum install git
Mac or Windows : go to git-scm
In my case i am using Debian ( Linux-based distribution )..Once done we can proceed to checkout some basic Git Commands :
git int → initialize a git repository or storage for your system ( it creates a .git folder that is by default hidden in the folders)
git add <file>→ allows you to add file(s) to the staging area before commit of you can remove the staged files using git rm — cached <file.extension>, You can also add a file with a specific extension , git add .extension or git add <specificFile>.<extension>
git status → checks the staged.
git commit → takes all the staged files and puts the in local repository ( this is always followed by a message, that allows you to explain the alteration made)
git push → takes all local repository and pushes it to the remote repository
git pull → pulls latest remote repo.
git clone → clones remote repository to your local repository
git branch → allow you to create a new branch
git checkout → allows you to switch from one branch to another
git merge → merges the branches or rather integrates the branches into one.
Now lets get our hands dirty…
Go to terminal / git bash..
Change directory to your desired location where you store projects, in my case it was desktop :
$ cd Desktop

$ mkdir MyApp && cd MyApp
create files that you would like to practice with :
$ touch app.py

$ touch index.html

$ mkdir dir2
In the MyApp directory :
$ git init

$ git add . (adds all files )

$ git status

$ git commit -m ‘first Message’
Create a .gitignore file ( to add files that you wouldnt want to be shared)
$ touch .gitignore
In the .gitignore file add files you don’t want to be added to the remote repository by adding the file name e.g app.js or adding a particular directory like /dir1.
Create git branch (if need be or amid collaboration instances).
$ git branch <newBranch>

$ git checkout <newBranch>
When you switch branches and create files in a different branch , you will be unable to see the created files in the new branch in your main branch( this is a way that allows different teams amid collaboration to work on sections of code and not affect the main branch).
To see or experience the above open the folder that contains the sample project and drag it to the left of your desktop window. Open terminal and drag it on the right side of your desktop window. Now create a new branch and switch to it using the git checkout . Once it confirms the switch of the branch now as shown below..
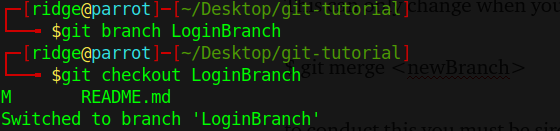
this is a feedback message once you have run the git branch then git checkout
this is a feedback message once you have run the git branch then git checkout
once in that particular branch, now create a file $ touch login.html , this will create a file called login.html. Monitor the open folder on your left you will notice the login file. Now switch back to the main branch git checkout master. The file disappears. This is because a merge must be conducted so as to all be in sync. This is where git merge comes in.
$ git merge <newBranch>
In a real project case, to conduct this you must be sure with the changes or the modifications made on the newBranch before you merge with main branch.
Check out the remote repositories
$ git remote
Add your project to the remote repository
$ git remote add origin <https://yourgithuburl/fileproject/.git>
Push project to remote repository:
$ git push
PS: git push will prompt you to input your credentials / authentication for Github.
Thank you and that’s all. The rest you will learn or rather discover as you continue coding…
Bon Chance

Top comments (0)