
As a CMS, WordPress makes it incredibly easy to use and manage images on your website. And, rightly so, as no website today is complete without them - both from an aesthetic and user experience perspective.
However, they can be a burden in terms of your average page weight and, in turn, your general website performance. In fact, it’s one of the top 3 contributors to page weight according to Google.
Luckily, there are image optimization solutions out there that don’t require technical knowledge to implement. One, in particular, stands out for its holistic approach to image optimization with a strong focus on mobile - ImageEngine.
Why use an Image CDN for Wordpress?
As many as ⅓ users leave a website that takes 1 second longer to load. Furthermore, Google themselves use page loading times as a ranking factor according to various user-centric performance metrics.
Since last year, Google is also prioritizing ranking websites according to mobile performance thanks to mobile-first indexing.
Unfortunately, WordPress does the bare minimum in terms of image optimization. Via responsive syntax, WordPress can only serve a limited number of differently sized versions of an image based on the screen size of the accessing device. It doesn’t take into account at all the deeper context, like which image formats are best on which browsing platforms or how to scale compression while maintaining viewing quality.
Obviously, the answer isn’t to get rid of images altogether but to find a way to limit their impact.
That’s exactly what Image CDNs are for.
According to Google, an Image CDN can reduce your image file sizes by 40-80%.
What is the ImageEngine Image CDN?
While any Image CDN is a step in the right direction, ImageEngine takes things even further.
ImageEngine is an intelligent, device-aware image CDN with unprecedented flexibility to deliver images optimally for different types of devices, operating systems, and screen sizes.
ImageEngine uses WURFL device detection to read everything it can about the context of the accessing device and adapt appropriately.
In today’s world, where the range of devices is growing exponentially, this is the closest you’ll get to build a level of future-proofing into your image optimization.
On the CDN side, optimized images are cached across the globe in over 20 PoPs, each of which has device-detection built into their business logic.
Just some of the steps ImageEngine takes to optimize images are:
- Use next-gen formats like WebP or jpg2000
- Resize images according to screen size
- Apply maximum compression without tangibly affecting image quality
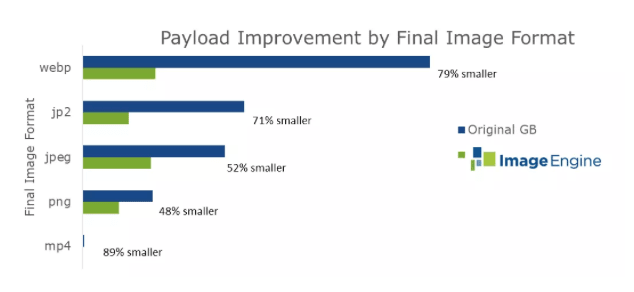
Smartly using next-gen formats alone can decrease total image payloads by up to 80%:
A notable new feature is support for data saving mode on Chrome browsers, decreasing payloads even further by deprioritizing viewing quality.
How to use Image CDN with ImageEngine - Step by Step
Step 1: Sign up for ImageEngine
You can head here to sign up for a free 60-day trial of ImageEngine. You’ll also need to provide ImageEngine with the URL of your website. Later, you’ll provide ImageEngine with the origin URL of your images. This can be the same as your website or it can be an Amazon S3 bucket or Google Cloud Storage URL.
The entire process is detailed here.
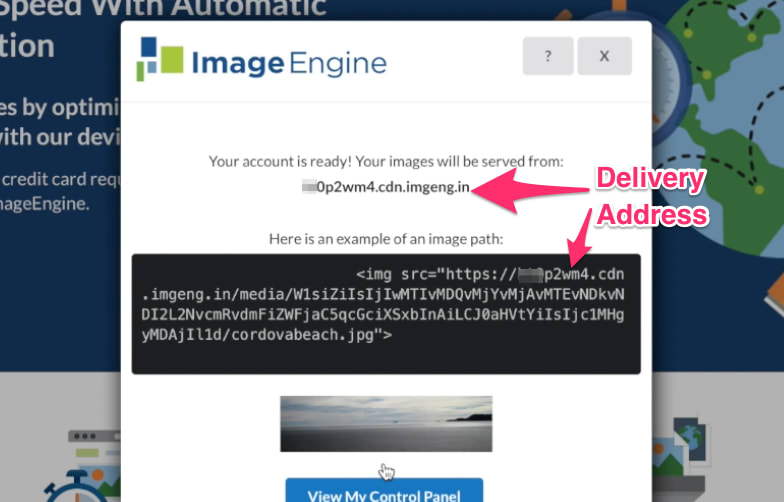
In the final step, ImageEngine will provide you with a Delivery Address where it will serve your images from:
You can copy this now or get it from your ImageEngine dashboard later.
Step 2: Install the Image CDN plugin
The Image CDN plugin can be installed just like any other WordPress plugin. Just head to your WordPress backend and then to Plugins -> Add New. Find the Image CDN plugin by searching for “ImageEngine”, and install and activate it.
Step 3: Serve optimize images via ImageEngine
ImageEngine is an almost entirely hands-off platform - one of its main advantages.
Just by providing it with your website domain, it fetches all your images from your website and renders optimized versions of them.
All you need to do is replace your image src URLs with your new ImageEngine image-serving domain.
To do this using the plugin, just got to Settings -> Image CDN in the main WordPress menu.
Use the domain ImageEngine generated for you under ‘My Domain Names’ in your ImageEngine dashboard and enter it in the ‘CDN URL’ box in the Image CDN panel:
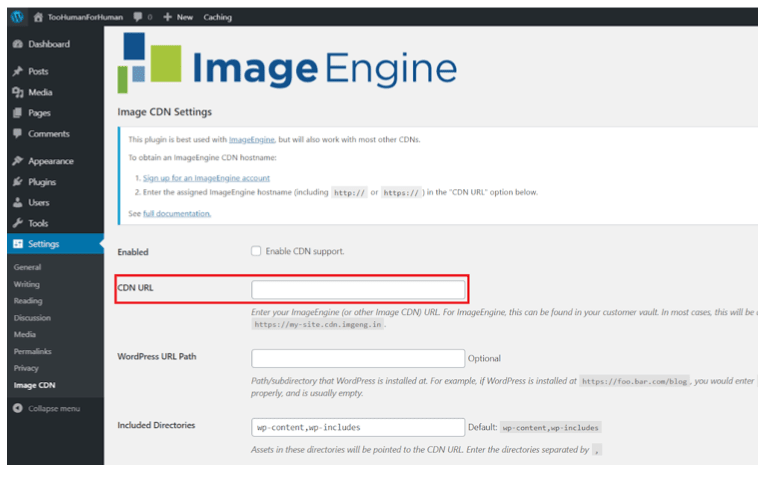
If your website is located in a subdirectory or you want to specify specific paths for images to optimize, you can do so using the ‘WordPress URL’ and ‘Included Directories’ boxes.
‘Save changes’ to apply.
And, that’s it. You should now be serving optimized images via your ImageEngine domain.
(Optional) Step 4: Adjust your image optimization preferences
ImageEngine already does everything within its power to optimize your images by default. This is the recommended way to use the CDN if you want to get the most out of it.
However, you can also use property-based directives to exercise some control over how images should be altered.
Directives can be added directly from the Image CDN panel under ‘ImageEngine Directives’.
For example, you can specify:
- Image resizing dimensions (e.g., ?imgeng=/w_300)
- Specific image formats (e.g., ?imgeng=/f_webp)
- The level of compression (e.g., ?imgeng=/w_300)
Or, any combination of directives.
What are the results?
The proof is in the pudding. So, let’s see what kind of performance increase you can expect on your WordPress website.
Here’s the performance of a typical image-heavy WordPress page using a predesigned theme:


As you can see, the performance is subpar in terms of all of Google’s user-centric performance metrics. The First Contentful and Meaningful Paint are particularly concerning, as these factors measure the time it takes for the user to see any useful content generated.
Using ImageEngine to serve and optimize our images, we get the following results:
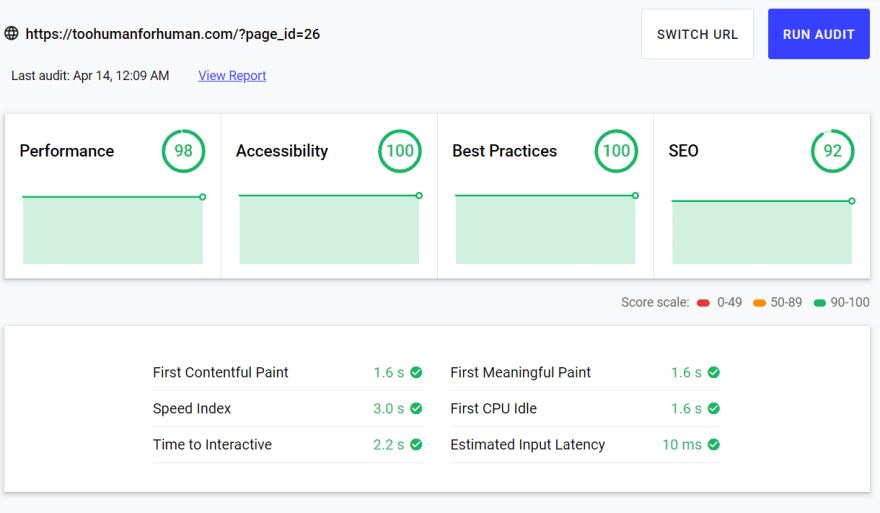
As you can see, there are drastic improvements across the board to those all-important user-centric performance metrics. The total page loading time was halved according to the Speed Index. The same goes for the First Contentful Paint and First Meaningful Paint.
The most drastic change came to Time to Interactive which is also one of the most important when it comes to avoiding frustrating your visitors.
Conclusion
If you’re building and hosting a website using WordPress, chances are you don’t want technicalities to stand in your way of maintaining a digital presence for you or your business. And, neither should you.
However, not optimizing your image content can lead to very real consequences.
ImageEngine is one platform that needs the minimum time or skill investment to use - yet delivers some of the most impressive results. Using the Image CDN plugin, makes using this service on your WordPress website a breeze.


Top comments (0)