
MongoDB Atlas is a fully managed cloud service for MongoDB. It provides a simple and cost-effective way to deploy, manage, and scale MongoDB databases.
AWS Virtual Private Cloud (VPC) peering allows you to connect your Atlas cluster to your VPC. This provides a private and secure connection between your Atlas cluster and your other AWS resources.
In this blog post, we will show you how to set up a MongoDB Atlas cluster and create VPC peering in AWS.
Prerequisites
Before getting started, you will need to have the following prerequisites:
- An AWS account
- A MongoDB Atlas account
Setting up a MongoDB Atlas cluster
To set up a MongoDB Atlas cluster, follow these steps:
Step 1: Create a MongoDB Atlas Cluster
- Log in to your MongoDB Atlas account.
- Click on "Clusters" in the left sidebar.
- Click the "Build a Cluster" button to create a new cluster.
- Choose the M10 cluster tier, which is a recommended starting point for most use cases.
- Configure your cluster settings, including:
- Cluster name
- Cloud provider (AWS)
- Region
- Cluster tier
- Additional settings (authentication, backup, etc.)
- Click the "Create Cluster" button to initiate the cluster creation process.


Step 2: Configure Network Access
To secure your MongoDB Atlas cluster, you need to configure network access:
- In the MongoDB Atlas dashboard, navigate to "Network Access" under the "Security" section.
- Click the "Add IP Address" button to whitelist the VPC CIDR block for secure access.

Step 3: Create a Peering Connection in AWS
This VPC peering allows private network communication between your resources in AWS and MongoDB Atlas cluster.
- Log in to your AWS Management Console.
- Navigate to the Amazon VPC dashboard.
- In the left sidebar, click on "Peering Connections" under the "Peering" section.
- Click the "Create Peering Connection" button.
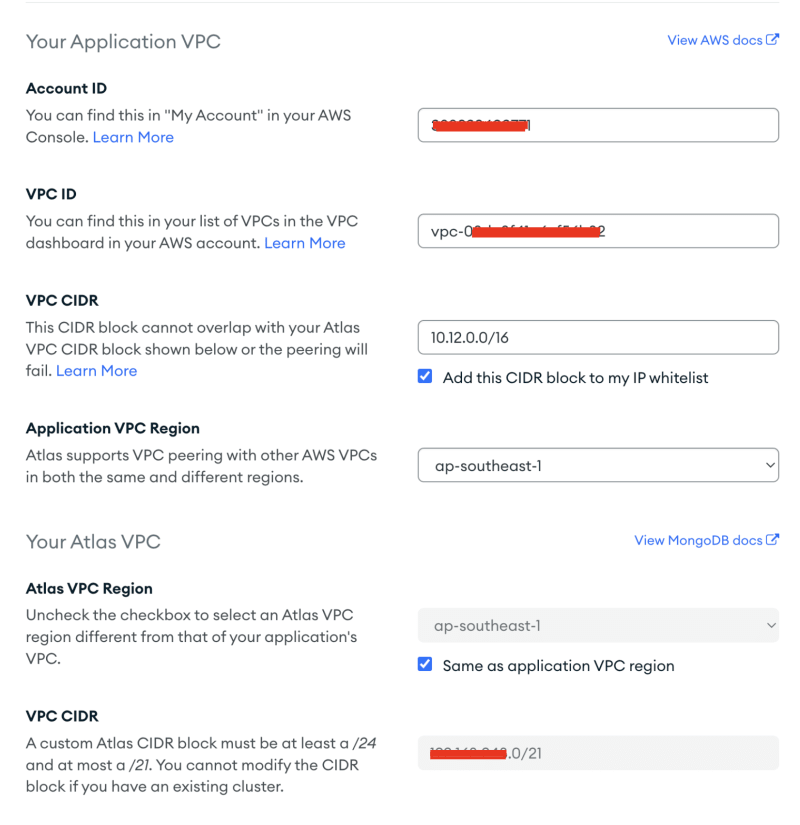
- Configure the peering connection as follows:
- Peering connection options: Select "Requester" (Your AWS VPC) and "Accepter" (MongoDB Atlas).
- Requester VPC: Choose your AWS VPC.
- Accepter VPC: Choose "Another AWS account" and provide the Atlas VPC details provided in the MongoDB Atlas dashboard.
- Provide a unique name for the peering connection.
- Click the "Create Peering Connection" button.
- In the peering connection details, click the "Actions" button and select "Accept Request" to approve the peering request in the MongoDB Atlas account.


Step 4: Configure Route Tables
To allow traffic to flow between your AWS VPC and MongoDB Atlas VPC, you need to update the route tables:
- In the AWS VPC dashboard, navigate to "Route Tables."
- Edit the route table associated with your AWS VPC.
- Add a new route with the destination CIDR block of the MongoDB Atlas VPC, pointing to the peering connection as the target.
- Save the changes.

Step 5: Test Connectivity
To ensure that the VPC peering connection is working correctly, test the connectivity between resources in your AWS VPC and your MongoDB Atlas cluster. Created a simple Python script on AWS Lambda that uses a VPC and private subnets to test whether the resources within the VPC can reach the MongoDB Atlas production environment through VPC peering.


Conclusion
In this blog post, we have shown you how to set up a MongoDB Atlas cluster and create VPC peering in AWS. This allows you to connect your Atlas cluster to your VPC and provide a private and secure connection between your Atlas cluster and your other AWS resources.

Top comments (0)