The following is an excerpt from Learn to Code in 30 Days, a book which teaches you to program in 30 easy steps using MiniScript and Mini Micro. However you can follow along without the book! Just download Mini Micro from here or here, fire it up, and follow the instructions below.
This program will generate pretty, physics-based fireworks, launched from wherever you click the mouse, complete with sounds on launch and burst. To create all the visual effects, we will use several display layers:
- Display 7 will be the background, but we'll switch it to pixel mode so we can draw a nice deep gradient.
- Display 5, the standard
gfxlayer, is where most of the drawing will take place. - Display 2 will be used to draw a brief "flash" (white circle) when a rocket bursts.
We will leave the standard text layer (display 3) alone, so you can see your typing when the program is not running. The graphics displays will be set to a scale of 3, making the pixels three times bigger than normal, so that the firework particles are easier to see.
Also, to help us with some list operations like removing an element by value, or selecting a random value, we will import the listUtil module. So, as you might expect, our program begins with the import statement, followed by setting up the displays. Use reset (or freshly launch Mini Micro) to clear any program you might have in memory, then edit to enter the code in Listing 1.
Listing 1 (Fireworks set-up code).
// set up
import "listUtil"
clear
gfx.clear color.clear, 960/3, 640/3
gfx.scale = 3

display(2).mode = displayMode.pixel
flashGfx = display(2)
flashGfx.clear color.clear, gfx.width, gfx.height
flashGfx.scale = gfx.scale
flashGfx.color = color.white

display(7).mode = displayMode.pixel
bkgnd = display(7)
bkgnd.clear color.black, gfx.width, gfx.height
bkgnd.scale = gfx.scale
for y in range(0, bkgnd.height-1)
    c = color.lerp("#550055", "#000022", y/bkgnd.height)
    bkgnd.line 0, y, bkgnd.width, y, c
end for
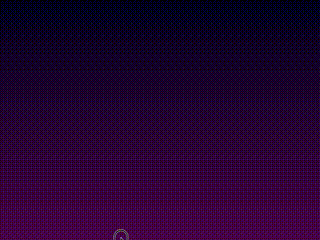
Save this program as fireworks.ms. Then run, and you should see a purple gradient representing the evening sky. (This also makes a nice background; someday you may want to put something like this into /usr/startup.ms to make it your standard work background!)
Here's the next portion of the fireworks program:
Listing 2 (more Fireworks set-up). Start at line 22.
burstColors = [color.yellow, color.red, color.blue,
   color.aqua, color.pink, color.lime, color.fuchsia]

launchSnd = new Sound
launchSnd.init 0.3, 5, [0,1,0], Sound.noiseWave

burstSnd = new Sound
burstSnd.init 1, 2, [1,0.1,0.01,0], Sound.noiseWave

panForX = function(x)
    return 2 * (x / gfx.width - 0.5)
end function

for x in range(0, gfx.width, 100)
    launchSnd.play
    wait
    burstSnd.play
    wait
end for
Lines 22-23 set up a list of colors to use for the firework bursts. This is a long list, so we simply hit return after a comma, and continue it on the next line. (Note that this might slightly confuse the code editor, and cause it to mark the closing square bracket in red — don't let that alarm you.)
Next, we define a couple of synthesized sounds for the rocket launch and burst. Remember that the parameters to Sound.init are duration, frequency, envelope, and waveform.
We want to use the stereo pan (i.e. left-right balance) to make these sounds appear in the left speaker when they occur on the left side of the screen, and in the right speaker when they occur on the right (and smoothly interpolate in between). The panForX function does that calculation, converting the x coordinate (which goes from 0 to gfx.width, the width of the graphics display) into a pan value (-1 to 1). Finally, the for loop on lines 35-40 tests all that out, playing sounds that should pan from left to right. (You might need to put on some headphones or ear buds to hear the effect.)
Code a little, test a little!
Once that's working, delete that for loop starting on line 35, and add this code instead.
Listing 3 (Fireworks Particle class). Start at line 35.
// make a Particle class
Particle = {}
Particle.x = 0
Particle.y = 0
Particle.vx = 0
Particle.vy = 0
Particle.color = color.yellow
Particle.trail = null
Particle.maxTrails = 5
Particle.gravity = -15
Particle.dragFactor = 0.99
Particle.update = function(dt=0.1)
    // apply gravity and drag to velocity
    self.vy = (self.vy + self.gravity*dt) * self.dragFactor
    self.vx = self.vx * self.dragFactor

    // apply velocity to position
    self.x = self.x + self.vx * dt
    self.y = self.y + self.vy * dt

    // draw, appending to the trail
    gfx.setPixel self.x, self.y, self.color
    if self.trail == null then self.trail = []
    self.trail.push [self.x, self.y]

    // erase when the trail is too long
    if self.trail.len > self.maxTrails then
        pos = self.trail.pull
        gfx.setPixel pos[0], pos[1], color.clear
    end if
end function
Particle.die = function()
    // erase trail
    for pos in self.trail
        gfx.setPixel pos[0], pos[1], color.clear
    end for
    // remove from global list
    particles.removeVal self  // (removeVal is from listUtil)
end function

// keep a list of all Particle instances
particles = []

p = new Particle
p.vx = 30
p.vy = 90
for i in range(90)
    p.update
    yield
end for
p.die
In Listing 3, we define a class called Particle. This represent things that move according to simply physics, like the rockets and the embers (i.e. burst particles). The physics is quite simple: in addition to the position (x and y), we also keep track of velocity (vx and vy). On every step, the vertical velocity vy is updated by gravity, and then the position is updated by the velocity.
To draw a particle, we're just using gfx.setPixel. But we also keep track of the last several positions it was drawn, in the trail list. So when we draw the particle at a new position, we add that position to the trail; and when the trail is too long, we pull off the oldest point and erase it (by setting the pixel to color.clear).
The Particle.die function is called when we want to remove a particle completely. It erases all the pixels in the trail, and then removes the particle from the global particles list. Note that this removeVal method we're using here is not standard MiniScript; it is something added by the listUtil module imported on line 1.
Finally, all that code at the end (lines 78-85) is, again, test code just to make sure that things are working so far. When you run this, you should see a particle leap up from the 0, 0 corner of the screen, arc across the screen, and then disappear.
When that's working, delete lines 78-85, and then continue on with Listing 4. Here we make a subclass of Particle, to handle the special case of a particle that is actually a Rocket (i.e. launched from the ground, and not yet burst).
subclass: a class created from another class using
new, so that it inherits all of the values and methods of that other classsuperclass: the more general class that a subclass is created from
Subclasses can be a very handy OOP (object-oriented programming) technique. They allow us to make a more specialized version of a class, one that is like the superclass in most ways, but also specialized in certain ways. In this case, the superclass is our general-purpose Particle class, and the subclass is Rocket. A rocket behaves like other particles in most ways, except that at some point in its flight, it bursts, creating a shower of other particles.
Listing 4 (Fireworks Rocket class). Start at line 78.
// make a subclass of Particle that represents a rocket
Rocket = new Particle
Rocket.timeTillBurst = 3
Rocket.update = function(dt=0.1)
    // do standard particle update...
    super.update dt

    // then, update time till burst, and burst when it's time
    self.timeTillBurst = self.timeTillBurst - dt
    if self.timeTillBurst <= 0 then
        // remove the rocket particle and its trail
        self.die

        // create the burst particles
        c = burstColors.any  // (.any provided by listUtil)
        for i in range(1,40)
            p = new Ember
            p.startColor = c
            p.x = self.x
            p.y = self.y
            angle = 2 * pi * rnd
            speed = 10 + 50*rnd
            p.vx = speed * cos(angle)
            p.vy = speed * sin(angle)
            particles.push p
        end for

        // flash and bang
        flashGfx.fillEllipse self.x-10, self.y-10, 20, 20
        globals.haveFlash = true
        burstSnd.play 1, panForX(self.x), 0.9 + 0.2*rnd
    end if
end function

Ember = new Particle
p = new Rocket
p.vx = 30
p.vy = 90
particles.push p
for i in range(100)
    for p in particles
        p.update
    end for
    yield
end for
Notice the Rocket.update function, which overrides the Particle.update function in the superclass. But the first thing that this function does is call super.update, which means that it runs the standard Particle.update code.
superis a special MiniScript keyword that finds the identifier after the dot somewhere higher in the chain of classes related bynew. It's commonly used in a subclass method to call the same method in the superclass.
It then goes on to figure out if it's time to burst. When it is, it calls its own die method, then creates a bunch of burst particles (using the Ember class we trivially defined in the test code on line 112), as well as drawing a flash (white circle).
The test code here defines Ember as a new Particle, but does not override any properties or methods. That's a pointless thing to do, except in a case like this, where we know we're going to need an ember class later, but for now are content with standard particle behavior. The test code then creates and launches a Rocket, with a little update loop to make it go.
Note that there is nothing here yet to erase the flash on the flashGfx display. So once the rocket bursts, it leaves a yellow circle behind. That's OK — we'll fix that later.
Moving on, clear out that test code starting on line 112, and let's create that Ember class for real.
Listing 5 (Fireworks Ember class). Start at line 112.
// make another Particle subclass that represents the
// embers that float down after the rocket bursts
Ember = new Particle
Ember.age = 0
Ember.gravity = -5
Ember.dragFactor = 0.90
Ember.startColor = color.pink
Ember.endColor = "#88000088"  // translucent red
Ember.update = function(dt=0.1)
    // age, adjust our color, and when it's time, die
    self.age = self.age + dt
    if self.age > 3 then
        self.die
    else
        // update our color
        self.color = color.lerp(self.startColor, self.endColor, self.age/3)
        // and then do standard particle update
        super.update dt
    end if
end function

p = new Ember
p.x = 120
p.y = 200
p.vx = 30
for i in range(50)
    p.update
    yield
end for
As usual, we include a bit of test code at the bottom so you can make sure it's working. When you run this, a little pink ember should appear near the top of the screen, fly off to the right, and fade out. That's what makes embers different from other particles: they change colors over time. Notice that the call to super.update here doesn't happen until later in Ember.update, after updating the color; otherwise the very first appearance of the ember would be in the wrong color.
Now we're almost done! We need a function to launch a rocket, and a main loop. Since any test code for the launch function would be practically the full main loop anyway, let's just press on and finish the program. Delete the test code starting on line 134, and wrap it up with Listing 6.
Listing 6 (Fireworks launch method and main loop). Start at line 134.
// function to create and launch a new firework
launchAt = function(x)
    p = new Rocket
    p.x = x / gfx.scale
    p.y = 0
    p.vx = 30 * rnd - 15
    p.vy = 10 * rnd + 80
    p.timeTillBurst = 3 + 3 * rnd
    particles.push p
    launchSnd.play 0.3, panForX(p.x), 0.9 + 0.2*rnd
end function

// main loop
mouseWasDown = false
haveFlash = false
while true
    // clear the flashes, if we have any
    if haveFlash then
        flashGfx.fillRect 0, 0, flashGfx.width,
           flashGfx.height, color.clear
        globals.haveFlash = false
    end if
    // launch whenever the mouse is clicked
    mouseIsDown = mouse.button
    if mouseIsDown and not mouseWasDown then
        launchAt mouse.x
    end if
    mouseWasDown = mouseIsDown
    // update all particles
    for p in particles
        p.update
    end for
    yield
end while
The launchAt function takes an x position in unscaled screen coordinates, like the mouse position (and unlike the gfx display in this program, which is scaled by a factor of 3). It creates a new Rocket instance, just like our test code from Listing 4. Many of the rocket properties — its initial velocity, and the time until it bursts — are randomized, which makes the fireworks more interesting and fun. The function also plays the launch sound, with stereo pan adjusted for the particle position, and the speed (pitch) randomized a bit so the launches don't sound too monotonous.
The main loop has several jobs. First, it clears the flash display, if indeed any flashes were drawn the last time through the loop. We do this with flashGfx.fillRect, filling with color.clear, because if we used flashGfx.clear, it would reset the display scale and then we'd just have to set it back.
Second, it watches mouse.button and compares it to the previous value, to determine when the mouse has just been clicked. When that happens, it calls our launchAt method to launch a rocket at the mouse position.
Finally, it loops over all particles and calls update on them. And then it calls the yield intrinsic, which tells Mini Micro to wait until the start of the next frame (frames are when the screen is updated, roughly 60 times per second).
Run the program, and click around the screen. A rocket should launch from below the mouse each time you click. Go ahead and spam the mouse button! These fireworks are for you; you deserve it! (Just press control-C to break out of the main loop when done.)
Going Farther
This has turned out to be a pretty short program — considerably shorter than the Sea Battle game you did in Chapter 14. Mini Micro allows you to make a lot of fun with not that much code! But since it was so short, perhaps you have time to try a bit more on your own?
One simple hack would be to make it launch two rockets each time the mouse is clicked, instead of just one. This is literally just one extra line in the main loop. Why not give it a try?
Another tweak is to change how long the embers last before they die. Right now they disappear after 3 seconds. Can you change that to 6 seconds? You will need to change the code in two places, because this time is used both to make the color fade out, and to actually remove the particles. Change it in both places, and make sure that works.
Then, realize that this is a rather poor design, having that magic number in two different places. (This is similar to the concept of magic strings discussed in Chapter 14.) Add a maxAge property to the Ember class, and use that instead of the number in both places.
Finally, we still have all the embers from a particular burst fading out and disappearing at the same time. Wouldn't it be more interesting if that time were randomized a bit too, so some embers last longer than others? Find where the embers are created, and we assign a random velocity. Assign a random maxAge there as well. Run your program and confirm that the embers in a burst now disappear at different times rather than all at once.
If you have difficulty with any of this, don't be discouraged! I encourage you to make use of the community resources you can find via the MiniScript web site (https://miniscript.org). There is a Discord server, forums, and more. Don't be afraid to ask for help — it is a very supportive and welcoming community, and asking for help is something even professional programmers do on a regular basis.

Top comments (0)