We've all seen the side menu which provides us with a map of the various screens of an app. From Gmail to Reddit, these are lifesavers when it comes to finding various functionalities. For Android developers, this seems like the go to choice for navigating within the app. You'd think there would be a resource revealing how to correctly implement this component. However, that is far from the case. I too was stuck for days trying to figure out how exactly to put this into my app but all I found was solutions that were incomplete or not optimal with a bunch of excess code.
In this article, I will take you through this process in a step by step manner so you can easily have this feature in your app
Before we get started, you'll need a navigation dependency in your build.gradle app level file. If it isn't already present, add this implementation("androidx.navigation:navigation-compose:2.7.5")
I have tried my best to not leave out any explanation which has resulted in the article being a tad long. Feel free to skip over the parts that you are well acquainted with.
Creating the Screens Class
First, we'll create a sealed class containing the screens accessible from the drawer.
sealed class Screens(
    val title: String,
    val route: String,
    val icon: ImageVector,
    val badgeCount: Int? = null
) {
    object Inbox: Screens(
        title = "Inbox",
        route = "inbox",
        icon = Icons.Default.Email,
        badgeCount = 31
    )
    object Sent: Screens(
        title = "Sent",
        route = "sent",
        icon = Icons.Default.Send
    )
    object Starred: Screens(
        title = "Starred",
        route = "starred",
        icon = Icons.Default.Star,
        badgeCount = 15
    )
    object Spam: Screens(
        title = "Spam",
        route = "spam",
        icon = Icons.Default.Warning
    )
    object Bin: Screens(
        title = "Bin",
        route = "bin",
        icon = Icons.Default.Delete
    )
}
We have four parameters in the Screens class,
- title: The text that appears on the top bar of each individual screen
- route: The route used while navigating to a screen
- icon: The icon that appears at the side of each item in the navigation drawer
- badgeCount: The text that will appear on a badge if needed. This is made nullable as not every item will need this ### Creating a NavHost to Switch Between Screens
We now define the navigation of our app.
@Composable
fun DrawerNavigation(navController: NavHostController) {
    NavHost(
        navController = navController,
        startDestination = Screens.Inbox.route
    ) {
        composable(Screens.Inbox.route) {
            InboxScreen()
        }
        composable(Screens.Sent.route) {
            SentScreen()
        }
        composable(Screens.Starred.route) {
            StarredScreen()
        }
        composable(Screens.Spam.route) {
            SpamScreen()
        }
        composable(Screens.Bin.route) {
            BinScreen()
        }
    }
}
This is a fairly straightforward step. A NavHost is created with the start destination as Inbox. Functions are provided to navigate to each screen. If you are not familiar with this, please refer to Navigation in Jetpack Compose
Defining the variables needed in our Composable
val navController = rememberNavController()
val currentBackStackEntry by navController.currentBackStackEntryAsState()
val currentRoute = currentBackStackEntry?.destination?.route ?: Screens.Inbox
val drawerState = rememberDrawerState(initialValue = DrawerValue.Closed)
val coroutineScope = rememberCoroutineScope()
val screens = listOf(
    Screens.Inbox,
    Screens.Sent,
    Screens.Starred,
    Screens.Spam,
    Screens.Bin
)
First, we have a navController that will be used to navigate to a screen when its item is clicked in the drawer. currentBackStackEntry returns the latest back stack entry. When the navController goes to another screen, the back stack is altered, the function gets recomposed and returns the current back stack entry. currentRoute stores the unique route of the latest entry onto the back stack. If it is null, it stores Screens.Inbox . drawerState helps us to store the current state of the drawer (open or close) while coroutineScope provides us with a way to call the open and close suspend functions. screens simply stores the list of screens that can be accessed from the drawer.
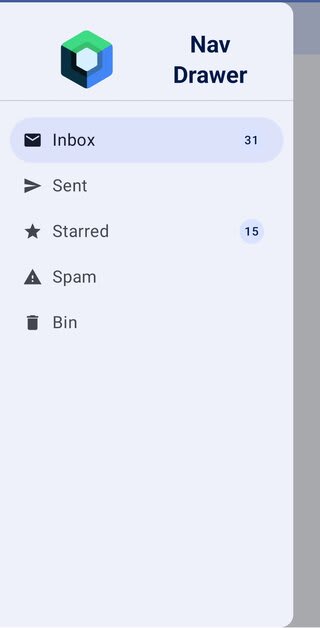
Creating a Drawer Header (optional)
You may skip this step if your navigation drawer does not need a header. I have created a very basic design. I encourage you to get as creative as possible.
@Composable
fun DrawerHeader() {
    Row(
        modifier = Modifier
            .fillMaxWidth()
            .padding(top = 20.dp),
        verticalAlignment = Alignment.CenterVertically,
        horizontalArrangement = Arrangement.SpaceEvenly
    ) {
        Image(
            painter = painterResource(id = R.drawable.jetpack_compose_icon),
            modifier = Modifier.size(100.dp),
            contentDescription = "App icon"
        )
        Text(
            text = "Nav\nDrawer",
            style = MaterialTheme.typography.headlineMedium,
            fontWeight = FontWeight.Bold,
            textAlign = TextAlign.Center,
            color = MaterialTheme.colorScheme.onPrimaryContainer
        )
    }
}
Creating the ModalNavigationDrawer
Finally, its time to actually implement it.
@OptIn(ExperimentalMaterial3Api::class)
@Composable
fun NavDrawer() {
    val navController = rememberNavController()
    val currentBackStackEntry by navController.currentBackStackEntryAsState()
    val currentRoute = currentBackStackEntry?.destination?.route ?: Screens.Inbox
    val drawerState = rememberDrawerState(initialValue = DrawerValue.Closed)
    val coroutineScope = rememberCoroutineScope()

    val screens = listOf(
        Screens.Inbox,
        Screens.Sent,
        Screens.Starred,
        Screens.Spam,
        Screens.Bin
    )

    ModalNavigationDrawer(
        drawerState = drawerState,
        drawerContent = {
            ModalDrawerSheet {
                DrawerHeader()
                Divider(thickness = 1.dp, modifier = Modifier.padding(bottom = 20.dp))

                screens.forEach { screen ->
                    NavigationDrawerItem(
                        label = { Text(text = screen.title) },
                        icon = {
                               Icon(imageVector = screen.icon, contentDescription = "${screen.title} icon")
                        },
                        selected = currentRoute == screen.route,
                        modifier = Modifier.padding(NavigationDrawerItemDefaults.ItemPadding),
                        badge = {
                            screen.badgeCount?.let {
                                Badge(
                                    modifier = Modifier.size(30.dp),
                                    containerColor = MaterialTheme.colorScheme.primaryContainer
                                ) {
                                    Text(text = screen.badgeCount.toString())
                                }
                            }
                        },
                        onClick = {
                            navController.navigate(screen.route) {
                                launchSingleTop = true
                            }
                            coroutineScope.launch {
                                drawerState.close()
                            }
                        }
                    )
                }
            }
        }
    ) {
        Scaffold(
            topBar = {
                TopAppBar(
                    title = { Text(text = currentRoute.toString().replaceFirstChar { it.uppercase() }) },
                    modifier = Modifier.fillMaxWidth(),
                    colors = TopAppBarDefaults.topAppBarColors(containerColor = MaterialTheme.colorScheme.primaryContainer),
                    navigationIcon = {
                        IconButton(
                            onClick = {
                                coroutineScope.launch { drawerState.open() }
                            }
                        ) {
                            Icon(imageVector = Icons.Default.Menu, contentDescription = "Menu icon")
                        }
                    }
                )
            }
        ) {
            Surface(
                modifier = Modifier
                    .fillMaxSize()
                    .padding(top = it.calculateTopPadding())
            ) {
                DrawerNavigation(navController)
            }
        }
    }
}
First of all, we pass drawerState to store whether our drawer is open or closed. In drawerContent we create a ModalDrawerSheet. This is the sheet that appears when the drawer is opened. After calling DrawerHeader, a NavigationDrawerItem is created for each screen. Most of the parameters passed are quite self-explanatory. If badgeCount is present in the screen, a badge is created displaying its value. The main talking point however, is the onClick lambda. Anytime an item is clicked we navigate to the respective screen. We specify that launchSingleTop is true which ensures that only one copy of our screen can be present at the top of the back stack, i.e. if an item is pressed twice or when its screen is already on top of the back stack, another copy will not be pushed onto the back stack. Besides, we call the drawerState.close() function from our coroutineScope.
Inside the content, a Scaffold is created where the topBar contains the screen title and a menu icon, which when clicked, opens the drawer by calling the drawerState.open() function from our coroutineScope.
Inside the Scaffold content, DrawerNavigation is called and the navController is passed to handle the onClick events of the navigation items.
Well, that was it. I have written this article based on how much I understand about this topic. Like all other code, even this can be further optimized. Any suggestion or corrections would be greatly appreciated.
Hope this helped you in some way.
Check out the source code on GitHub
You can reach out to me on Twitter or any other socials on my profile.

Top comments (0)