
I wrote this post a while back when learning git. If you like my writing take a look at my blog.
One of my goals of the year is to contribute to an open source project. Now why would I want that? I think that it will make me a better developer and it could be a fun way to do something different than stuff I do at work. At the same time i use open source software in every project I use and now it's time to give something back. The biggest source for open source software is GitHub and I realized that i needed to learn more about git. This post is my take at learning git and I hope it will be useful for you to.
What git is
Git is a Distributed Version Control System(DVCS). It was created in 2005 by the Linux community. The goals was mainly that is was going to be fast, fully distributed, have strong support for non-linear branches and could be used for large projects.
As opposed to a Centralized Version Control System(CVCS) like Subversion or Team Foundation Version Control(TFVC) git is fully distributed. What it means is that everyone has it's own fully fledged version of the repository which is isolated from the others. You can do your work, making branches and commit without connecting to a central repository. But then when you're ready to share your changes with others you can just push the changes you've made to a central repository or if you want the latest changes someone else has committed just pull them down to your own.
Three states
Git has tree states where your files can reside and this is the very core in git so this is very important to remember.
- Modified
- Staged
- Committed
When a file is changed it will be marked as modified but it will not be committed. The only files that will be committed are those which has been staged. When you stage a file it will be staged as is at that moment. If changes are made after staging the file those changes will not be committed. When files are committed they are safely stored in the repository and is under version control.
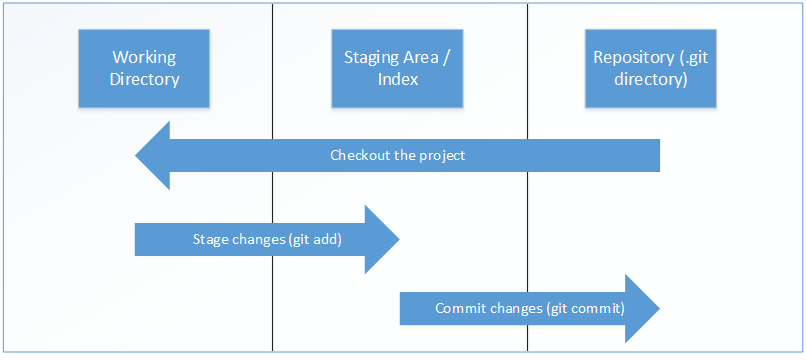
The three states are connected to the tree areas
- Working Directory
- Staging Area / Index
- Repository
The working directory is the place where you work with your files. When you want to store the changes the first thing you need to do is getting the files to the staging area so git knows what to commit. Now that the files are staged those files can be committed. Remember that if there are changes that hasn't been staged those files will not be committed.
How changes are stored
A big difference between git and other Version Control Systems(VCS) is that it stores snapshots and not the difference since the last commit. If you change a line in a file git takes a full snapshot of that file and stores it with the commit. To be efficient git doesn't take snapshots of files that hasn't been changed but instead reference the last snapshot of that file. The way git stores files and together with that the repository is local is what makes git so fast.
Every commit is checksummed based on its contents(files and directory structure) using SHA-1 hash. This makes git aware of corruption so you don't loose any information. The checksum is then used as reference and will be the unique id for that commit.
![]()
When a commit is made it stores the snapshots together with some metadata such as a commit message, time, author, etc. One important thing that also is stored is a reference to one or more parent commits. A commit doesn't have a reference to a child commit. This is very important to remember when we'll start to talk about undoing and looking at history.
Getting started
The first thing you need to do is getting git on your system. Get it here. The rest of the post will use git on the command line but there is a built in GUI tool that can be run with "git-gui" and several third-party tools that is platform-specific.
After installing git we need to setup some first time configuration. Git has both global and repository specific settings. Your name and email will be associated with each commit and needs to be set.
git config --global user.name "Jonathan M"

git config --global user.email jonathan@example.com
If you don't want this name or email to be used in every repository i can just omit the --global parameter and it will only be used in the current repository. There's a lot more settings that can be changed like the default editor to be used. But this will be enough for now.
Getting your repository
The git init command will create an empty repository in your current directory and a subdirectory called .git which is the skeleton of the repository. The .git folder holds data about your repository such as configurations files, all your commits, branches and tags.
With git init --bare git creates a bare repository which doesn't create the .git folder as a subdirectory instead all information is stored in the root folder. A bare repository is not meant to do development work in because it doesn't have a working directory. The purpose of a bare repository is to be used as a central repository and just store changes without being abled to edit them. The naming convention for a bare repository ends with ".git" e.g "my-repo.git"
More often the repository is already created and you want to get it locally so you can look and start working at it.
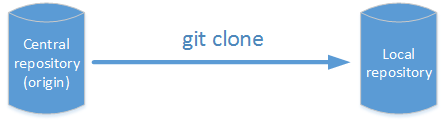
git clone https://github.com/Jontem/my-central-repo.git
copies my-central-repo(in this case hosted on GitHub) to my current directory. My new local repository is now it's own repository fully isolated and a complete copy of the cloned repository. When a repository is cloned it creates a remote connection called origin pointing back to the original repository. Every change that is made in my local repository is not reflected to my central repository unless I push my changes back.
Saving your changes
When you have something that you want to commit the first thing to do is to stage your changes. The git add command adds files or directories to the staging area/index.
You either specify which file
git add <file/directory>
or use
git add .
to specify all files(that is not your .gitignore file). An asterix can also be used to select multiple files e.g git add *.txt. The files in the staging area are those that will be committed. As mentioned before the add command is not just for adding a new file to the staging area but also for adding changed files.
Remember that when a file is added to the staging area git will take a snapshot of the file as is at that moment. If you change the file after that, you will have to stage those changes by running git add again.
To commit files in the staging area run
git commit
This will open an external editor so a commit message can be added.
git commit -m "changed the readme"
With the -m parameter a message can be added directly from the command-line.
git commit -a
If you think the staging part is an unnecessary step there is the -a parameter which adds all previously added files in the repository that has changed to this commit.
Examine your repository
To see how your working directory, staging area and committed changes compare to each other git has the status command.
git status
With the status command this informations is presented
- Which branch you are on
- Changes to be committed
- Changes not staged for commit. To commit these files run git add
- Untracked files. Files that are not tracked by your repository. To commit these files run git add
Inspecting the history of a repository can be done with
git log
It shows you all commits in the repository with the latest commits at the top.
git log -p -2
This shows you the latest two commits and a diff view every change a commit has introduced.
git log --stat
The --stat parameter will only show which file have changed.
git log --pretty-format="%h - %an, %ar : %s"
To customize the output to your needs you can make use of the --pretty-format parameter. Run git help log for available placeholders.
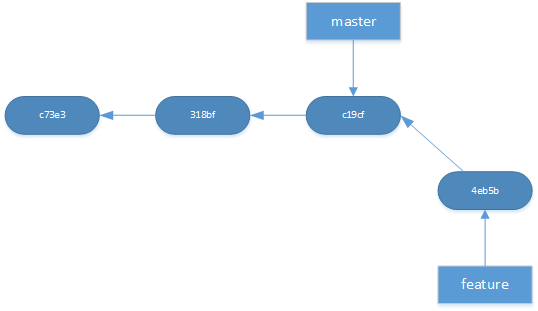
Branching
Branches are very easy and fast to create in git. They are just a pointer to a commit which is very different from centralized version control which will do a full fetch of all your files to a new directory structure. When a branch is checked out your working directory will immediately reflect those changes. Because gits distributed nature a branch can exist only in your local repository without needing to push that branch to every repository. Because of that it's very common to branch in git whenever you work on a new a feature, fixing a bug or some other change.
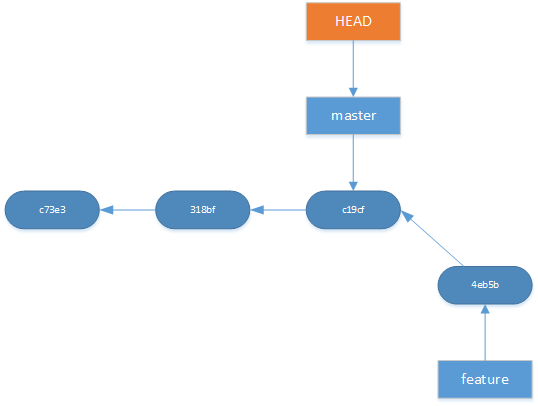
In git there is a special pointer called HEAD. Whatever HEAD points to is the what will be reflected in your history and working directory. In other words what HEAD points to is what branch you are on.
git branch
The branch command lists all your local branches. With --remote or -all you list only remote or local and remote branches.
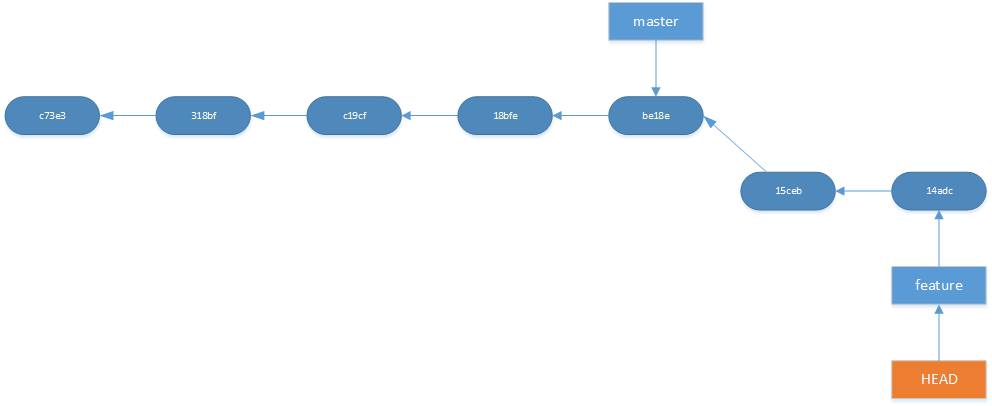
git branch feature
Will create a new branch called feature from the current branch latest commit
git checkout feature
This will change the branch to feature by pointing HEAD to the branch pointer for feature.
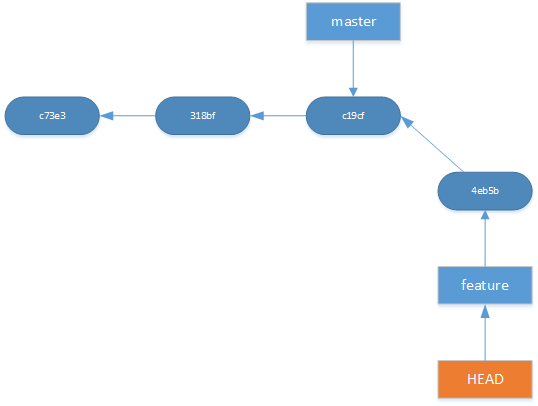
git checkout -b feature
The -b parameter will create a new branch from the current branch pointer and then switch to the newly created branch.
The checkout command can also be used to look at a specific commit. One use case could be that you want to see if a bug existed last week. First get the commit id and then use
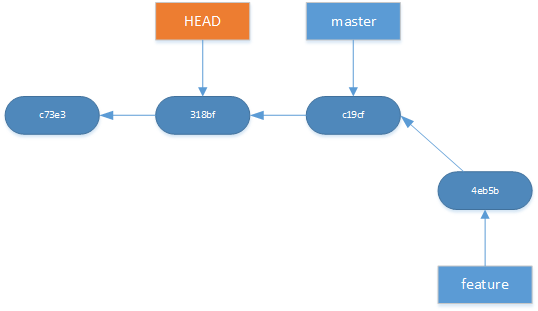
git checkout 318bf
This will put you in "detached HEAD" state. It will happen when you point HEAD to a specific commit instead of a branch pointer. When in detached HEAD you can look around and make experimental changes.
But this can also be dangerous because there is no pointer pointing to the new commits. Remember that a commit only has a reference to one or more parents. In a normal branch git has a branch pointer which always has a reference to the latest commit. But in "detached HEAD" only HEAD points to the latest commit. When git checkout master is used again to get back to master you will no longer have a reference to your new commits that you did in "detached HEAD". There are ways to get those changes back like git reflog command. If you want to do changes or have done changes in "detached HEAD" just create a new branch directly to safely save your change by invoking
git checkout -b my-new-branch
Checkout has a third use case when using it with a file as a parameter.
git checkout HEAD -- myfile.txt
This will overwrite the file in your working directory with the version of that file from the latest commit and it will not update what HEAD points to which means you're still on the same branch. The "--" parameter tells checkout that this is a file operation. It's not a required parameter but it prevents to mistakenly do a branch operation if there is branch with the same name as the file.
Merging and this thing called rebasing
Merge and rebase is two commands which has the same goal and that is integrating changes from one branch into another branch. The big difference is how they do it. To merge first switch to the branch which you will be merging into. In our example were on the master branch. Then run
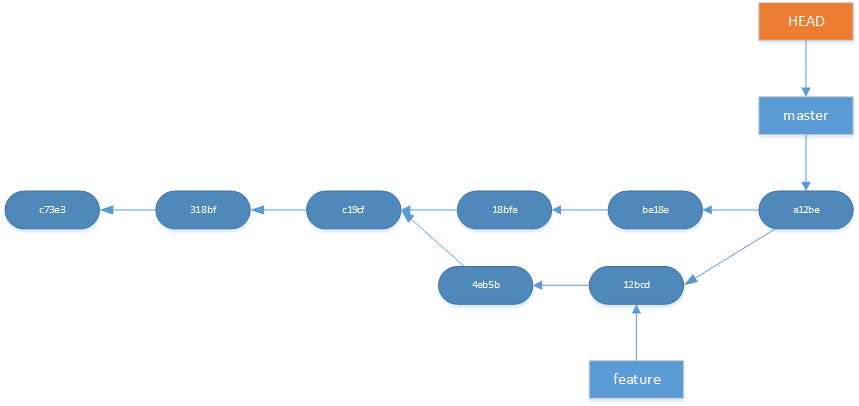
git merge feature
This command merges master into feature and this will create a new merge commit. Merging is non-desctructive operation and it combines the history from both branches with new merge commit thas has two parents.
If the master branch is very active and you have to merge often the history will contain lots of merge commits. To avoid this you can use rebase.
Rebase alters the history of your repository it does so by stuffing away your commits and then adds the commits from the other repository and then replays your commits last.
git rebase master
Sets the base commit which the current branch is based on to masters latest commit. A trick to remember what rebasing does is to pronounce the "re" in rebasing for yourself.
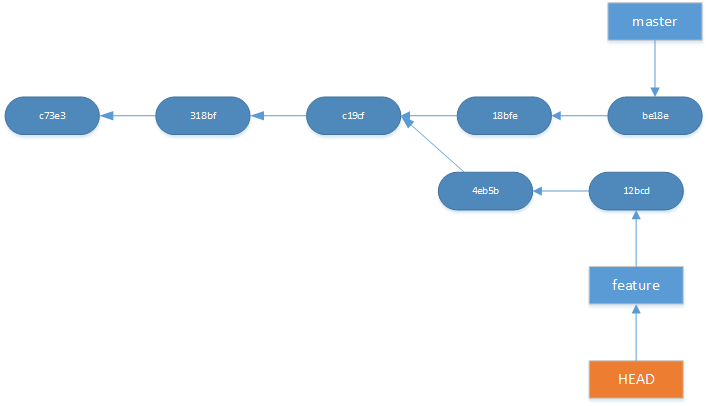
After this rebase your feature branch starts where master is now. This has the benefit of a much cleaner history because it eliminates the merge commits and creates a perfect linear history.
The important thing here is that your stuffed away commits will get new id:s and this will change the history. The "golden rule of rebasing" is to never rebase commits that has been shared with other developers because it changes history and this can put you in a situation which can be cumbersome to sort out.
Undoing things
The reset command is used for resetting your HEAD to a specific state.
git reset HEAD~1
This will move HEAD one commit back. A specific commit id can also be specified. This is another command which important to only do on changes that hasn't been shared with others, because it changes history. Reset has three important parameters which changes how reset works.
- --soft - This will move the branch pointer that HEAD is referencing to the commit specified. But nothing else.
- --mixed -- This will move the branch pointer that HEAD is referencing to the commit specified and update the staging area/index to reflect that commit. This is the default parameter
- --hard - This will move the branch pointer that HEAD is referencing to the commit specified, update the staging area/index and overwrite the working directory to reflect that commit. Be aware that this will reset every tracked file to that commit. Unlike git checkout you will not be notified that you have unsaved changes and to undo this you will have to run "git reflog" because you will have unreferenced commits.
Reset can also be useful when you want to combine commits and make one commit of all changes. For instance running
git reset --soft <commit>
will reset the history but leave the index and working directory untouched. Then run
git commit -m "my new commit"
and you will have cleaned up and merged your previous commits to one single commit.
git reset HEAD <file>
Reset also makes it possible of resetting files. If supplying a file as a parameter git overwrite the file in the staging area with the file from HEAD. If the file is not in HEAD it will unstage the file. When using reset with files git does not move the branch pointer.
The revert command is different from reset because it will create a new commit without the reverted changes. This is a safe way to undo changes because the history will not be changed. This should always be the choice when the branch is public.
git revert HEAD~2
will revert the changes that the second latest commit made and create a new commit. Unlike reset, revert has no file operations
Sometimes when you made a commit you realized that you forgot something or you the commit message wrong. With
git commit --amend -m "my new message"
git will replace the latest commit with a new one. Remember to stage new files that you want to add before committing.
Working with remotes
git remote
shows your connections to other repositories. It can be a central repository for your team or colleagues repository. A remote consists of a url(HTTP/HTTPS or SSH) and a friendly name to use in your commands. With git remote you can add, rename or delete a remote.
git fetch <remote> <branch>
gets all commits from the remote repository and stores them locally. Fetching is a safe to see whats been changed in a remote repository and it will not affect your current work. You can review the repository with
git checkout origin/master
Think of a remote branch as read-only and when you do a checkout it will put you in detached HEAD. To list all remote branches use
git branch -r
Another way to see whats changed between a remote branch and local branch is to run
git log master..origin/master
It will show you all commits that has happened in origin/master that is not in master. If you change position of the branches it will show what's in master but not in origin/master. It's also possible to show the file difference with
git diff master origin/master
git pull origin
is a shorthand for a fetch and merge on the current branch. Git pull can also use rebasing instead of merging by specifiying --rebase
git push origin master
does the opposite of fetch it pushes your local changes to the remote branch. By default git only lets you push when a fast-forward merge is possible. A fast-forward merge is when nothing has changed in the remote branch since you started and you have all those changes locally. To force an update that will overwrite the remote branch with your local branch use "--force". Forcing a push is not something that should occur very often cause it will change history. One thing to be aware of is that tags is not automatically pushed.
git push origin master --tags
will push your local tags.
In conclusion...
I hoped you enjoyed and learned something from this post, I know I certainly have. The post became a lot longer than I planned but I felt it was necessary and even now i have left some parts out. If you like the post or see something that is incorrect please leave a comment below.


Top comments (5)
Nice summary, thank you. I'd written a similar guide for my team (academics who are used to working on their own) and was going to post that but you beat me to it :D I'd not included some of the set up you have or the images so I'm happy to just point people at this one instead ;)
Thank you! If there's anything you think is missing. Please let me know.
There are some things I need to go through with people that you haven't covered, but this could easily be another post.
ssh keys vs username/password and deploy keys for servers - why use them
I go for rebase before merge as all our branches tend to be direct from master - I like to see conflicts resolved outside of master (even a local copy) - branches of branches tend to need better processes than beginners can handle
.gitignore - I let my team use whatever IDE they want, so ensuring their IDE specific files and also data specific files aren't checked in is critical - having a tensorflow checkpoint >100MB in your commit history is very painful when you try to push to GitHub ;)
never code directly into master and never force anything
Easily enough for you to do a follow up post :)
Really great summary of the git basics for everyday use. I'll forward it to my teams.
Thank you!