This week, I had the opportunity to submit my first interview assignment during my interview process with Sequoia Consulting. The assignment was to create a React Component that was capable of lazy loading, and that utilized the Observer API. Lazy loading as defined by the Wikipedia article is 'a design pattern commonly used in computer programming to defer initialization of an object until the point at which it is needed'. We see it a lot on some of those fancier websites, when an image is loaded as we scroll down to its location. It was really fun to learn about this topic. Let's take a walk through the code!
First concern that we have is to detect where our element is in relationt our viewport. In order to detect this, I used an API availabe in most browsers called the Intersection Observer API. This API service allows us to attach an observer onto specific elements that can detect its position in relation to the viewport. Let's take a look at our code.
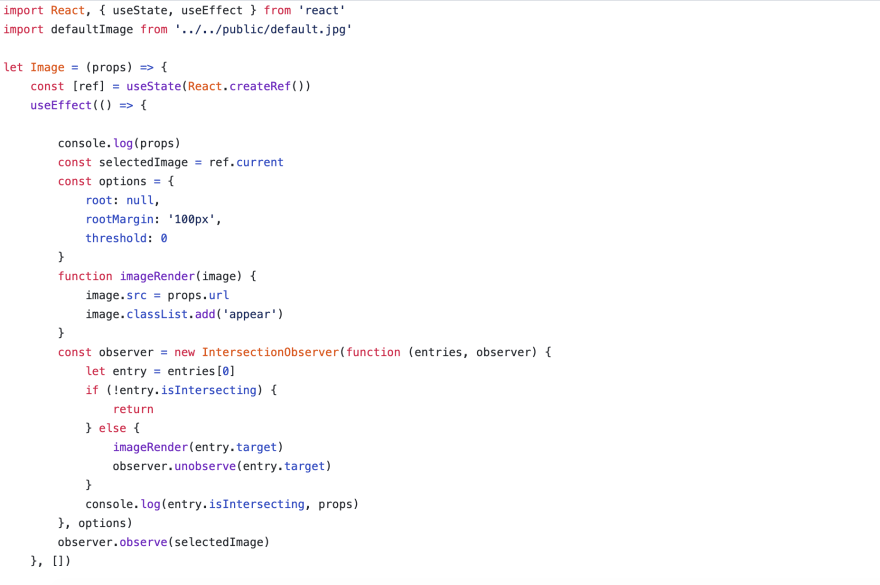
So first thing that I did was to set up a state variable with hooks that created a reference to the object. If you haven't read up on references, you can read about them here. As it mentions in the React docs, a good case to use refs would be to select text and to trigger animations, both of which we will do. Also, refs are particularly important for our case, because we are trying to access the actual unique HTML in the DOM elements being generated by our React engine, and so we need to use references for this case.
Sidenote: You also could have used a class component too to utilize use state and componentDidMount, but my assignment required me to use hooks.
Next, I set up a useEffect method, which triggered on intialization. When the component is triggered, we want to start listening to where it exists on the DOM, and to use our Intersection Oberserver API in conjunction with that.
In order to use this Intersection API, we had have to first create a new instance of it which takes two arguments: a callback function, and an options variable which we'll get into later.
First with the callback function, we give this function two arguments which are the HTML elements we want to observe with the entries variable which we will receive, and observer variable, which allows us to perform functions on the observer itself. In our case, we set up the callback function to determine whether the entry (we only had one per component, but with class selectors you can get multiple), was currently intersecting, and if it did intersect, then you would perform a helper function on the entry.target. As you might've noticed, the entry variable the callback function receives has multiple properties like isIntersecting and target among others, which you can use to perform operations on your HTML.
Before we get into the helper function, the options variable is important, because it sets the definition for what counts as an intersection. The first variable is the root variable which gives us the intial 'box' we are trying to use as the viewport. This can be selected using document.querySelector or if you just leave it null it becomes the viewport by default.
The next is our rootMargin variable allows us to make our box bigger (or smaller if you use negative numbers) and adjust the boundaries of your box. You can use an array here which corresponds to the margins for [top, right, bottom, left].
Last but not least, we have the threshold variable which is a number between 0 and 1 and is a ratio that determines what ratio of your element has to be in the root element to trigger a callback function. You can have multiple values in an array for this element and that would trigger the callback function each time that each particular threshold ratio in the array was crossed.
Now that we have everything for our interaction detection and callback function set up, all I had left to do was to actually decide what I want to do with the callback function when it is called. For this, I decided to change the source of the image element from a default image to the url from the Unsplash API and then add a class to it which would perform a transition, which would be considered our image loading action.

This was the CSS for my transition. Yep only 3 lines! First we have a class that has opacity 0, then we make a transition attribute which takes in the value we want to transition, how long it should take, and what style of transition we want. More on transitions here. Then the class we're adding has the target opacity we would like to transition to.
Here's the final result! Very pretty.


Top comments (3)
Great article! One question, I don’t see an import for IntersectionObserver?
Thanks Christian! I was wondering this too, but I think it's just something built into the browser. I just tried making a new instance of IntersectionObserver in my console and it works.
Nice, thanks for clarifying.