If you’re like me, you’re always on the lookout for tools that help you work smarter, not harder. Today, I want to share one that’s changed the way I handle image optimization - ImageEngine.
Let’s face it, image optimization is a chore. If you want to DIY it, your options are basically writing the same lines of responsive syntax for the nth time or optimizing images with image editing software. Neither are scalable when we’re talking about devving or maintaining multiple websites or a huge site with tonnes of images. As a developer - that’s not ideal and definitely not what you spend your time on.
ImageEngine is an intelligent Content Delivery Network for Images; an image CDN. Using device-aware edge servers and advanced WURFL device-detection images are treated as dynamic, rather than static content.
You can let ImageEngine take over the image optimization and delivery aspect of your site almost entirely. This is more scalable, future-proof, and adaptive than other solutions, like responsive images.
What’s the problem with images?
To show you just how much room for improvement the average image-heavy website has, let’s look at the results of a Lighthouse audit on this page. It’s a typical e-commerce products page demo with multiple stacked images and image breakpoints:
![Ecommerce demo website with images]
If we run a Lighthouse performance on the original we get the following results:
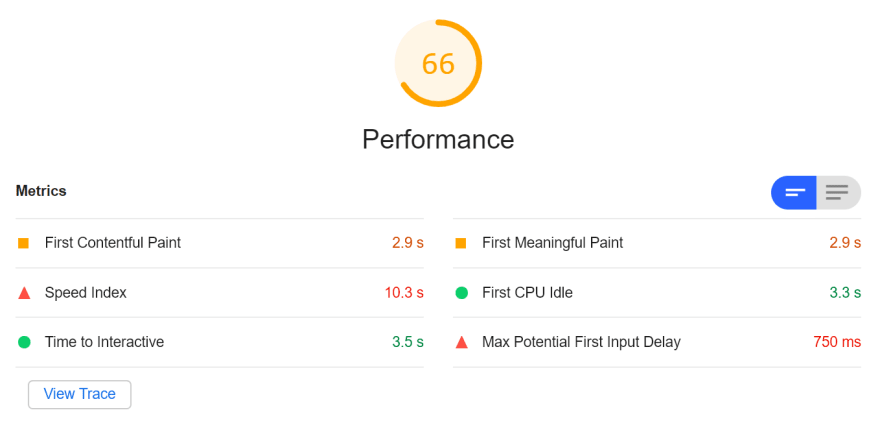
First of all, the First Contentful and First Meaningful Paint time could be improved. These are flagged as critical user-centric performance metrics by Google and reflect the time it takes important content to load. As you can see by the Speed Index, it took more than 10.3s for all content to load, which is way too slow.
If we look at the opportunities for improvement that Lighthouse identified for us, we can already see what impact images have:
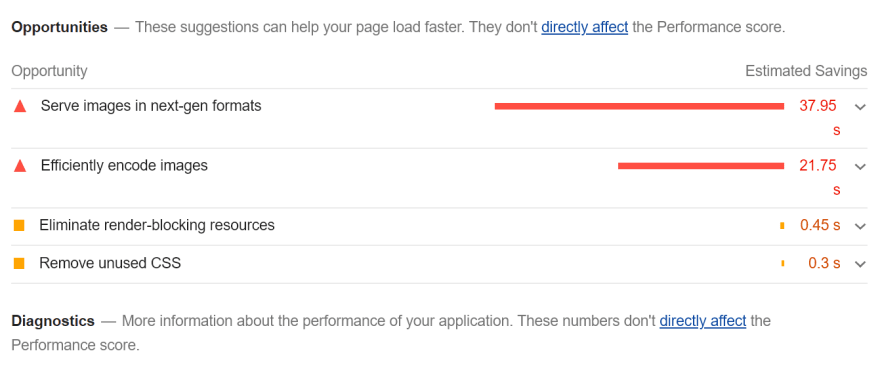
- Serve images in next-gen formats: Newer image formats like JPEG 2000, JPEG XR, and WebP provide better compression than standard .PNG and .JPEG formats.
Efficiently encode images: This indicates that there are more efficient compression and loading techniques as well as image formats that can be used.

Avoid enormous network payloads: Due to the lack of compression and using inefficient image formats, our total payload was way bigger than it needed to be.
How to optimize images using ImageEngine
OK, so now that we know what the problem is, let’s get to the solution. Signing up to the ImageEngine Image CDN and serving optimized images via the service is super simple.
Step 1: Sign up to ImageEngine
You can sign up for an account at imageengine.io. Each step of the setup process is explained in the documentation.
First thing to do is to enter the domain name of the webpage where you intend to use ImageEngine. Then, you’ll be asked for the origin of the images. The suggested origins during signup are extracted from the website you entered in the first step.
Step 2: Confirm your new image serving domain
ImageEngine will then provide you with a newly created hostname where your images will be served from. Basically, ImageEngine will load your images from the origin, optimize them on its servers, and then serve them through this new domain.
This new domain will look something like:
2xao83no.cdn.imgeng.in/images/ImageEngineLogo.png
The hostname can also be “CNAME’d” in your DNS, if you want to use your own domain name.
Step 3: Update your image ‘src’ attributes
You’ll then need to update your image source URLs so they are pulled from the ImageEngine domain. So, your img tags will look something like this:
<img src="//images.mysite.com.imgeng.in/path/myimage.png">
(Optional) Step 4: Fine-tune your image optimization settings
Once you’ve signed up for ImageEngine and set up your image-serving domain, ImageEngine will already use its full range of image optimization powers to speed up image delivery.
Generally, I’d just recommend letting ImageEngine do its thing. However, you can change some of the settings for specific use-cases. Overriding ImageEngine’s default optimization might reduce its efficacy and limit its situational adaptability.
You can add settings from the dashboard, by specifying a path to certain images and then adding the settings. For example:
- Set Minimum Cache TTL/Browser Cache TTL
- Pass Images Through, which will not apply optimization to the selected images
Or, you can pass directives to ImageEngine in the “src” attribute of your images, for example:
<img src="//images.mysite.com/images/myimage.png?imgeng=/cmpr_20/">
Will override ImageEngine’s default compression settings and tell it to compress the image by 20%. The documentation has a full list of all the supported directives you have at your disposal.
What are the results?
So, now that our images are optimized by ImageEngine we can run the Lighthouse audit again. Here are the results:
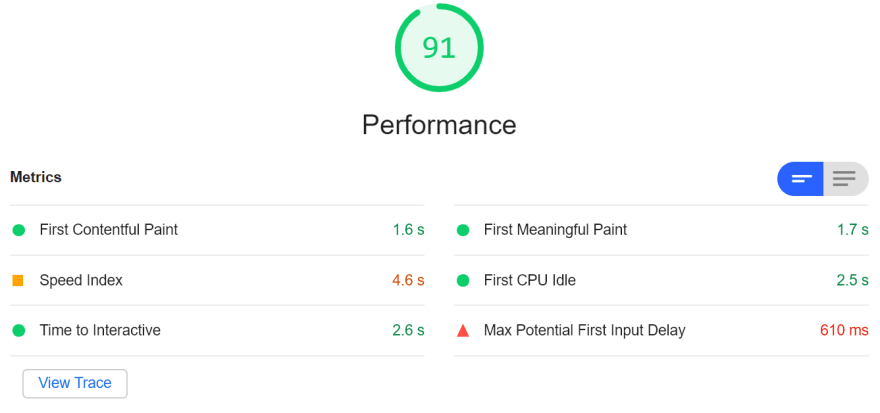
Pretty much all of our crucial user-centric performance metrics are up. This means users will see crucial information on the page much faster and get to interact with it. And, you can see that the Speed Index time more than halved thanks to the reduced payload.
All-in-all, it’s a superb win for overall customer experience and Google’s performance metrics
Another neat new feature of ImageEngine with even more data-saving potential is support for Chrome Lite Mode. When Chrome users switch on this setting, Chrome passes the Save-data:on header to the website server.
ImageEngine will proactively try to reduce the image payload by applying extra compression. Of course, image quality will be affected by these high levels of compression. However, your users will get what they want, which is a much faster loading page.

Top comments (0)