
Before the introduction of profile READMEs in 2020, GitHub merely showcased public repositories and activities on your GitHub profile.
But with profile READMEs, you can do so much more. It’s now possible to turn your GitHub profile into something of a portfolio where recruiters can visit to learn more about you and your work. Make sure you present yourself as well as you can. Your profile should showcase your best work, favorite tools and programming languages, and whatever else makes you stand out.
This tutorial will teach you how to create a GitHub Profile README using a GitHub Profile README Generator.
How to create a GitHub profile README
To get started, you need to create a new repository. Navigate to the top right corner of your GitHub profile and click on the plus icon.

The new repository must have the same name as your GitHub username. Your username is the name on the left, just beside the space GitHub provides for you to fill in the name of your new repository. After entering the username, you’ll know you got it right when a confirmation message below the username bar states that the new repository is a special repository.

Then tick Add a README file and click Create repository.
After creating the repository, go back to your GitHub profile. The new README will be at the top of your profile, like the image below.

Click the tiny pencil icon on the far right to edit your README file. Highlight and delete the content on the README. Then open the GitHub Profile README Generator. Fill and tick all the relevant sections. You can even look at other GitHub profiles for inspiration.
Note that in the Add-ons section of the GitHub Profile README Generator, you have to tick the one that applies to you from the last three options, as in the image below. Ticking one of those adds a blog post section to your GitHub profile. This will allow you to add a blog post workflow to your GitHub profile later in this tutorial.

When you’ve filled and ticked all the relevant sections, click Generate README at the bottom of the page. The top of the page that opens will look like the image below.
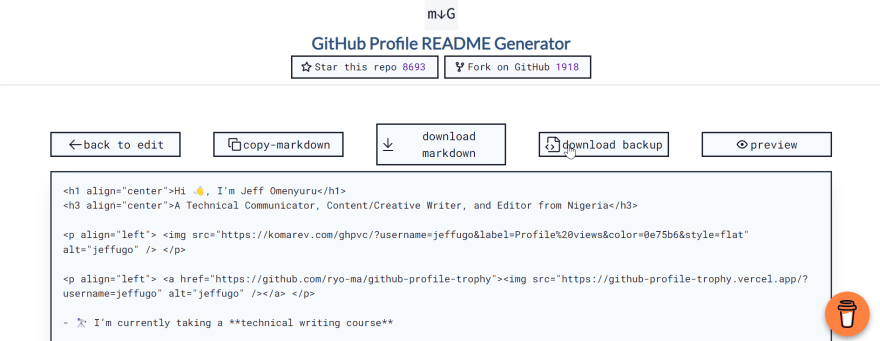
You can click preview to see what your GitHub profile will look like. The point is to check if you’re satisfied with how it looks and all the information you entered. If you’re not satisfied, click back to edit to go back to the GitHub Profile README Generator. But if you’re satisfied, click copy-markdown to copy everything and then paste it directly into your README on GitHub. Scroll down and click Commit changes at the bottom of the page. Your GitHub profile will look like this:

For some people, this would be it. But if you look at the image above, you’d notice that nothing appears under the blog posts section. As a technical writer, you want to showcase your latest blog posts so that anyone who visits your profile can immediately access your work. Below is a tutorial on how to create a blog post workflow.
Creating GitHub blog posts workflow
Install and set up your VS Code.
After installing and setting up VS Code, click the extension button on the sidebar. Type "GitHub Repositories" into the search bar and install.

Then go to the command palette by clicking the settings button at the bottom left corner of your VS Code. The command palette is the first option on the menu. A search bar will open when you click command palette.
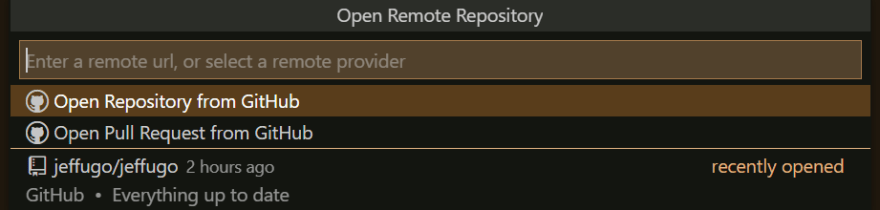
Enter "Remote Repositories" into the search bar and click Remote Repositories when it comes up in the drop-down. You'll get the same image below. Click Open Repository from GitHub.
At this point, you'll be prompted to authenticate your GitHub account if you’ve never logged in from VS Code before. After the authentication, your GitHub repositories will appear in the file explorer in VS Code.
Open the new repository you created at the beginning of this tutorial and create a folder titled .github inside. Inside .github, create another folder titled Workflows. Then create a yml file titled blog-post-workflow.yml inside Workflows. You can create the folders and the yml file at once in VS Code.

To do that, click on the icon in front of the arrow in the image above and enter .github/workflows/blog-post-workflow.yml in the name bar. Click here and copy the code you see in the image below.
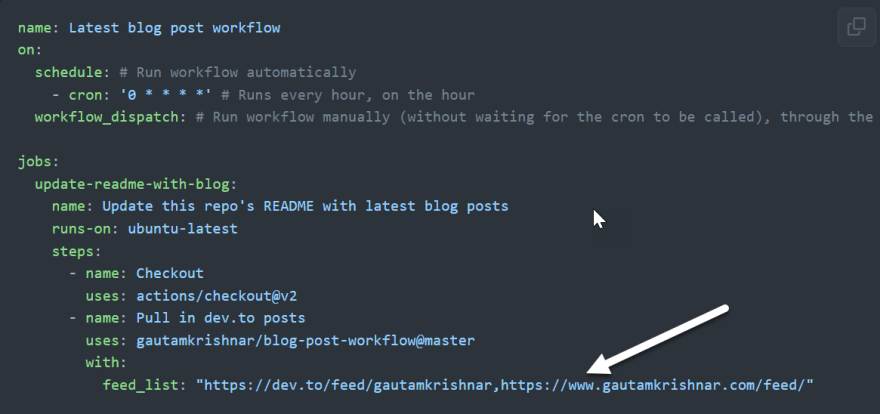
Paste the code inside your yml file. Get the RSS feed URLs of your blog post sources and replace the feed list in the code above, indicated with an arrow. Visit this repository and scroll down to get the RSS feed URLs of some popular blogging platforms. Simply remove the links in the code above and paste yours in, separated by a comma if you have multiple sources. Don't remove the quotation marks.
After replacing the feed list, save and then commit the changes by clicking the source control icon, shown with an arrow in the image below. Write a commit message in the message bar before clicking the tick icon above the message bar.

After that, go to your GitHub profile and open the repository you just made changes to. To see your new workflow, click Actions in the bar just below where GitHub displays names of repositories, as seen on the left in the image below.

To open your new workflow, click on Latest blog post workflow. Then run by clicking Run workflow at the bottom right corner. It takes only a few seconds to finish. If successful, a message that says “Workflow run was successfully requested” will appear at the top of the page.
Check your GitHub profile for the lineup of your latest blog posts. By default, it will display five of your latest blog posts if you have that many.

Top comments (0)