
UPDATE 2021-06-06
A few days after publishing this I came across a bug where agent jobs would be stuck in pending state. I've since fixed this and documented some additional changes I've made at the end of the post.
The UK’s coronavirus vaccine strategy has been to target those most vulnerable first, and then trickle down towards the healthier population. Since that age is creeping down toward my age group, I wanted to see if I could alert myself when I would be eligible for the vax.
My local GP would send out an SMS text message informing me when I’m eligible, however I’ve heard that this text can come days after you’re eligible. Knowing that the latest guidance is maintained on the NHS Coronavirus Vaccine site, I can use Huginn to alert me when the page updates with the latest eligibility.

tl;dr
- Huginn is an automation tool with a number of different agents
- It can be configured to monitor a property (or properties) on a web page and trigger an action
- That action can take the form of an email alert
- This can be used to monitor the latest age group eligible for a vaccine
Deploying Huggin
Huginn is a self-hosted automation kit that allows you to create agents and workflows in response to events, sort of like your own IFTTT (If This Then That).
Being self-hosted it can be deployed out in a number of ways. I already have Portainer (a GUI for Docker) running in a virtual machine - so to deploy it out I can follow the instructions for Docker container deployment. I created a docker-compose file so that it can be easily replicated for yourselves in Docker, or even as a Portainer Stack.
You’ll notice there are some environment variables for SMTP here; the values for these will differ for your SMTP setup. I talk more about how I set this up with my Gmail account later in the post.
Also big thanks to zblesk for their blog post on Huginn which helped me iron out some of the environment variables!
version: "3"
services:
  huginn:
    command:
      - /scripts/init
    container_name: huginn
    environment:
      - SMTP_PORT=587
      - SMTP_SERVER=<SMTP_SERVER>
      - SMTP_PASSWORD=<SMTP_PASSWORD>
      - SMTP_USER_NAME=<SMTP_USER_NAME>
      - SMTP_ENABLE_STARTTLS_AUTO=true
      - SMTP_AUTHENTICATION=plain
      - SMTP_DOMAIN=<SMTP_DOMAIN>
      - DATABASE_POOL=30
      - TIMEZONE=London
      - IMPORT_DEFAULT_SCENARIO_FOR_ALL_USERS=false
    image: huginn/huginn:latest
    ports:
      - 3000:3000/tcp
    restart: unless-stopped
    user: "1000"
    volumes:
      - mysql:/var/lib/mysql
    working_dir: /app

volumes:
  mysql:
    driver: local
Be sure to change TIMEZONE to your timezone, I found that having an incorrectly set timezone caused Huginn jobs to be backed up in a pending state. I tried Europe/London first but that caused the process to crash on boot; so I ultimately got it working with just London.
The config above will expose Huginn on the Docker host at port 3000. I like to give my services a nice domain name to access them at using Caddy, which I’ve written about before. Here’s a condensed version of what my Caddy config file looks like for Huginn.
{
  "apps": {
    "http": {
      "servers": {
        "srv0": {
          "listen": [
            ":443"
          ],
          "routes": [
            {
              "handle": [
                {
                  "handler": "subroute",
                  "routes": [
                    {
                      "handle": [
                        {
                          "handler": "reverse_proxy",
                          "upstreams": [
                            {
                              "dial": "192.168.2.15:3000"
                            }
                          ]
                        }
                      ]
                    }
                  ]
                }
              ],
              "match": [
                {
                  "host": [
                    "huginn.joannet.casa"
                  ]
                }
              ],
              "terminal": true
            },
            // ... others removed for brevity
          ],
          "tls_connection_policies": [
            {
              "match": {
                "sni": [
                  "huginn.joannet.casa",
                  // ... others removed for brevity
                ]
              }
            },
            {}
          ]
        }
      }
    },
    "tls": {
      "automation": {
        "policies": [
          {
            "issuer": {
              "challenges": {
                "dns": {
                  "provider": {
                    "api_token": "CLOUDFLARE_API_TOKEN",
                    "name": "cloudflare"
                  }
                }
              },
              "module": "acme"
            },
            "subjects": [
              "huginn.joannet.casa",
              // ... others removed for brevity
            ]
          }
        ]
      }
    }
  }
}
I’ll need to also add in a DNS entry in PiHole to route HTTP calls on my network for https://huginn.joannet.casa to the IP address of my Caddy server.
Setting up agents
The workflow we need to set up here is pretty simple whereby we only need two agents; a Website Agent and an Email Agent. The website agent will perform the scraping of the NHS website on a regular basis, and if the component on the web page has changed, then it will invoke it’s downstream notifier - the Email Agent.
Website Agent ------ invokes ------> Email Agent
Before we do that we’ll need to create an account for it - this is all local to your deployment and is not external. The invitation code you’ll need to enter is try-huginn.
When you get through to the main page, I suggest disabling or removing the agents that are there already to prevent some problems later on. If you set IMPORT_DEFAULT_SCENARIO_FOR_ALL_USERS=false then you should not see any there.
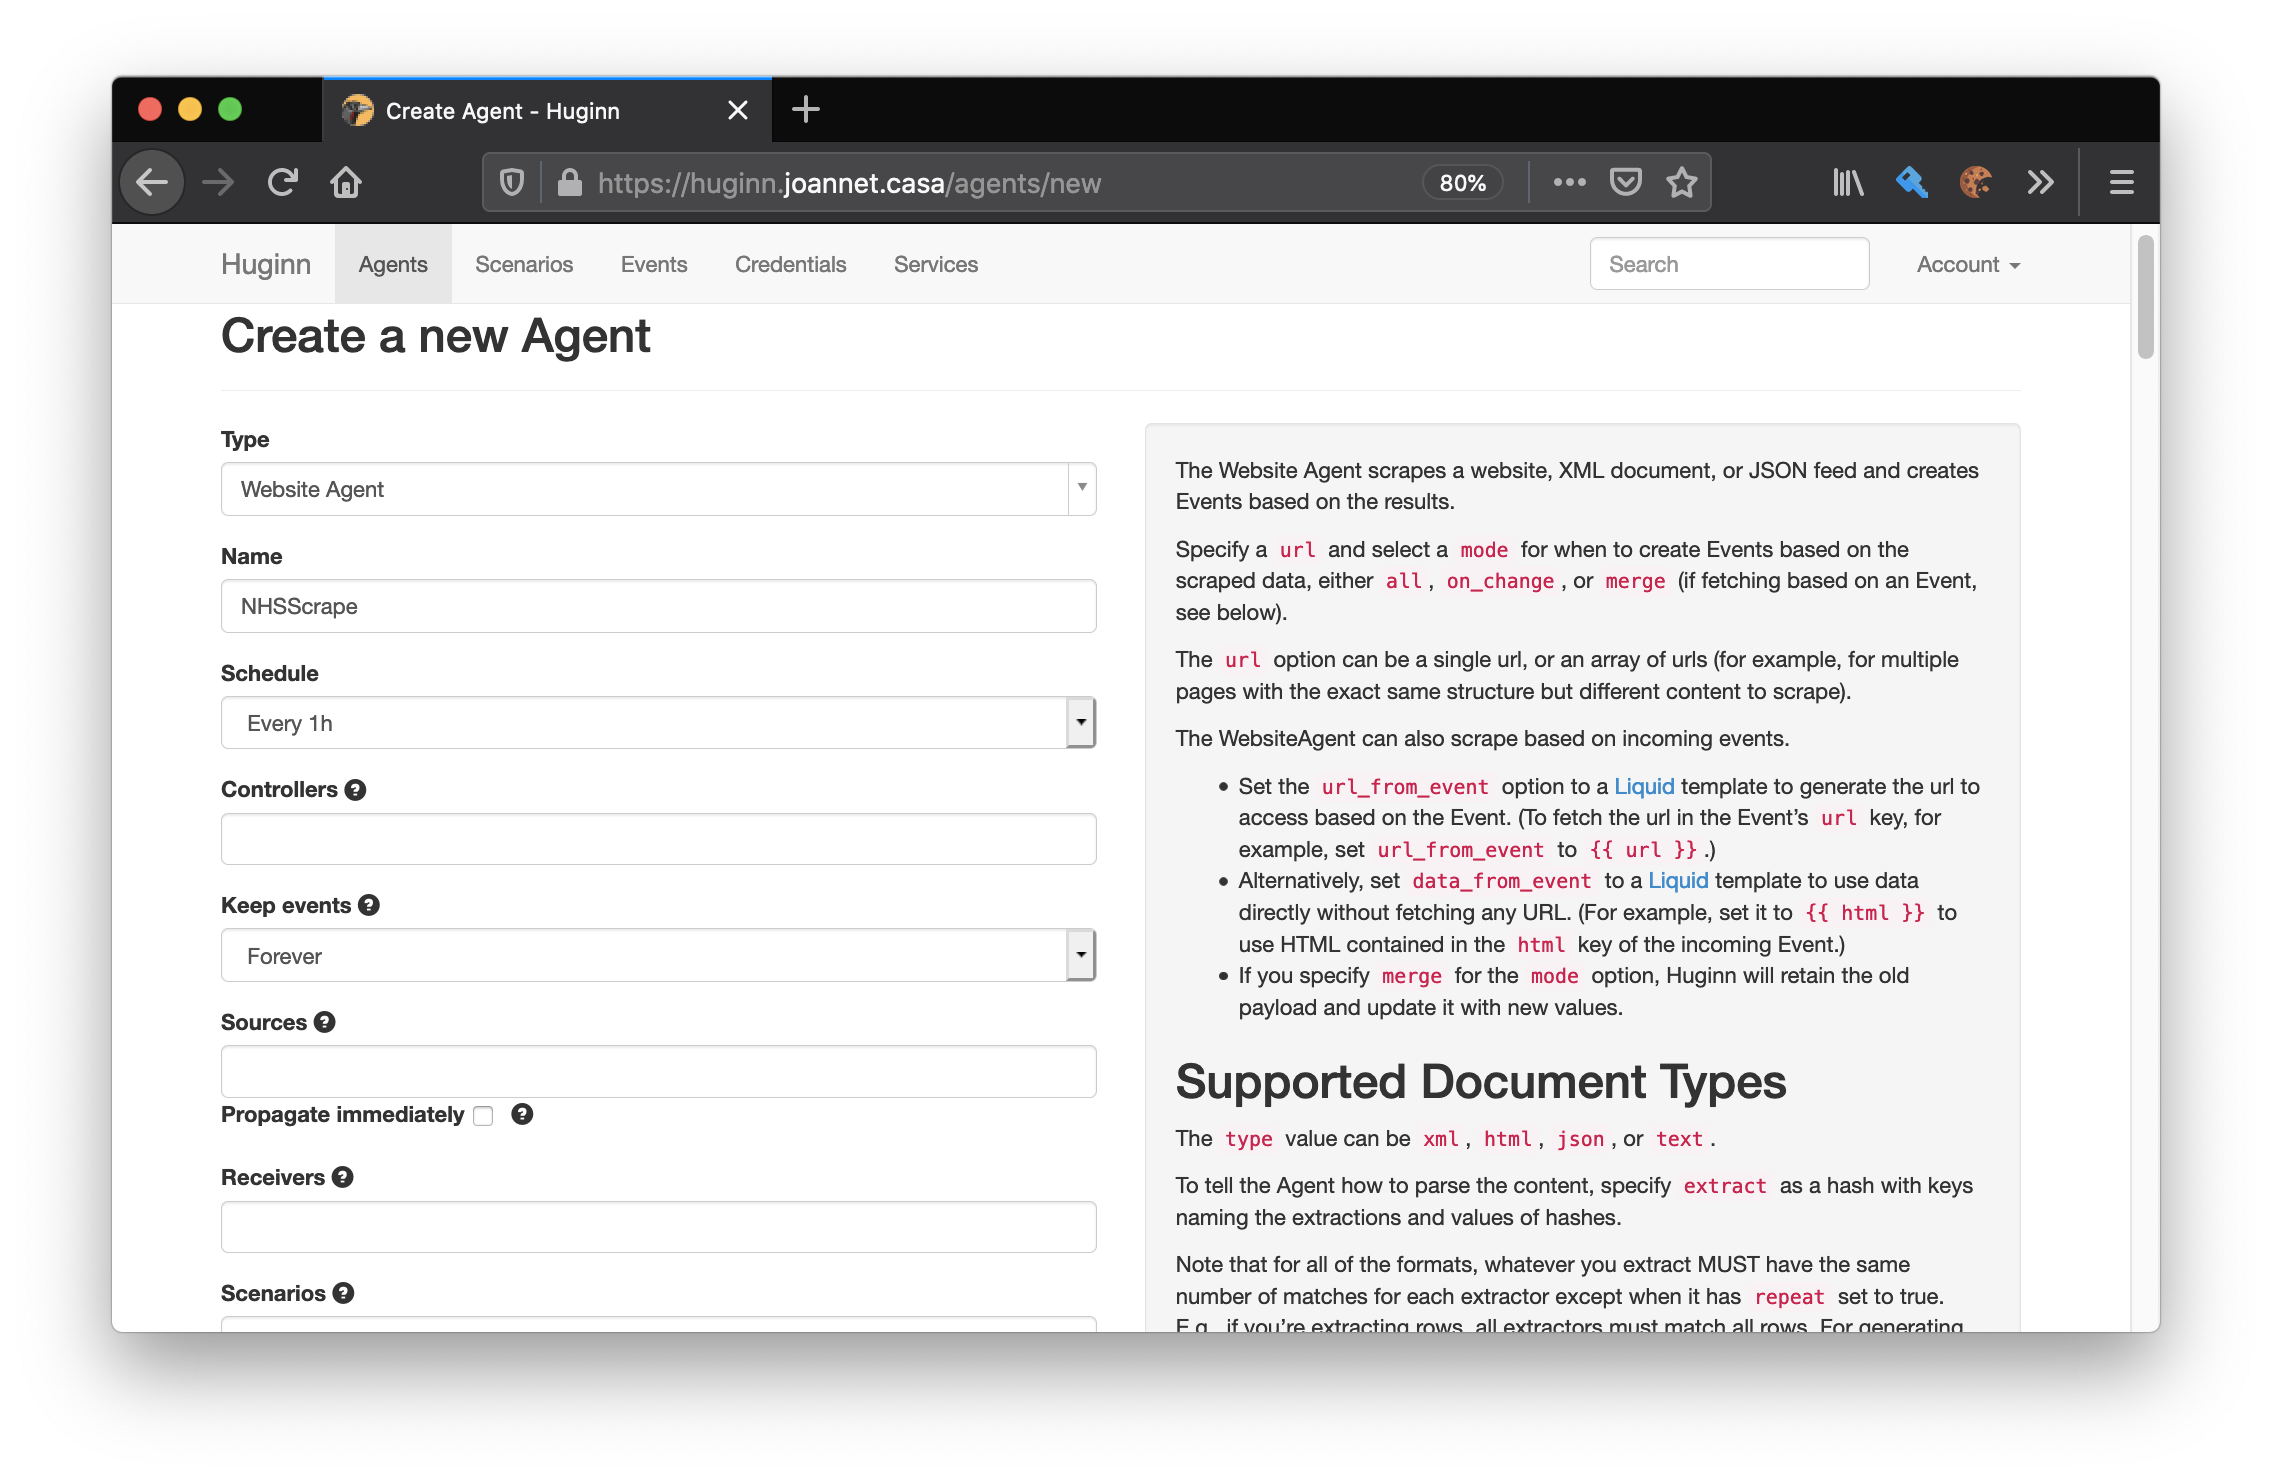
Website agent
From the Huginn home page, create a new agent, where the type will be Website Agent.
There will be a bunch of fields that appear, the only ones you need to fill in are:
- Name
- e.g.
NHSScrape
- e.g.
- Schedule
- for me, checking once an hour is good enough
- Options
The other fields serve a purpose that’s beyond the scope of this post.
Within Options comes the configuration used to define the website agent. The documentation for the agent config appears on the right hand side, so you can read through that for reference.
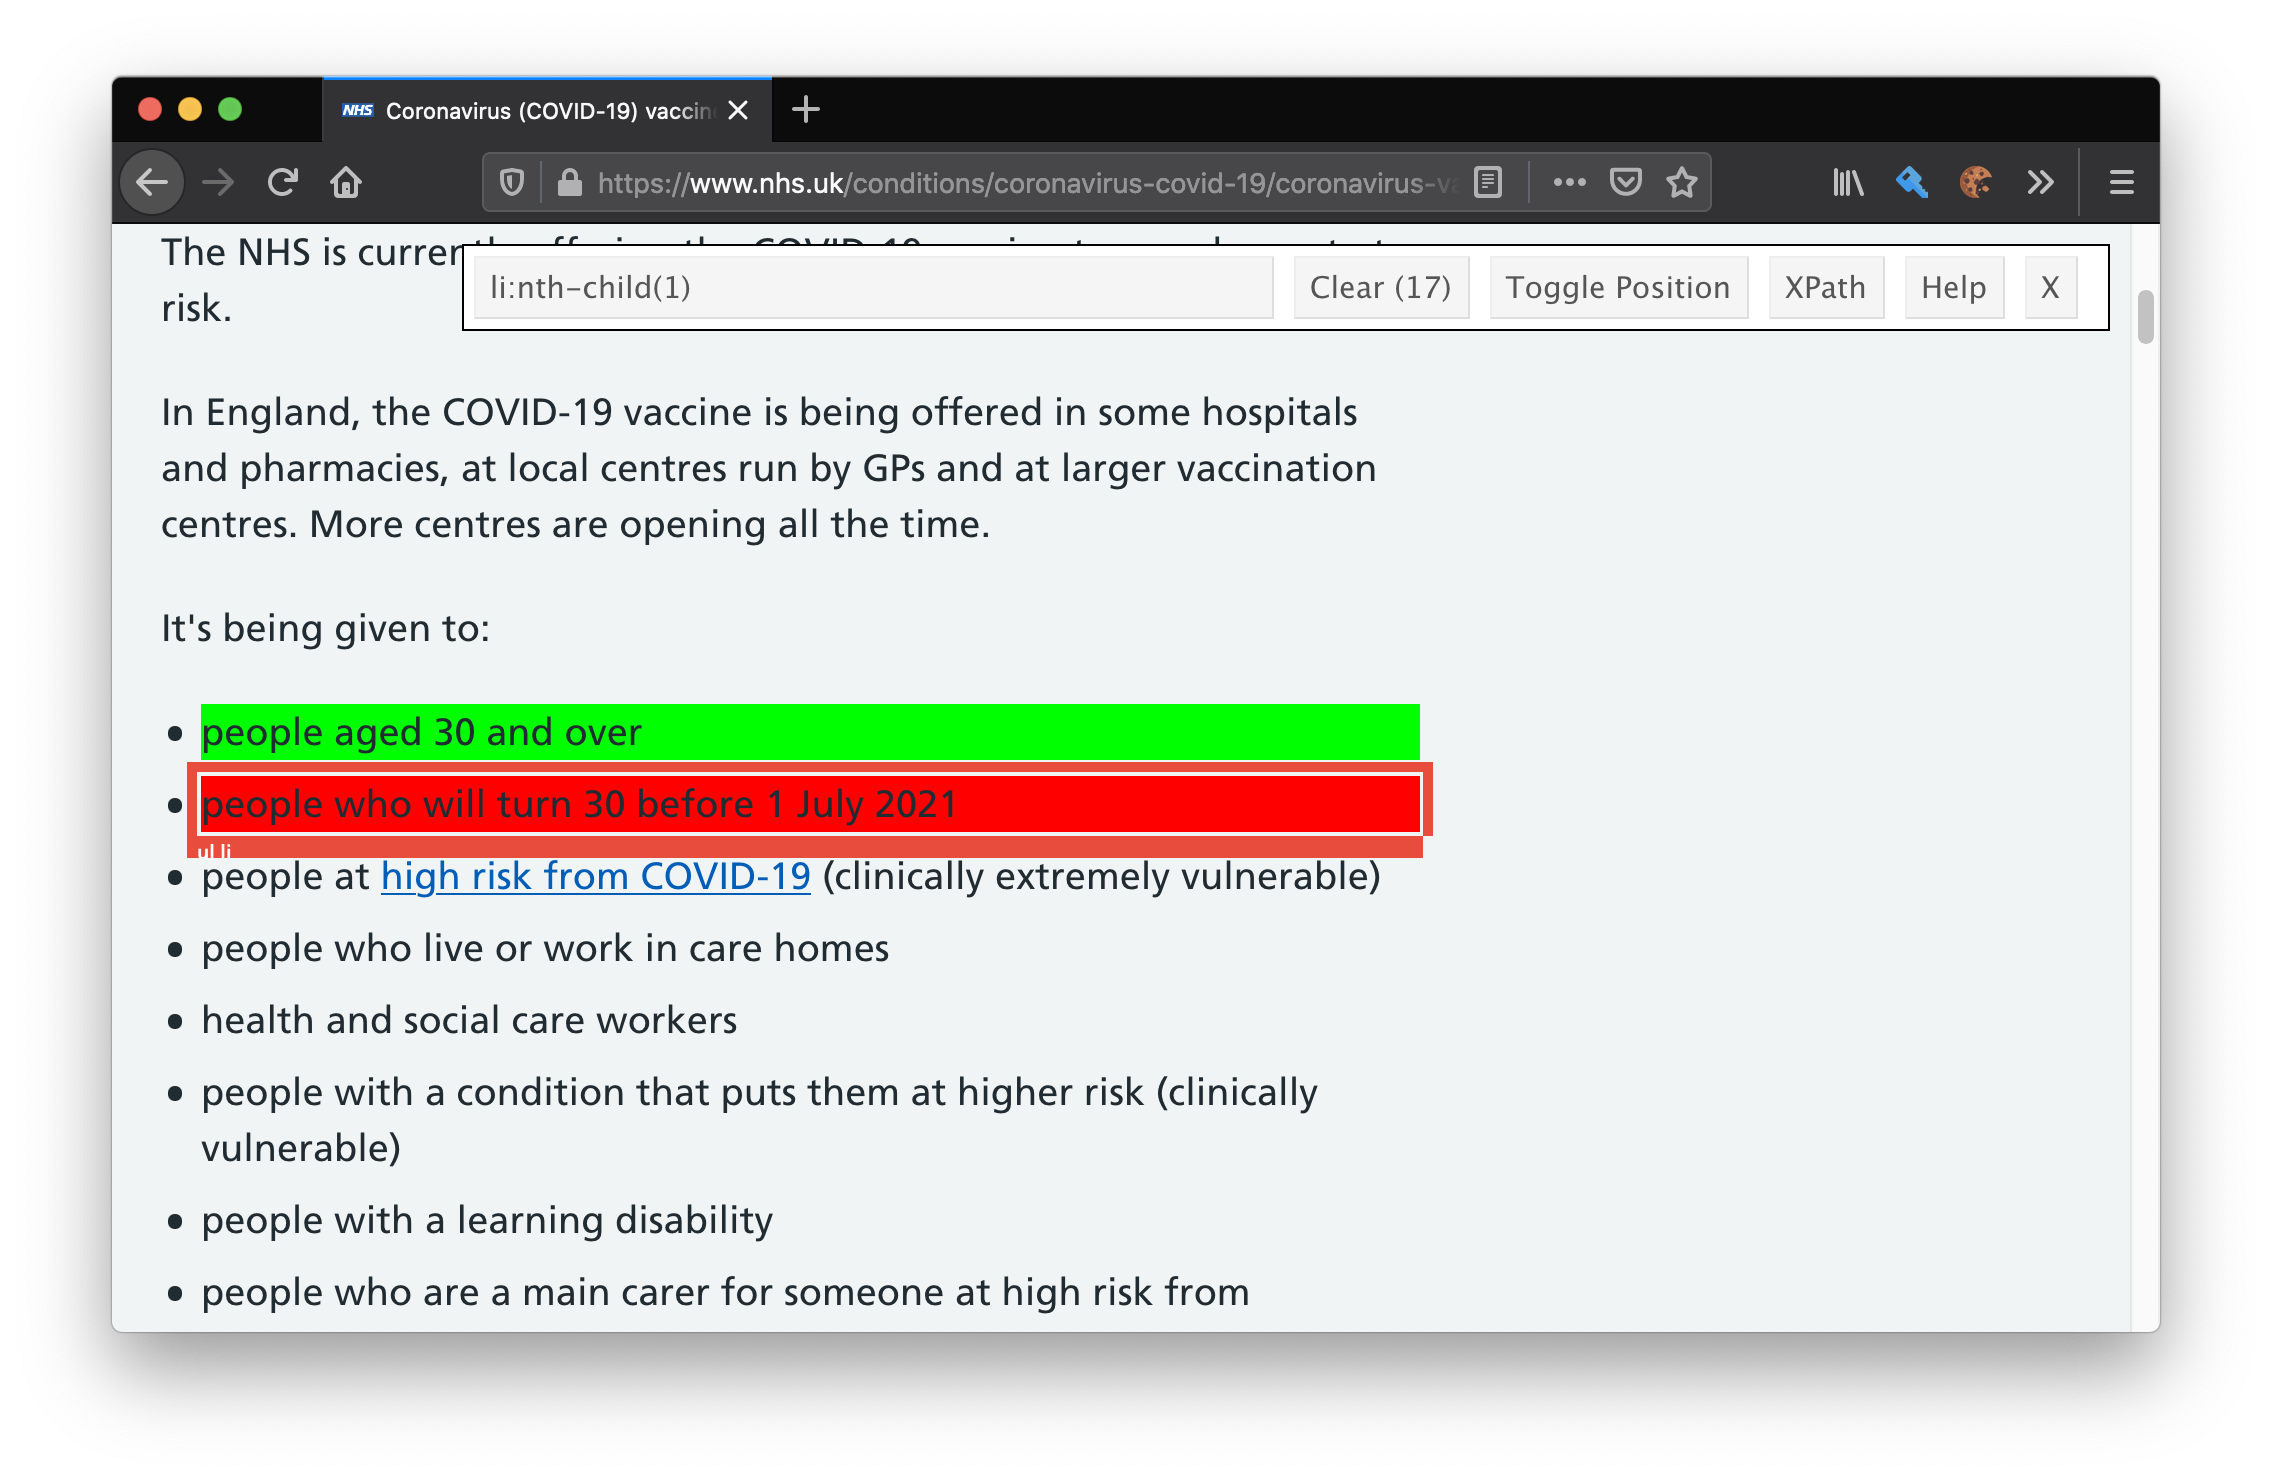
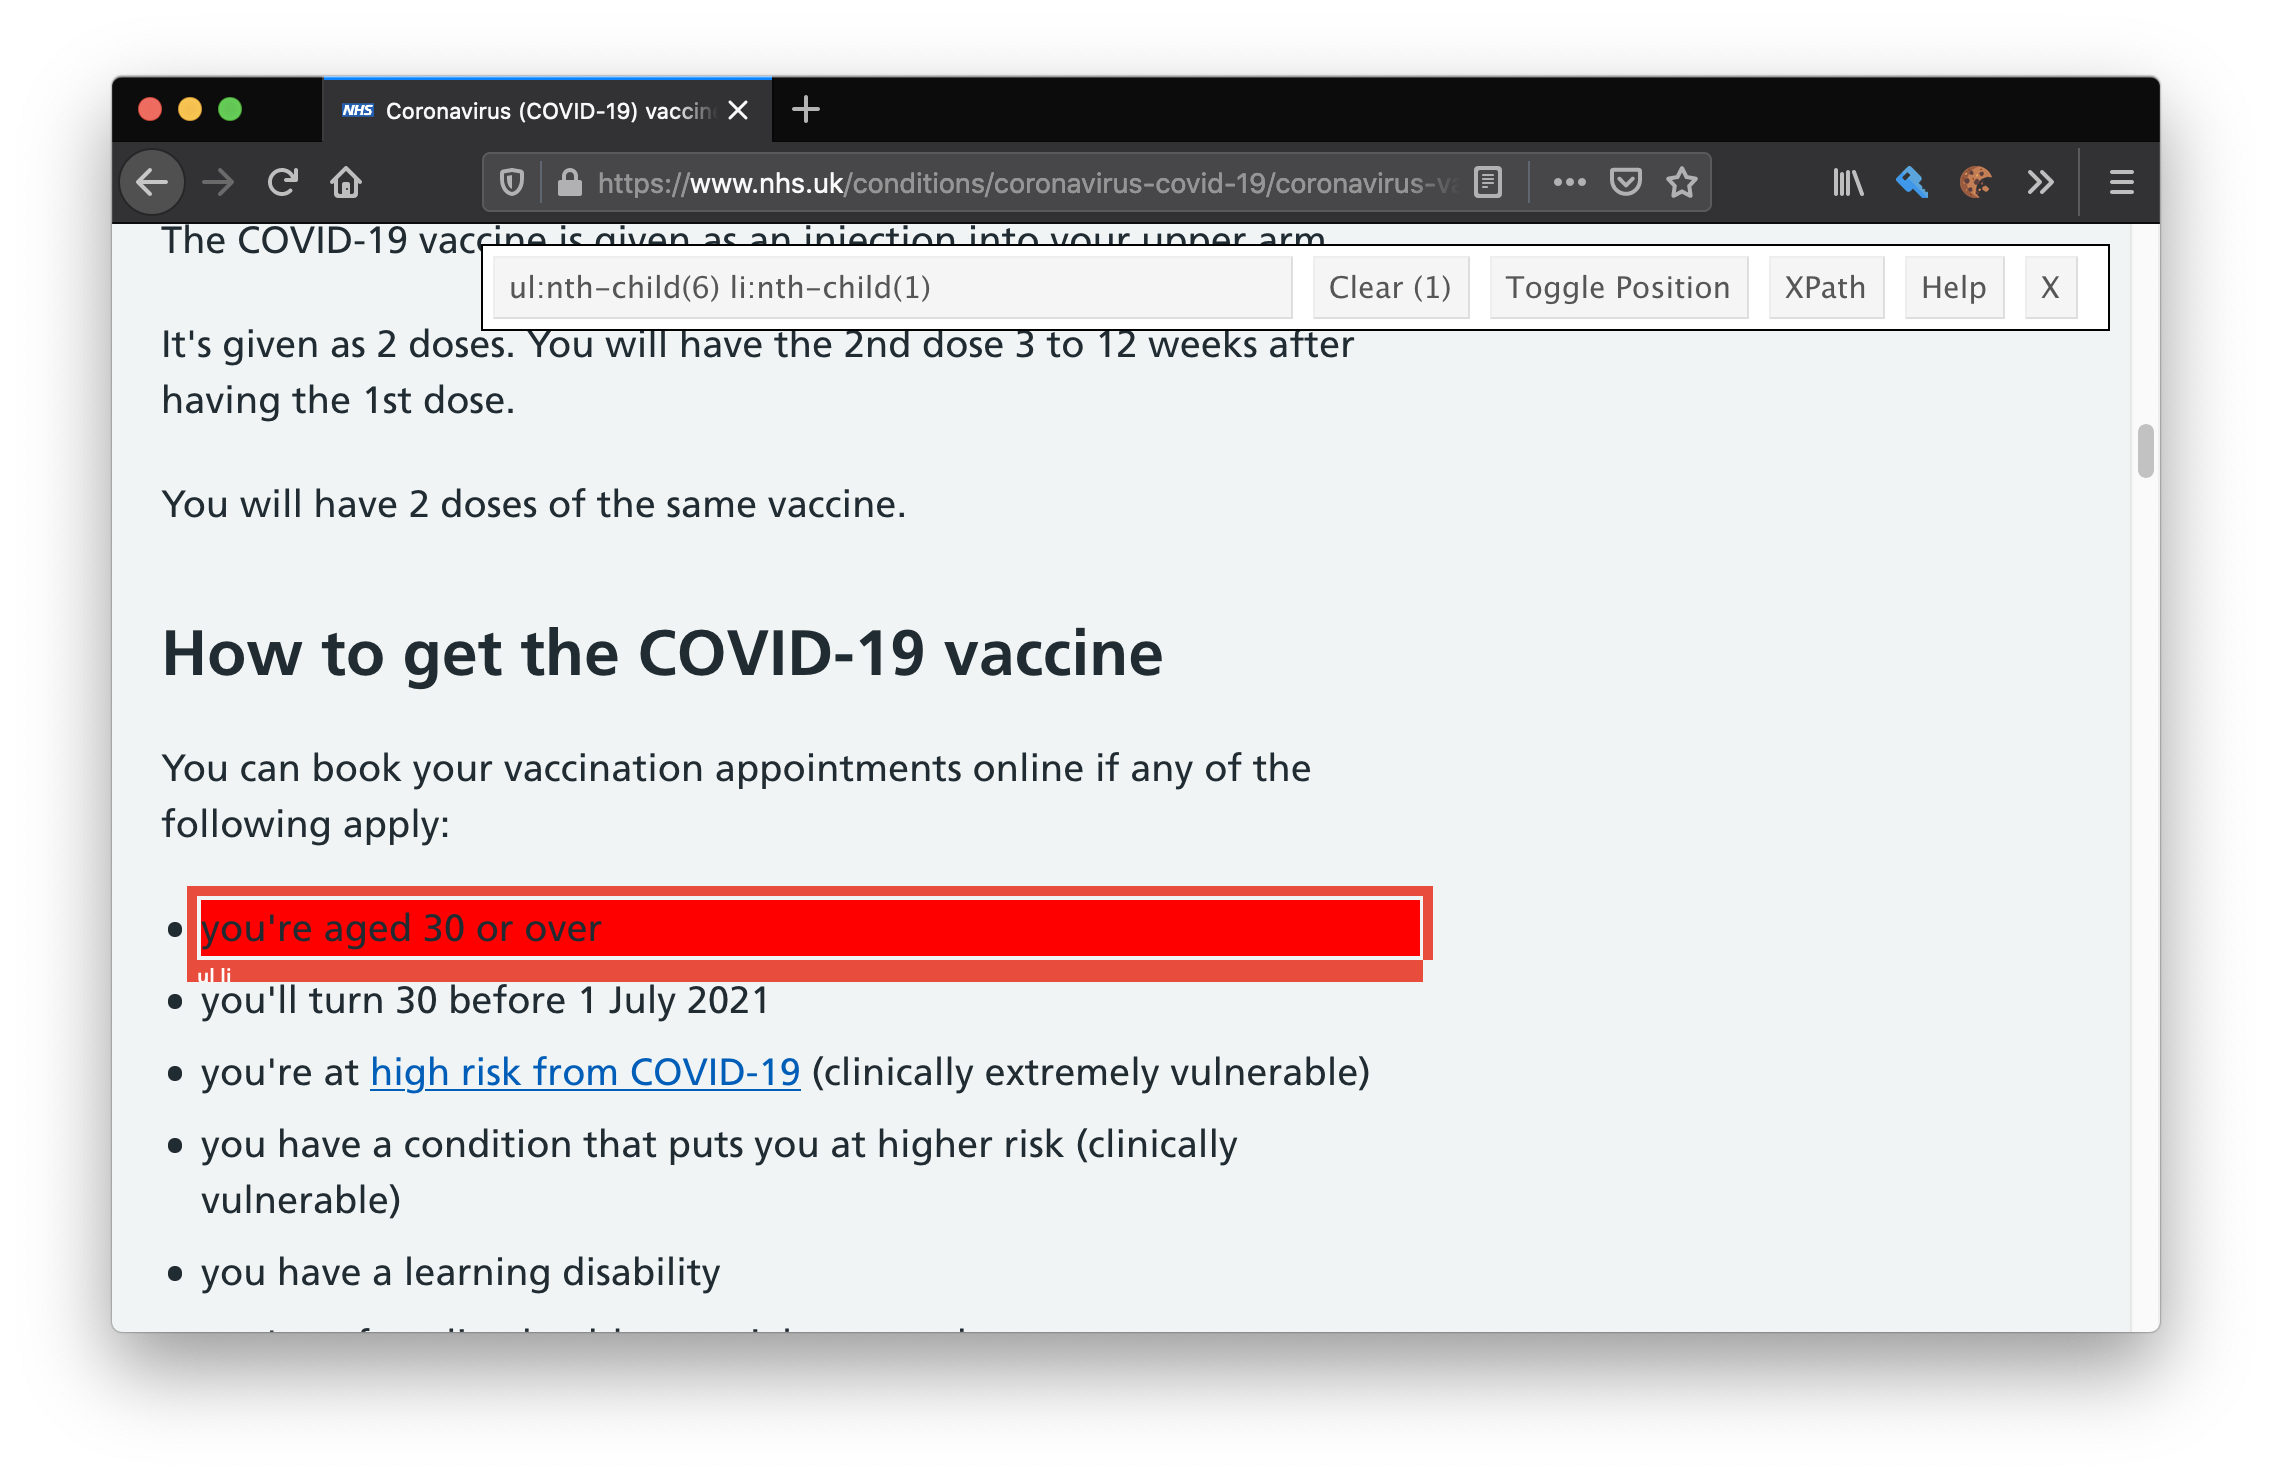
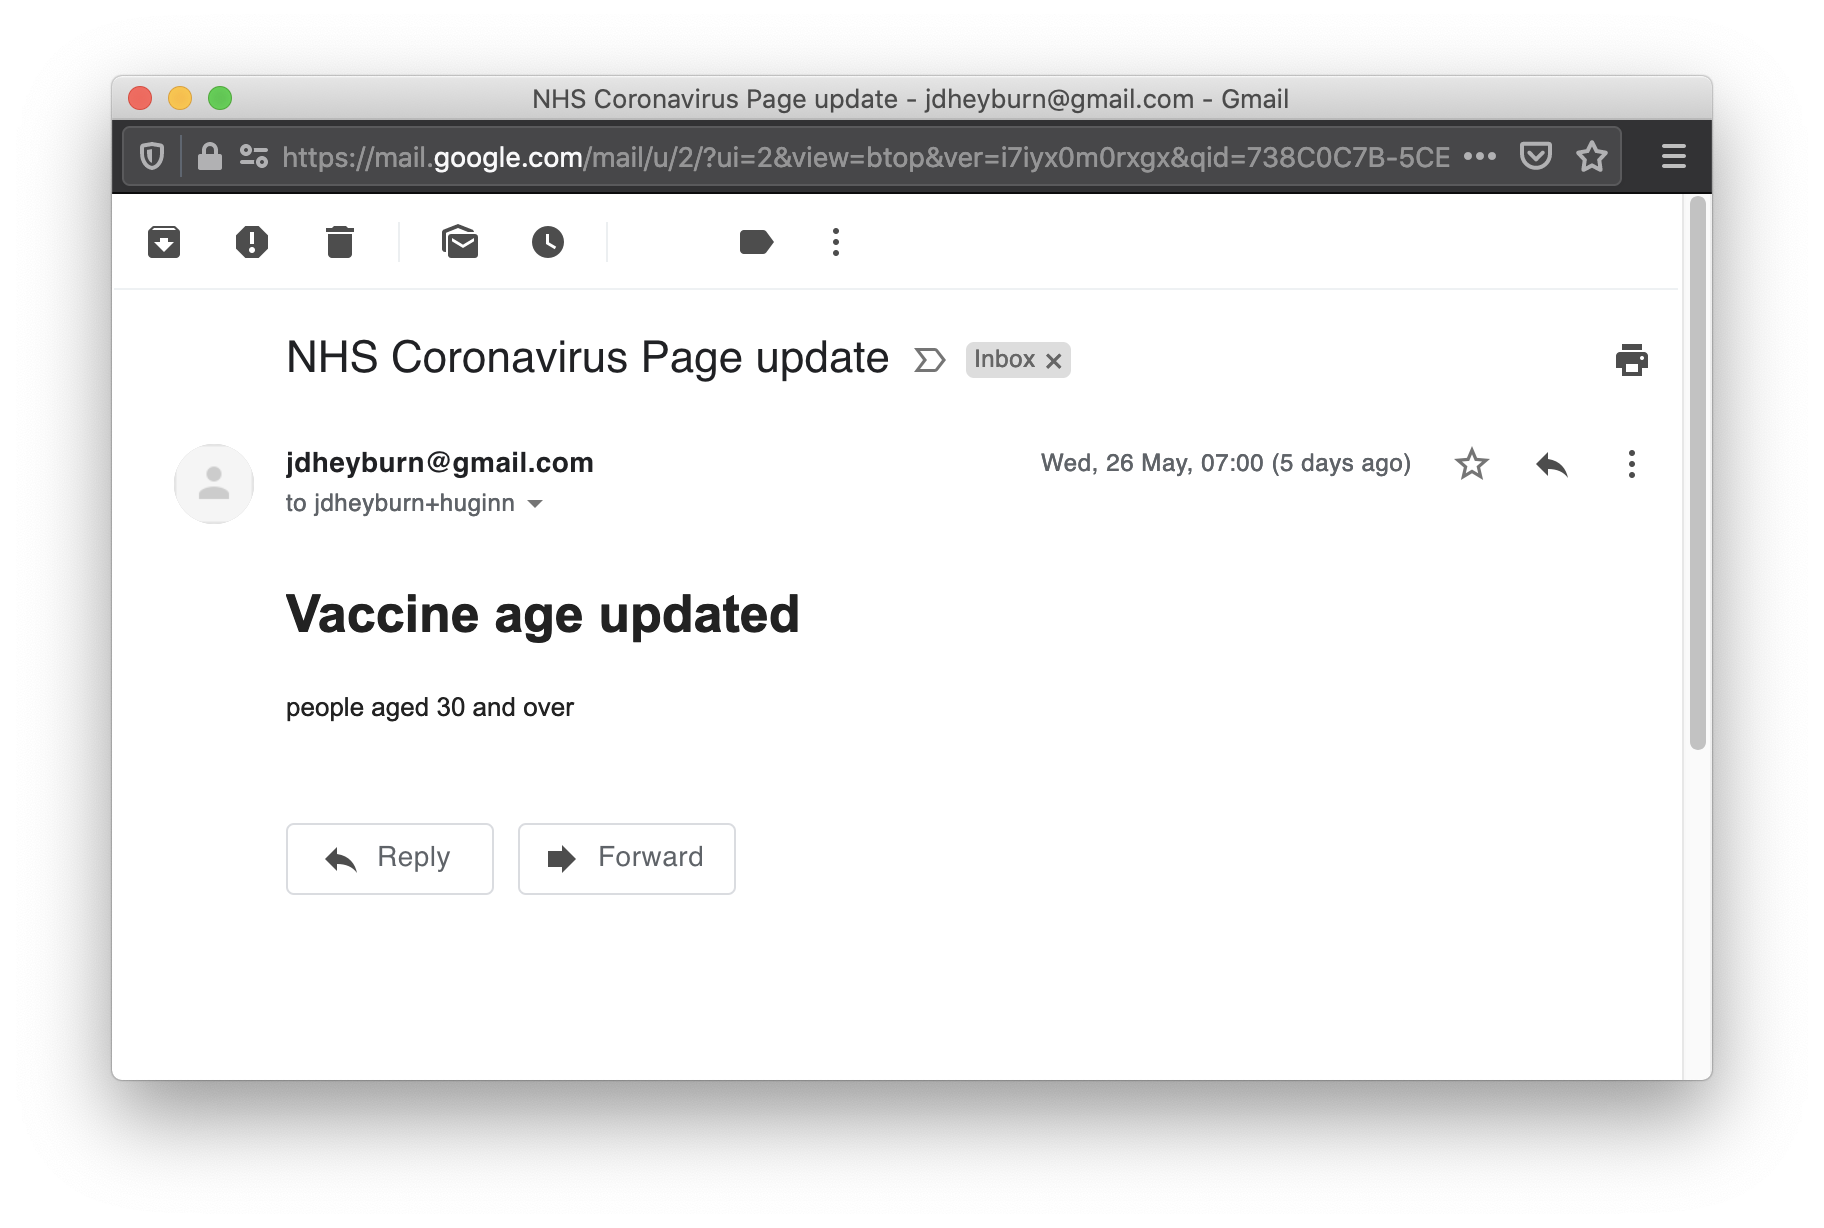
In order for us to determine how to configure this we first need to decide what part of the web page we want to be alerted on in event of a update. Refer to the screenshot below of the NHS Coronavirus Vaccine page and you’ll see a number of bullet points listed out of the vaccine criteria. The text we want to be alerted on is “people aged 30 and over”.
The website agent supports an xpath syntax as a config option, which is an expression syntax used to retrieve objects from XML documents - including HTML. But how do we find out what the xpath for this text field is?
Enter SelectorGadget. It’s a bookmarklet tool that helps with just that - I recommend taking a look at the short tutorial on how to use it.
Since I know I only want to select the first bullet point in this particular list, I start off by first clicking that property which turns that node green.
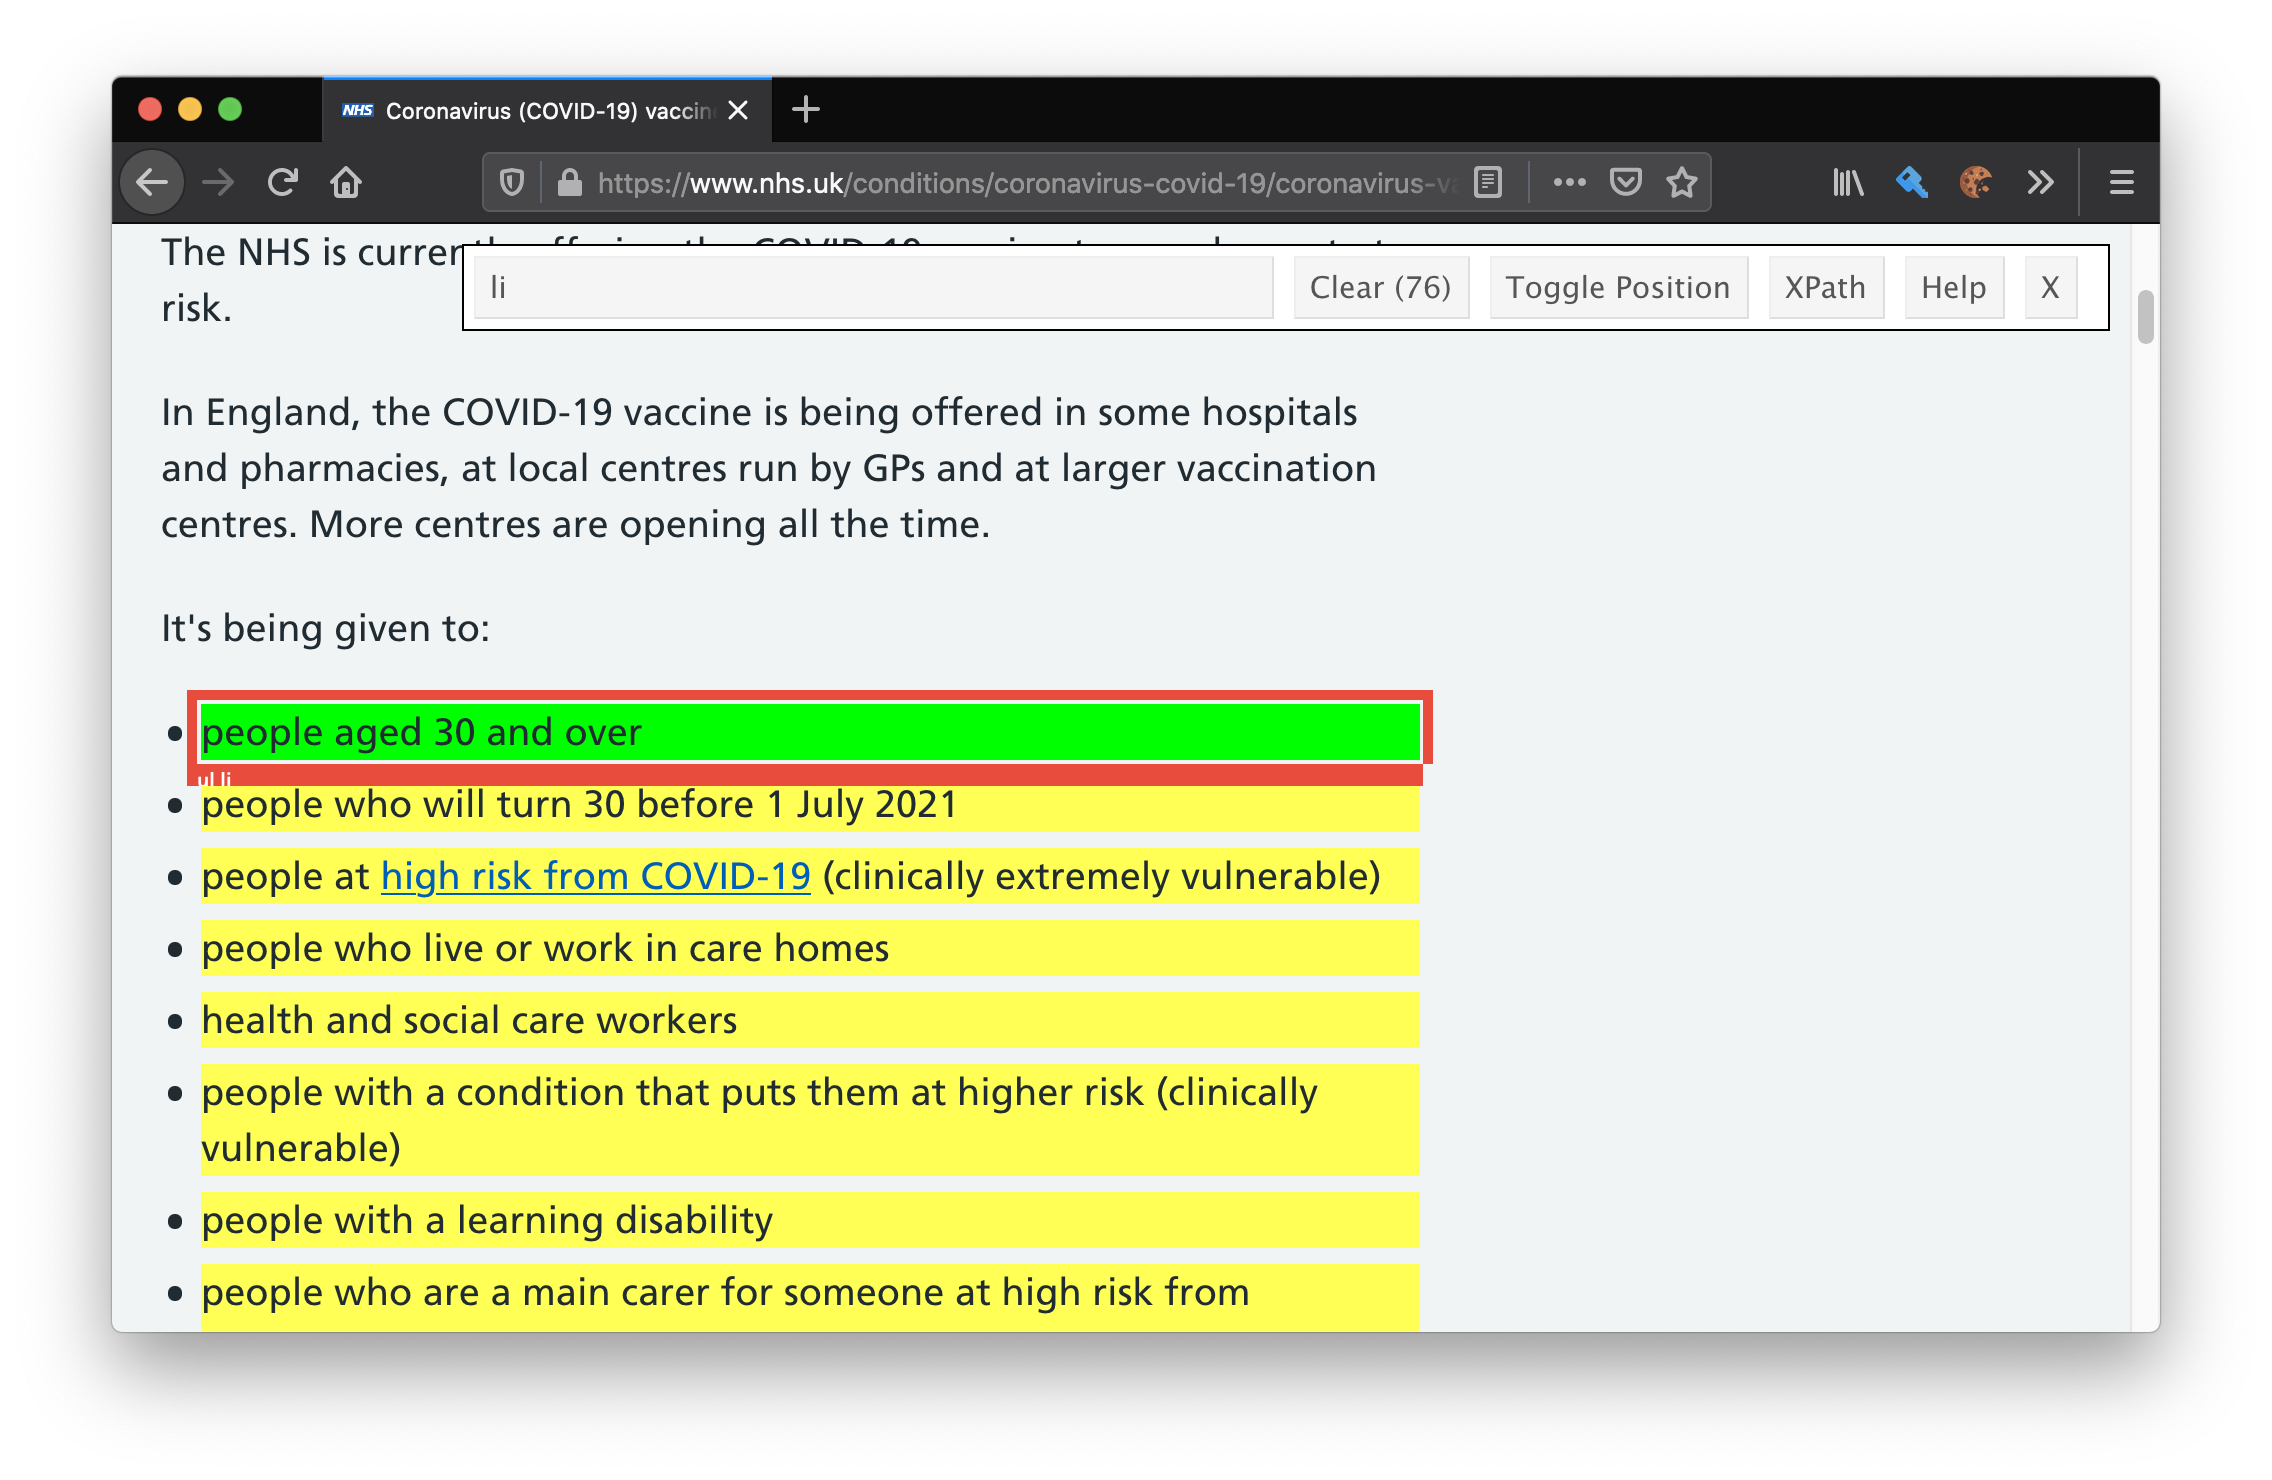
Clicking on the property I want to target highlights it green
You can see the xpath for this is a <li> node, which returns 76 results on the page we’re scraping. These are represented by the boxes that are highlighted yellow.
What I want to do is whittle it down by filtering out all the other <li> nodes I’m not interested in, so that I only have 1 result left. As I’ve already made my first selection, any subsequent clicks will now filter those out. So now it’s just a case of playing whack-a-mole until all yellow highlighted fields are gone.
Clicking the second bullet point indicated that I don’t care about any other <li> elements in this range.
<li> properties also make up headings at the top of the page - so these appear highlighted in yellow too.
Clicking the Home element filters that out.
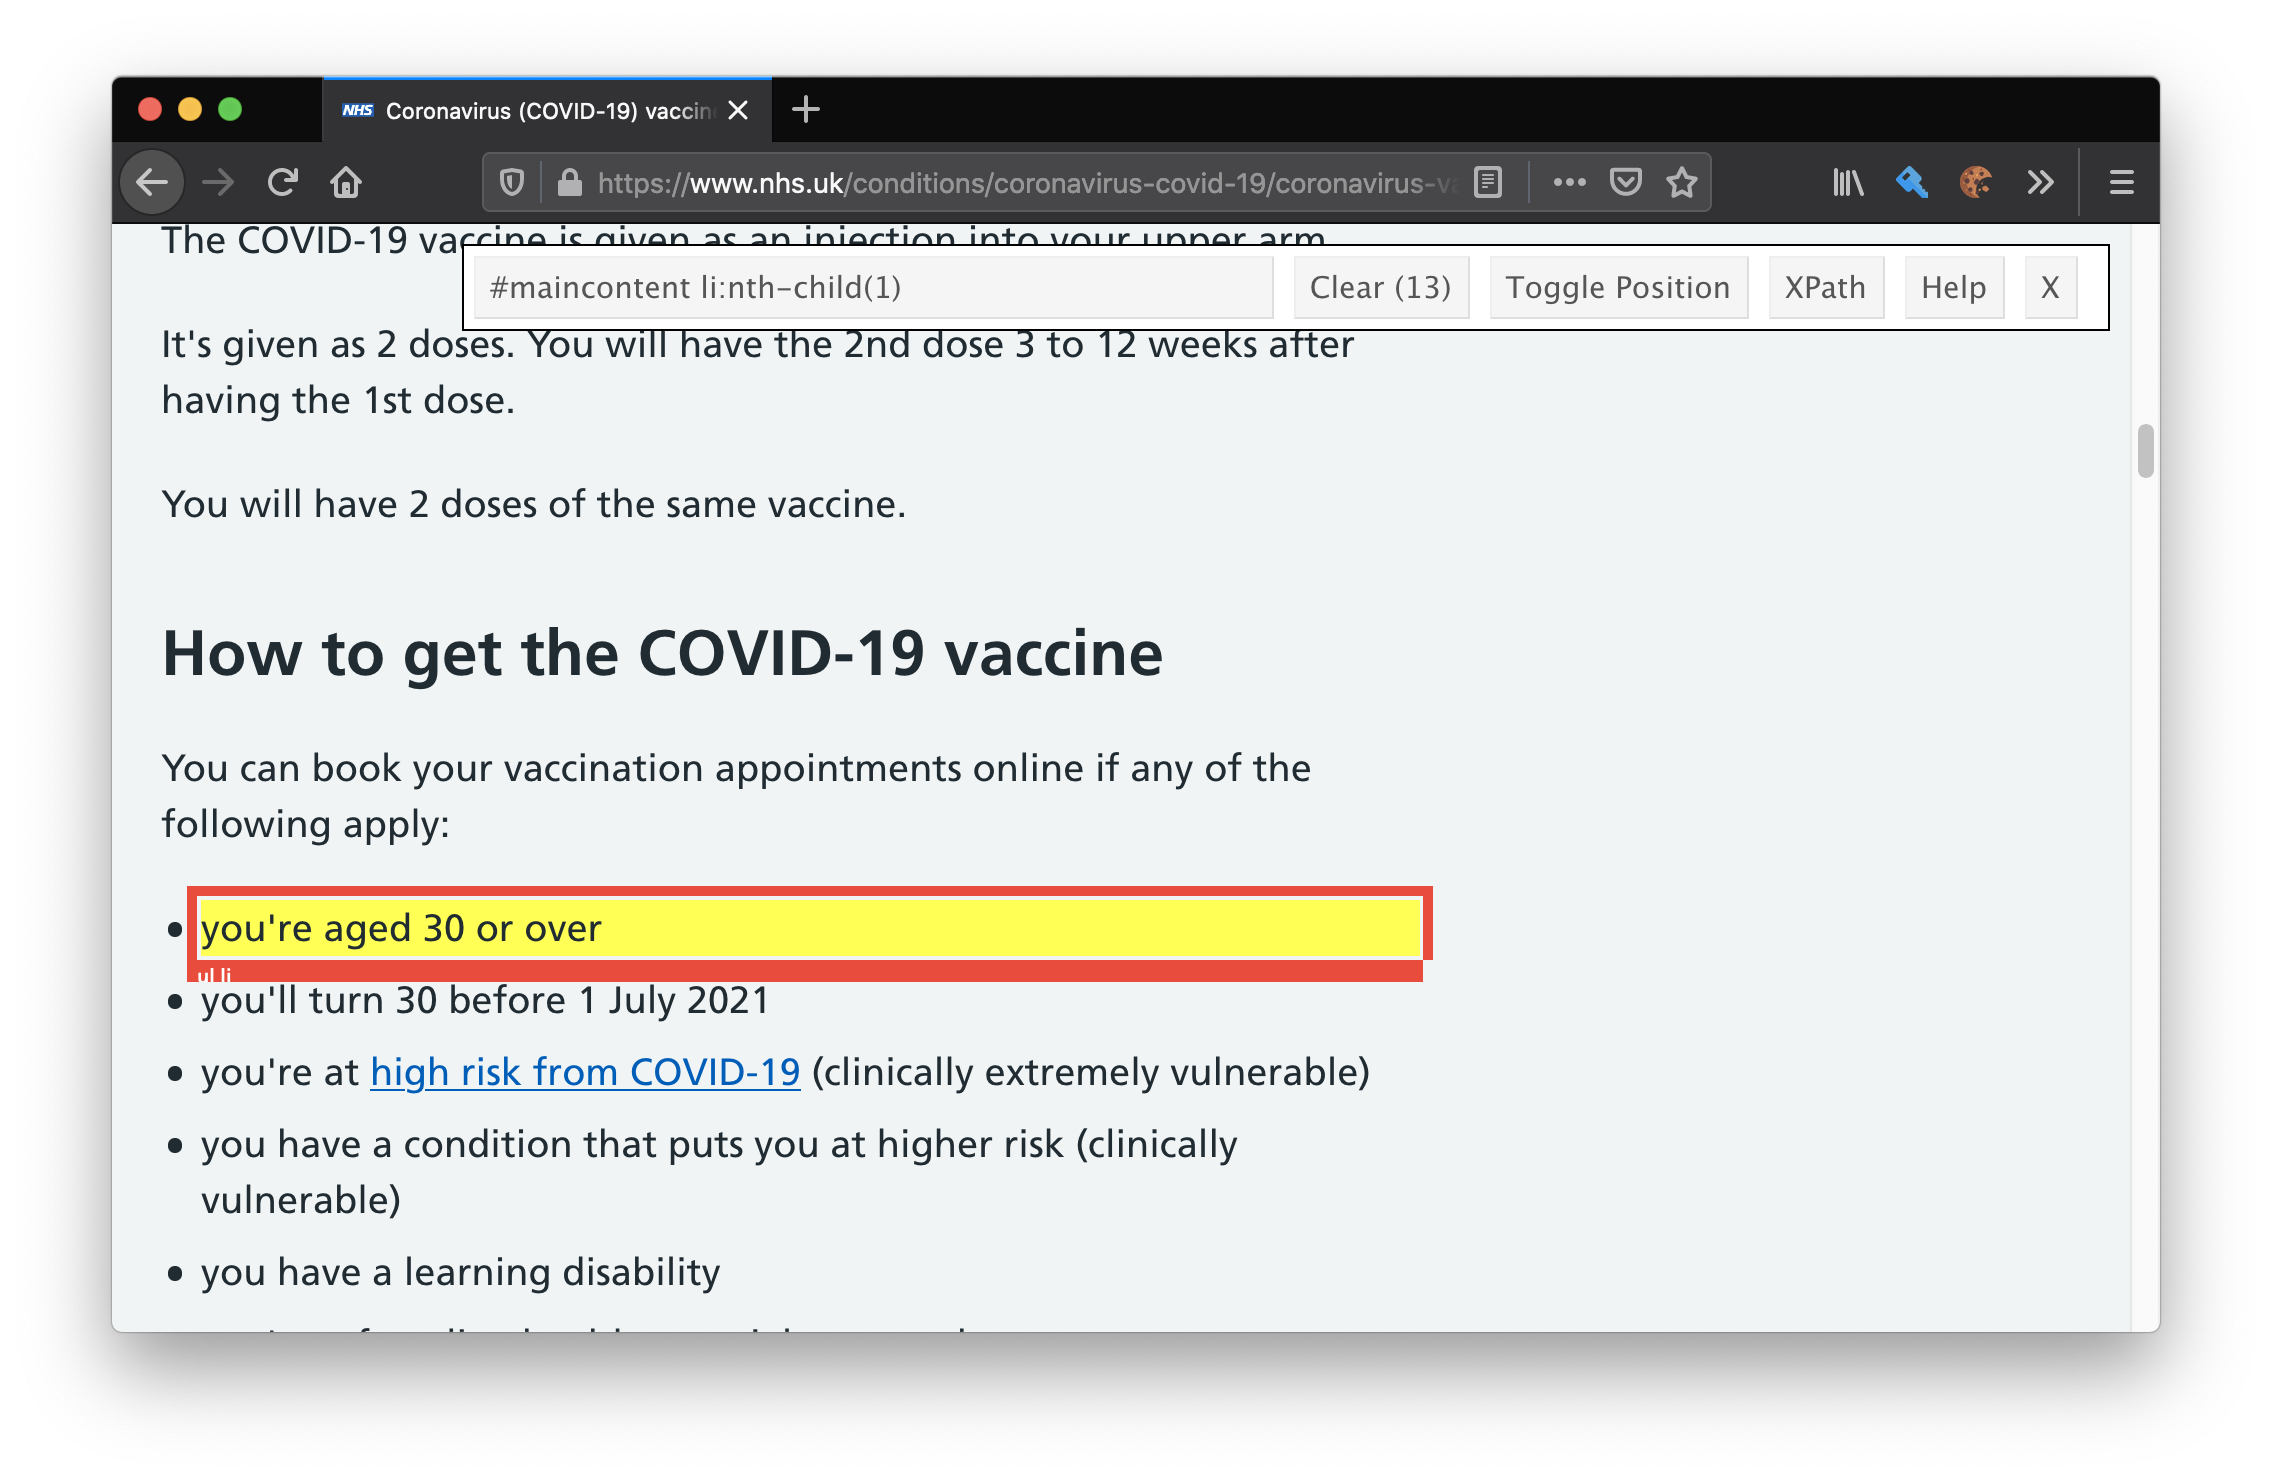
Scrolling down further on the page, there’s another <li> range which needs to be filtered.
Boom - filtering that means we only have 1 element being targeted.
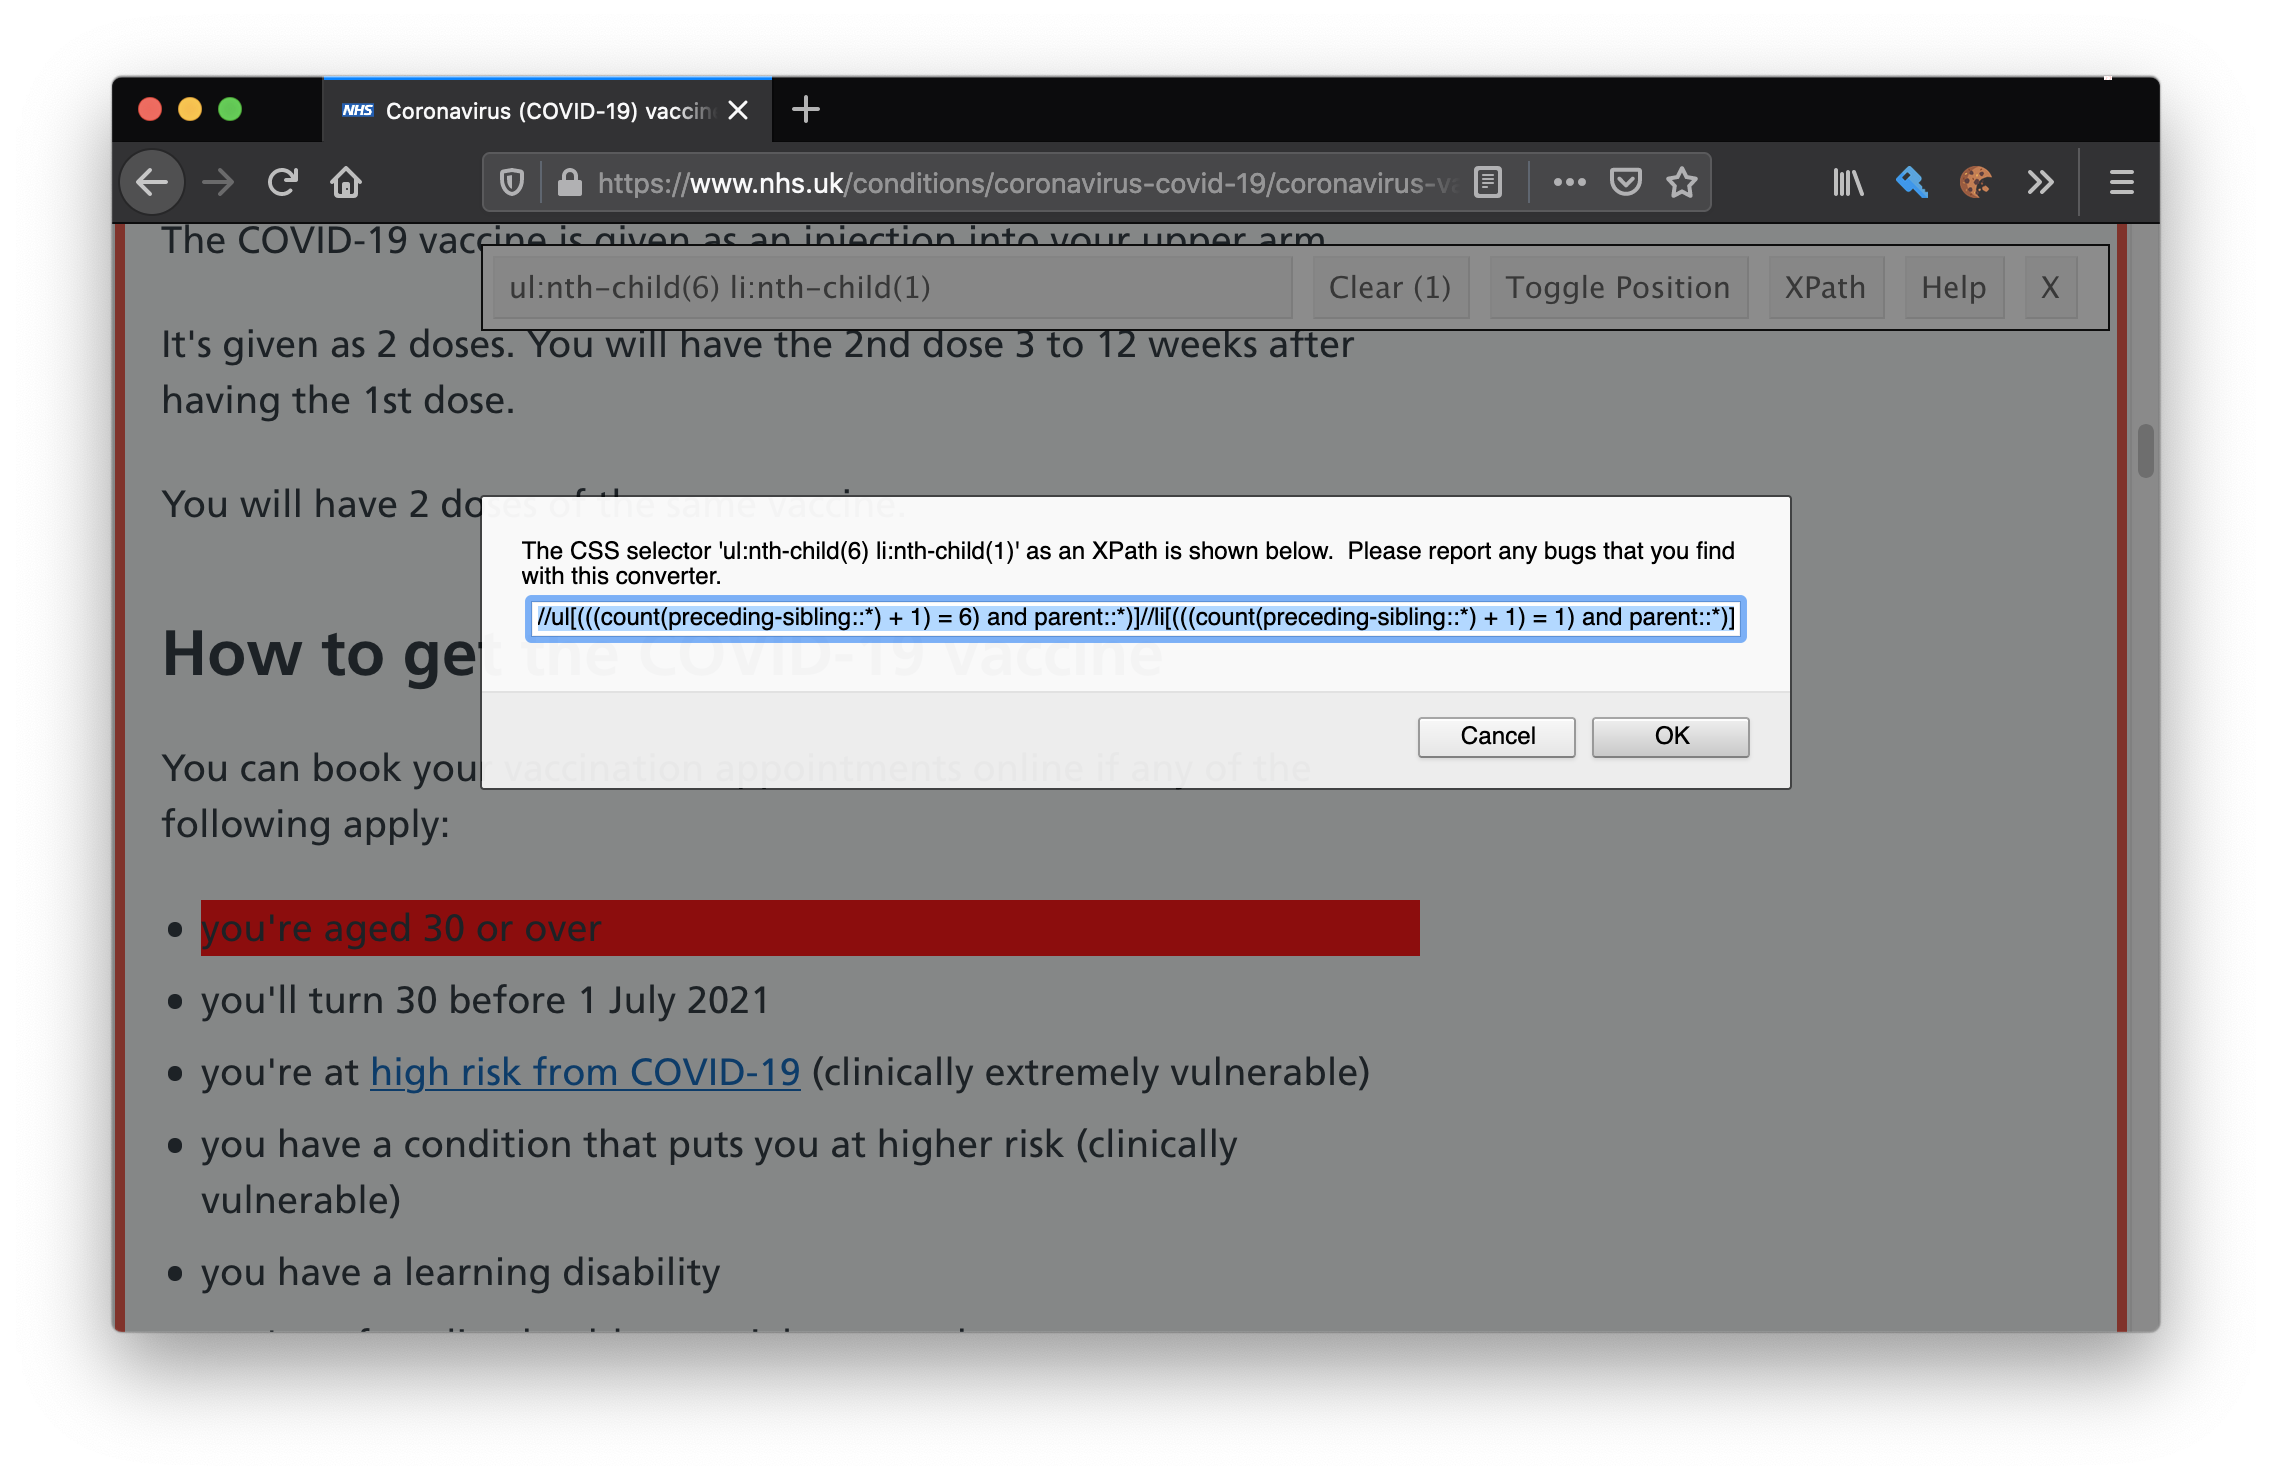
We now only have 1 selection, so now we can click the XPath button in the tool to retrieve the config we need.
//ul[(((count(preceding-sibling::*) + 1) = 6) and parent::*)]//li[(((count(preceding-sibling::*) + 1) = 1) and parent::*)]
N.B. since writing this it looks like the xpath changed - I’ve updated the config below with the same. I retrieved it using the same method as described above.
As a future task it’d be great to see if we could be alerted on when the working status of a job fails - but it seems that feature is missing.
Going back to the agent config, this xpath syntax then goes into the xpath key.
{
  "expected_update_period_in_days": "2",
  "url": "https://www.nhs.uk/conditions/coronavirus-covid-19/coronavirus-vaccination/coronavirus-vaccine/",
  "type": "html",
  "mode": "on_change",
  "extract": {
    "title": {
      "xpath": "//ul[(((count(preceding-sibling::*) + 1) = 4) and parent::*)]//li[(((count(preceding-sibling::*) + 1) = 1) and parent::*)]",
      "value": "normalize-space(.)"
    }
  }
}
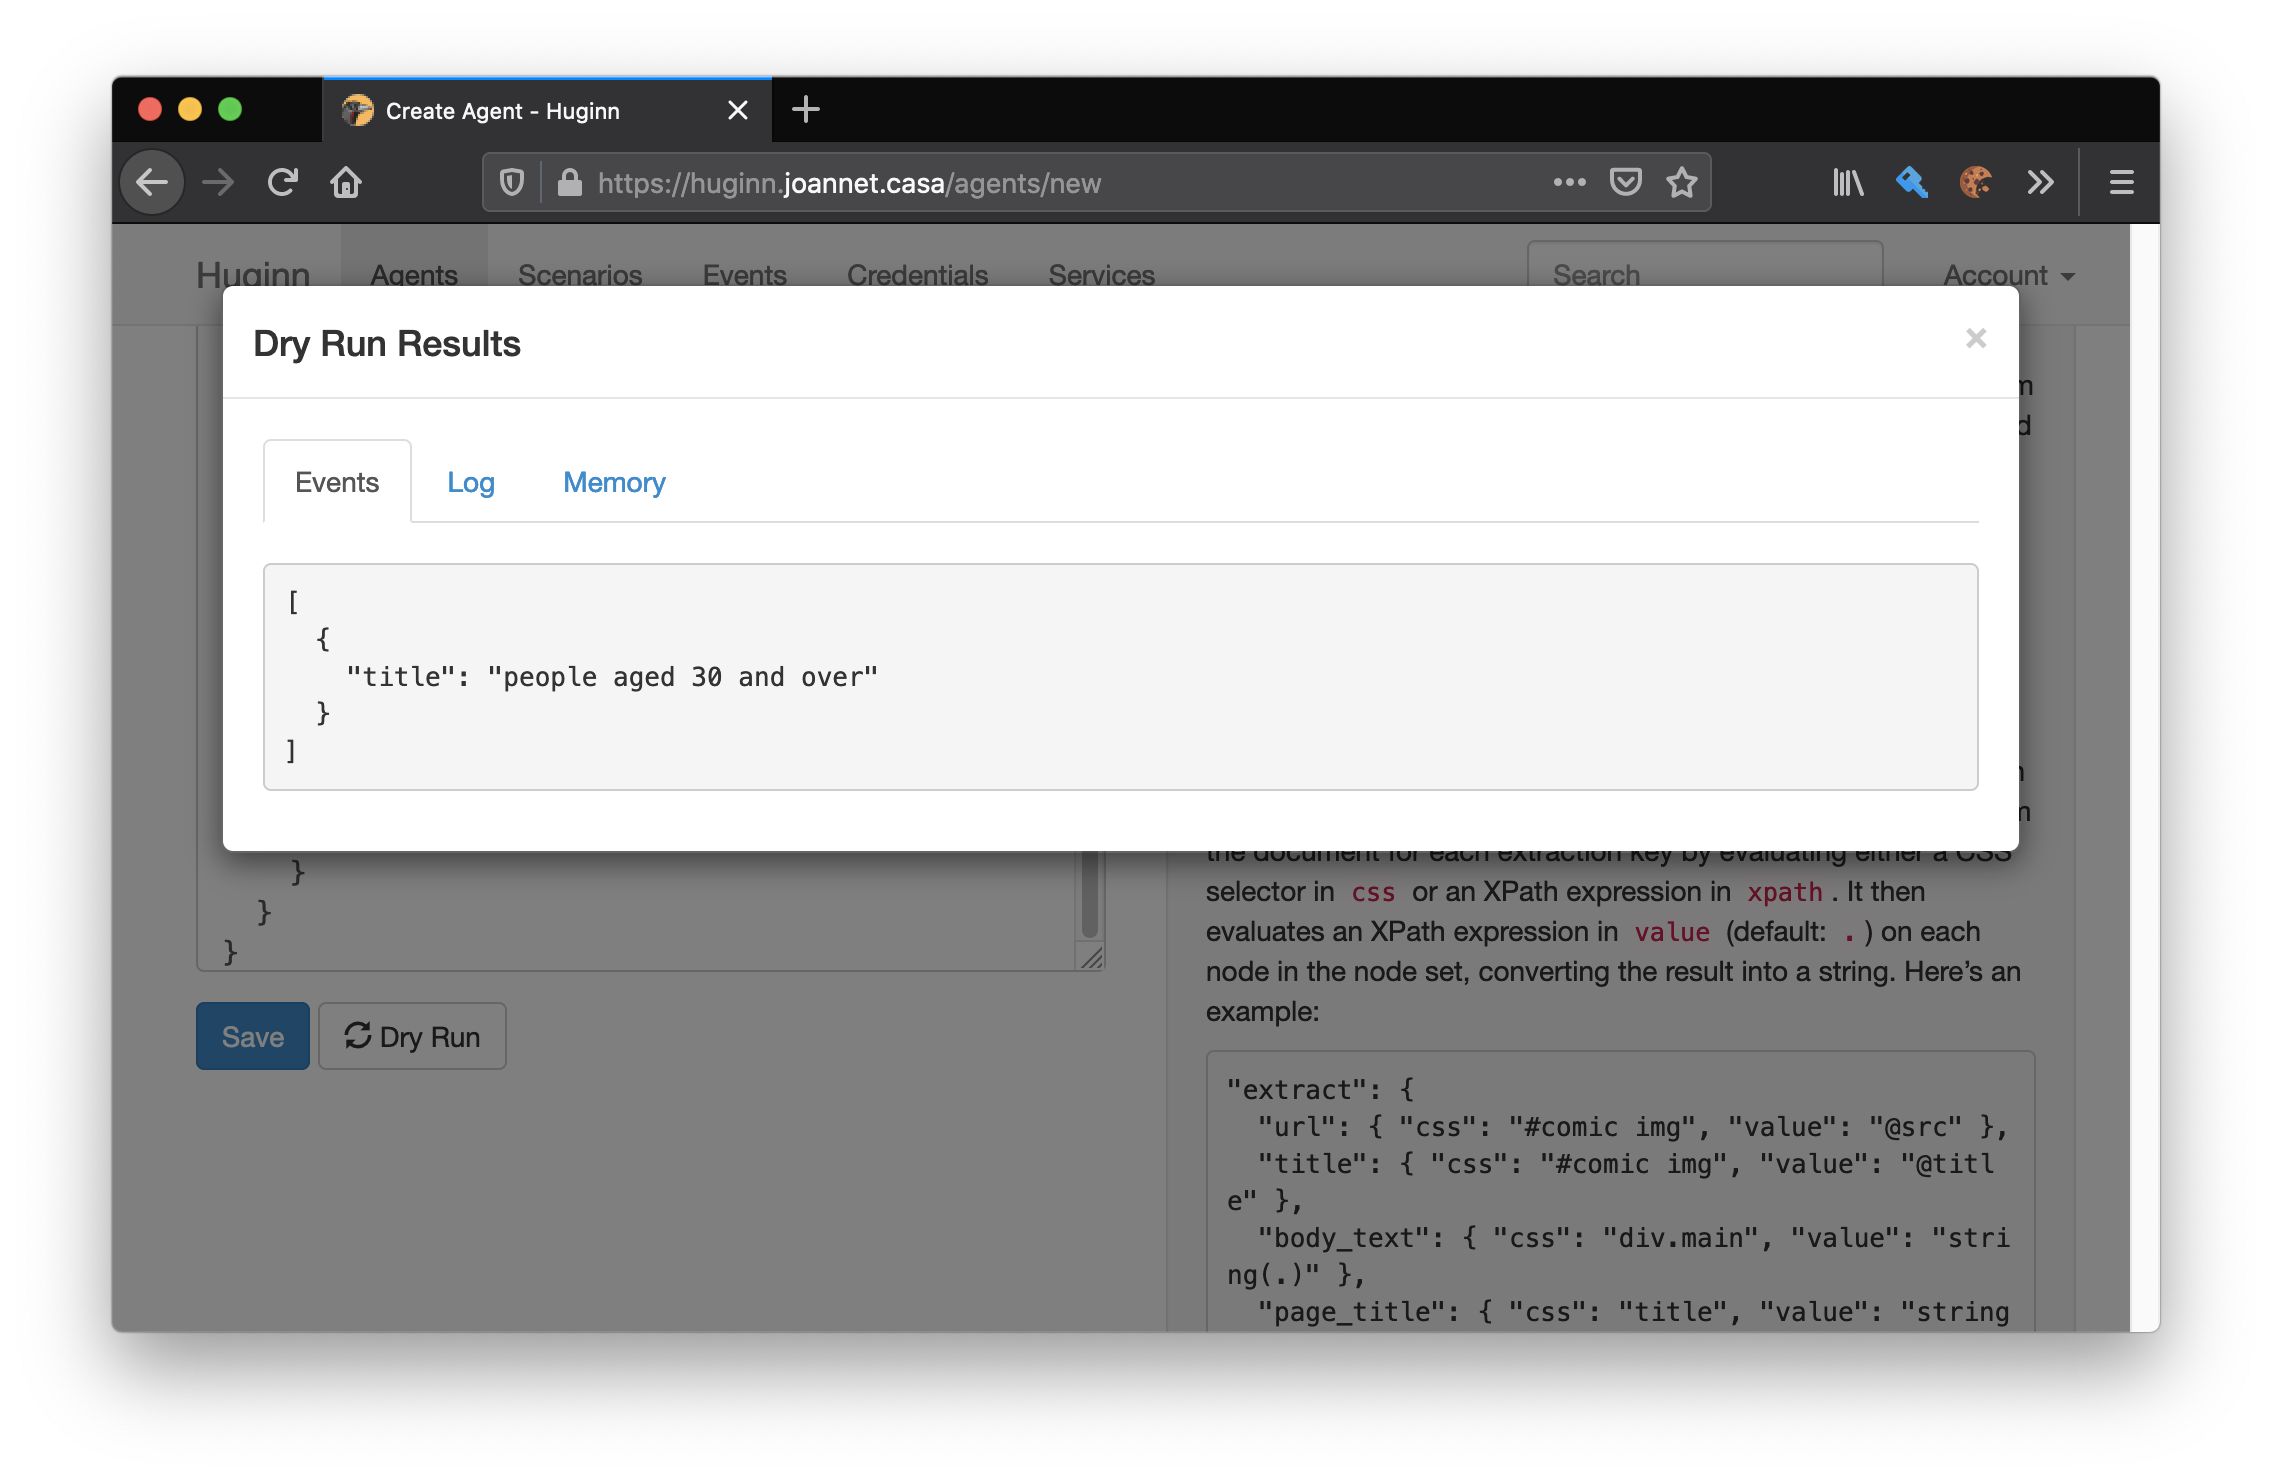
Once it’s configured then you can click on Dry Run at the bottom to see the text it extracts.
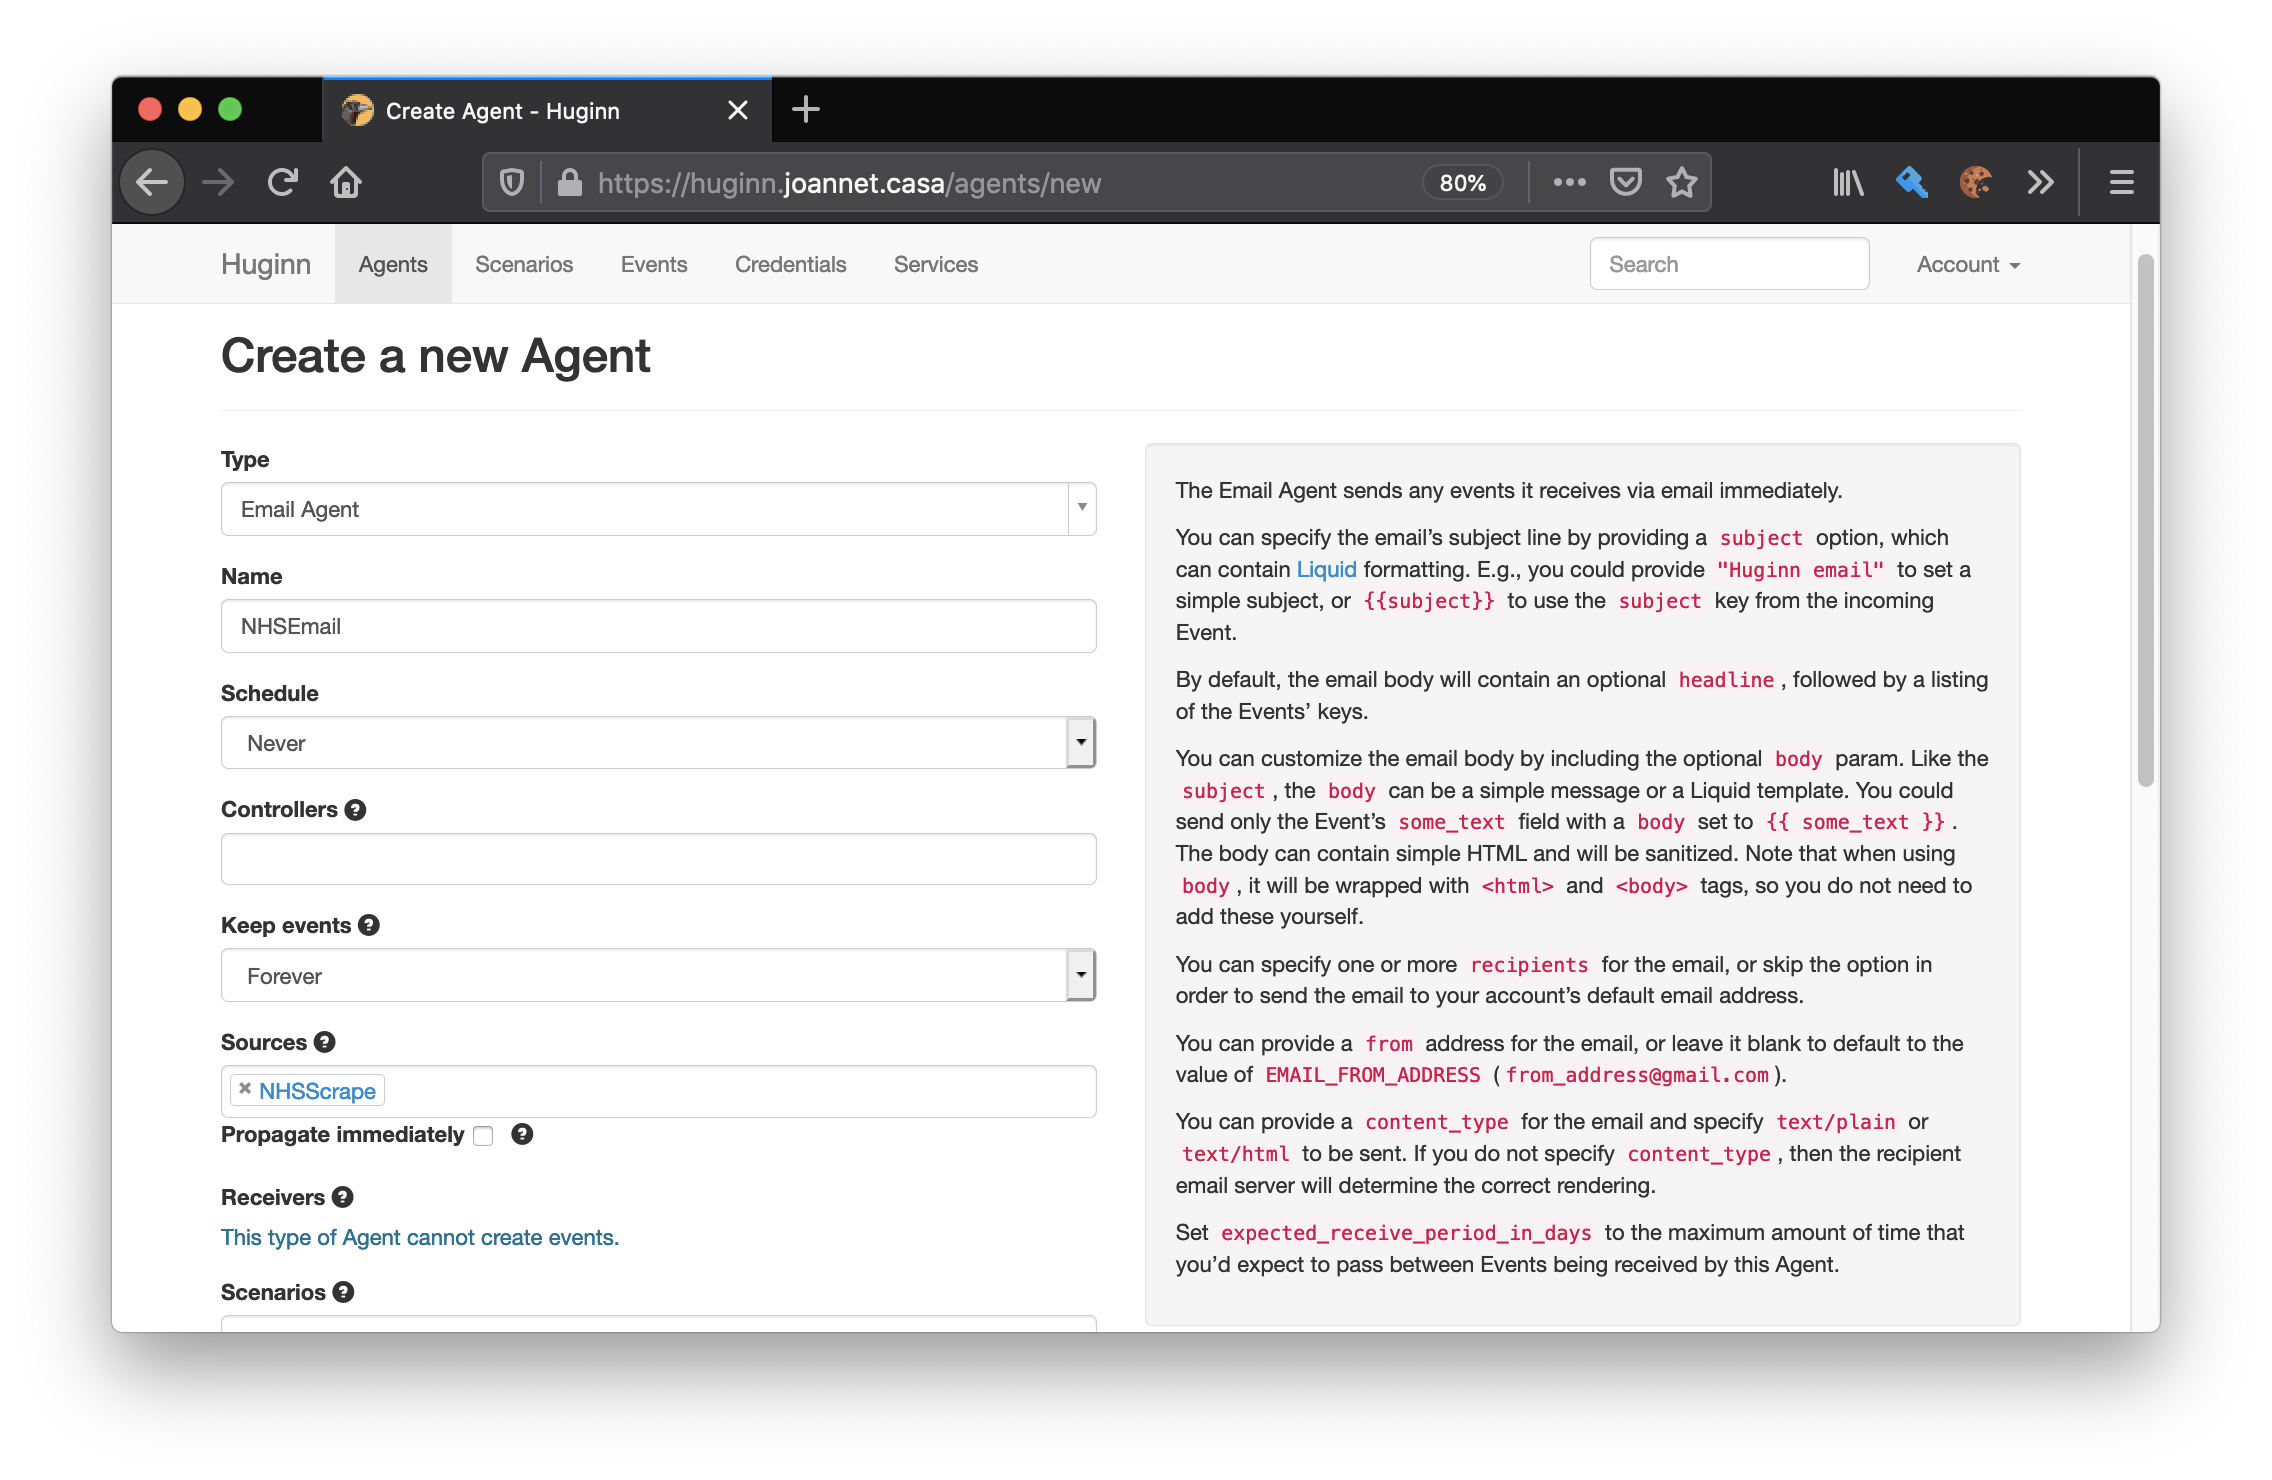
Email agent
Now that the website agent is set up we need to set up our alert destination; this takes the form of an email agent. At minimum, we only need to configure these fields:
- Name
- e.g. NHSEmail
- Sources
- select the website agent you created beforehand
- Options
Note that an agent such as email can have multiple sources - so if you wanted to be alerted on multiple web pages then you only need one email agent.
The options field is not as complex as the website agent - mine is configured with this:
{
  "subject": "NHS Coronavirus Page update",
  "headline": "Vaccine age updated",
  "expected_receive_period_in_days": "2"
}
The real complexity lies in configuring Huginn to send email…
Configure Huginn for sending email over Gmail SMTP
I have a Gmail account which opens up SMTP access to allows applications to send email programatically, where Huginn has support for this. You’ll notice earlier when we deployed Huginn that I had a number of environment variables configured for SMTP. It took a bit of trial-and-error and searching through GitHub issues to get it right, but that config works for me.
Since my Gmail account is set up with 2FA, I cannot use my actual Gmail password in the SMTP_PASSWORD field. Instead what I have to do is set up an application-specific password that only Huginn is configured for. This restriction known in Google as less secure app access.
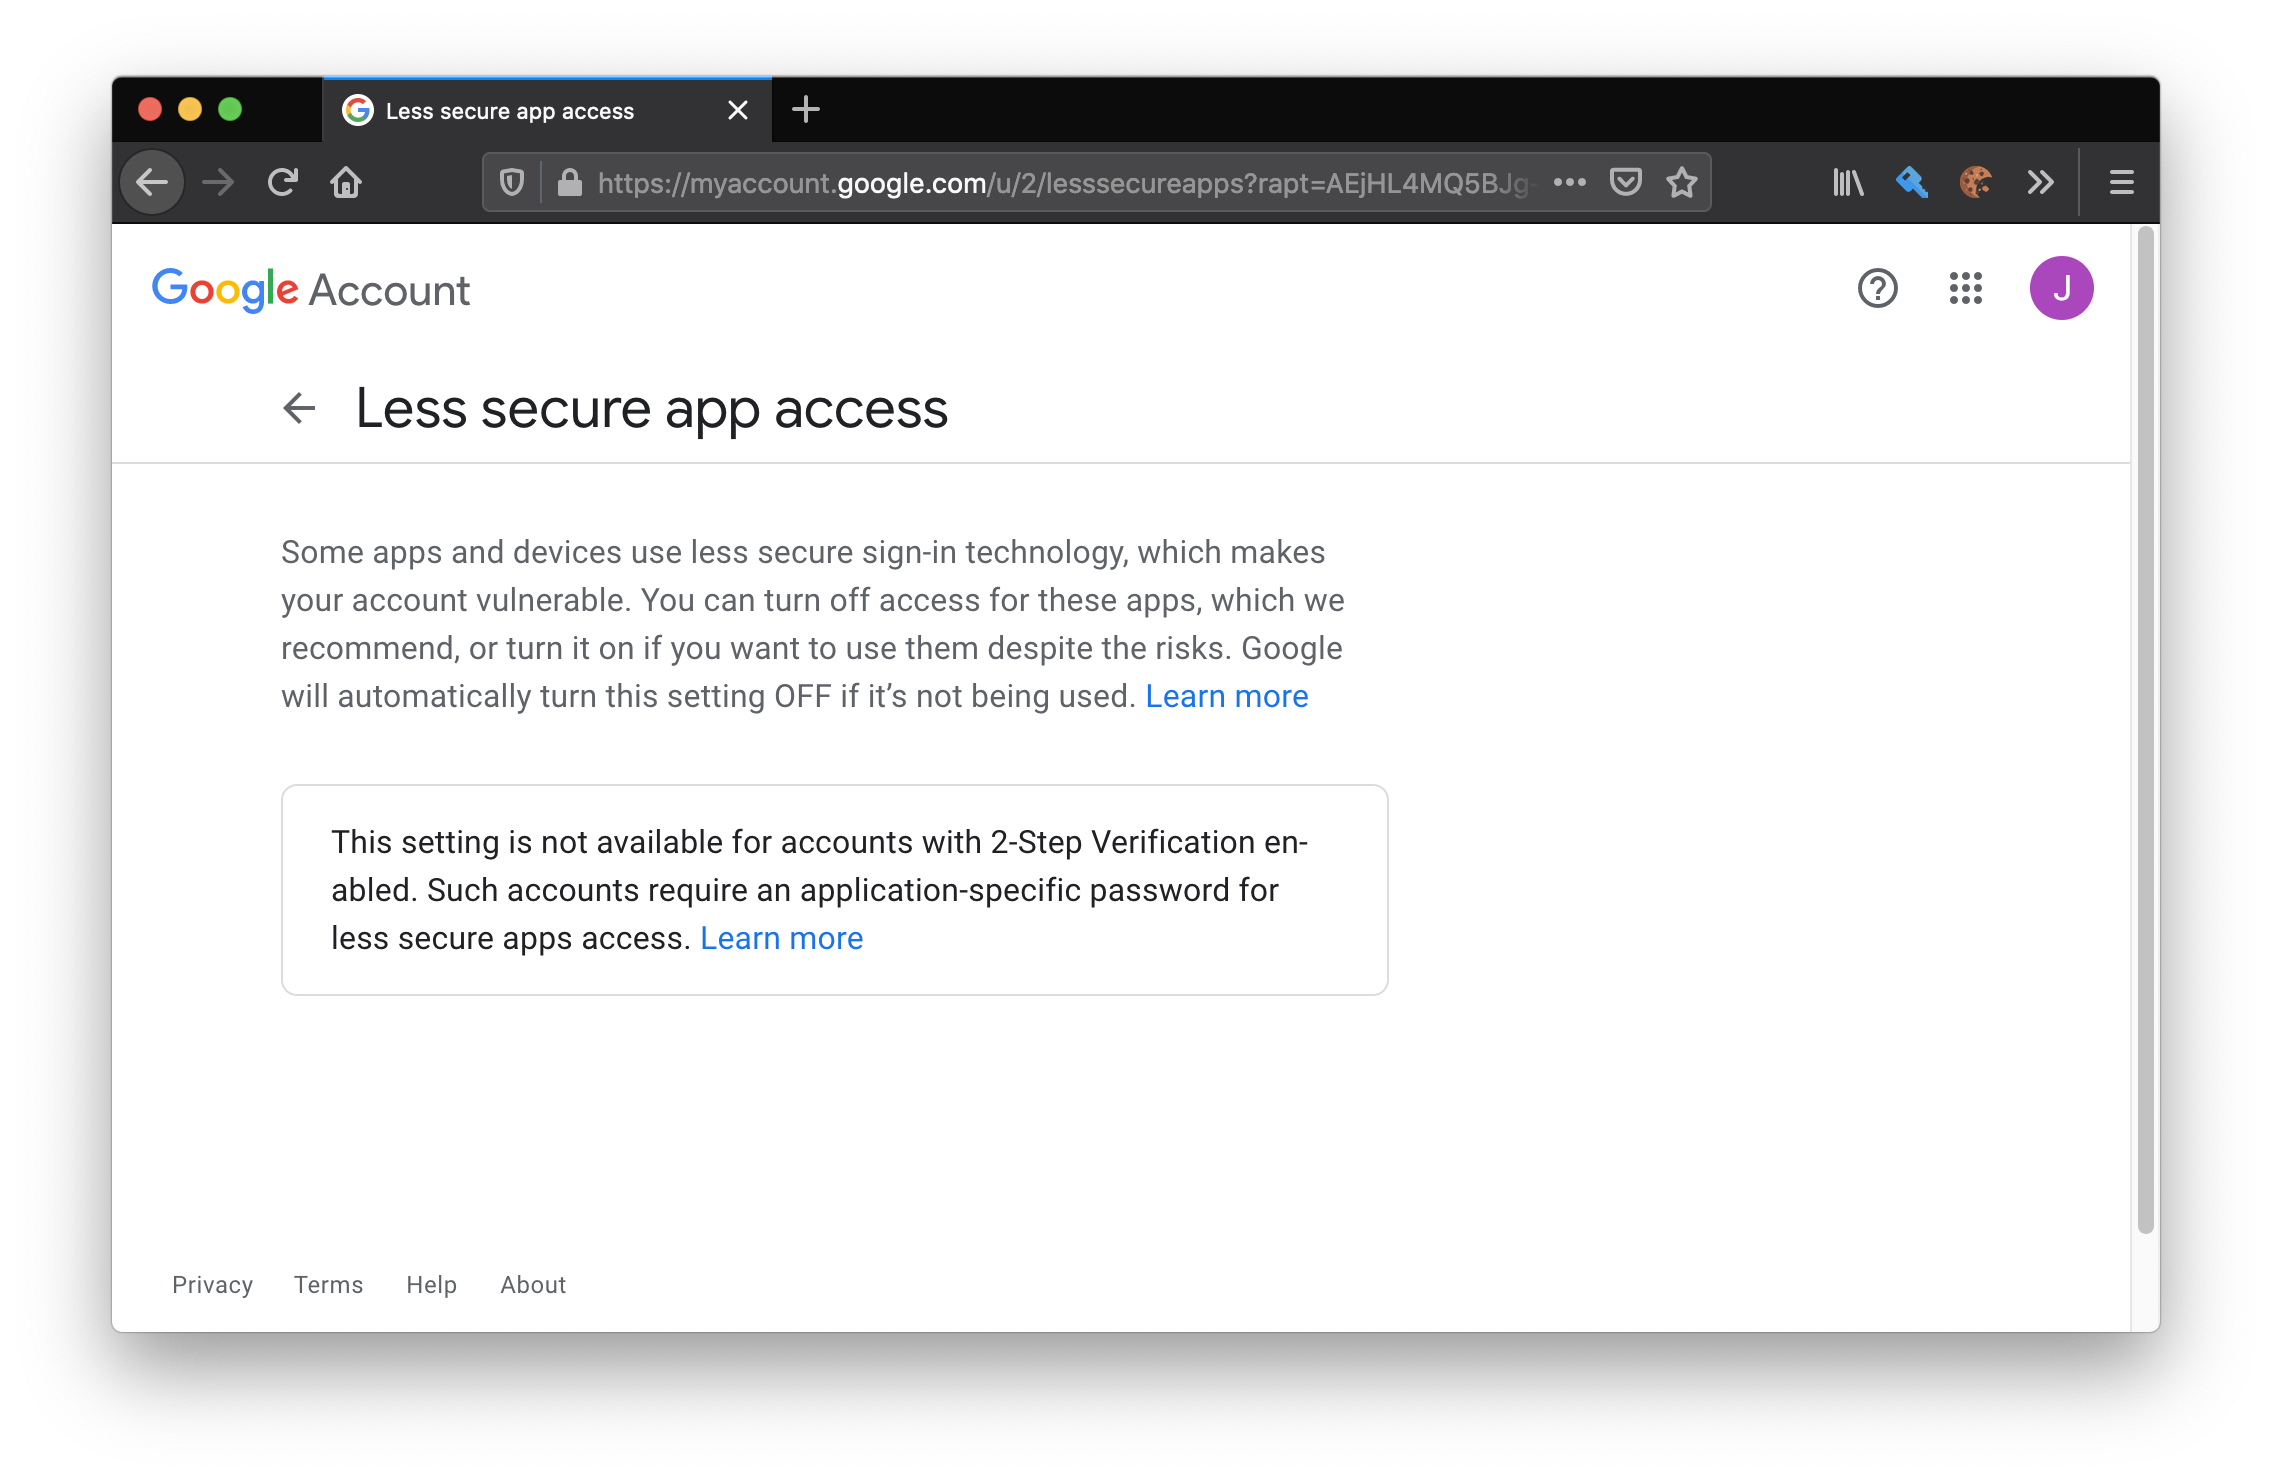
As mentioned, we’ll need to set up an app password. For this I navigated to the app password page for my account and selected Other (Custom name) from the app dropdown, to then enter the name of the app. The name doesn’t matter here - it’s for your reference.
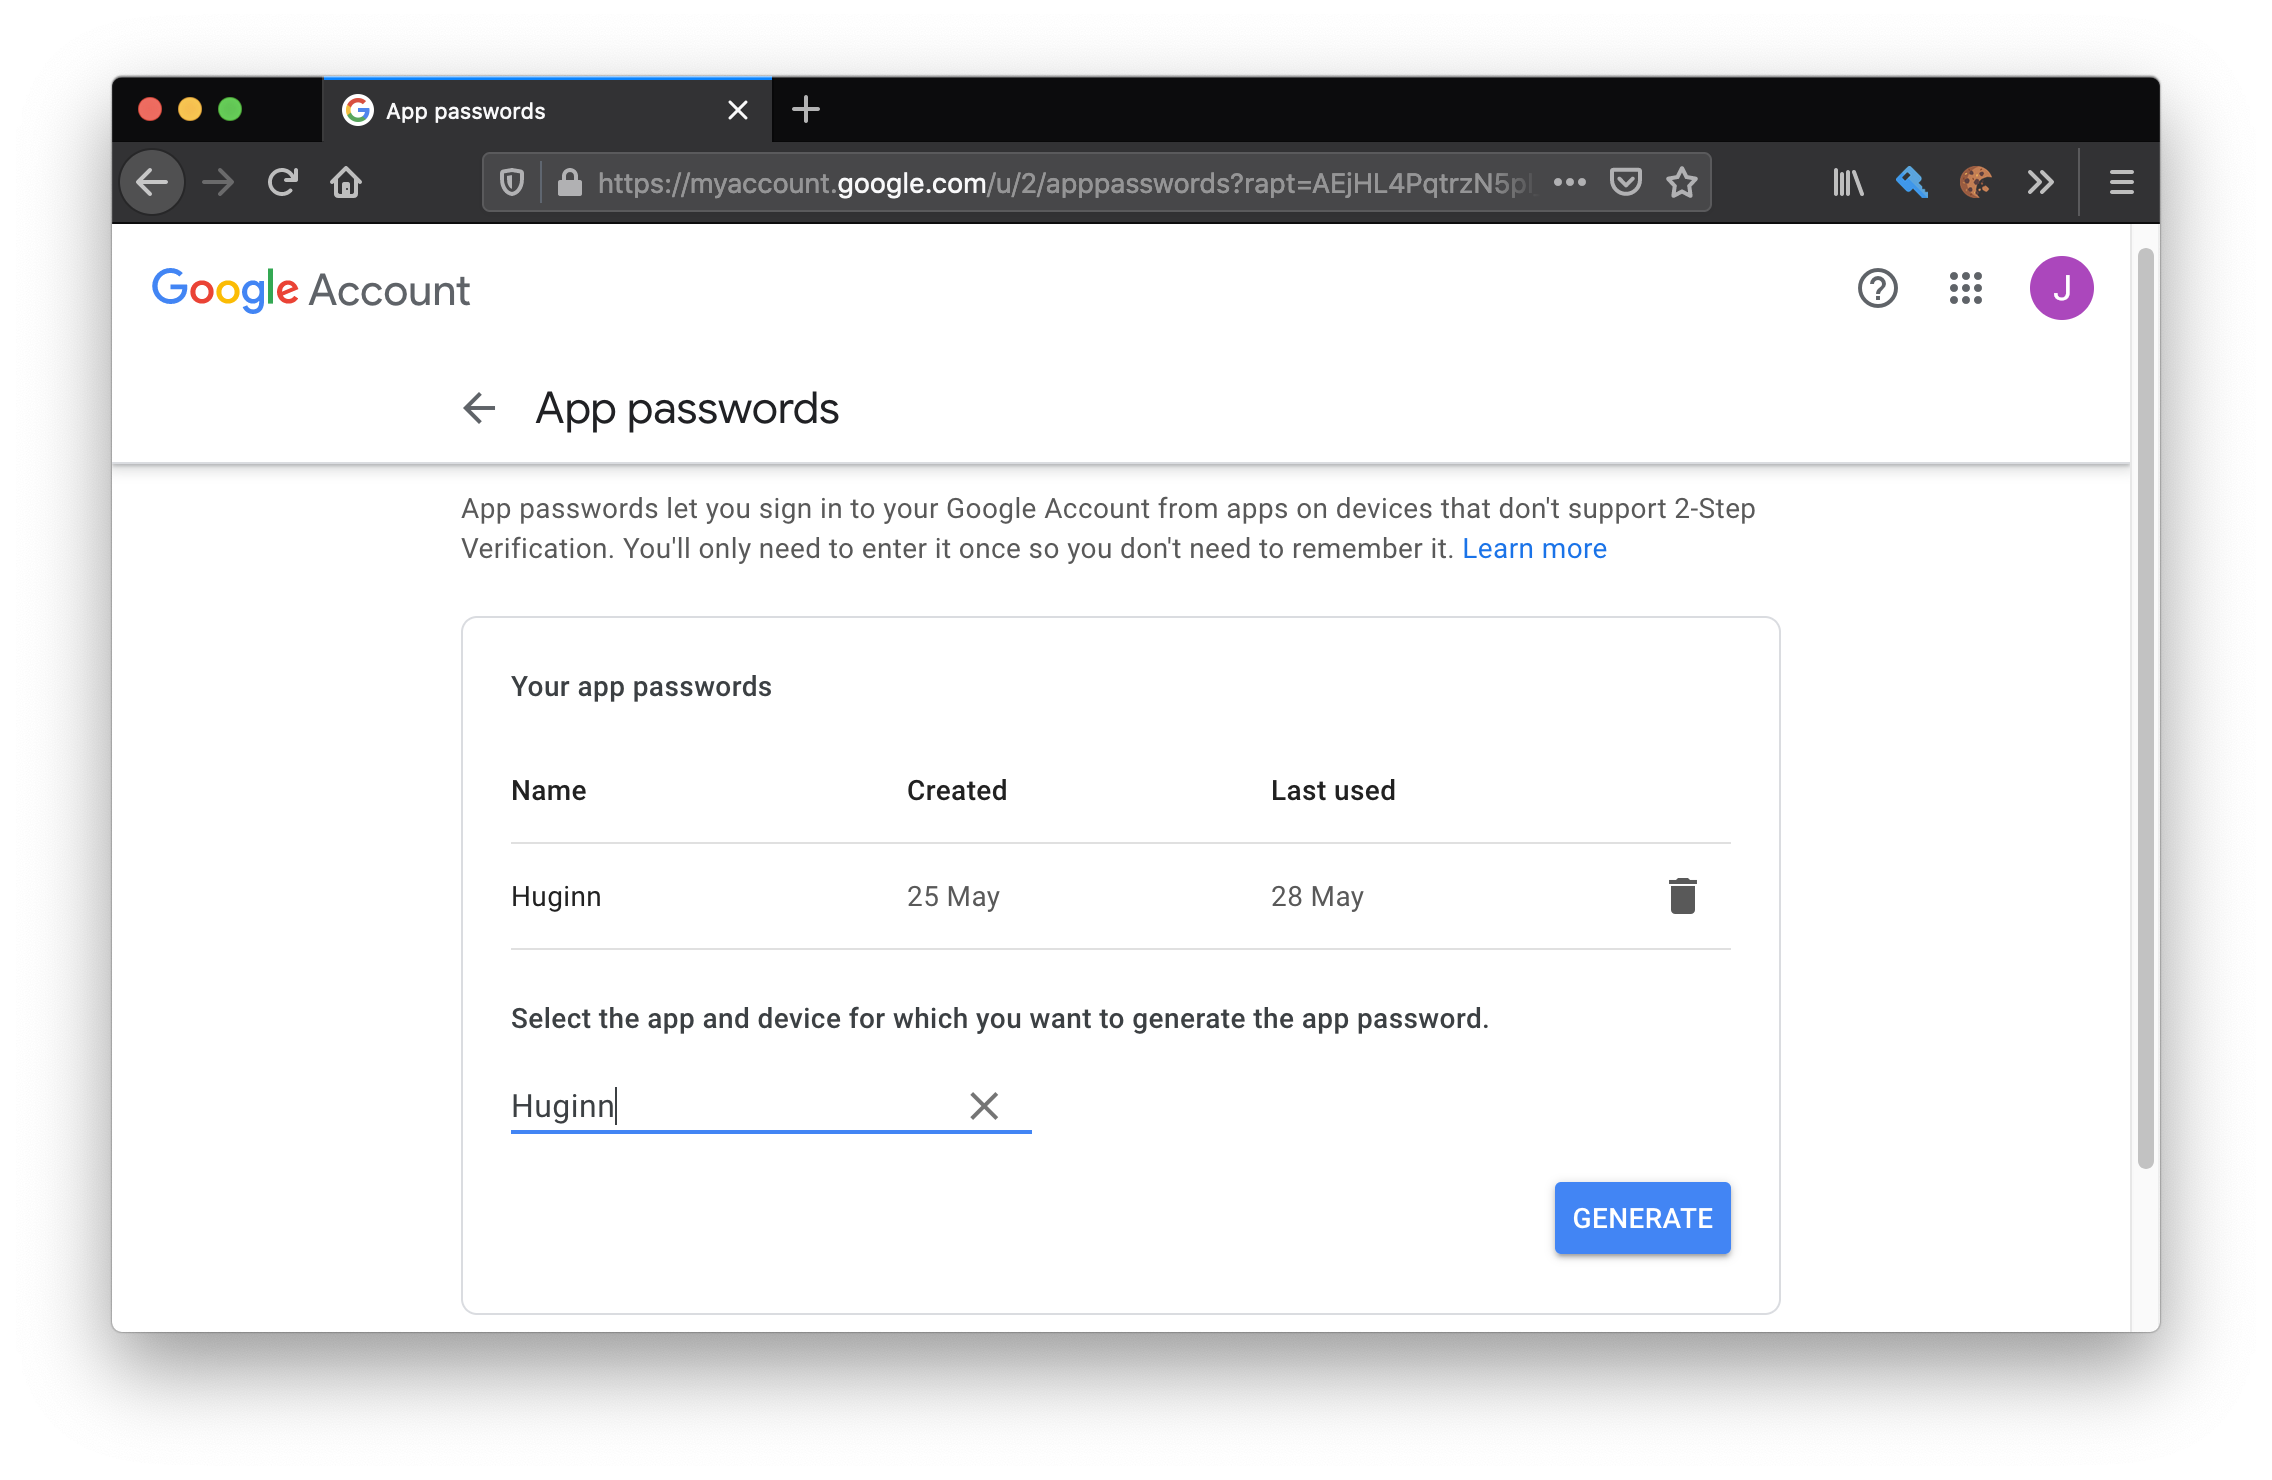
When you click on Generate it will display the password assigned. It is this value that goes into the SMTP_PASSWORD env var for Huginn to pick up.
As a recap, the environment variables that I needed to set in order to get emails to be sent were:
SMTP_DOMAIN=gmail.comSMTP_SERVER=smtp.gmail.comSMTP_PORT=587SMTP_AUTHENTICATION=plainSMTP_USER_NAME=$EMAIL_ADDRESSSMTP_PASSWORD=$APP_PASSWORDSMTP_ENABLE_STARTTLS_AUTO=true-
DATABASE_POOL=30- While not directly related to SMTP, it helps ensure there are enough threads to process database requests
Note if you did not start up Huginn with these environment variables already set, then you’ll need to restart the service so that it can pick them up.
Testing the flow
We can test the whole flow by making a modification to the website agent we created. Currently the mode we have it set to is on_change which is the desired end mode, and will only trigger its receivers if there has been a change in the property being selected. If we change the mode to be all then it will always invoke the receivers.
Couple this with setting a frequent schedule (i.e. every 5m) then we should be receiving an email with the current value every 5 minutes.
on_change
Now we just play the waiting time until getting vaxx’ed up as Marc Rebillet says… 💉
Fixing agent jobs stuck in pending state
Using the docker compose file above caused an issue for me where Huginn would get jobs stuck in a pending state - where rebooting the container was the only way to unblock them... no good for an alerting app!
Huginn by default includes a mysql daemon as the datastore if none is provided in the environment variables. I decided to have mysql running in a separate container to see if that fixed it... and it did!
My new docker compose file looks like this:
services:
  huginn:
    command:
      - /scripts/init
    container_name: huginn_huginn
    environment:
      - SMTP_PORT=587
      - SMTP_SERVER=<SMTP_SERVER>
      - SMTP_PASSWORD=<SMTP_PASSWORD>
      - SMTP_USER_NAME=<SMTP_USER_NAME>
      - SMTP_ENABLE_STARTTLS_AUTO=true
      - SMTP_AUTHENTICATION=plain
      - SMTP_DOMAIN=<SMTP_DOMAIN>
      - TIMEZONE=London
      - DATABASE_POOL=30
      - DATABASE_NAME=huginn
      - DATABASE_USERNAME=huginn
      - DATABASE_PASSWORD=<MYSQL_PASSWORD>
      - DATABASE_HOST=huginn_mysql
      - DATABASE_PORT=3306
      - START_MYSQL=false
      - DATABASE_ENCODING=utf8mb4
      - IMPORT_DEFAULT_SCENARIO_FOR_ALL_USERS=false
      - DOMAIN=huginn.joannet.casa
      - INVITATION_CODE=<INVITATION_CODE>
    image: huginn/huginn:latest
    ports:
      - 3000:3000/tcp
    restart: unless-stopped
    user: "1000"
    working_dir: /app
    depends_on:
      - mysql
  mysql:
    image: mysql
    container_name: huginn_mysql
    restart: always
    ports:
      - "3306:3306"
    environment:
      - MYSQL_ROOT_PASSWORD=<MYSQL_ROOT_PASSWORD>
      - MYSQL_DATABASE=huginn
      - MYSQL_USER=huginn
      - MYSQL_PASSWORD=<MYSQL_PASSWORD>
    volumes:
      - mysql:/var/lib/mysql

volumes:
  mysql:
    driver: local
The mysql container is pretty standard so I won't cover that here. There are some env vars I had to add to the huginn container:
-
DATABASE_HOST- the database hostname to connect to, we can use the container name here -
DATABASE_PORT- the port to which to connect to the database -
DATABASE_NAME- the name of the database to use -
DATABASE_USERNAME- who we should connect to the database as -
DATABASE_PASSWORD- authentication for the user -
DATABASE_ENCODING- a requirement when using a newer version of MySQL as defined in the documentation -
START_MYSQL- whether to use a local mysql daemon or not
Some additional env vars I added unrelated to the new database:
-
IMPORT_DEFAULT_SCENARIO_FOR_ALL_USERS- I don't care able the agents that are added by default -
INVITATION_CODE- Lock down Huginn by requiring this code for new user sign ups -
DOMAIN- the endpoint that Huginn is available at
I've also added in a depends_on on the database container to assist with orchestration. On first boot however it takes some time for mysql to initialise the database, so Huginn may fail as the database is not yet ready to be connected to. Once the initialisation is done then reboot the Huginn container and it should be able to bootstrap the database fine.

Top comments (0)