If you use Airtable to keep an inventory of items in your warehouse, you can save time by scanning QR codes with your iPhone and quickly updating your Airtable base as you restock your shelves or check items in and out.
In this tutorial, we’ll learn to build a system that automatically creates QR Codes for every record in an Airtable base. You’ll be able to print QR Codes for each product and attach them to your inventory shelves for easy scanning and updating information on every record.
Part 1: Generate QRCodes for every row in Airtable using a formula
We’ll use the QRCode API in an Airtable formula to automatically produce barcodes for each record (row) in Airtable.
Part 2: Transform image file URLs to attachments in bulk with Autocode
We’ll write a script to transform a bulk of image file URLs into image attachments in Airtable.
Let’s get started!
Part 1: Generate QRCodes for Every Row in Airtable using a Formula
You can easily create QRCode images for each item in an Airtable Product Inventory Management System. As a sample for this tutorial, we’ll use this inventory tracking template.
Copy the template to your Airtable Workspace by clicking this link 👇🏼
https://airtable.com/templates/local-business/expDrHGuyjSQlrKTq/inventory-tracking
Right-click on any record in an Airtable to view the record URL.

Notice that all record URLs include a TableId ViewID RecordID: https://airtable.com/<TableID>/<ViewID>/<RecordID>;
For Ex: https://airtable.com/appYf6XDJS4EtYfP1/tbl5CBRYJFvT3VCif/viwCV6qE9IazFasPl/rechADzwWPVMsMBg4
We will use these record URLs in a formula to autogenerate QRCodes for every record using an API service hosted on Autocode:
https://autocode.com/qrcode/api/generate/#__main__
Try it out by inputting some text and errorCorrectionLevel. Press Run and take out your phone to scan the QrCode.
Great! We can use this QRCode service that we can use to automatically generate QRcodes for every record in our Airtable.
Writing the Formula in Airtable
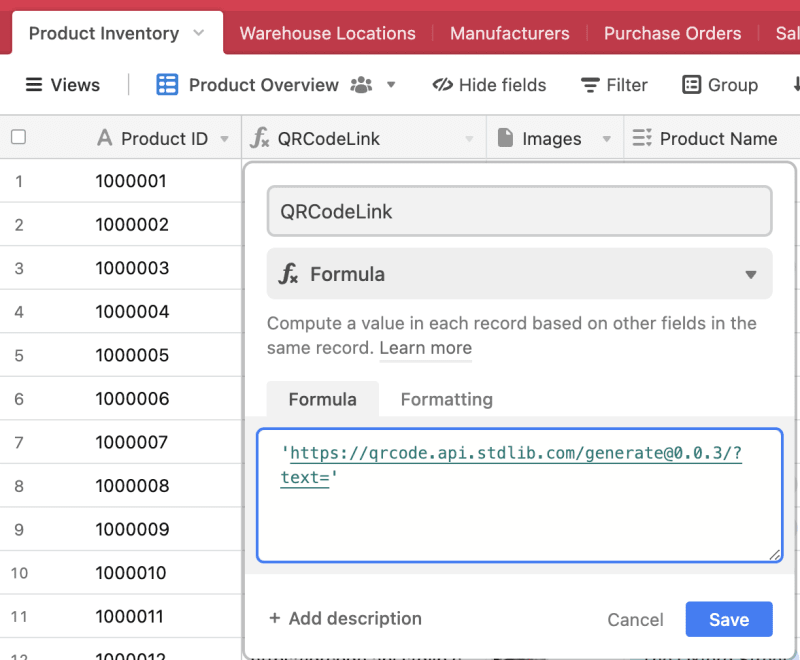
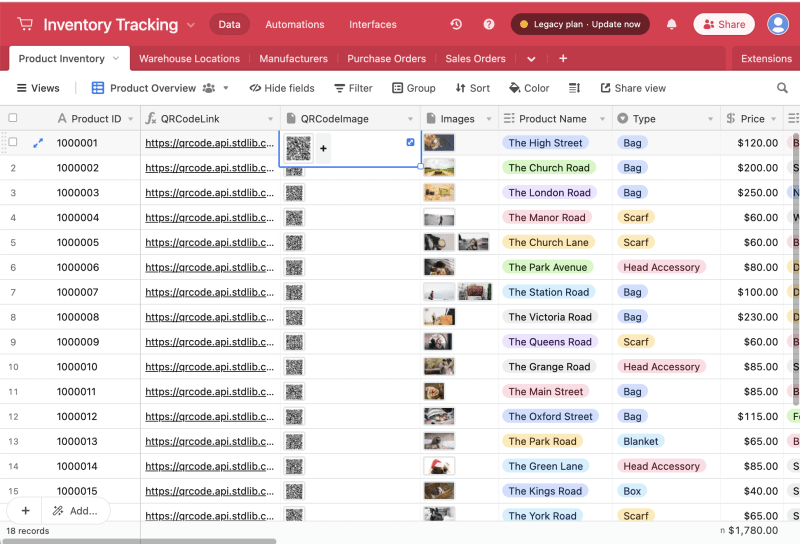
Create a new field and title it QRCodeLink (field names to to be exact) select Formula for the field type.
Copy and paste the QRCode URL in the formula field, followed by ?text=.
Like so: https://qrcode.api.stdlib.com/generate@0.0.3/?text=
Step 2:
Next, we’ll add a new function by first inserting an ampersand (&) as a separator. Then:
Add the
ENCODE_URL_COMPONENT(function followed by the URL to your Table which consists of
"https://airtable.com/TableID/ViewID/" insert an ampersand (&) as a separator and addRECORD_ID()
function to retrieve every row’s ID. Don’t forget to close off your function with a bracket).
Add another ampersand (&) separator and add the additional parameter'?errorCorrectionLevel=Medium'Mine looks like this: 'https://qrcode.api.stdlib.com/generate@0.0.3/?text=' & ENCODE_URL_COMPONENT("https://airtable.com/tbl5CBRYJFvT3VCif/viwCV6qE9IazFasPl/" & RECORD_ID()) & '?errorCorrectionLevel=Medium'
Hit Save. Now every time you add a new record to your Airtable, a QRCode will be auto generated for that record.
Part 2: Transform Image File URLs to Attachments in Bulk with Autocode
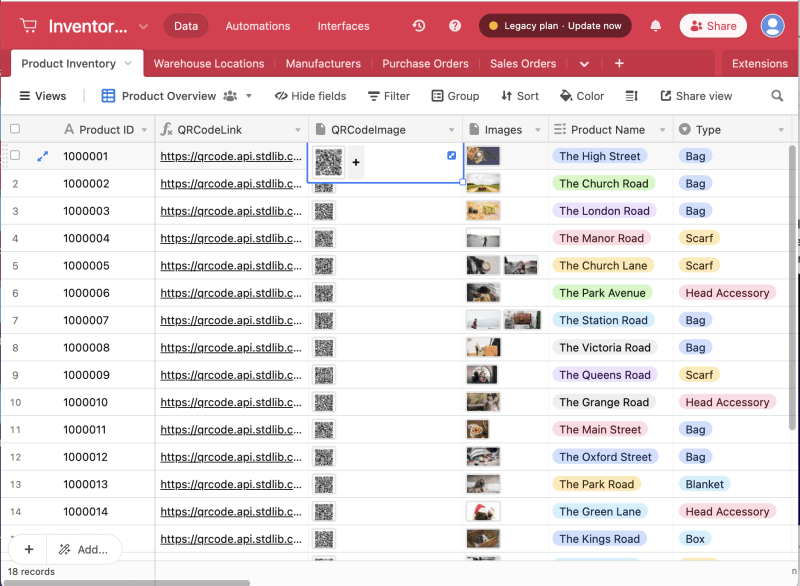
You now have a link to the QRCode image for every row in Airtable.
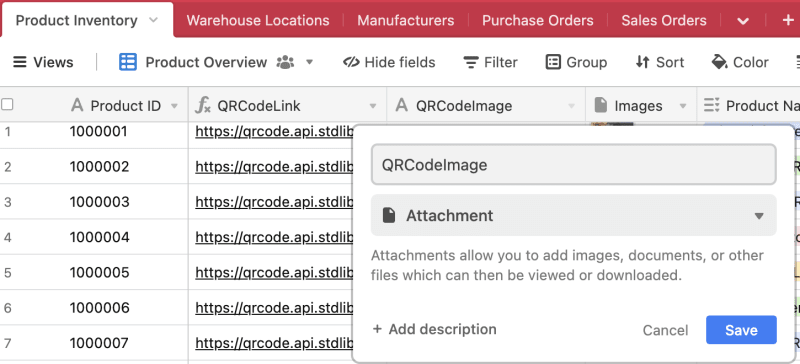
Create a new Attachment field and title it exactly like so: QRCodeImage:
We now need to write a script on Autocode to transform our QrCode links to image attachments. Head on over to your Autocode dashboard and sign in or create an account.
Select New Web Service and give the project a name.
You will be routed to the __main___.js file for your project. Delete the auto generated code and paste the following code:
const lib = require('lib')({token: process.env.STDLIB_SECRET_TOKEN});

module.exports = async () => {
  let result = {airtable: {}};

console.log(`Running [Airtable → Select Records by querying a Base]...`);
  result.airtable.selectQueryResult = await lib.airtable.query['@0.5.2'].select({
    baseId: `< Insert BaseId Here >`,
    table: `Product Inventory`,
    where: [
      {
        'QRCodeImage__is_null': true
      }
    ],
    limit: {
      'count': 0,
      'offset': 0
    }
  });
  console.log(`Running [Airtable → Update Records by querying a Base]...`);
  for (var i = 0; i < result.airtable.selectQueryResult.rows.length; i++) {
  await lib.airtable.query['@0.5.2'].update({
    baseId: `<Insert BaseID Here>`,
    table: `Product Inventory`,
    where: [
      {
      'Product ID': `${result.airtable.selectQueryResult.rows[i].fields['Product ID']}`
      }
      ],
    limit: {
      'count': 0,
      'offset': 0
    },
    fields: {
      'QRCodeImage': [ {"url": `${result.airtable.selectQueryResult.rows[i].fields['QRCodeLink']}`}]
      },
    typecast: false
  });
  }
  return result;
};
Press Save and select the red Account Required button, which will prompt you to link an Airtable account.
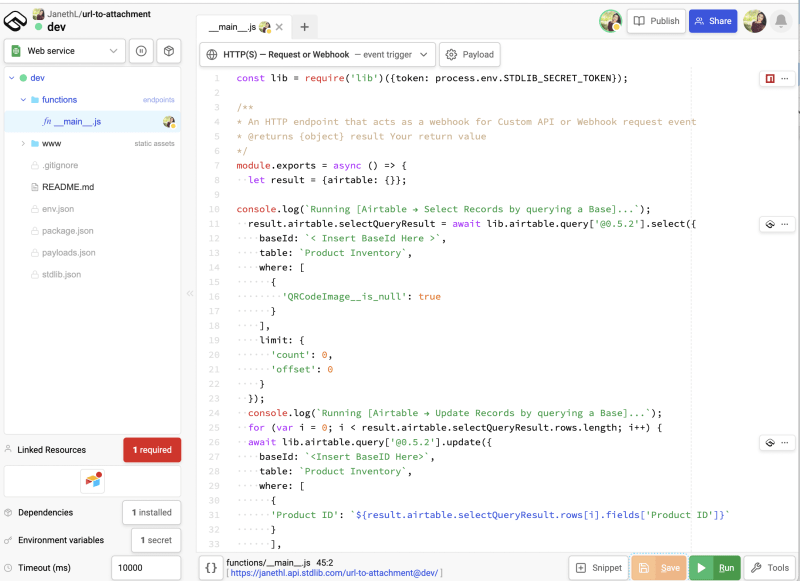
Select Link then Link Resource and follow the instructions on the modal to retrieve your Airtable API Key and select Finish.

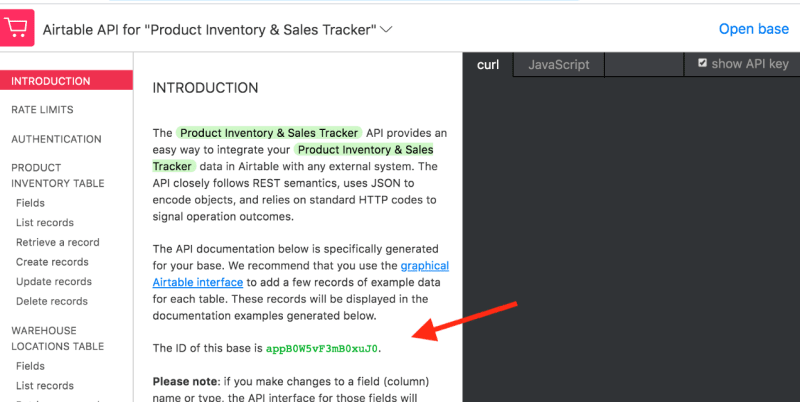
Once you’ve finished Linking your accounts you need to add your base’s ID to line 12 and Line 28.

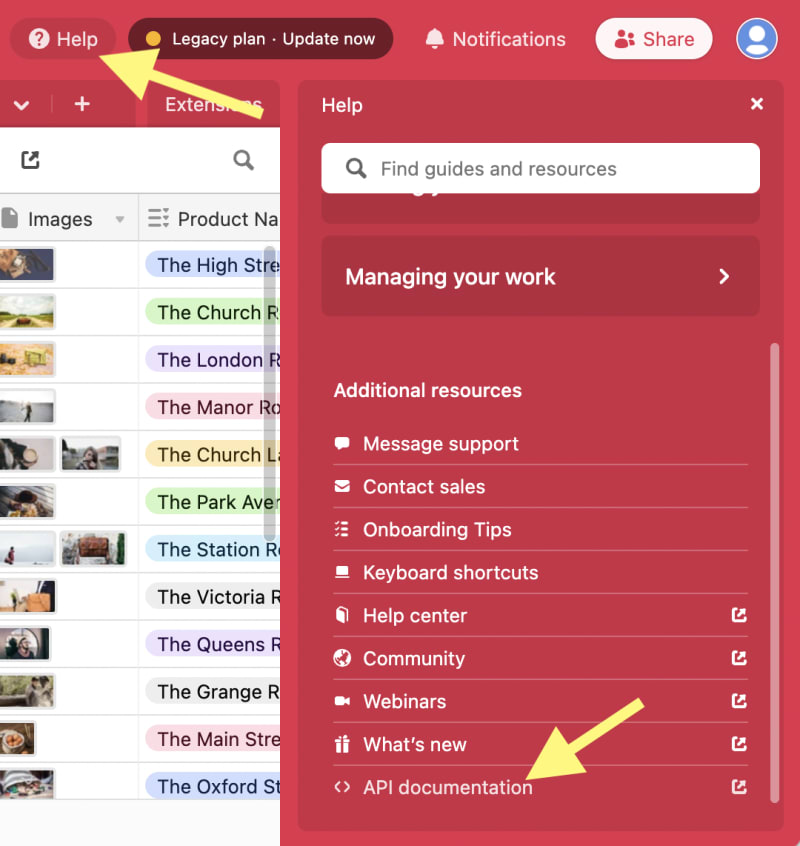
Locate your Base ID by clicking on the HELP tab on the upper right corner of your Base. Select API documentation.
Paste the base ID onto line 12 and line 28 in between the backtick quotes to set the value for baseId as seen in the screenshot:
Finally up your timeout to 30,000 ms. By default it is set to 10,000 ms.
If you have a large amount of records, you may need to run this script a couple of times to complete transfering all links to attachemts.
Hit Run Test Event and watch as your Airtable becomes populated by Autocode.
That’s it! 🤗
You now have all the tools you need to build an inventory control system with Airtable and QRCode APIs on Autocode. I hope you found this tutorial helpful. If you have any questions, jump into our Discord support channels. Our team at Autocode is ready to help.








Top comments (1)
This is a good idea!
I'll try it out