
With the new CSS Paint API (aka Houdini, presumably named after the Melvins album 🤘😁), we can use most of the HTML Canvas drawing methods to draw an image or shape and use it in any CSS property that takes an image. Today I want to show how I used Houdini in my newly-rebuilt portfolio site* to generate border images and speech-bubble-shaped divs. I will also cover using the polyfill, using Houdini with webpack and Babel, and the snags I hit while making the following demos.
*Not currently polyfilled - you will see a fallback unless you view it with Chrome
The basics of using Houdini are as follows: for any CSS property that takes an image, such as background-image, enter paint(workletName) as the value. In a JS file, create an ES6 class for your worklet. In the same file, call the registerPaint method with the workletName and the class name as the arguments. Then, in your main JS file or webpack entry point, feature detect for CSS.paintWorklet. If it's there, which right now is only in Chrome, call CSS.paintWorklet.addModule('./myWorkletClassFile.js'); otherwise, after npm i -S css-paint-polyfill, we can dynamically import the polyfill so it will be a separate webpack chunk, then call addModule. Now we are ready to develop our class and generate some art! The repo for this article:
 jamessouth
/
paint-demo
jamessouth
/
paint-demo
repo for my first article on the css paint api
paint-demo
Demos from my article on the new CSS Paint (Houdini) API.
Demo 3 (Chrome only)
//(simplified) index.js, webpack entry point
import '../css/demo.scss';

if (CSS.paintWorklet) {
  //not imported so won't be picked up by webpack, which is ok
  CSS.paintWorklet.addModule('./demo.min.js');
} else {
  import(/* webpackChunkName: "css-paint-polyfill" */ 'css-paint-polyfill').then(() => {
    CSS.paintWorklet.addModule('./demo.min.js');
  });
}
Generating a page's background

So let's start with generating a page's background. Demo 1 is live here.
  <!--index1.html -->
  <body>
    <div class="bg">
      <div>a</div>
      <div>b</div>
      ...
      <div>n</div>
    </div>
  </body>
<!--a fallback for no support or polyfill, then calling paint with demo1 worklet-->
  <style>
    .bg{
      background-image: linear-gradient(black, black);
      background-image: paint(demo1);
    }
  </style>
Normally I wouldn't have a <style> tag in the HTML, but there is some kind of caching issue when paint declarations are made in SCSS, at least for worklets that run on page load. To see what I mean, check out Demo 4 in Chrome - the page fails to load every other time you hit reload 😢.
What I believe to be the same caching issue also causes problems for me on Firefox - without dev tools open and Disable Cache checked, the polyfill almost never runs 😭. This could be due to the way I have my demo repo set up, or the hosting on GitHub. The polyfill is pretty reliable on Edge and Safari in my testing.
You will see the background-color on the body when the polyfill doesn't run, not the gradient fallback. The polyfill works by creating an image, so if you resize or re-orient, you will get repeats or cut-offs of the original image formed when the page loaded. Repeats can be prevented with background-repeat set to no-repeat; you will also just see the background-color on the body. Since Chrome has some native support for Houdini, when you resize or re-orient, the worklet runs again and redraws to fit the new dimensions, so watch out for that if you write a complex paint function.
The fake placeholder content in Demo 1 is in a div which will hold the painted background and cover the page. This is a workaround for this bug in Chrome which breaks CSS custom properties set on the body (also apparently html and :root), at least with regard to accessing them in a paint worklet. The remaining CSS is :
//demo1.scss
.bg{
  --stars: 522;
  min-height: 100vh;
  width: 100%;
  display: grid;
  grid-template-columns: repeat(auto-fill, minmax(250px, 1fr));
}
.bg div{
  width: 200px;
  height: 200px;
  background-color: coral;
  margin: 1em auto;
  text-align: center;
  font-size: 3em;
}
A second workaround for the Chrome bug is to use pseudo-content on the body, but then the polyfill doesn't work. A third workaround is to set custom properties on the body anyway, then in the worklet, test for the presence of props. If they're not there (as will be the case with Chrome), set a default value. Anyway, let's get to the worklet!
In our worklet class we can create static helper methods for use in the paint method, where we do our drawing. The paint method takes 1 to 4 arguments:
- the canvas context (
ctx) on which you call the drawing methods - the dimensions of the element you are drawing on, which we can just destructure as
{ width, height } -
props, which gives you access to CSS custom properties - an
argsarray that holds arguments passed in when you call the paint worklet from CSS, likepaint(workletName, arg1, arg2, ...)
As of right now there is no support anywhere for args 😭. Watch Is Houdini ready yet? for updates.
//demo1.js
class Demo1 {
  static get inputProperties() { return ['--stars']; }//access CSS custom property

  static getWidth() {
    return Math.floor(Math.random() * 10) + 1;
  }

  //other static methods omitted but they all just return random numbers

  paint(ctx, { width, height }, props) {
    const stars = props.get('--stars');//use CSS custom property

    ctx.fillStyle = 'rgb(0, 0, 0)';
    ctx.fillRect(0, 0, width, height);//cover all of element

    for (let i = 0; i < stars; i += 1) {//populate stars on black background
      ctx.fillStyle = `rgba(255, 255, 255, ${Demo.getTransparency()})`;//hsla not working in Edge
      ctx.fillRect(Demo.getDistAlongSide(width), Demo.getDistAlongSide(height), 1, 1);
    }

    const ctr = [//all lines start halfway across, just below bottom
      width / 2,
      height + 2,
    ];

    for (let i = 0; i < 700; i += 1) {
      const startSide = i % 4;
      const endSide = (startSide + Demo.getEndSide()) % 4;
      ctx.beginPath();
      ctx.moveTo(...ctr);//spread coordinates as two args
      ctx.lineTo(...Demo.getPoint(endSide, width, height));
      ctx.lineWidth = Demo.getWidth();
      ctx.lineCap = 'square';
      ctx.strokeStyle = `rgba(${Demo.getColor(240, 15)},
        ${Demo.getColor(240, 15)},
        ${Demo.getColor(50, 20)},
        .05)`;//use high opacity for a Roy Lichtenstein/pop-art look
      ctx.stroke();
    }
  }
}
registerPaint('demo1', Demo1);//called with worklet name and class name
Now we are ready to build! As far as I can tell, the Worklet interface only accepts ES6 classes, so a transpiled-to-ES5-function worklet doesn't work, and neither does a class wrapped in a function by webpack (if there's a way to just minify in webpack please answer my question on Stack Overflow). So, I have been processing them outside of webpack. This works fine but makes iterating in development a little slower. Install the babel-minify package as a dev dependency, then in package.json minify your worklet files and place them in your /dist folder:
  //package.json
  "scripts": {
    "lint": "eslint ./src/js",
    "dev": "webpack-dev-server",
    "build": "webpack",
    "prebuild": "rm -f dist/demo1.min.js && npx minify src/js/demo1.js --out-file dist/demo1.min.js..."
// && minify the other worklets etc...
  }
In my webpack config, I use the CleanWebpackPlugin and delete everything except the minified worklet files:
  //webpack.config.js
  plugins: [
    new CleanWebpackPlugin({ cleanOnceBeforeBuildPatterns: [
      '**/*',
      '!demo1.min.js',
      //other worklet files...
    ] }),
To develop the worklet I then move it to the /dist folder and name it demo1.min.js since that is the name I'm using elsewhere. Now when I start webpack-dev-server, /dist is wiped except for the worklet and the development workflow is normal except for having to manually refresh the browser to reflect a change to the worklet. When I'm done, I move the worklet back to source (renaming to demo1.js) and build for production. The prebuild script will minify the worklet and webpack will take care of the rest!
Generating border images
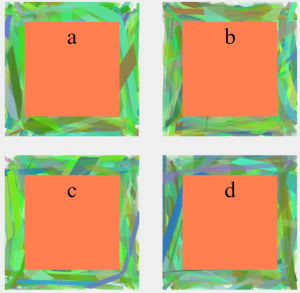
Demo 2 (live site) has a similar structure to Demo 1, just some dummy content:
  <!--index2.html-->
  <body class="border">
    <div>a</div>
    <div>b</div>
    <div>c</div>
    <div>d</div>
  </body>
  <style>
    .border div{
      border-image-source: linear-gradient(blue, blue);
      border-image-source: paint(demo2);
    }
  </style>
It is styled similarly to Demo 1 except we are using Houdini to generate border images:
//demo2.scss
.border{
  min-height: 100vh;
  width: 100%;
  background-color: #efefef;
  display: grid;
  grid-template-columns: repeat(auto-fill, minmax(284px, 1fr));
}
.border div{
  width: 200px;
  height: 200px;
  background-color: coral;
  margin: 1em auto;
  text-align: center;
  font-size: 3em;
  --lines: 343;
  border-image: 82 / 42px / 14;//short for border-image-slice, -width, -outset
  border-style: solid;
}
Just drawing a bunch of lines that form the image we set as the border image source:
//demo2.js
class Demo2 {
  static get inputProperties() { return ['--lines']; }//CSS custom prop

  //static methods omitted but they all just return random numbers

  paint(ctx, { width, height }, props) {
    const lines = props.get('--lines');

    for (let i = 0; i < lines; i += 1) {
      const start = Demo2.getRandomPoint(width, height);
      const end = Demo2.getRandomPoint(width, height);
      ctx.beginPath();
      ctx.moveTo(...start);
      ctx.lineTo(...end);
      ctx.lineWidth = Demo2.getWidth();
      ctx.lineCap = 'square';
      ctx.strokeStyle = `rgba(${Demo2.getColor(36, 150)},
        ${Demo2.getColor(108, 150)},
        ${Demo2.getColor(12, 200)},
        ${Demo2.getTransparency()})`;
      ctx.stroke();
    }
  }
}
registerPaint('demo2', Demo2);
In my portfolio site, I only used this technique for focus styles and only for a bottom border; here are the SCSS and worklet.
Generating arbitrarily-shaped elements

We can use Houdini to carve any shape out of a div with the mask-image property (here is my portfolio's speech bubble worklet). Any element we do this to will still occupy a rectangle in the CSS box model of course, but within its box we can achieve any look we want. For this third demo, I went a little crazy: I re-created the POP! explosion lithograph that American artist Roy Lichtenstein made for the cover of the April 25, 1966, issue of Newsweek. This one only works in Chrome because the polyfill does not seem to like multiple paint values in a single style sheet, but you can use multiple style sheets with one paint invocation each to work around this issue. Demo 3 is live here.
  <!--index3.html -->
  <body class="shape">
    <div id="pop">
      <p><span>P</span><span>O</span>P</p>
    </div>
    <div id="expt"></div>
    <div id="blue"></div>
    <div id="outline"></div>
  </body>
  <style>
    #expt{
      -webkit-mask-image: paint(demo3b);
      mask-image: paint(demo3b);
    }
    #pop{
      background-image: paint(demo3a);
    }
    #blue{
      -webkit-mask-image: paint(demo3c);
      mask-image: paint(demo3c);
    }
    #outline{
      -webkit-mask-image: paint(demo3d);
      mask-image: paint(demo3d);
    }
  </style>
Remaining CSS for the cloud and outline:
//(partial) demo3.scss
#blue{
  background-color: #f5f9fc;
  background-image: radial-gradient(#1b4282 30%, #122182 32%, #1a237e12 33%),
                    radial-gradient(#1b4282 30%, #14248e 32%, #1a237e08 33%);
  background-size: 8px 8px;
  background-position: 0 0, 4px 4px;
}
#outline{
  background-color: #282a2c;
}
As far as the worklet code goes, there is little difference between masking and drawing. For the exclamation point and cloud outline, either way works since they are solid colors. The red/yellow/white explosion is solid too but I drew it so that I could apply the dark outlines; it does not seem possible to both mask a shape and have an outline around it, which is why the cloud's outline is a separate worklet.
I tried to pattern the blue cloud in the worklet but it wasn't looking good. A nested loop can be used to draw across the width and height of the subject element, but I didn't find a way to keep what is drawn confined within the cloud's boundaries. I also tried the ctx.createPattern() method but I couldn't find a way to get an image into the worklet (no DOM access) to be the pattern source. So, I made the cloud's pattern in CSS then masked the shape in a worklet, thus requiring another worklet to make the outline.
To help draw these shapes I used this tool which generates the draw instructions and adds x- and y-offsets, which I then used to position the shape within the div.
More on the polyfill and conclusion
One last thing I wanted to show with the polyfill was that calling paint in your CSS before other declarations seems to work better than putting it just anywhere. I made Demo 4 to show the aforementioned caching issue when paint is called in SCSS, but also to say that if other declarations come before it the polyfill doesn't seem to run as often, so you just get the body's background color. The cover image of this article is a shot of Demo 4.
//demo4.scss
.cache{
  //put paint declaration first for best results
  background-image: linear-gradient(black, black);
  background-image: paint(demo4);
  --rays: 582;
  min-height: 100vh;
  width: 100%;
}
Before I discovered this placement made a difference, it took seemingly random declarations like display: block (even though that is already the default on a div) to get the polyfill to run 😖😕😵🤦♂️.
Houdini is nascent technology with growing browser support, but we can already do lots of cool things with our backgrounds, borders, and divs. If you can imagine it, you can draw it! I hope you found this article helpful and are inspired and empowered to use paint to push your front-end creativity forward. Please leave a comment and share widely! Thank you!

Top comments (0)