
You can use JavaScript to do many things like build a website, mobile app, and even a backend server with Nodejs. In fact, I would argue that using Node is one of the easiest ways to get up and going with a web server. In this article, we will look at creating a web server with Node and a popular package called Express.
We will also talk about
- RESTful Routing
- HTTP Methods
- Query Parameters and Body
Project Setup
Install Node
To get started, the first thing you'll need to do is install Node. The install link is on the home page on the site. It should be a pretty straight forward installer once you get it downloaded. As of this article, the current stable version is 12.13.0.
Create a JavaScript Server File
The next step is to create the file that we will write our code in to run our server. To do this, create a folder somewhere on your computer. Then, open that folder in your favorite text editor. Hint, if you're not using Visual Studio Code for Web Development, YOU ARE MISSING OUT! There's almost no debate, you should be using it :)
If you'd like to learn how to take full advantage of VS Code as your editor, check out Learn Visual Studio Code. It's the most popular Visual Studio Code course on Udemy!
After you open the folder open in VS Code, create a file called app.js. Inside of that file add the following log statement.
console.log("Hello world from Node and Express");
Now, run the file by using the following command in your terminal.
node app.js
Initialize as NPM Project
By installing Node earlier, you also got NPM, the Node Package Manager. We will use NPM to install JavaScript packages in a second. We need to use NPM to initialize our project so that we can install packages.
To initialize our project as a JavaScript or NPM project, run the following command. You can accept all of the defaults for now.
npm init
Using Nodemon
Here's one little trick we can incorporate as we get started. Install nodemon as a global package like so.
npm install -g nodemon
With this package, we can start our server and have it auto-reload every time we make changes and save our files. Trust me, this is super helpful when doing development. To run your file replace node with nodemon.
nodemon app.js
Using Express NPM Package
Now that we configured the project, we need to install the Express package from NPM. To do so, run the following command in your terminal.
npm install express
With the package installed, we can now create a basic server by adding the following code.
const express = require("express");
const app = express();

app.listen(3000, () => {
  console.log(`Listening on port 3000`);
});
Let's break it down. We import express and use it to generate the app object. We then call app.listen() which starts the server on the port that we pass (3000 in this case). We also pass in a callback function so that we can log when the server starts.
After you save your file and the server reloads, check that you see the log output in your console.
Optimizing Your Server Port
Typically, when you host your application, you can't hardcode your port number to 3000 as above. The port number should be passed in as an environment variable from the server. However, you won't have that luxury during development. To fix this, you can use the environment variable if possible, and otherwise, use the hardcoded one. Change your code to this.
const express = require("express");
const app = express();

const port = process.env.port || 3000;
app.listen(port, () => {
  console.log(`Listening on port 3000`);
});
This "or" trick in JavaScript will use the first variable if available, and the second one (hard coded port number) if not.
CRUD, HTTP Methods, RESTFul Routing
For some extra background we need to talk about a few different concepts.
CRUD
CRUD is an acronym for Create, Read, Update, and Delete. If you think about it, most applications are considered "CRUD Applications" to a certain extent. Let's take Facebook for example. You can create posts, you can view/read posts, you can update a post, and you can delete a post.
If you can build a CRUD application, you can build almost anything
CRUD functionality is the core of all applications!
HTTP Methods
We are about to start working with endpoints in Express. Each endpoint will need a route and an HTTP method. For the most part, the HTTP methods line up with the different components of CRUD.
Create -> POST
Read -> GET
Update -> PUT
Delete -> DELETE
We will talk about these more in a minute.
RESTFul Routing
RESTFul routing is more or less a standard for how to create consistent API Route endpoints. They correspond to CRUD components and use HTTP methods in their definition.
Routes typically revolve around objects. For example, in the Facebook example, the object would be a post. In today's demo, we will be talking about books. Here's how RESTFul Routing standards would recommend us creating book endpoints.
GET /books - retrieve list of books
GET /books/:id - retrieve one book with a specific id
POST /books - create a book
UPDATE /books/:id - update a book with a specific id
DELETE /books/:id - delete a specific id
Creating CRUD Endpoints with Express
Before we create our endpoints, let's setup some dummy data to use in our application. We are going to add an array of book objects that each contain a title and an author. Let's use Harry Potter books since they're LITERALLY THE BEST BOOKS IN THE WORLD!
Keep in mind, this data will reset each time the server restarts!
const books = [
  {
    title: "Harry Potter and the Order of the Phoenix",
    author: "J.K. Rowling",
  },
  {
    title: "Harry Potter and the Deathly Hallows",
    author: "J.K. Rowling",
  },
];
In a real application, we would store this data in a database, but for now, it works for our demo
GET /books
Now that we've got our dummy data in place, we can create our first route. Remember, there are two required pieces of information when creating a route, HTTP method and path/route URL.
Here's the first route to retrieve the list of books.
app.get("/books", (req, res) => {
  res.send(books);
});
We use our app variable and call the get() method, which translates to the GET HTTP method. The first parameter is the path, and the second parameter is a callback function. This callback function will gets called when someone sends a request to that endpoint.
Notice that the callback function takes two parameters. These two represent the incoming request object and the outgoing response object. We will us the request in the next route, but in this one we use the response object to send back data. In this case, we are sending back all of the items in the array.
To test this, you can type the following url into your browser and you should see your book data displayed.
localhost:3000/books
GET /books/:id
Now, let's create the route to retrieve one specific book based on an id. For this demo, the unique id will be the array index of the book. For example, the first book will have an index of 0, so it's id will be 0 as well.
There is one notable difference in this route from the one above. We are defining the path for this route to include the id as a query parameter. Here's the code.
app.get("/books/:id", (req, res) => {
  const id = req.params.id;
  res.send(books[id]);
});
Notice that we can access the id as a variable on the request object. This is because we defined it in the path with a colon. That signifies that the id can vary which gives the user the ability to request different books.
To test this, type the following into your browser and you should see the first book in your array (at index 0) returned.
localhost:3000/books/0
Using Postman To Test HTTP Requests
So far, we've only created endpoints using GET, and we can test them in the browser. Unfortunately, the browser can only make GET requests, so we need to use a tool called Postman to test the rest of them. You can download here.
Without writing code, you can only make GET requests in the browser. You can use JavaScript to perform other types of requests
Inside of Postman, you'll see an area to choose the HTTP method, type in the url, and enter data to be posted to the server. Here's a screenshot for reference.
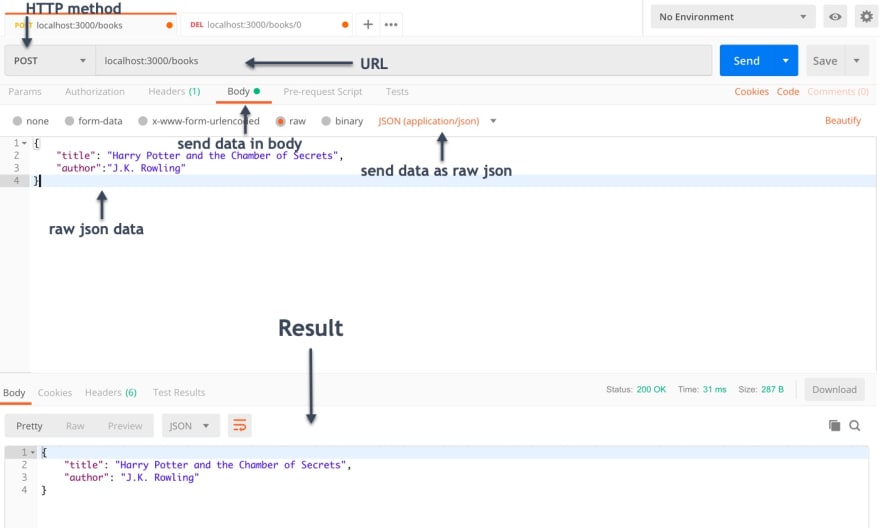
POST /books
With Postman installed, we can now create the endpoint to create book objects. It will have a method of POST and will need to receive book data in the body of the request. Here's what the route looks like.
app.post("/books", (req, res) => {
  const book = req.body;
  books.push(book);
  res.send(book);
});
The only thing that should be new here is how we retrieve the incoming data from the request in the body. You get access to the request body by calling _req.body. _
After getting the body, we then add that book object to the array. Looks good right...?
Well, if you send this request in postman (refer to the Postman screenshot above), notice that nothing gets returned. We should see that same book object returned, but we don't.
If you were to make another GET request to /books you'll notice that the list of books does not include the one you thought you added. The problem is that you have to make one small change in Express to receive the request body. You can add the following lines right before your dummy data is declared to fix this.
app.use(express.json());
app.use(express.urlencoded());
_; //Parse URL-encoded bodies_
If you now send another POST request, then send a GET requests to /books, you should see the newest book was added.
UPDATE /books/:id
The good thing is, for our update route, we won't see any new code that we haven't used before. We will need to retrieve the book id as we did with the second GET route above. We will also need to retrieve the request body like we did in the POST route.
After getting the id and the updated book information, we replace the book object at that index in the array with the new book object.
app.put("/books/:id", (req, res) => {
  const id = req.params.id;
  const updateBook = req.body;
  books[id] = updateBook;
  res.send(updateBook);
});
DELETE /books/:id
Again, no new concepts with our DELETE route. We retrieve the incoming book id from the request. Then, we use that id to remove that specific book from the array. We can use the splice() array function to quickly remove an item at a specific index.
app.delete("/books/:id", (req, res) => {
  const id = req.params.id;
  books.splice(id, 1);
  res.send(id);
});
Final Code
const express = require("express");
const app = express();
const path = require("path");
//CRUD - Create, Read, Update, and Delete
//HTTP Methods - Post, Get, Put, Delete

const books = [
  {
    title: "Harry Potter and the Order of the Phoenix",
    author: "J.K. Rowling",
  },
  {
    title: "Harry Potter and the Deathly Hallows",
    author: "J.K. Rowling",
  },
];

//app.use(express.static('public'));
app.use("/static", express.static(path.join(__dirname, "public")));

app.use(express.json());
app.use(express.urlencoded()); //Parse URL-encoded bodies

app.get("", (req, res) => {
  console.log("Hello world");
  res.sendFile("index.html");
});

app.get("/books", (req, res) => {
  res.send(books);
});

app.get("/books/:id", (req, res) => {
  const id = req.params.id;
  res.send(books[id]);
});

app.post("/books", (req, res) => {
  console.log(req.body);
  const book = req.body;
  books.push(book);
  res.send(book);
});

app.put("/books/:id", (req, res) => {
  const id = req.params.id;
  const updateBook = req.body;
  books[id] = updateBook;
  res.send(updateBook);
});

app.delete("/books/:id", (req, res) => {
  const id = req.params.id;
  books.splice(id, 1);
  res.send(id);
});
const port = process.env.port || 3000;

app.listen(port, () => {
  console.log(`Listening on port ${port}`);
});
Wrap Up
Using Node on the server is continuing to grow in popularity and opens up lots opportunities. It's a great skill to have on your resume and can certainly open up some opportunities for you.
The Express package that we covered today is by far the most popular way to set up routes in your Node application. Hopefully, after this article, you'll be able to create a quick web server with RESTful routes in no time!


Top comments (0)