
Intro
Ive recently posted about what the buzzword Metaverse means, as well as examples of what the underlying technology WebXR is and what it is capable of.
What I didnt address, was how to start developing these experiences from a practical development perspective.
Im currently in the process of writing documentation for an open source library Ive created called Wrapper.js, which aims to easily allow developers to spin up Full Stack Web3 based applications.
In the meantime, I wanted to share some key code snippetsthat may be helpful to someone out there looking to develop these kinds of experiences.
Overview
In order to make the most of the information in this post, its important that you understand these two key points:
The Concept
The big difference between tradition XR and WebXR, is that WebXR based applications run in the browser.
Using the WebXR API, you can query what capability is of the device youre using to view the experience and load the appropriate content so that it is able to load without issue.
This enables you to open the web application on an XR headset, desktop or mobile device and be able to interact with the content.

The Tech Stack
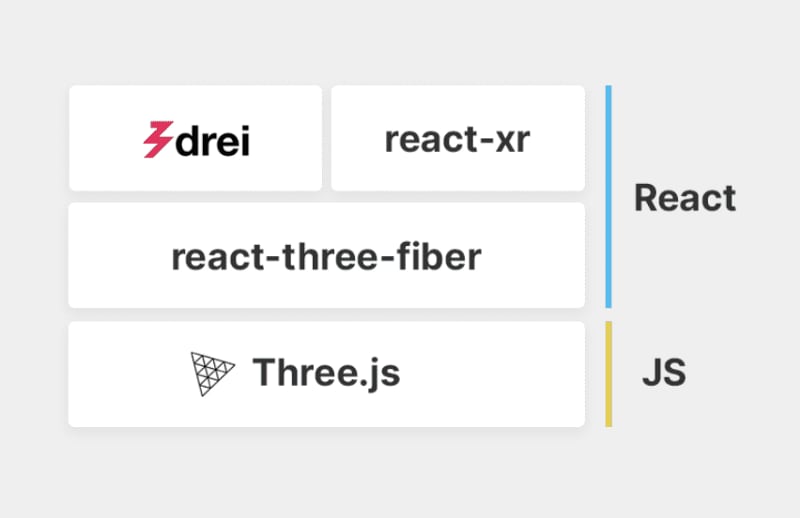
The libraries we will be using to implement this concept are:
- Three.js (implemented with React-Three-Fiber) for the creation of 3D assets.
- React-XR for leveraging the WebXR API (e.g VR Headset + controllers) & React-Three-Drei which has useful functions for creating WebGL content.
- React to componentise & standardise the logicin this case we will use NextJS.
WebXR Code Examples
There are two examples to talk through in order to implement cross device compatible WebGL content, these are outlined below.
These are extracts from the WebXR template of the Wrapper.js repository.
The index file
In Next.js, this file would be located in pages/index.jsif youre using another implementation of react, you can extract this into your index file.
Important lines to note here are:
- Line 5 : where we import the XRScene Higher Order Component we will write to do the logic to load assets correctly.
- Line 16 and line 39 : which indicate how you wrap your 3D assets (GLTF models / meshes / lights etc) with the XRScene component, demonstrating how to neatly contain and separate web compatibility logicfrom WebGL content.
import Head from 'next/head'
import dynamic from 'next/dynamic';
import React, { useRef, useState, Suspense, lazy, useEffect } from 'react'

const XRScene = dynamic(() => import("../components/XRScene"), { ssr: false });
const Shiba = lazy(() => import("../components/3dAssets/Shiba.js"), {ssr: false});
const Slide = lazy(() => import("../components/3dAssets/Slide.js"), {ssr: false});
const Dome = lazy(() => import("../components/3dAssets/Dome.js"), {ssr: false});

export default function Home() {
  return (
    <>
      <Head>
        <title>Wrapper.js Web XR Example</title>
      </Head>
      <XRScene>
        <Shiba
          name={'shiba'}
          position={[1, -1.1, -3]}
          rotation={[0,1,0]}
        />
        <Dome
          name={'breakdown'}
          image={'space.jpg'}
          admin={true}
        />
        <Slide
          name={'smile'}
          image={'smile.jpeg'}
          position={[-2, 1, 0]}
          rotation={[0,-.5,0]}
          width={10}
          height={10}
        />
        <ambientLight intensity={10} />
        <spotLight position={[10, 10, 10]} angle={0.15} penumbra={1} />
        <pointLight position={[-10, -10, -10]} />
        <spotLight position={[10, 10, 10]} angle={15} penumbra={1} />
      </XRScene>
    </>
  )
}
XRScene Higher Order Component
The XRScene component is written in a manner that you can pass other child components into it and render them based on specific logic (essentially acting like a parent wrapper that renders children componets, this is known as a Higher Order Component).
Important lines to note are between 3845, where it is calling the webxr api through navigator.xr :
- If the WebXR api is not accessible, then the device is considered a normal website rendering device
- If immersive-ar is possible on that device, then the scene will be rendered for Augmented Reality
- If immersive-vr is possible on that device, then the scene will be rendered for Virtual Reality
Another important set of lines is between 913, which sets the devices capability (normal Web vs WebAR vs WebVR) so that you can reference it in other components throughout your application.
import React, { useRef, useState, useEffect, Suspense, lazy } from 'react'
import { Canvas } from '@react-three/fiber'
import { VRCanvas, ARCanvas, useXR, DefaultXRControllers, Hands } from '@react-three/xr'
import deviceStore from '../../stores/device';

export default function XRScene(props) {
  const { children } = props;
  const { device, setDevice } = deviceStore();
  useEffect(() => {
    const fetchData = async() => setDevice(await checkDevice())
    fetchData();
    // eslint-disable-next-line react-hooks/exhaustive-deps
  }, [])

  return (
    <>
      {device != undefined && device == 'webAR' &&
        <ARCanvas style={{
          height: '100vh',
          width: '100vw'
        }}>
            <Suspense fallback={null}>
                <perspectiveCamera
                    fov={65}
                    aspect={window.innerWidth / window.innerHeight}
                    radius={1000}
                />
                <DefaultXRControllers />
                {children}
            </Suspense>
        </ARCanvas>
      }
      {device != undefined && device == 'webVR' &&
       <VRCanvas style={{
          height: '100vh',
          width: '100vw'
        }}>
            <Suspense fallback={null}>
                <perspectiveCamera
                    fov={65}
                    aspect={window.innerWidth / window.innerHeight}
                    radius={1000}
                />
                <DefaultXRControllers />
                <Hands />
                {children}
            </Suspense>
        </VRCanvas>
      }
      {device != undefined && device == 'web' &&
        <Canvas style={{
          height: '100vh',
          width: '100vw'
        }}>
            <Suspense fallback={null}>
                <perspectiveCamera
                    fov={65}
                    aspect={window.innerWidth / window.innerHeight}
                    radius={1000}
                />
                {children}
            </Suspense>
        </Canvas>
      }
    </>
  )
}

const checkDevice = async() => {
  if(navigator.xr == undefined) return 'web'
  let isAR = await navigator.xr.isSessionSupported( 'immersive-ar');
  if(isAR) return 'webAR';
  let isVR = await navigator.xr.isSessionSupported( 'immersive-vr');
  if(isVR) return 'webVR';
  return 'web'
}
Conclusion
This post has shown you how to render a scene based on the device youre usings compatibility with the WebXR API.
I hope this is helpful for you developing you WebXR experiences, have fun :D

Top comments (0)