So you want to start using push notifications in your new shiny mobile app written in React Native. But if you’re new to mobile development and you don’t know anything about how push notifications work, you can be lost (as I was the first time). What’s so difficult about push notifications?
- Each platform (Android, iOS) implements it differently.
- React Native implementation itself is a bit different for each platform and React Native push notification libraries can also have differences.
- There is some backend/server-side involved.
- Different behavior based on the state of the app (open, in the background, closed) from the user perspective.
- Various types of notifications (local/remote, foreground/background, …).
First, let’s look at the general specifics of push notifications and then I’ll discuss the selection of React Native library and show you how to set up push notifications and React Native notifications library on each platform.
Architecture
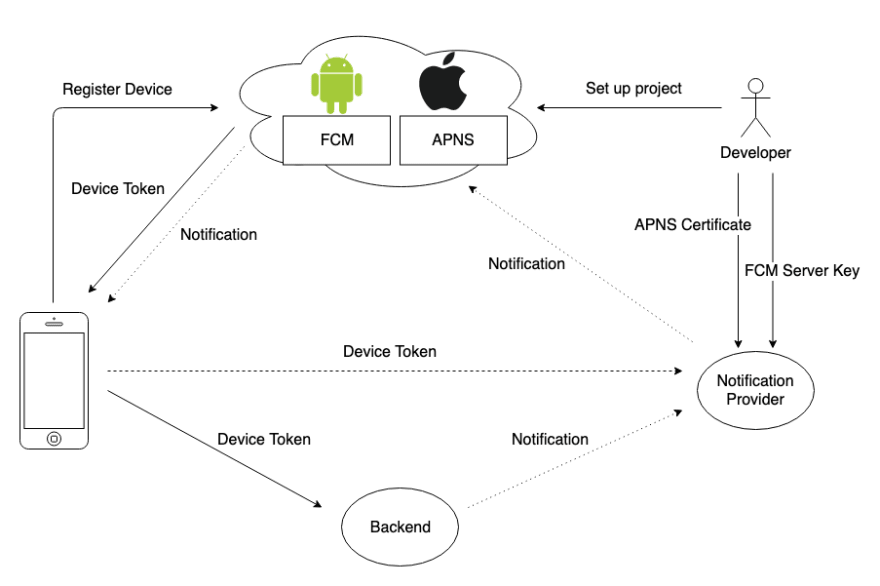
APNs (Apple Push Notification service) and FCM (Firebase Cloud Messaging) are cloud services provided by Apple for iOS and by Google for Android, respectively. To utilize these services as a developer, you need to register your app for APNs or FCM (I’ll explain how to do that later). After that process, you will get a certificate for iOS and Server API Key for FCM which you will save into your notification provider. Notification Provider could be AWS SNS for example. You can also use FCM, build your own or it can be part of your backend system.
The goal of APNs and FCM services is to allow you to send a notification to a user without knowing anything about the IP address of the user’s device. You just add some code into your app which registers the user’s device with APNs or FCM and returns back a device token. Then you send a notification message for the given device token from your backend system via notification provider to APNs or FCM and they take care of the rest - delivery to the user’s device.
Notification Types
Foreground vs. Background
- Foreground notification means notification which the user gets when the app is open and running.
- Background notification is either when the app is running in the background or when the app is closed.
There is a different behavior and API for handling notifications depending on the state of the app on the user’s device and you have to be prepared for that.
Remote vs. Local
A local notification is a notification initiated from within the app and then delivered into the system notification center by a given time or repeatedly. Such notification is not being sent from the server. Vice versa, a remote notification is sent from a server. In this article I’ll be focusing mainly on remote notifications.
React Native library
So far, I’ve tried two libraries:
I started with zo0r/react-native-push-notification, but I had an issue with receiving background notification on iOS so I went with wix/react-native-notifications.
Install the library by running:
- Yarn:
yarn add react-native-notificationsor - NPM:
npm install —save react-native-notifications.
Now, you can go through the setup section for iOS or Android as you need. In any case, you need to go through React Native Implementation section right after that, before going to “testing” section for any platform.
iOS Setup
Enroll in Apple Developer Program
If you want to send a remote notification, even just for testing purposes, you have to be enrolled in Apple's developer program. It costs $100 for a year, but if you want to publish your app in App Store you would need to do it anyway.
Enable push notification
Open your project in Xcode. I’m using RN > 0.60 so I open PushNotificationsWixDemo.xcworkspace. Go to Xcode project settings -> Capabilities and turn on Push Notifications (see Add a capability to a target). To see this option in Capabilities menu, you need to be logged into Xcode with your Apple ID which is enrolled in the Apple developer program as I mentioned before. Advanced App Capabilities shows what kind of developer account you need for a specific capability.
Create a Certificate
You need to create a TLS certificate to be able to communicate with APNs. You can do that in your Apple Developer Account page in Certificates, Identifiers & Profiles section.
Before you start, you need to Create a certificate signing request (don’t forget to fill in “Common Name” field, otherwise, the certificate created from such CSR won’t work). When you have one, for example, CertificateSigningRequest.certSigningRequest, continue with creating the certificate as described in Communicate with APNs using a TLS certificate. When asked for Certificate type, just select Development SSL Certificate, that’s good enough for playing around with push notifications within your project. For the production version of the app distributed via App Store and even for beta testing via TestFlight you would need to create a Production SSL Certificate.
During this process, you’ll create, download and add cer file into your Keychain. Then you’ll export p12 file which we will use later for testing push notifications.
NOTE: While writing this article, I found there is another option: Communicate with APNs using authentication tokens, but I haven’t tried it.
Other useful resources:
React Native Setup
Continue with other steps in React Native Notifications Getting Started Guide · React native notifications related to iOS:
pod install —project-directory=ios/- Update
AppDelegate.m
Android Setup
As I mentioned before, Android is using FCM for push notification delivery. I would say it’s more straightforward. You just need a Google Account to log in to Firebase Console and create a project for Android there. There is one thing that could be a bit confusing. You can set up and use FCM also for other platforms such as iOS, web, C++ or Unity, but this only means that FCM could work also as a Notification Provider from our diagram. It’s not a replacement for APNs service and you would need to do iOS setup described above anyway.
SIDE NOTE: As of April 10, 2018, Google deprecated GCM. Then removed the GCM server and client APIs by April 11, 2019. You need to migrate GCM apps to Firebase Cloud Messaging if you’ve used it before. That’s also the reason why you can spot GCM from time to time, in dependencies or as an attribute in message payloads for example.
Create Firebase Project
If you want to send push notifications to Android, you would need to create a project in Firebase Console Firebase Console and register your app there (as described at Add Firebase to your Android project | Firebase step 1., 2. and 3.
-
Step 1: Create a Firebase project:
- Add Project
- Project name push-notifications-wix-demo
- Turn off “Enable Google Analytics for this project"
-
Step 2: Register your app with Firebase:
- Android package name: com.pushnotificationswixdemo (you can find it in
android/app/build.gradlefile, android -> defaultConfig -> applicationId) - App nickname (optional): Push Notifications Wix Demo
- Register app
- Android package name: com.pushnotificationswixdemo (you can find it in
-
Step 3: Add a Firebase configuration file:
- Download
google-services.jsonand put it intoPROJECT_DIR/android/app/folder. - Update
PROJECT_DIR/android/build.gradleandPROJECT_DIR/android/app/build.gradlefiles. Beware that there might be differences in specific versions defined in Firebase console and Android Installation · React native notifications. I usually try to set the Gradle files according to current Firebase console recommendations and downgrade if it doesn’t work with React Native notification library.
- Download
React Native Setup
Continue with other steps in Android Installation · React native notifications:
- Add the library to your application class (e.g. MainApplication.java)
- Link react-native-notifications in
PROJECT_DIR/android/settings.gradle
Now you should have everything set up correctly. Open Android Studio and try to build your app as a sanity check whether you have correct dependencies.
Android Client Setup Under the Hood
There is more information about Set up a Firebase Cloud Messaging client app on Android | Firebase and FirebaseMessagingService | Google APIs for Android | Google Developers, but wix/react-native-notifications library does a lot of it for you and you don’t have to worry about it. I’m adding it just for reference. I found it interesting to know what’s under the hood.
React Native Implementation
Create PushNotificationsManager.js file with following content and add it into your project:
import React from 'react'
import { Platform, View } from 'react-native'
import { Notifications } from 'react-native-notifications'

export default class PushNotificationManager extends React.Component {
  componentDidMount() {
    this.registerDevice()
    this.registerNotificationEvents()
  }

  registerDevice = () => {
    Notifications.events().registerRemoteNotificationsRegistered(event => {
      // TODO: Send the token to my server so it could send back push notifications...
      console.log('Device Token Received', event.deviceToken)
    })
    Notifications.events().registerRemoteNotificationsRegistrationFailed(event => {
      console.error(event)
    })

    Notifications.registerRemoteNotifications()
  }

  registerNotificationEvents = () => {
    Notifications.events().registerNotificationReceivedForeground((notification, completion) => {
      console.log('Notification Received - Foreground', notification)
      // Calling completion on iOS with `alert: true` will present the native iOS inApp notification.
      completion({ alert: false, sound: false, badge: false })
    })

    Notifications.events().registerNotificationOpened((notification, completion) => {
      console.log('Notification opened by device user', notification)
      console.log(`Notification opened with an action identifier: ${notification.identifier}`)
      completion()
    })

    Notifications.events().registerNotificationReceivedBackground((notification, completion) => {
      console.log('Notification Received - Background', notification)

      // Calling completion on iOS with `alert: true` will present the native iOS inApp notification.
      completion({ alert: true, sound: true, badge: false })
    })

    Notifications.getInitialNotification()
        .then(notification => {
          console.log('Initial notification was:', notification || 'N/A')
        })
        .catch(err => console.error('getInitialNotifiation() failed', err))
  }

  render() {
    const { children } = this.props
    return <View style={{ flex: 1 }}>{children}</View>
  }
}
Add PushNotificationManager into App.js file like that:
import React from 'react'
import { View } from 'react-native'
import { Provider } from 'react-redux'
import PushNotificationManager from './pushNotifications'
import { RootScreen } from './router'

const App = () => {
  return (
    <>
      <Provider store={store}>
        <PushNotificationManager>
          <View style={{ flex: 1 }}>
            <RootScreen />
          </View>
        </PushNotificationManager>
      </Provider>
    </>
  )
}

export default App
Testing iOS Push Notifications
To test push notifications on iOS you need:
- Start the app: currently, it's not possible to test remote push notifications by running the app in Simulator, so you have to start the app from Xcode and run it on a connected device. It should change in the future versions of Xcode (see How to Send Push Notifications to the iOS Simulator).
- Device Token: in this demo project, we’re just logging it into the browser console in the
registerDevicemethod, you can just copy it from there. In real world, you would send a token to your Notification Provider and then send a notification from there. - Get TLS certificate: We’ve created such certificate in the iOS Setup -> Create Certificate section of this article.
You can test push notifications just by sending an HTTP request directly to APNs via curl. But first, we need to generate .pem from our .p12 which we will send with that request.
Create .pem from .p12 certificate file via openssl command:
openssl pkcs12 -nodes -clcerts -in Certificates.p12 -out Certificates.pem
If you're confused what these files and file extensions mean, try to look at certificates - PEM, CER, CRT, P12 - what is it all about? - Information Security Stack Exchange.
After that, you can send the HTTP request by the following command (just replace abcd with a password you set for the .pem certificate in the previous step):
curl -v \
  -d '{"aps":{"alert": {"title": "Game Request", "body": "Bob wants to play poker"},"sound":"default"}, "data": "some custom data"}' \
  -H "apns-topic:PROJECT_BUNDLE_IDENTIFIER" \
  -H "apns-expiration: 1" \
  -H "apns-priority: 10" \
  --http2 \
  --cert CERTIFICATE_FILE_PATH:CERTIFICATE_PASS \
  https://api.development.push.apple.com/3/device/DEVICE_TOKEN
Other useful resources:
- Testing your iOS APNS certificate — A developer’s help guide.
- Local and Remote Notification Programming Guide: Creating the Remote Notification Payload
Testing Android Push Notifications
To test push notifications on Android you need:
- Start the app: you can use an emulator or connected device.
- Get Device Token: in this demo project, we’re just logging it into the browser console in the
registerDevicemethod, you can just copy it from there. In real world, you would send a token to your Notification Provider and then send a notification from there. - Get Server Key: you will find it in your project's Project Settings -> Cloud Messaging -> Server key.
The first option to try whether it works is to go into your project in Firebase console. Go to Cloud Messaging -> Notifications tab -> New notification. This approach has one problem. It doesn’t work for initial notifications, which are a special case of background notifications when your app is closed and you open it by tapping on the notification in notification center. The reason is that Android distinguishes two types of push notification message:
- Notification Message
- Data Message
The main difference is whether the message payload contains notification or data attribute. To send a notification that can be processed as initial notification, you would need to put data attribute into the payload, but I didn’t find out how to send Data message via Firebase console. You can find more details in the following links:
- About FCM messages | Firebase
- Receive messages in an Android app | Firebase
- android - How to handle notification when app in background in Firebase - Stack Overflow
- android - Firebase onMessageReceived not called when app in background - Stack Overflow
Hopefully, we can use the good old pure HTTP request via curl or Postman (Test FCM Notification with POSTMAN! - Android School - Medium) for example. Here is the curl command I use:
curl -X POST \
  https://fcm.googleapis.com/fcm/send \
  -H 'Authorization: key=SERVER_KEY' \
  -H 'Content-Type: application/json' \
  -H 'Host: fcm.googleapis.com' \
  -d '{
 "to" : "DEVICE_TOKEN",
 "data" : {
     "body" : "Body of Your Notification in Data",
     "title": "Title of Your Notification in Title",
     "key_1" : "Value 1",
     "key_2" : "Value 1"
 }
}'
There is documentation for the Firebase Cloud Messaging HTTP protocol.
When you run the command, you should get the notification into your Android. The notification should appear in system notification center and in the console log. Even if the app is not running, you should get the notification and see it as an initial notification in the browser’s console log after opening the app by tapping on the notification.
Summary
- Whichever React Native library you choose, you still need to know how to set up push notifications specifically for a given platform.
- There are various types of push notifications (foreground/background, local/remote - this article focuses on remote notifications, …).
- You can send push notifications for each platform by sending an HTTP request via
curlcommand. The difference is in the authentication mechanism with a certificate for iOS and Serve key for Android. The setup is vastly different for each platform. - Android:
- You have to create a project in Firebase console and add the Android app to get push notifications key. You can also add the iOS app, but it's not necessary. You would still need to set your APNs authentication key and register for remote notifications for iOS anyway.
- iOS:
- You must be enrolled in Apple Developer Program if you want to send remote notifications.
- You need to set your APNs authentication key or certificate and register for remote notifications in your project.
- It’s not possible to send a push notification into an app running on Simulator.
- You must be enrolled in Apple Developer Program if you want to send remote notifications.
I hope I provided you at least a good overview of what you need to know to use push notifications on both Android and iOS platforms via React Native library. My goal wasn’t to describe all the steps in detail but to put together pieces of information and links I’ve gathered while setting up push notifications.

Top comments (28)
Hi @jakubkoci , thanks a lot! This article helped me a ton!
On file PushNotificationsManager.js, I had to remove the Android OS check, right before the
Notifications.getInitialNotification(), in order to get the initial notification on iOS.Thanks, @rodrigo98rm , you're right. You saved me, I had an issue with it today 👍 I fixed it in the article.
when i runned my code i get this error
TypeError: Cannot read property 'refreshToken' of undefined
This error is located at:
in NavigationContainer (at DrawerNavigator.js:18)
in component (at SceneView.tsx:98)
i don't know if i am missing something but i followed every point of instruction
same issue here did find any solution???
With
how to access the token inside RootScreen without using Redux ?
With
, how to access the token inside RootScreen without using Redux ?
That's really a very much helpful one.
I've succeeded to integrate push notification in my react native application. Thanks.
One issue found with versioning of google services and min SDK versino, by upgrading all services and everything now works fine now.
i get this when i tried the first section of the code
typeError null:null is not an object evaluating.this.nativeCommandModule.refreshToken
can not ready refreshtoken of undefined
did you fix it ???
Me too, I'm having the same problem.
"react-native": "0.62.2",
"react-native-notifications": "^3.2.2",
how to access the token inside RootScreen without using Redux ?
Hello good article, also an excellent service for Push Notifications is with the INDIGITALL Service, it allows to send Push Notifications with also geo-located images, programmed among many more functions, here is the link of the documentation to install it easily: https: // docs.indigitall.com/es/
@jakubkoci great article! the instructions for sending PNs via the curl are awesome.
question, did you ever have any issues getting the ios event handlers to trigger? I've been using the react-native-notifications library for a couple weeks now and am running into some issues in iOS.
I opened a GH issue here if you have any time to look: github.com/wix/react-native-notifi..., if not, no worries!
Hello,
I have a quick question if you can help me please:
My react project is a simple Web view with integration of FCM notifications, and for that I have to send the token device by injection of javascript when calling the webview.
Anyone have an idea please?
Thank you