
Amazon Simple Storage Service (S3) and Amazon Elastic Compute Cloud (EC2) are two major storage services offered by AWS. But What are these services all about? What are they used for? and How can you use them? This article will respond to each of these questions.
A. SERVICES PRESENTATION
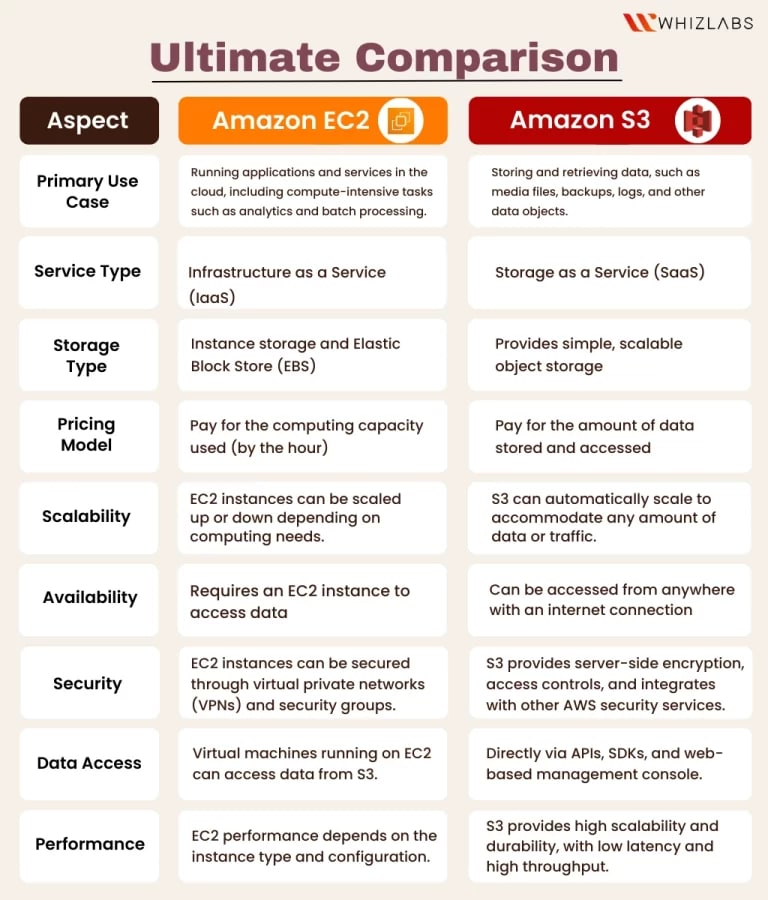
SE3:
An Amazon S3 bucket is a public cloud storage resource available in Amazon Web Services (AWS).Simple Storage Service(S3) is an object storage offering service. S3 is lightweight and provides the capability to store data. Having used Firebase for long I can say SE3 matches the firebase storage service.
EC2:
An Amazon EC2 instance is a virtual server in Amazon's Elastic Compute Cloud (EC2) for running applications on the Amazon Web Services (AWS) infrastructure. EC2 is a web service that provides secure, resizable computing capacity in the cloud. Do you know what are virtual machines and how they are used? Actually EC2 gives you the possibility to create a virtual machine.
B. COMPARING SE3 AND EC2
But when do we use each of these service? Hmmm, I found an amazing recap on this image.
C. CREATING AN SE3 INSTANCE
To follow the following steps, you have to create an AWS account.
i. Go to the AWS official website.

ii. Sign in to the console.

iii. Enter your credentials and login.

iv. Search for SE3 in the search bar and navigate to the console.

v. The next step is quite simple. Create a bucket.

Note: While naming your bucket, please choose a unique name. If not, the bucket will not be created and you will be prompted an error. So yeah, choose a unique name, as unique as you are....
Make no change on the configurations and create your bucket. Yeah, it is done. You have just created your first bucket.
But now, come on. As a cloud practitioner you will not only have to create buckets. You will have to upload data. Do you want to try it now? Let's give a try.......
UPLOADING A FILE IN A BUCKET(Optional)
a. Click on upload and select the file/folder you want to upload.

Congrats, it is done. You have just uploaded your file/folder. But question: Can you access this file from anywhere? To have the question, try and click on the link in the description box of your newly added resource. Can you access your resource? Ooooopppppsss! Mine is not working. Have a look at my error.

Do you know why we have this error ? The reason is simple; if you go back to your SE3 console you. will notice that all the public access are blocked by default. This is actually a security measure. You don't want anyone to access your data right? But if you want to make it public, you definitely have to change this default configuration.
To do it(Optional):
i. Click on the edit button.

ii. Uncheck the block public access and confirm.

Back to permissions, you will discover that the access parameter changed from all to Objects can be public.
Let's continue......
iii. Edit the Object Ownership. Here enable ACLs and confirm.

iv. Go back to the permissions.
Here you will notice that the Access control list(ACL) is editable. Click on the edit button and check the list and read.

Even once this step done, you can't still access your uploaded resource from the internet. Why? Because you have changed the bucket configurations and not the object's ones. To fix this, you have to follow the same steps for the objects. Are you ready? Don't worry, we are almost done.
v. Click on the object, go to permissions and edit Access control list.

Congratulations, you are done. Click on the link and let the magic happen. Can you access your resource now? What a question. Yes of course........
D. LAUNCHING AN EC2 INSTANCE
Stop asking yourself while this title is launching an EC2 instance instead of creating one. The reason is simple. On the AWS console, to create an instance, you just need to click on the launch button. But let's go gradually okay?
i. Search EC2 in the search bar.

ii. Launch an instance and let's go.

iii. Add a name and select the OS image you want.
I'll choose Windows OS. Why? Because I am using a MacOS and I want to show to you what to do in this case.

Once done launch the instance.
For MacOS(Optional)
a. Go to AppStore and download Microsoft Remote Desktop
iv. Go back to the EC2 Management Console and click on connect to your instance. Is it done? Okay.
v. Now connect using RDP client and download the remote desktop file.

vi. Create a key pair associated with the instance you are creating.
Why? Why not???? Actually, it is also a security measure. Only you should have the access key to your machine right? Once the key created, you will have to download it in your local storage.
vii. Open the .rdp file you have downloaded.

Now, you will have to enter a username and a password. The default username is Administrator. To have your password, decrypt the key you have downloaded when creating your key pair.

Once decrypted, you can access and copy your password and boom!!!!!!

You have a brand new machine created.
Congratulations. You have just created an EC2 instance.
Hey: Note please, you must always as a newbie terminate your instances and delete your resources..... Always do that, if not you may receive an unexpected bill.
It was a pleasure sharing this article with you. Do you have questions? Comment them out and I'll definitely help you through.

Top comments (0)