We will go step by step in order on how to set up and host a Full Stack application using React.js, Nginx, Strapi and MongoDB Atlas. We will be using DigitalOcean to host this application and MongoDB Atlas for a free database cluster.
FYI - We will not be interacting with the Strapi API via the React App in this tutorial. We will only be getting boilerplate code setup with Nginx, the rest will be up to you!
Steps:
- Create and Configure DigitalOcean Droplet
- Set up your domain name
- Set up Nginx and SSL using Let's Encrypt
- Create MongoDB Atlas Cluster
- Create and deploy a Create-React-App site
- Create and deploy a Create-Strapi-App API
Step 1 - Create and Configure DigitalOcean Droplet:
Your first step is to set up a DigitalOcean Droplet in the cloud to host the site and API on. You may use whatever cloud hosting provider that you want, but the steps may vary depending on the host you choose.
First, you need to create an account on DigitalOcean. You can use this link to get free 100$ credit, which expires 60 days after signing up. Keep in mind you will be asked for your credit card. As long as you don't spend all of the 100$ in free credit, or go over 60 days of hosting, you will not be charged.
Step 1.1 - Create a new droplet
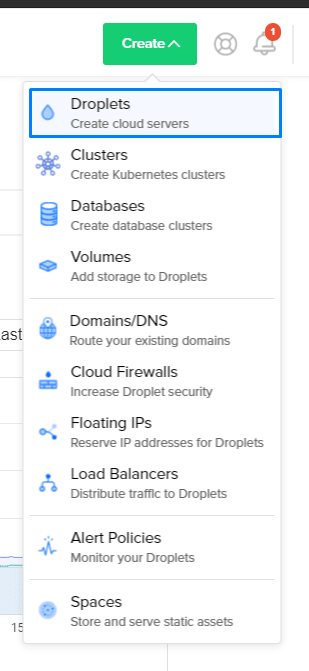
After creating your account and logging in, look at the navigation bar at the top, and click the button that says "Create". A drop-down menu will appear, click Droplets.
Under "Choose an image", make sure the "Distributions" tab is selected. For this application, we will be using Ubuntu - 18.4 (LTS) x64.
Next, you will choose your plan. For this specific application, we will be using the 10$mo plan. This is necessary for Strapi, their guide states "minimum of 2 GB/1 CPU".
Next, you're able to choose the location in which your site will be hosted. Generally, you will want to choose the site closest to those who will be accessing this site the most.
For the "Authentication" section, select "Password" and then enter a secure password which will be used to login to the root account for your server.
At "Finalize and create", you may change the hostname which as stated, helps you identify your droplet.
Then, select the project in which you want to create this droplet. Then hit the "Create Droplet" button.
After a couple of minutes (for DigitalOcean to set up your droplet). Your server is now up and running.
Step 1.2 - Login to the server
You will need to SSH into your server via your Terminal and use the root password you choose when setting up the droplet.
To SSH into the server you will need the IP address to your Droplet, navigate to your Droplet's dashboard by selecting "Droplets" on the left navigation bar, then select the droplet you just created. You will need the "ipv4" address, click on the address to copy it.
Now with the ipv4 address you copied from your Droplet's dashboard you will need to run this command in your terminal (Replace "droplet_address" with the ipv4 address you just copied):
ssh root@droplet_address
Upon running this command, you may receive a warning regarding host authenticity. If this occurs, accept the warning and provide your root password that you choose.
Step 1.3 - Create a new user
Setting up your server using the root superuser could lead to some accidental destructive actions, as the root user has the privilege to run any command. So to be safer while setting up your server, we will create a separate user (Replace "john" with whatever username you would like).
adduser john
Step 1.4 - Give the new user root privileges
You now have a new account with default account permissions, but these permissions will not be sufficient to set up the server. So we will give the account the option to run commands as root. After we add the user to the sudo group, you can prepend "sudo" in front of any command to run it as root (Replace "john" with whatever username you chose in the previous step).
usermod -aG sudo john
Now your new account has root permission, now enter the following command to login as your new user.
su - john
Step 1.5 - Set up Basic Firewalls
By default, Ubuntu servers have a basic firewall built-in called "UFW", which stands for "Uncomplicated Firewall". It's very simple to set up and will improve your server's security greatly.
You can see which applications UFW currently allows by typing:
sudo ufw app list
The response to the previously entered command should be:
Available applications
  OpenSSH
OpenSSH is a tool for remotely logging in with the SSH Protocol. This is necessary for us to login to your servers via SSH. We will need to allow these connections by typing:
sudo ufw allow OpenSSH
Then we will need to put your changes into action. To enable the firewall, type the following command:
sudo ufw enable
Press "y" and then "Enter" to continue. To verify that your firewall has been enabled and your changes occurred, check the status of the firewall by typing:
sudo ufw status
The output of this command should read:
Status: active

To                         Action      From
--                         ------      ----
OpenSSH                    ALLOW       Anywhere
OpenSSH (v6)               ALLOW       Anywhere (v6)
If that was the output you received, then so far you're on the right track to getting a Full-Stack application hosted. Next up, your second main step, setting up your domain name.
Step 2 - Set up your domain name
In this step, you will need to purchase a domain name from a domain name registrar. Some domain name registrars include but are not limited to GoDaddy, namecheap, and many others.
We will be using DigitalOcean to configure your domain and point your domain to the server. Look at the navigation bar at the top, and click the button that says "Create". A drop-down menu will appear, click Domains/DNS.
Once you click Domains/DNS, enter the domain name that you purchased from the third party registrar. Then click Add Domain.
After adding the domain, you will be redirected to a records page for the domain you entered. Assuming your domain isn't already pointing at the digital ocean name servers, you should see a box that says "What's next?". This means you need to point your domain to DigitalOcean's nameservers. DigitalOcean created a tutorial on how to point your domain to their nameservers from common domain registrars.
After changing your nameservers from your domain registrar, you will now be able to use DigitalOceans DNS records to point the domain to your server.
For the first record, enter "@" in the Hostname field, select your desired Droplet, and hit Create Record.
For the second record, enter "www" in the Hostname field, select your desired Droplet, and hit Create Record.
Step 3 - Set up Nginx and SSL using Let's Encrypt
Now that you have pointed your domain to the server. We need to host the React.js and Strapi app. We will be using Nginx.
Step 3.1 Install Nginx
In your terminal, ensure your SSH connection to the server hasn't been interrupted. Then run the following command to install Nginx:
sudo apt-get install nginx
After installation is complete, we will need to adjust the UFW (Firewall) to allow access to Nginx.
Step 3.2 Enable Nginx in UFW
Similar to how we enabled OpenSSH to allow for SSH connections. We will start by listing all applications by running:
sudo ufw app list
Assuming Nginx installed correctly, the UFW app list command should respond with:
Available applications:
  Nginx Full
  Nginx HTTP
  Nginx HTTPS
  OpenSSH
There are three possible Nginx profiles:
- Nginx Full - Allows for unencrypted and encrypted traffic
- Nginx HTTP - Allows for unencrypted traffic
- Nginx HTTPS - Allows for SSL encrypted traffic
Since we haven't set up Let's Encrypt, we will temporarily select "Nginx HTTP".
sudo ufw allow 'Nginx HTTP'
After allowing traffic for "Nginx HTTP", you can verify that the change was successful by running:
sudo ufw status
The output of this command should read:
Status: active

To                         Action      From
--                         ------      ----
OpenSSH                    ALLOW       Anywhere
Nginx HTTP                 ALLOW       Anywhere
OpenSSH (v6)               ALLOW       Anywhere (v6)
Nginx HTTP (v6)            ALLOW       Anywhere (v6)
Step 3.3 Testing Nginx web server
Nginx should already be running, this can be tested by checking the status of Nginx:
systemctl status nginx
You should get an output similar to this:
● nginx.service - A high performance web server and a reverse proxy server
   Loaded: loaded (/lib/systemd/system/nginx.service; enabled; vendor preset: enabled)
   Active: active (running) since Fri 2020-08-21 14:10:55 UTC; 2 days ago
     Docs: man:nginx(8)
 Main PID: 882 (nginx)
    Tasks: 2 (limit: 2361)
   CGroup: /system.slice/nginx.service
           ├─882 nginx: master process /usr/sbin/nginx -g daemon on; master_process on;
           └─883 nginx: worker process
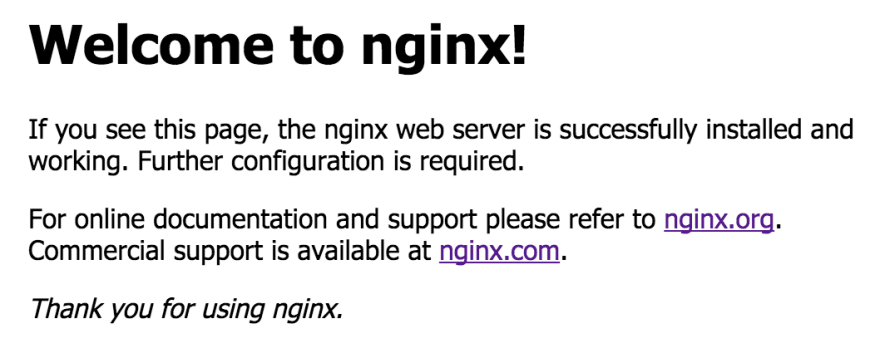
Now that we have confirmed the Nginx web server is up and running, we can take the test to the next level. In the browser of your choice, enter your droplets ipv4 address into the address bar.
Upon navigating to the servers IP address, you should see a "Welcome to nginx" page. That looks as follows:
Now that we have verified our web server is working as expected, we will configure our SSL certificates for your domain.
Step 3.4 Configure SSL certificates using Let's Encrypt and Certbot
Let's Encrypt is a non-profit certificate authority run by Internet Security Research Group that provides SSL certificates for encryption at no charge. We will be using Certbot to automate the process and make obtaining an SSL certificate a breeze.
We will install Certbot's repository by running:
sudo add-apt-repository ppa:certbot/certbot
Press Enter to accept the addition of this repository.
Then run the following command to install the Nginx specific Certbot installation:
sudo apt install python-certbot-nginx
Step 3.5 - Update Nginx Configuration for Certbot
Certbot needs to know which domains it will be including in the certificate.
Open the default configuration with nano or your text editor of choice by running:
sudo nano /etc/nginx/sites-available/default
Modify the "server_name" property to fit your domain:
server_name example.com www.example.com;
After changing the server_name, we should verify the configuration:
sudo nginx -t
We will also make some changes that will be necessary to get Strapi working.
Add in the following sections of code before the "location /" property:
    location /api/ {
        rewrite ^/api/(.*)$ /$1 break;
        proxy_pass http://strapi;
        proxy_http_version 1.1;
        proxy_set_header X-Forwarded-Host $host;
        proxy_set_header X-Forwarded-Server $host;
        proxy_set_header X-Real-IP $remote_addr;
        proxy_set_header X-Forwarded-For $proxy_add_x_forwarded_for;
        proxy_set_header X-Forwarded-Proto $scheme;
        proxy_set_header Host $http_host;
        proxy_set_header Upgrade $http_upgrade;
        proxy_set_header Connection "Upgrade";
        proxy_pass_request_headers on;
    }

    location /dashboard {
        proxy_pass http://strapi/dashboard;
        proxy_http_version 1.1;
        proxy_set_header X-Forwarded-Host $host;
        proxy_set_header X-Forwarded-Server $host;
        proxy_set_header X-Real-IP $remote_addr;
        proxy_set_header X-Forwarded-For $proxy_add_x_forwarded_for;
        proxy_set_header X-Forwarded-Proto $scheme;
        proxy_set_header Host $http_host;
        proxy_set_header Upgrade $http_upgrade;
        proxy_set_header Connection "Upgrade";
        proxy_pass_request_headers on;
    }
Also, if you plan to use react-router-dom on your React App, you may want to change the fallback webpage from "404" to "index.html". You could also create a location route for each react-router page you have, but obviously, as new pages are made, this will have to be updated each time.
    location / {
        try_files $uri $uri/ /index.html;
    }
Press CTRL + X to exit nano, then press Enter to save your changes.
Again, you will verify the syntax of your Nginx configuration:
sudo nginx -t
There is one more change we need to make regarding Strapi and Nginx, we need to update the upstream configuration for the Strapi server hosted on port 1337. Run nano on upstream.conf:
sudo nano /etc/nginx/conf.d/upstream.conf
Once you enter upstream.conf, enter the following code snippet:
upstream strapi {
    server 127.0.0.1:1337;
}
Press CTRL + X to exit nano, then press Enter to save your changes.
For a final time in this step, you will verify your Nginx configuration:
sudo nginx -t
Assuming no errors are found in the check, reload Nginx to initialize the new configuration:
sudo systemctl reload nginx
Step 3.6 - Update Firewalls to support Nginx HTTPS
Now we're almost ready to run Certbot, but there is one thing we need to do first. We need to change our UFW profile to allow Nginx Full since we will soon have SSL this is what we need.
sudo ufw allow 'Nginx Full'
Make sure to remove the previous HTTP Nginx profile from UFW.
sudo ufw delete allow 'Nginx HTTP'
Now we're ready to run Certbot and get the SSL certificates.
Run the following command with your domain in place of the placeholder values(You can use as many domains as you need, just make sure to prepend the "-d" to each domain):
sudo certbot --nginx -d example.com -d www.example.com
You will be prompted to enter your email address and agree to the terms of service. Then Certbot will ask you how you would like your HTTPS configured.
Please choose whether or not to redirect HTTP traffic to HTTPS, removing HTTP access.
-------------------------------------------------------------------------------
1: No redirect - Make no further changes to the webserver configuration.
2: Redirect - Make all requests redirect to secure HTTPS access. Choose this for
new sites, or if you're confident your site works on HTTPS. You can undo this
change by editing your web server's configuration.
-------------------------------------------------------------------------------
Select the appropriate number [1-2] then [enter] (press 'c' to cancel):
Select your choice, then hit Enter. The Nginx configuration will be updated and Nginx will automatically reload.
Option "2: Redirect" is the recommended choice, as it will ensure your site/API is always served over https.
Your site is now being served over HTTPS, verify this by navigating to the domain you have been using thus far.
https://domain-name.com
Step 3.7 - Check Certbot's Auto-Renew Feature
Let's Encrypt's SSL certificates are only valid for 90 days. So you will need to make sure Certbot can automatically renew this license. To test the renewal, run this:
sudo certbot renew --dry-run
If the dry-run successfully completed, Certbot will renew your certificate within 30 days of expiration (2 day check intervals).
Step 4 - Create MongoDB Atlas Cluster
Firstly, you will need to register for a MongoDB Atlas account.
Upon creating an account, you will be prompted to create a cluster (Set of databases). In this tutorial, I will be using the Free Cluster. But feel free to pick another tier, the setup will be the exact same.
Select the region that is closest to the region you selected for your DigitalOcean Droplet, doing so will minimize the time it takes for the server and database to interact.
The next settings are optional, I recommend you set a Cluster Name that is related to the project you will be building.
Once you modified the setting to your liking, click the "Create Cluster" button.
The database may take a couple of minutes to set up.

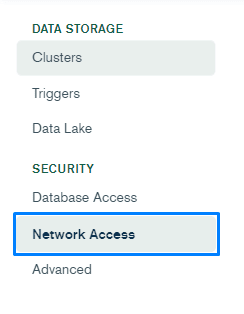
After the database finishes setting up, navigate to the "Network Access" page using the navigation on the left.
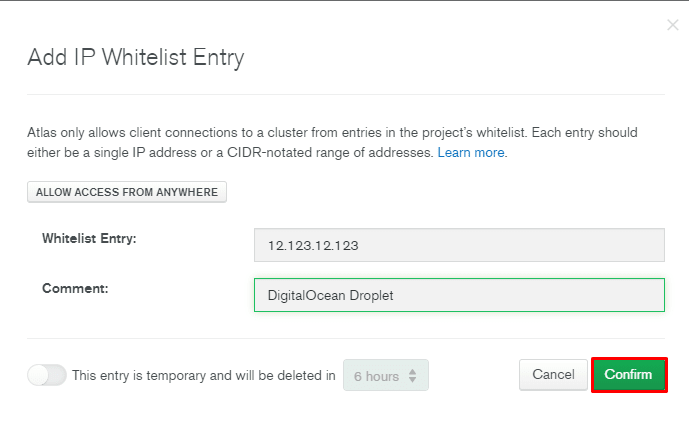
We will need to give our DigitalOcean server access to the MongoDB database. If any IP address could modify the database, that would be a major security risk. So to whitelist our servers IP, click the "Add IP Address" button.
Next, enter your servers ipv4 address and give it a name so you remember which IP it is. Once you have done that, hit "Confirm".
Now that we have set up our MongoDB Atlas Cluster, and given our server access to the database, we're ready to move on to the React app.
Step 5 - Create and Deploy a Create-React-App site
We will setup the react app on our machine locally and push production files to the server when we would like to make changes. But first, we must make a directory to contain those production files. Make sure to replace "domain.com" with your domain.
sudo mkdir -p /var/www/domain.com/html
After creating the directory, we will need to grant ownership of the directories to the user account that you've been using. The $USER environment variable is the account that you're currently signed into (Make sure you're not logged in as root).
sudo chown -R $USER:$USER /var/www/domain.com/html
Step 5.1 - Create a sample page
Now that we have set up the directory for the production files, let's verify that everything is working by creating a basic HTML file.
First, create the file by running:
nano /var/www/domain.com/html/index.html
Then enter the following contents into the html file:
<html>
  <head>
    <title>Domain.com testing!</title>
  </head>
  <body>
    <h1>The placeholder html file is working!</h1>
  </body>
</html>
Press CTRL + X to exit nano, then press Enter to save your changes.
Step 5.2 - Update the Nginx configuration
Now that we have created a new directory to serve web files from, we need to let Nginx know that it will be serving files from "/var/www/domain.com/html" instead of the default directory "/var/www/html"
To do this, we will need to open the Nginx configuration file again by running:
sudo nano /etc/nginx/sites-available/default
You will be modifying the root directory. You can search for text by pressing Press CTRL + W, enter "root" and then press Enter. You will need to change the root line so that it reflects your domain/directory.
root /var/www/domain.com/html;
Press CTRL + X to exit nano, then press Enter to save your changes. Then we will verify the Nginx configuration syntax again by running:
sudo nginx -t
Assuming no problems were found, we will then put our changes into effect by restarting Nginx:
sudo systemctl restart nginx
Now visit your website in the browser of your choice to verify that Nginx is serving the index.html we entered.
https://domain.com
You should see this page:
If that works, we're ready to import react production files.
Step 5.3 - Generate a Create-React-App on your local machine
If you already have a react app setup, you can skip to Step 5.4.
To create a react app on your local machine ensure you have npm and node installed, navigate to the desired directory, replace "your-site" with your site's name and run one of the two commands below:
NPX:
npx create-react-app your-site
Yarn:
yarn create react-app your-site
After the react app finishes installing, you can test the application on your local machine to ensure the site is working correctly. To do this, make sure you're in your projects parent directory by running (Replace "your-site" with your site's name):
cd your-site
Then start the react application by running:
npm run start
When the application starts, you will see a message similar to the one below:
Compiled Successfully!

You can now view your site in the browser.

Local: http://localhost:3000/
On Your Network: http://12.123.12.123:3000

Note that the development build is not optimized.
To create a production build, use yarn build.
Now navigate to http://localhost:3000/ to view your react app.
Step 5.4 - Create a production build to push to the server
Now you're ready to replace the sample index.html file we created earlier with a production build of your react site. Firstly, we need to generate the production build by running:
npm run build
Once this completes, we have the files needed for Nginx to serve our users, but the files are still on our local machine, so we will need to push these files to the server. We can do that using SCP by running (Make sure to replace "user", "server_ip_address", and "domain.com"):
scp -r ./build/* user@server_ip_address:/var/www/domain.com/html
After the file transfer completes, open your browser of choice, and navigate to your domain. You should see the create react app boilerplate page (Shown below).
Now we will make it easier to deploy a production build of react to the server by adding a "deploy-production" script.
Open the "package.json" in your react app (local machine).
In the "scripts" section, add in a "deploy-production" script as shown below (Make sure to replace "user", "server_ip_address", and "domain.com"):
"deploy-production": "react-scripts build && scp -r ./build/* user@server_ip_address:/var/www/domain.com/html"
Once you have added in the "deploy-production" script, your scripts section should look like so:
"scripts": {
  "start": "react-scripts start",
  "build": "react-scripts build",
  "deploy-production": "react-scripts build && scp -r ./build/* user@server_ip_address:/var/www/domain.com/html",
  "test": "react-scripts test",
  "eject": "react-scripts eject"
},
Make some changes to the react app on your local machine, then run the "deploy-production" script in the root directory of your react app to ensure everything is working properly.
Step 6 - Create and deploy a Create-Strapi-App API
We will start by creating a directory for the Strapi application to live in, SSH into the DigitalOcean droplet and run the following command:
sudo mkdir -p /var/www/domain.com/strapi
After creating the "strapi" directory, you will navigate to the directory by running:
cd /var/www/domain.com/strapi
Now that we're in the "strapi" directory, you will create your Strapi app by running one of the two commands:
NPX:
npx create-strapi-app . --quick-start
Yarn:
yarn create strapi-app . --quick-start
Upon running the previously listed commands, you will be greeted with two installation options, we will be choosing the second option, "Quickstart". Navigate using the up arrow, and down arrow, select an option by pressing Enter.
? Choose your installation type
 ❯ Quickstart (recommended)
   Custom (manual settings)
Step 6.1 - Configuring Strapi for MongoDB
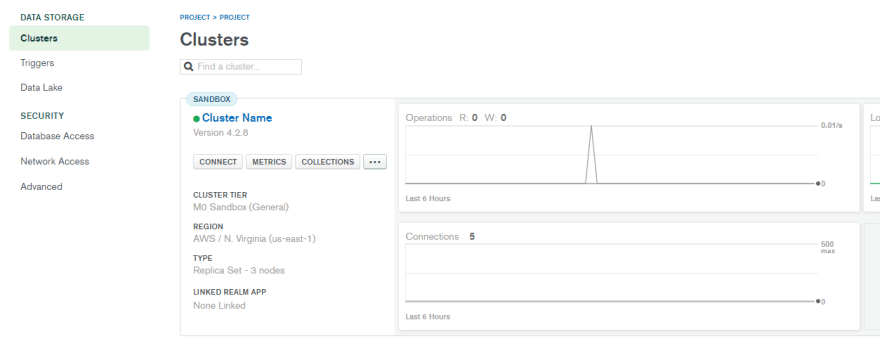
You will now navigate to the MongoDB Atlas website, make sure you're logged in. Navigate to your clusters dashboard.
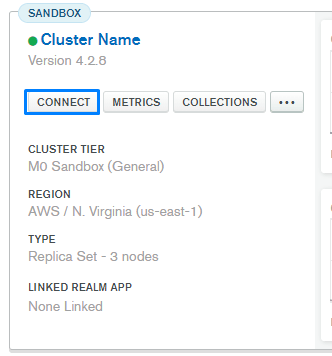
Then click on the connect button for your desired cluster.
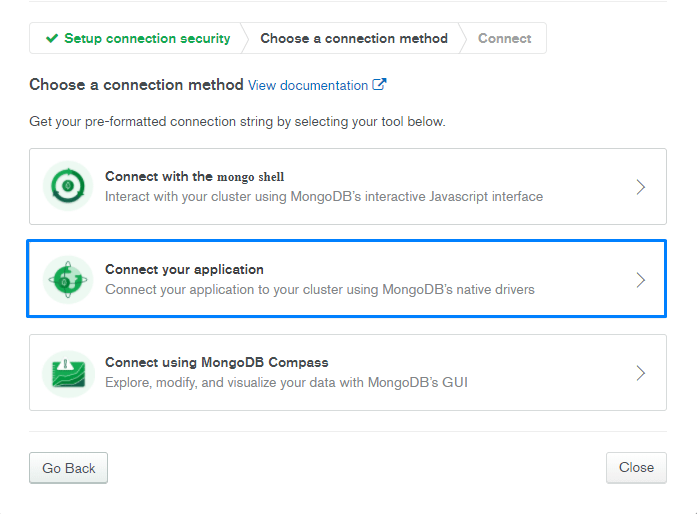
Select "Connect your application".
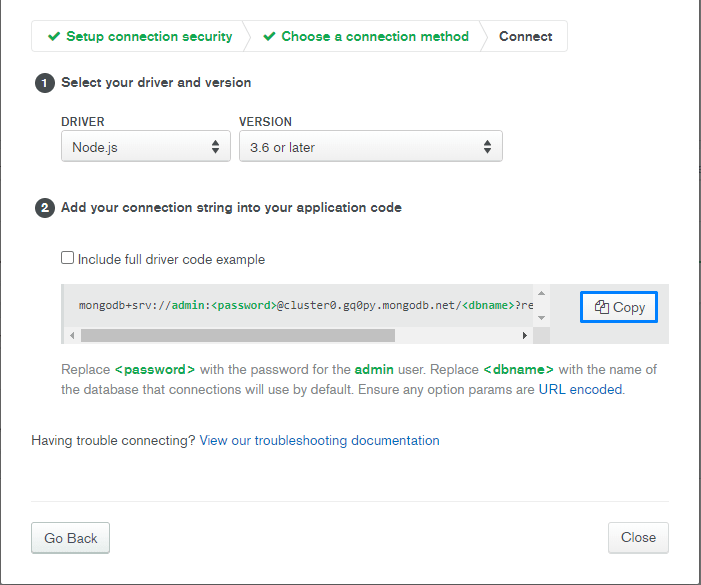
Click the copy button to save the connection string to your clipboard. Make sure to replace the password with your MongoDB Atlas password. If you're going to be pushing this code to a public repository, make sure to store this connection string in an .env!
Now that we have the MongoDB Atlas connection string, navigate to the "database.js" configuration files by running:
nano /config/database.js
Update your database.js to look like the following configuration, make sure to replace "your-connection-string" with your MongoDB Atlas connection string that you just got:
{
  defaultConnection: "default",
  connections: {
    default: {
      connector: "mongoose",
      settings: {
        uri: "your-connection-string"
      },
      options: {
        ssl: true
      }
    }
  }
}
Press CTRL + X to exit nano, then press Enter to save your changes. Then we will edit the server.js file:
nano /config/server.js
Your server.js configuration file should look similar to the configuration listed below (Make sure to replace "domain.com" with your domain, and generate a JWT to place in the secret property):
{
  host: '0.0.0.0',
  port: 1337,
  url: 'https://domain.com/api',
  admin: {
    url: 'https://domain.com/dashboard',
    auth: {
      secret: "enter-your-jwt-here",
    },
  },
}
Step 6.2 - Create and run a production build of Strapi
Now that we have configured Strapi to work with MongoDB and Nginx, we should be ready to create a production build and run Strapi:
npm run strapi build
Then start strapi using that build:
npm run strapi start
After starting strapi, you should see a message similar to the one below:
 Project information

┌────────────────────┬──────────────────────────────────────────────────┐
│ Time               │ Mon Aug 24 2020 19:13:10 GMT-0500 (Central Dayl… │
│ Launched in        │ 25432 ms                                         │
│ Environment        │ development                                      │
│ Process PID        │ 17512                                            │
│ Version            │ 3.1.3 (node v12.16.1)                            │
│ Edition            │ Community                                        │
└────────────────────┴──────────────────────────────────────────────────┘

 Actions available

Welcome back!
To manage your project 🚀, go to the administration panel at:
http://localhost/api/admin

To access the server ⚡️, go to:
http://localhost/api
To log into Strapi, in the browser of your choice, visit the following webpage:
https://domain.com/dashboard
You should be greeted with a signup page, enter your desired email and password, and signup. After logging in with your new signup, you should see the Strapi dashboard:
Click on the image below to view a tutorial on setting up Strapi.
After setting up some types and entering some data, navigate to your domain followed by the type name to fetch the data (Replace "type-goes-here" with the type name) in the browser of your choice.
https://domain.com/api/type-goes-here
Assuming you entered some data and correctly typed the collection type, you should get a response similar to the following JSON:
Conclusion
Now that you have two boilerplates (React & Strapi) setup with Nginx, you get to decide how you would like to implement the two. Hopefully, this tutorial was easy to follow and you had no trouble getting to this point. Please leave any suggestions you have for me in the comments below as this is my first article/tutorial.










Top comments (8)
If youre here because youre seeing
E: Unable to locate package python-certbot-nginxwhen running
python-certbot-nginxYou'll want to instead install the python3 flavored certbot instead
Great tutorial and thank you for your work.
It's good enough for people to kick start their own project.
I have a suggestion for so called a "best practice". May u make a tutorial for strapi again?
deploy it on AWS, and split it into dev/staging/production mode for management.
By using pre-set config for nginx security on digitalocean.com/community/tools/n...
besides, PM2 for application online 24/7. what do u think?
I like it! That's a very good idea. I should've included something regarding pm2 for managing the application.
btw, I've followed along this tutorial, and I think some of the commands are missing(install nodejs) or need to replace.
sudo apt install python-certbot-nginx>sudo apt install python3-certbot-nginx
I think there's a slight mistake in Step 5.4 that had me figuring out the error for so long. The command should be:
scp -r ./build/* user@server_ip_address:/var/www/domain.com/react/
Because the folder react/ was used as the root directory in the nginx config file and not the html/ folder. Hope it helps anyone who gets stuck here.
I didn't catch this... Thanks for pointing it out!
Hey Amit,
It really shouldn't differ once you get an ubuntu server setup. Because an Ubuntu instance is just an Ubuntu instance and as long as you use the same version there shouldn't be any issues.
I just created an account to thank you for this tutorial