
Amazon Amplify is a set of tools that provides user authentication, storage, hosting, and other backend services for your web and mobile apps. In combination with AWS Cognito, it enables you to build a secured user authentication service that can perform several operations, such as user registration, account verification, account recovery, and many others.
Amazon Amplify provides an easy-to-use authentication flow for your web and mobile applications, and a few social sign-in methods which are Facebook, Google, Amazon, and Apple.
While, NextJS is a React framework that provides amazing features such as faster page loads, server-side rendering, image optimization and many more for your web application.
In this article, I will guide you on how to do the following:
- Set up Google sign-in in a Next.js app.
- Add Amazon Amplify to your Next.js app.
- Install Tailwind CSS to a Next.js app.
- Implement an Email authentication service with Amazon Amplify.
- Implement a protected Dashboard page.
- Implement Google sign-in with Amazon Amplify.
How to set up Google sign-in in a Next.js app
Before you can implement Google sign-in in a Next.js app, you will first of all have to do some configurations that will allow you to add Google authentication, by providing you with the necessary authorization keys.
The steps are as follows are available at Amplify Social sign in Docs. You'll find all the information to generate a Client ID and Client Secret needed for the project. And, here is the summary:
🚀 Visit Google Cloud Platform.
🚀 Click Select a project and create a new project.
🚀 Input the project name and create the project.
🚀 Click OAuth consent screen to configure the project and publish the app.
🚀 Click Credentials from the sidebar and select Create OAuth Client ID.
🚀 Click ADD URI, under Authorized JavaScript origins.
🚀 Add http://localhost:3000 as a URI.
🚀 Click Create to generate a Client ID and Client Secret for the project.
🚀 Save the Client ID and Client Secret for later use.
How to add Amazon Amplify to your Next.js
To make use of Amazon Amplify, you have to install the CLI, which allows you to create AWS cloud services for your app.
🚀 Open your terminal.
🚀 Install and configure AWS Amplify CLI by running the command:
# Install via NPM
npm install -g @aws-amplify/cli

# Configure Amplify and add your IAM user credentials
amplify configure
🚀 Run npx create-next-app@latest --ts and it takes as an argument the app's name, so it can be anything you want to name your app.
npx create-next-app@latest --ts nextjs-amplify-auth
🚀 cd into your Next.js project root folder and run the code below:
amplify init
Amplify CLI will ask you some questions about your project and you can keep the default configuration.
🚀 Run the code below to configure Amplify authentication in your Next.js folder.
amplify add auth
Same as the previous step, Amplify command line will ask you some questions:
Using service: Cognito, provided by: awscloudformation

 The current configured provider is Amazon Cognito.

 Do you want to use the default authentication and security configuration? Default configuration with Social Provider (Federation)
 Warning: you will not be able to edit these selections.
 How do you want users to be able to sign in? Email
 Do you want to configure advanced settings? No, I am done.
 What domain name prefix do you want to use? CHOOSE a name
 Enter your redirect signin URI: http://localhost:3000/dashboard/
? Do you want to add another redirect signin URI No
 Enter your redirect signout URI: http://localhost:3000/
? Do you want to add another redirect signout URI No
 Select the social providers you want to configure for your user pool:
Google
🚀 After configuring Amplify Auth, deploy it to your AWS account with the following command:
amplify push
After that, you also need to install the following dependencies:
npm install aws-amplify @aws-amplify/auth
In ./pages/_app.tsx, replace the whole content by:
import '../styles/globals.css'
import type { AppProps } from 'next/app'
import awsExports from "../src/aws-exports"
import Amplify from "aws-amplify"

Amplify.configure(awsExports);

function MyApp({ Component, pageProps }: AppProps) {
  return <Component {...pageProps} />
}

export default MyApp
How to Install Tailwind CSS 3 to a Next.js project
🚀 Install Tailwind CSS by running the command:
npm install -D tailwindcss postcss autoprefixer
🚀 Create tailwind.config.js and postcss.config.js configuration file by running:
npx tailwindcss init -p
🚀 Copy and paste the code below into the tailwind.config.js:
// tailwind.config.js
module.exports = {
  content: [
    "./pages/**/*.{js,ts,jsx,tsx}",
    "./components/**/*.{js,ts,jsx,tsx}",
  ],
  theme: {
    extend: {},
  },
  plugins: [],
}
🚀 Inside styles/global.css file replace the content by the following code:
@tailwind base;
@tailwind components;
@tailwind utilities;
How to Implement an Email Authentication service with Amazon Amplify
To demonstrate email authentication with Amazon Amplify and AWS Cognito, I will be creating three routes which will signify:
🚀 Sign up page with email verification
🚀 Sign in page
🚀 Dashboard page
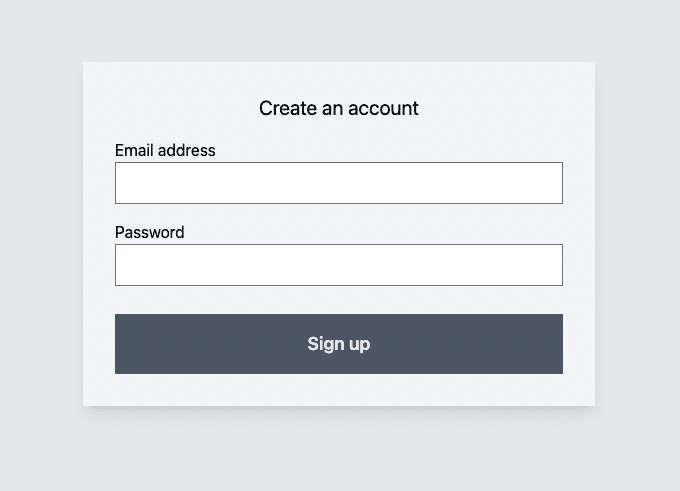
Sign up page
This page allows users to create an account with their email and password.
import { useState } from "react";
import { Auth } from "aws-amplify";

const SignUp = () => {
  const [email, setEmail] = useState("");
  const [password, setPassword] = useState("");

  const handleSignUp = async (e: React.FormEvent) => {
    e.preventDefault();

    try {
      await Auth.signUp({
        username: email,
        password,
        attributes: { email },
      });
    } catch (err) {
      console.error(err);
    }
  }

  return (
    <main className="bg-gray-200 h-screen flex items-center justify-center">
      <form className="max-w-lg w-full bg-gray-100 shadow-lg p-8 flex flex-col">
        <p className="text-xl mb-4 text-center">Create an account</p>

        <label htmlFor="email">Email address</label>
        <input
          id="email"
          value={email}
          type="email"
          className="border py-2 px-4 border-gray-500 focus:outline-none mb-4"
          onChange={(e) => setEmail(e.target.value)}
        />

        <label htmlFor="password"> Password</label>
        <input
          id="password"
          value={password}
          type="password"
          className="border py-2 px-4 border-gray-500 focus:outline-none mb-4"
          onChange={(e) => setPassword(e.target.value)}
        />

        <button
          className="mt-3 text-lg font-semibold py-4 px-4 bg-gray-600 text-gray-200"
          type="submit"
          onClick={handleSignUp}
        >
          Sign up
        </button>
      </form>
    </main>
  );
}

export default SignUp;
- From the code snippet above,
Authinimport { Auth } from "aws-amplify";provides us several functions such as sign-in, sign-up, confirm password, etc. - The
signUp()function accepts the user's email and password. It creates an account for the user via theAuth.signUp()function.
Confirm Sign up page
After the user signing up, inside the same route, the user can verify his email address.

...
  const [email, setEmail] = useState("");
  const [password, setPassword] = useState("");
  const [newUser, setNewUser] = useState(false);
  const [verificationCode, setVerificationCode] = useState("");
  const router = useRouter();
...
  const handleSignUp = async (e: React.FormEvent) => {
    e.preventDefault();

    try {
...
      setNewUser(true);
    } catch (err) {
      console.error(err);
    }
  }
...
  const handleConfirmSignUp = async (e: React.FormEvent) => {
    e.preventDefault();

    try {
      await Auth.confirmSignUp(email, verificationCode);

      await router.push('/signin');
    } catch (err) {
      console.error(err);
    }
  }
...
  <form className="max-w-lg w-full bg-gray-100 shadow-lg p-8 flex flex-col">
  {newUser ? (<><p className="text-xl mb-4 text-center">Verify your email</p>

  <label htmlFor="verificationCode">Verification code</label>
  <input
    id="verificationCode"
    value={verificationCode}
    type="text"
    className="border py-2 px-4 border-gray-500 focus:outline-none mb-4"
    onChange={(e) => setVerificationCode(e.target.value)}
  />

  <button
    className="mt-3 text-lg font-semibold py-4 px-4 bg-gray-600 text-gray-200"
    type="submit"
    onClick={handleConfirmSignUp}
  >
    Confirm
  </button></>) : (<><p className="text-xl mb-4 text-center">Create an account</p>
...
- Inside
handleSignUpfunction, we added the following linesetNewUser(true);to display the account validation instead of sign up page. - The
confirmSignUp()function validates the user's email address. The validation code is sent after the user signing up and it's needed to activate the account. If successful, it redirects the user to the sign in page.
Sign in page
When the user has already an account, he can sign in to the application with the following Next js page.

import { Auth } from "aws-amplify";
import { useRouter } from "next/router";
import { useState } from "react";

const SignIn = () => {
  const [email, setEmail] = useState("");
  const [password, setPassword] = useState("");
  const router = useRouter();

  const handleSignUp = async (e: React.FormEvent) => {
    e.preventDefault();

    try {
      await Auth.signIn(email, password);

      await router.push('/dashboard');
    } catch (err) {
      console.error(err);
    }
  }

  return (
    <main className="bg-gray-200 h-screen flex items-center justify-center">
      <div className="max-w-lg w-full bg-gray-100 shadow-lg p-8 flex flex-col">
        <p className="text-xl mb-4 text-center">Sign in to your account</p>

        <form className="flex flex-col" onSubmit={handleSignUp}>
          <label htmlFor="email">Email address</label>
          <input
            id="email"
            value={email}
            type="email"
            className="border py-2 px-4 border-gray-500 focus:outline-none mb-4"
            onChange={(e) => setEmail(e.target.value)}
          />

          <label htmlFor="password"> Password</label>
          <input
            id="password"
            value={password}
            type="password"
            className="border py-2 px-4 border-gray-500 focus:outline-none mb-4"
            onChange={(e) => setPassword(e.target.value)}
          />

          <button
            className="mt-3 text-lg font-semibold py-4 px-4 bg-gray-600 text-gray-200"
            type="submit"
          >
            Sign in
          </button>
        </form>
      </div>
    </main>
  );
};

export default SignIn;
- From the code snippet above, the
signIn()function sign-in users into the application after validating if an account exists with the exact email address and password. - When the email address and the password is correct, the user will automatically redirects to the dashboard page.
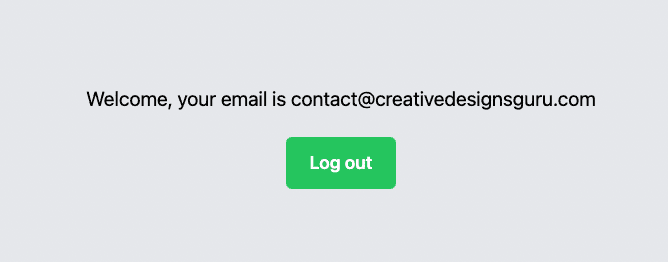
Dashboard page
The dashboard page simulates an authenticated page, it only displays when the user is authenticated.
import { Auth } from "aws-amplify";
import { useRouter } from "next/router";
import { useEffect, useState } from "react";

const Dashboard = () => {
  const [user, setUser] = useState<any | null>();
  const router = useRouter();

  const handleLogOut = async () => {
    await Auth.signOut();

    await router.push('/signin');
  };

  useEffect(() => {
    const getProfile = async () => {
      const userInfo = await Auth.currentUserInfo();

      if (userInfo) {
        setUser(userInfo);
      } else {
        await router.push('/signin');
      }
    };

    getProfile();
  }, [router]);

  if (!user) {
    // Currently loading asynchronously User Supabase Information
    return null;
  }

  return (
    <main className="bg-gray-200 h-screen flex flex-col items-center justify-center">
      <p className="text-xl mb-4">Welcome, your email is {user.attributes.email}</p>

      <button
        className="mt-2 text-lg text-white font-semibold bg-green-500 py-3 px-6 rounded-md"
        onClick={handleLogOut}
      >
        Log out
      </button>
    </main>
  );
};

export default Dashboard;
- From the code snippet above, this is a protected route that is available to only authorized and authenticated users.
- The
signOutfunction sign out users out of the application and the user is redirected to the sign in page.
How to Implement Google login with Amplify
With Amplify Auth and AWS Cognito, we can easily enable Google authentication. Users can sign in to the application with just a click using a valid Gmail account.
Here is a code sample:

...
  const handleSignInWithGoogle: MouseEventHandler = async (e) => {
    e.preventDefault();

    Auth.federatedSignIn({ provider: CognitoHostedUIIdentityProvider.Google });
  };
...
  <p className="text-xl mb-4 text-center">Sign in to your account</p>

  <button
    className="text-lg text-white font-semibold bg-blue-500 py-3 px-6 rounded-md focus:outline-none focus:ring-2"
    onClick={handleSignInWithGoogle}
  >
    Sign In with Google
  </button>

  <hr className="bg-gray-600 border-0 h-px my-8" />

  <form className="flex flex-col" onSubmit={handleSignUp}>
...
-
Auth.federatedSignIn()accepts a string containing the provider key, it states the social sign-in method.
Conclusion
Amazon Amplify with Cognito is a tool that enables you to create and deploy well-secured full-stack web applications in minutes. Amplify has a robust authentication service; provides storage, data, and many more for your web applications.
If you want to build a scalable Next.js web application and deploy it in a few minutes, Amazon Amplify may be your preferred choice. It provides many powerful features that you can utilize and build upon to suit your needs.
For a real and live use cases, you also need to implement the following:
- Password recovery
- Password recovery confirmation
- Email modification
- Password modification
Instead losing your time to implement yourself, you can also checkout my React SaaS Boilerplate is the perfect starter kit to launch your SaaS faster and better with a complete authentication. Fully built on AWS and Amplify, it uses Cognito, Lambda, AWS CDK, etc. Leveraging all AWS ecosystem.

Top comments (1)
Please hi don't understand this code