
An authentication with tokens became a must-have feature for modern web apps. It suits natively to single page applications and mobile applications. While Spring is de facto starndard in Java ecosystem, there are developers, who prefer to use alternative solutions. This is true, because Spring is quite heavy platform and there is a number of lightweight and fast microframeworks. Javalin is a popular choice - it started from well-known SparkJava project. However, microframeworks offer to developers barre toolbox, often limited to HTTP request/response handling. All other functionality, such as security, is out of scope. Which means, that we have to implement it manually.
This article provides an overview of an implementation of token based authentication (JWT authentication) for REST API, written with Javalin microframework. There is the solution, but it may not be the best option - in particular if you need more flexibility or you need to have more control on authentication. For that, you may be interested to continue reading this post.
App architecture
In this post we will observe a simple task management application. It is organized in as REST API and has two main endpoint groups: auth (signup/login) and tasks. protected/tasks endpoint is secured with JWT - user has to attach an Authorization header with a valid token and userId. I will not go through each component, as you can access a full source code yourself in this github repository. Instead, we will concentrate on how to work with tokens and implement auth endpoints. Take a look on the graph below, which demonstrates an app's architecture:

As I mentioned before, in this article we will review:
- UserController component (deals with HTTP requests)
- UserService and its implementation (contains a business logic, related to auth flow)
- TokenManager and its implementation (the component, that generates and asserts tokens).
Generate tokens
In this post we will use jjwt library to work with tokens. An alternative solution is to use on Nimbus Jose-JWT - you can learn more in my post about two-factor authentication for Webflux, where I used it. To generate tokens we first need to have a secret key. Usually, you app will read it from configuration, but in a sample we can rely on generate value:
public JjwtTokenManagerImpl() {
    this.key = Keys.secretKeyFor(SignatureAlgorithm.HS256);
}
The process of issuing new tokens is very straightforward with jjwt library. All you need is to specify those params, you want to include in the token's payload. In the simplest case it will be just userId value, although you can add other claims:
@Override
public String issueToken(String userId) {
    String token = Jwts.builder().setSubject(userId).signWith(key).compact();
    return token;
}
Validate tokens
In order to access protected routes, user have to provide two headers: token and userId. Therefore, TokenManager.authorize() method is responsible for token assertion.
@Override
public boolean authorize(String token, String userId) {
    try {
        String subject = Jwts.parserBuilder().setSigningKey(key).build().parseClaimsJws(token).getBody().getSubject();
        return subject.equalsIgnoreCase(userId);
    } catch (Exception ex){
        throw new ForbiddenResponse();
    }
}
Signup
First we need to create a user, before she/he can access task APIs. To do so, the client sends an email and password to the /signup endpoint. Here we need to implement following steps:
- Get email and password from request's body (AuthRequest)
- Create a new User with email and password
- Save user entity to the database
- Obtain userId
- Issue a new token for this user
- Return to the client successful AuthResponse object with the token and userId value
For the controller'part we need to implement steps 1 and 6, while steps 2-5 are handled by the service. Take a look on the code snippet, that provides a code of UserController.signup() flow:
public void signup (Context context){
    AuthRequest request = context.bodyAsClass(AuthRequest.class);
    AuthResponse result = service.signup(request);
    context.json(result);
}
Note, that Javalin provides a Context object to abstract work with HTTP requests/response. It also has methods like bodyAsClass() to serialize JSON body to Java entity and json() to send back a response with JSON data. Next, let check how to perform steps 2-5 in the UserServiceImpl implementation. Here is a code:
@Override
public AuthResponse signup(AuthRequest request) {
    String email = request.getEmail();
    String password = request.getPassword();
    User user = repository.signup(email, password);
    String userId = user.getUserId();
    String token = manager.issueToken(userId);
    AuthResponse response = new AuthResponse(userId, token);
    return response;
}
You can now run the app, and test, that the signup flow does work:

Login
After we created a new user record in the database, we can do login. From a technical point of view, we have to implement these steps:
- Get email and password from request's body (AuthRequest)
- Find in the database a User with the same email
- In case, that user does exist - assert that passwords do match
- Issue a token
- Return to the client successful AuthResponse object with the token and userId value
- If user does not exist or passwords do not match - return AuthResponse with success = false
Again, we separate a process into two parts: the controller delas with HTTP request/response and the service to do business logic. Take a look on the controller implementation below:
public void login (Context context){
    AuthRequest request = context.bodyAsClass(AuthRequest.class);
    AuthResponse result = service.login(request);
    context.json(result);
}
Generally, the controller code, looks similar to the previous one, as it only does request/response handling. Steps 2-4 are defined in the service's part. Here is how it is done:
@Override
public AuthResponse login(AuthRequest request) {
    String email = request.getEmail();
    String password = request.getPassword();
    Optional<User> result = repository.findByEmail(email);
    if (result.isPresent()){
        User user = result.get();
        String passwordInDatabase = user.getPassword();
        if (password.equalsIgnoreCase(passwordInDatabase)) {
            String userId = user.getUserId();
            String token = manager.issueToken(userId);
            AuthResponse response = new AuthResponse(userId, token);
            return response;
        } else {
            throw new ForbiddenResponse();
        }
    } else {
        throw new ForbiddenResponse();
    }
}
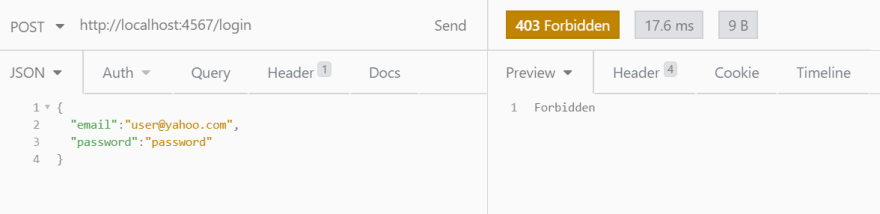
Take a look on that code snippet. You could note, that if user is not presented or if wrong password was supplied, application interrupts a flow with ForbiddenResponse. This is a special type of exceptions from Javalin, that are mapped to HTTP response codes and that simplify development. For example, let try to login a user with wrong password:
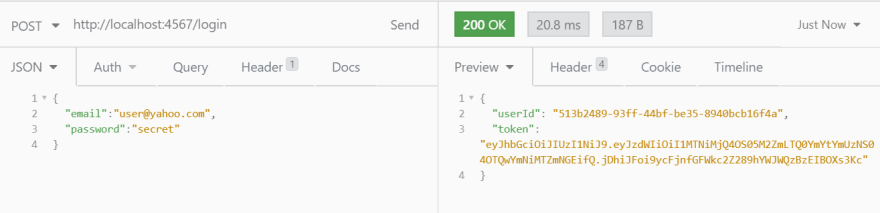
Finally, we can do a testing to verify that the login process works as we planned. Let call login endpoint with valid credentials:
Everything is up and running! That is all for this post. You can find the full source code, including protected endpoints implementations in this github repository. Feel free to experiment with it. If you have questions regarding this post, you can ask them in comments below or contact me.


Top comments (0)