
Since stepping into the role of Team Lead at my current place of employment, I have perfected a technique for leading scrum-based development teams through planning and delivering features*.* In this blog post, I will walk you through the 9 steps you should take, starting from the very first time you hear an idea from the product owner through to when the new feature is released.
Real world scenario
Let’s say I work for a company that provides a time tracking app (think of Toggle or Clockify). Imagine that one of the most requested features for the app is an advanced Reports page where users can see a breakdown of time spent on various projects. Using this scenario as an example, I will demonstrate how to deliver software effectively in 9 steps!
Overview of Steps
- Somebody proposes a new feature (this could be a UX team member, product owner, customer, etc.)
- The UX team creates mockups and wireframes for the new feature
- The UX team, product owner, and the Team Lead discuss the mockups to make sure that it’s clear how the feature is supposed to work
- The Team Lead and the product owner show the mockups to the development team
- The Team Lead drafts the initial plan for how to build the feature and deliver it to customers
- The Team Lead shares the plan with the team, who help to refine it
- The team estimates each task in the plan
- The team plans their sprints
- The team sprints until the feature is released to customers
Roles involved
- Product owner
- UX team or an individual designer
- Team Lead (a.k.a tech lead)
- Development team
1. UX proposal
After doing some research and design, the UX team proposes the following wireframe for the new Reports page:

The designer creates a wireframe
2. Product owner meets the Team Lead
The product owner describes the proposal and shows the wireframes to the Team Lead. Before accepting the work, the Team Lead verifies the following:
- The wireframes don’t miss anything crucial
- What the expected outcome is, in terms of business goals
- Which metrics should be tracked
- Whether there are any other specific requirements
Before proceeding, the product owner and the Team Lead work with the UX team to clarify any of the points above. The Team Lead must have a sufficient* understanding of the requirements of the new feature and the desired outcome.
*In my experience, it is often the case that no one has a complete picture of the proposed solution (or even the problem!) before the development team starts planning how to build the new feature or even before they ship the first iteration.
3. Team Lead Meets the Development Team
The Team Lead then presents the proposal for the new feature to the development team, making sure the big picture makes sense to everyone. At this time, the team is encouraged to ask any clarifying questions. There is no implementation planning at this point.
It’s a good idea to include the product owner in this meeting so they can listen to your version of the proposal and make sure it lines up with their vision. This way, everyone gets on the same page!
Once the team has an idea of what’s coming down the pipeline, the Team Lead starts working out an initial plan.
4. Team Lead Creates a Plan
This section describes the holy grail approach for quickly building and delivering large features when you are running a team of several developers. I will show you how to break down the requested feature into smaller tasks which can be worked on simultaneously by several team members.
To start the initial plan, the first thing I do is copy-paste the wireframe provided by the UX team into a Google drawing and outline the major UI components that the team will need to build for the new feature:

Team Lead outlines future Angular components over the wireframe
There are a couple of benefits to outlining the future components in this way (especially if your front-end is built using a component-based framework such as Angular or React):
- The outlined components suggest the names you will use in the code so when you get to work on the task, you can jump into writing the code for the component instead of thinking how to name it
- The outlined components show what pieces we need to build overall
- When the feature is broken down into individual tasks and you’re working on one of those tasks, this outline is very convenient for looking up how the component you’re building fits into the bigger picture. Especially useful for bigger projects!
So here is an example of the initial plan that I would write for implementing the new Reports page for our time tracking app:
- Scaffold the new Reports page
- Scaffold the data service for the new Reports page
- Build component: daterangepicker
- Build component: bar-chart
- Build component: summary
- Build component: pie-chart
- Build interactions on the new Reports page
- Build analytics gathering for the new Reports page
- Test the new Reports page and adjust if needed
- Polish the UI of the new Reports page
- Release the new Reports page to customers
It really starts as simple as that: Just a few bullet points in a plain text, usually written in a Google doc so it can be easily shared and edited.
I don’t involve the team in writing the initial plan just yet. (They are usually busy with whatever else is going on in the sprint.) It’s much more efficient if I come up with some initial way to build the feature and then show it to the team as a starting point. We then figure out together whether the plan makes sense and what we can do to improve it.
The way those tasks are laid out in the plan is crucial for successful execution. I will go over each task in detail in the “Sprint execution” section. The next step is to show this plan to the team.
5. Team Lead Shares the Plan with the Team
The Team Lead shares the plan with the team to figure out whether the approach makes sense and how to improve it. After the discussion, the initial plan might change somewhat as the team’s shared experience shapes up a better way of delivering the feature to customers.
Once everyone agrees on the plan, it’s time to go over each task, fill in the details, estimate the effort, and plan out sprints.
6. Team Estimates Tasks
Next, the team works through the list of tasks from the plan and figures out how much effort it will take to complete each task. Before I ask the team to estimate the task (which is done via planning poker), I write down all the things I think it will take to implement this task. Then I ask the team to see if I missed anything. (This all happens during a teleconference meeting while I’m sharing my screen with the Google doc.)
After a discussion, we usually have all the points listed for the task and then each developer gets to vote on how much effort they think the task will take. We use story points for this, but your team can use whatever estimation technique fits the team.
The details that we figure out together for each task always include bullet points about what needs to be done as well as examples of the previously completed similar pieces of code, links to relevant files in GitHub, or links to articles on Medium or whatever else would help the person who gets to work on the task.
Below is the example of what the first task looks like after we figure out how to build it and estimate the level of effort (assuming the app is built using Angular):
Task: Scaffold the new Reports page
- Add a new Angular module: “report”
- Add a new Angular router path: “/app/report”
- Add a new Angular component: “report”
- The new page should be accessible in production by visiting the URL path
- The existing UI should not link to the new Reports page so that no customers can discover it yet
- (link to the existing router config in GitHub for an example)
- Story points: 3
The amount of detail spelled out for each task depends on the task’s complexity and risk, as well as the team’s overall experience working on similar tasks. One benefit of this activity is that the team learns more about the feature that they need to build and how individual tasks make up the whole.
Going over the entire list of tasks in a single sitting is a daunting job. Usually, after going through a few tasks, the team will get tired, distracted, and eager to get back to their day. I have found that limiting the planning/estimation meeting to 30 minutes, twice a week (usually right after our short scrum meetings) is far more effective. This way, the planning meeting doesn’t take much time from the developers’ day and by the time the next sprint starts, we have all the tasks estimated and discussed and ready to go. An added bonus: The final planning meeting before the next sprint is usually very quick!
Once, the team figures out the details and the level of effort for at least a few tasks, it’s time to start taking these tasks from the Google doc into the tracking system (e.g., Jira) and put these tasks into the sprint backlog.
7. Sprint Planning
At this stage, the Tech Lead converts the tasks from the Google doc into tickets in the tracking system (e.g. Jira) used by the team. Creating the tasks in the tracking system after the plan is solidified in the Google doc saves a lot of time. You don’t have to deal with renaming/updating stuff in the tracking system because you already did it in the doc!
An example of Jira sprint planning board after the task has been created, based on the Google doc:
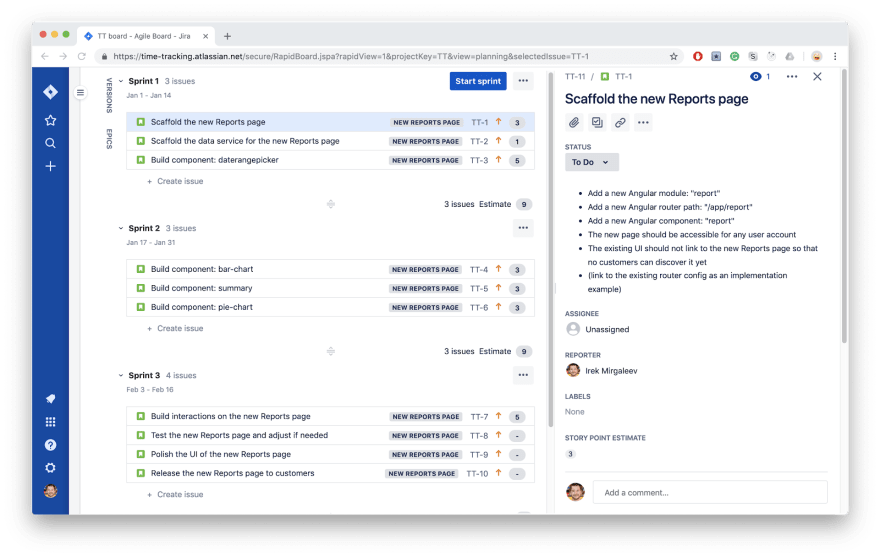
Planned out sprints to deliver the new Reports page
As your team continues doing the estimation sessions a couple of times every week, your sprint planning board gets filled with tasks with specified details and estimated effort. This is a sure recipe to make your product owner happy. Looking at this board makes it easier for them to prioritize the work if there is something else the team needs to work on. It also helps the product owner estimate the delivery date for the feature.
The next step is to start building the damn thing!
8. Sprint Execution
Now let’s go over all the tasks required to deliver the new Reports page in more detail.
Task: Scaffold the new Reports page
Scaffolding the new Reports page creates a common area that will contain all the UI that the new feature will provide. For example, if you’re using Angular, this means declaring a new route path and an empty component that represents the new page. Having the new page scaffolded allows developers to see how the components fit together as they are building and adding them to the page.
Task: Scaffold the data service for the new Reports page
The data service is meant to provide all the data that the entire page will need. In our example this includes:
- Daily hours tracked for all projects for the bar-chart component
- The summary of total hours tracked per project for the summary component
- The percentage of hours tracked per each project for the pie-chart component
At the time when the developers add this data service to the codebase, it will not have any functionality yet. Continue reading to see how this initially empty data service comes into play when developers start building individual UI components.
Tasks: Build component: *
These tasks include building all the UI components that the new Reports page will contain (daterangepicker, bar-chart, summary, and pie-chart, etc). This is where the scaffolded page and the data service come into play. As developers build individual components, they have the page to display those components and the data service to implement all the data fetching/preparation functionality.
The best part about having a scaffolded dedicated data service for the page is that even if the backend is not yet ready to output real data, you can stub the service methods with the mock data and continue building the component without waiting for the backend. Then, when the backend becomes available, you just replace the mocked data with real API calls. This allows the team members to work on these tasks in parallel without stepping on each other’s toes. For example, in our case, four developers can pick up the four tasks (daterangepicker, bar-chart, summary, and pie-chart components, respectively) and build them simultaneously!
Task: Build interactions on the new Reports page
This task involves all the click-and-hover state handling. Typically, when you hover over individual data points in the bar and pie chart, it shows a tooltip with info such as the ‘data point value’ and ‘date.’ Or when you click on the date range, it should pop a date range picker with a calendar. And when you pick a new date in the calendar, it would reload all the data on the page. (This would be a whole other component but I omitted it to keep things simple.)
If there is a lot of interaction that needs to be implemented, then this task should be broken down into more, smaller tasks based on the expected behavior.
Task: Build analytics gathering for the new Reports page
This task involves tracking the business metrics associated with the new feature. Remember, we’re adding the new Reports page to satisfy some kind of business goal. This task requires clarifying what that goal is / what exactly the product owner wants to track on the new page.
This might include:
- Recording whether users are visiting the new Reports page at all
- Recording the most popular date range that users select via the daterangepicker component
- How many projects the new Reports page usually displays for an average user
Whatever these metrics are, you’ll need to make sure to set up the data collection before the feature is released to all customers.
Task: Test the new Reports page and adjust if needed
Testing the new Reports page is necessary because when multiple developers work on various parts of the new feature, it’s easy to miss something as you put the pieces together. In my experience, when you start poking at the new feature as a whole, you always find something that no one anticipated. For example, perhaps the user has 1000 projects to show on the new Reports page and now when you’re giving it a try, it won’t load at all. Or perhaps the pie-chart component was added after the daterangepicker component, and now the pie-chart won’t refresh properly as the user changes the date range! This task is about catching these types of bugs and fixing them.
It’s best to perform this task after all the pieces have been built and released to production behind a feature flag (or a secret URL parameter, or whatever technique you use to hide the work-in-progress stuff from customers). This way, you can load the new Reports page for any customer account in production and see what it looks like when presenting the real data.
Task: Polish the UI of the new Reports page
Developers should not be bothered by nitty-gritty design details while building out the pieces of the new Reports page. There should be 0 minutes spent on fiddling with margins, paddings, colors, or type fonts until all of the core functionality is in place. This allows the team to focus on what’s absolutely essential to deliver the new feature.
After the core functionality is in place, the team can then go to work adjusting and polishing all the small things that make the page look awesome!
(This approach has worked exceptionally well for me for delivering features within budget and on time!)
Task: Release the new Reports page to customers
At this point, the new page is fully tested with real-world data in production and the looks are polished. So the job now is to present the new page to customers! This might mean adding a menu item that will point to the new page, or swapping the existing Reports page with the new one; it really depends on your preferred mechanism of releasing new features to customers.
When the sprint starts, everyone can grab a task at the same time. The very first couple of tasks are just for scaffolding the new page and the data service so they are usually finished very quickly before the rest of the developers make any significant progress on the (more complex) tasks that depend on the scaffolded page and the data service. That is, building individual components such as daterangepicker or the charts.
So when the two scaffolding tasks are finished, they are merged into the master branch right away and the rest of the team updates their feature branches and gets their scaffolded page and data service available to use with their components.
As the Team Lead, you have some essential responsibilities during sprint execution. These responsibilities are outlined below.
Responsibility: Help the team see the big picture
Help the team with whatever questions come up regarding their individual tasks. Since they are busy with their tasks, sometimes it is harder for them to see the bigger picture and how their piece fits into the whole. So your job is to help them understand this better and answer whatever questions they may have.
Responsibility: Resolve blockers
If somebody learned that their task, Task B, depends on another task, Task A, your job is to make sure that somebody (or you!) makes Task A a first priority. Completing Task A will unblock the team member who is trying to complete Task B.
Responsibility: Review code
Review the code produced for each task to make sure it works as expected.
Responsibility: Help the team stay focused
Make sure that everyone stays on track and that they are not trying to solve any problems that fall outside the scope of their assigned tasks. If you are a developer, you probably know the feeling when you start discovering that your task is going to take a lot more work than you initially thought.
For example, if you’re working on the “Build component: daterangepicker” task, you might think that the user might want to specify the date range down to an hour, not just the date (e.g. 2pm to 3pm). This might lead to adding this extra functionality to the daterangepicker component which will take extra time and energy. The problem here is that this extra functionality was not included in the original scope of the task and we don’t know for certain whether the users would even want it. So the Team Lead’s job here is to make sure that developers don’t try to solve every unexpected problem, overengineer, and delay the project. In other words, the Team Lead makes sure that the team focuses on what’s absolutely necessary to build the feature and ensures they don’t get distracted by things that are out of scope.
Responsibility: Work on a couple of tasks yourself
As the Team Lead, it is essential that you also work on a couple of tasks during the sprint. I find it quite challenging to make the time for this but it is well worth it. Otherwise, it might feel like you just tell everyone what to do but contribute nothing yourself (which might not be ideal for team morale). Besides, by building a few things yourself, you get the real sense of what it really takes which is an invaluable experience for the Team Lead.
Responsibility: Retrospect
This responsibility is related to the “Resolving blockers” point but it’s more about the process overall rather than unblocking individual tasks. Sprint retrospective is the ideal mechanism for getting together with the team and finding patterns that prevent the team from delivering value.
For example, one of the biggest sources of wasted time that I’ve seen is when a developer takes a long time to address feedback on their code (e.g., a pull request on GitHub). You can see it when you look at a pull request that has a few comments from other developers but there has been no activity addressing this feedback for the past 3 days. That means the task will be shipped 3 days later than it could’ve been! The solution to this is to encourage the team to address feedback as soon as possible to get the task out the door.
Responsibility: Demo
As the team crunches through the tasks, more and more pieces come together and you start seeing how the whole feature is shaping up. This is the perfect time to show some of that to the product owner and the UX team for early feedback. This helps get everyone on board with the latest development. Sprint demo is a great way to conduct this activity.
When the tasks representing the core functionality (shown below) are finished, it’s time to wrap it up and release the feature to all customers.
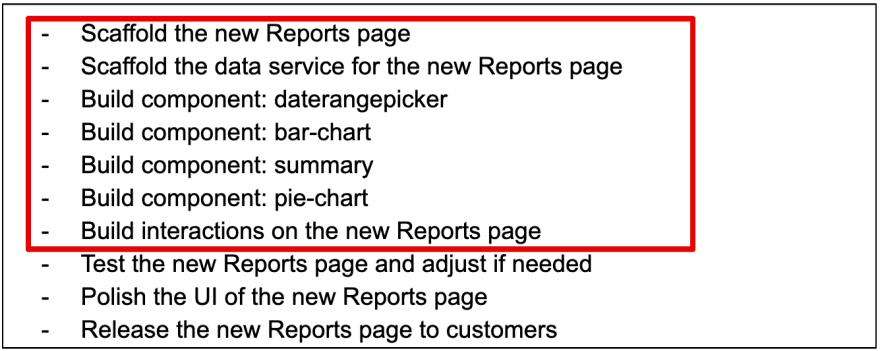
Tasks representing core functionality
9. Test, Polish, Release
At this point, the core pieces are complete and now it’s time to test that everything is hooked up properly and working as expected. At the same time, somebody can start working on polishing the appearance of the new Reports page. This includes all of the little tasks that the team was deferring in order to focus on the core functionality: All the margins, paddings, colors, shades, etc. As the part of the same task, the team asks the UX and the product owner for feedback and the final confirmation that they are happy with what they see and get the approach for the release to all customers.
And the last task is to get this in front of your customers. Depending on your situation, this might mean adding the link to the new Report page in the main menu so the users see it and click on it. This might also involve some marketing activity as well.
You might think this would be the end of the story but it never is.
Maintenance
Getting the initial version of the feature out in the wild is just the beginning. After that comes learning whether it works as customers expect, fixing some missed use cases, adjusting other little things you might have missed and just generally learning how well the feature is received.
The feedback from customers and stakeholders sets the future development of the newly introduced feature. This might mean many things including turning the feature into something completely different or even scrapping it altogether. This is just a reality of software development.
Conclusion
In this blog post, you learned how to take the idea from your product owner and lead your development team to build and deliver it in the most effective way. I showed how to prepare and breakdown a big feature into small tasks that can be worked on by several developers in parallel. I also demonstrated how to ensure a successful execution once everyone is in full swing trying to build the thing.
Main takeaways:
- Prepare the initial plan before involving the team. This way you’ll have a starting point for the planning discussion which will be a much better use of your team’s time.
- Make sure you understand the requirement and overall expected outcome of the new feature before you involve the team.
- Do not put any tasks into the tracking system (e.g. Jira, Trello) from the Google doc until the team filled in details and estimated the task. This will save time adjusting tasks in the tracking system in case if your initial plan changes.
- Help the team to stay focused on the agreed scope and avoid chasing rabbit holes
- Spread planning sessions for the next sprint throughout the current sprint to avoid all day planning meetings. This is especially relevant to teams where members are spread out across many time zones.

Top comments (1)
Thanks for this, Irek. Definitely worth referring back to regularly!