EHR (Electronic Health Record) systems are modeled in a proprietary format/structure and are not based on market models such as FHIR or HL7. Some of these systems can interoperate data in a proprietary format for FHIR and other market models, but others can not. InterSystems has two platforms that can interoperate proprietary formats for market ones: InterSystems HealthShare Connect and InterSystems IRIS for Health. The transformation functionality (DTL - Data Transformation Language) of these platforms can receive data in any format, structure, or communication channel (CSV, JSON, XML, and others via FTP, File, HTTP, etc.) and transform it into market formats directly (FHIR, CDA, HL7 and so on). However, InterSystems has an intermediate format called SDA (Summary Document Architecture) which is used by these platforms to effortlessly generate FHIR STU, R3, R4, HL7v2, HL7v3, and others. In addition, when in SDA format, health data can be persisted in the HealthShare UCR. Thus, first, the proprietary/custom format is transformed to SDA, and then the data can be automatically converted into any market format, as well as saved in HealthShare. In this article, we will show you how to transform proprietary/custom data into SDA using IRIS for Health. The sample data we used was generated by the SYNTHEA bulk data generation project (https://synthea.mitre.org/downloads). We will convert 1000 patients from a CSV file to SDA, using the Interoperability features of IRIS for Health.
Article support application – custom2sda
Install the sample application that will be used with this article by following the instructions:
If you want to install using ZPM:
1. Open IRIS Namespace with Interoperability Enabled.
2. Open Terminal and call: USER>zpm "install custom2sda"
If you want to install using Docker:
1. Git clone and pull the repo into any local directory:
$ git clone https://github.com/yurimarx/custom2sda.git
2. Open the terminal in this directory and run:
$ docker-compose build
3. Run the IRIS container with your project:
$ docker-compose up -d
4. Open the production (http://localhost:52775/csp/healthshare/user/EnsPortal.ProductionConfig.zen?PRODUCTION=customsda.CustomToSDAProduction) and start it. (user _SYSTEM and password SYS). It will read patients.csv and convert it to SDA.
Create a CSV Record Map to get the custom/proprietary data
In the previous step, you ran the production that read the patients.csv and turned it into SDA. Now we will do the same with patients2.csv. We could take advantage of the current production, but I would like to demonstrate how to create everything from scratch. So, stop this production, and let's do the following.
1. Go to Management Portal (http://localhost:52775/csp/sys/%25CSP.Portal.Home.zen?$NAMESPACE=USER, make sure you are in the User namespace).
2. Create a CSV Mapper for the patients2.csv. Interoperability > Build > CSV Record Wizard:

Note: Select CRLF for Record Terminator
3. Click Create RecordMap to open the Record Mapper UI and change the Target Classname to customsda.Patients2RecordMap.Record:
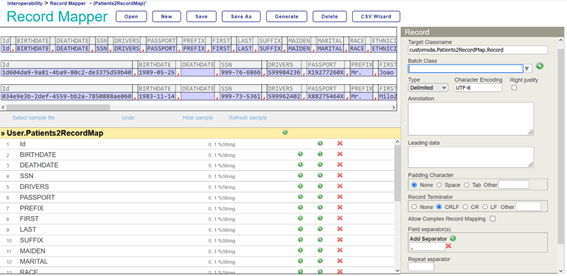
4. Select BIRTHPLACE and set MAXLEN=200 in the Datatype Parameters field. By default, all %String fields store 50 characters, but BIRTHPLACE and ADDRESS need more space. Do the same for ADDRESS:

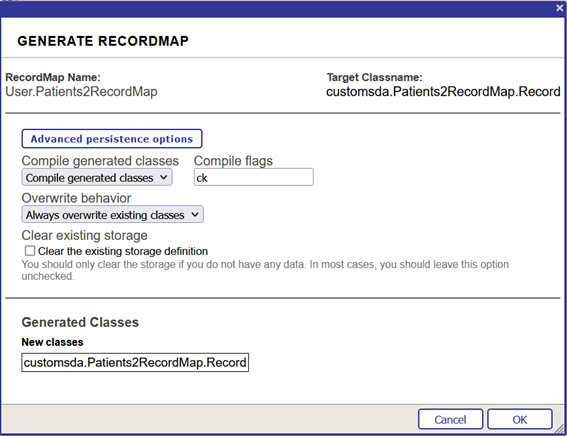
5. Click the Save button and Generate button. Accept default options and click Ok to Generate RecordMap classes.
6. Click Interoperability to go to the next tasks:

Create the Data Transformation from Custom to SDA
It is time to use the DTL to visually build the transformation map from custom to SDA.
1. Click Interoperability > Build > Data Transformations > Go button:

2. You can see the Data Transformation Builder here. Click the New button:
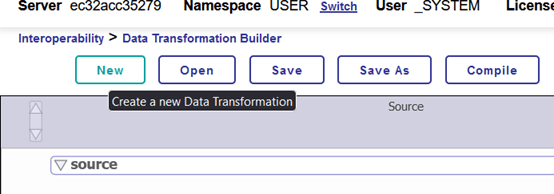
3. Change the Data Transformation Wizard set Package to customsda, and the Name to PatientDTL2:

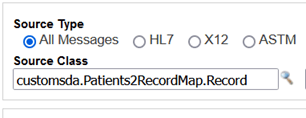
4. At this point, we will set Source Class. Click the magnifier icon near the Source Class field:
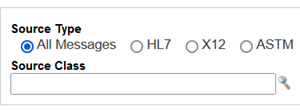
5. Click Message Classes > customsda > Patients2RecordMap > Record:

6. At this stage, the Source Class should look like this:
7. In the Target Type section, select XML and accept Target Class with the value EnsLib.EDI.XML.Document:

8. Select the Magnifier icon near the Target Document Type and click XML Document > SDA3_schema > Container:
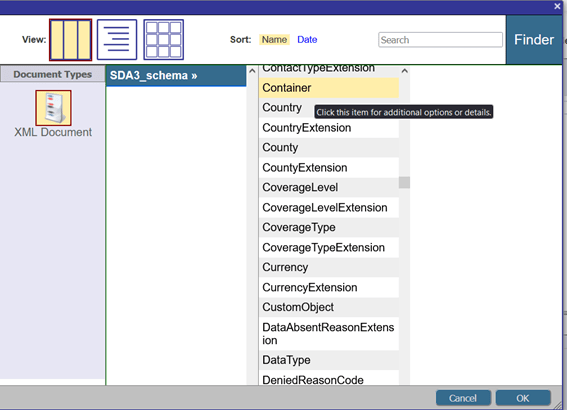
Note 1: Container is the root element for all SDA elements, like Patient.
Note 2: for SDA3_schema to be available the following actions are needed:
Copy SDA3_schema.xsd to your local file system:

Import the SDA3 XSD Schema:

9. Now, when the source and target are configured, click the OK button:

10. Now we have the source and target fields available for visual mapping:

11. To create a transformation, you need to drag the circle of the source field and drop it into the arrow of the target field, line by line.

12. In the Actions section, you can see the set results:

13. After mapping all the fields, your actions list will look like this:

Note: for properties with (), you need to set the index because those properties can have more than one item. In this sample we have only one address, so target.{Patient.Addresses(1)….} is configured with 1.
14. Click the Save button and Compile button.

15. Finally, click the Interoperability shortcut to go to the Interoperability menu:
![]()
Create the Interoperability Production, the last artifact to complete our work!
Productions are the mechanisms used to effectively automate integration flows. It’s time to create our output to transform the patient data in the patients2.csv file to SDA.
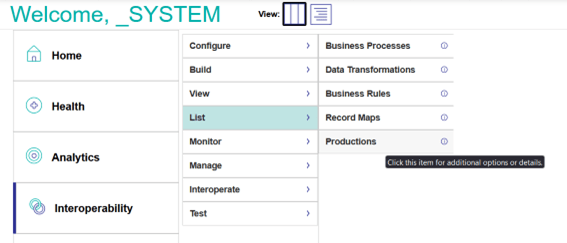
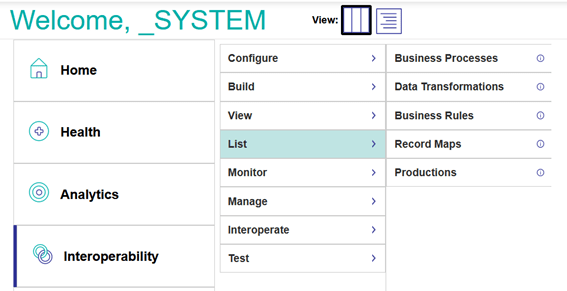
1. Click Interoperability > List > Productions:
2. Click the New button:
.png)
3. Set customsda to Package, Patients2Production to Production Name, and Production Type to Generic. Click Ok:

4. Now we have the Production Configuration:

5. Click the Plus button near Services:

Note: Services are the components used by productions to get source data.
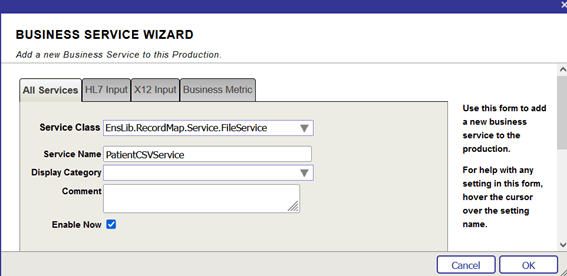
6. Configure the Service Class with the value EnsLib.RecordMap.Service.FileService, and Service Name as PatientCSVService, and check Enable Now:
7. Select PatientCSVService and configure the Settings tab with
the values and click the Apply button:
● File Path: /opt/user/data/
● File Spec: patients2.csv
● RecordMap: Patients2RecordMap
● Target Config Names: PatientProcess

8. Click the Plus button located near Operations:
Note: Operations are production components used to write/persist data on a target (databases, systems, API, Web Services, FTP, File, etc.)
9. Configure the Operation with these values:
● Operation Class: EnsLib.EDI.XML.Operation.FileOperation
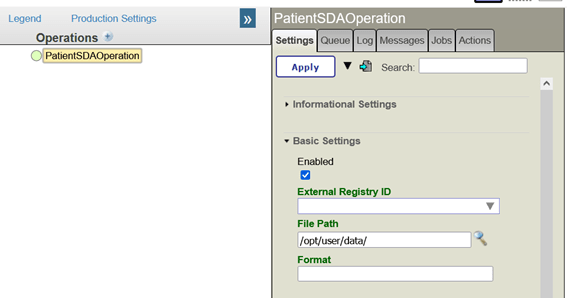
● Operation Name: PatientSDAOperation
● Check Enable Now

10. Select the PatientSDAOperation and set the value /opt/user/data/ to the File Path and click the Apply button:
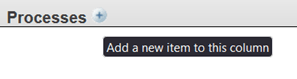
11. Click the Plus button next to Processes:
Note: Processes are the production component to coordinate the data flow.
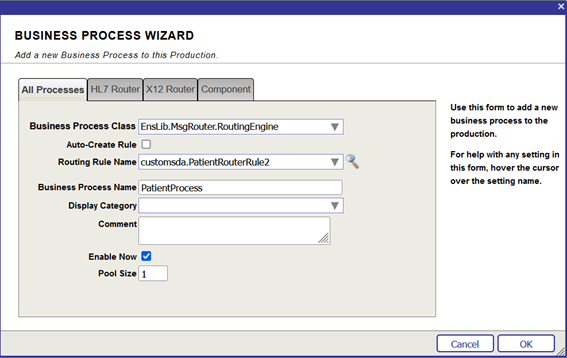
12. Configure the Business Process with these values:
● Business Process Class: EnsLib.MsgRouter.RoutingEngine
● Routing Rule Name: customsda.PatientRouterRule2
● Business Process Name: PatientProcess
● Check Enable Now
13. So far, we have got all components created:

14. Select PatientProcess and go to Settings tab > Magnifier icon near Business Rule Name:

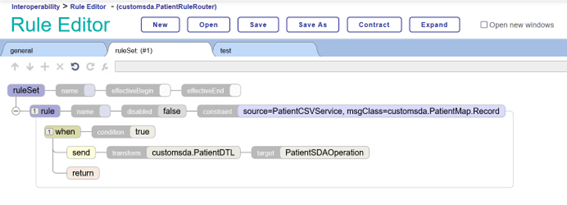
15. Now we will configure the Routing Rule into Rule Editor:
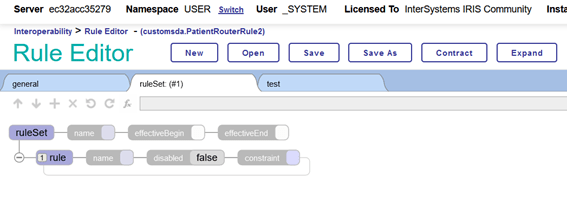
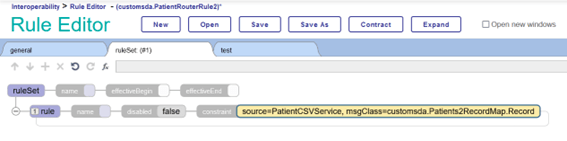
16. Do a double-click on the constraint component and configure Source with PatientCSVService and Message Class with customsda.Patients2RecordMap.Record:

17. Currently, we have source and target configured:
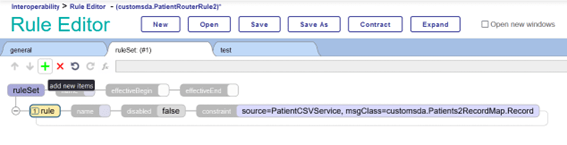
18. Select rule component and click the Green Plus button:
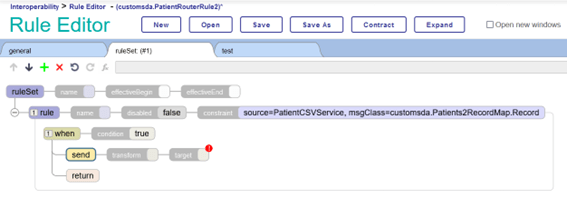
19. Select Send to create a When component:

20. Select When component, click the Green Plus button, and select Send component:

21. You are supposed to see the picture displayed below on your screen:
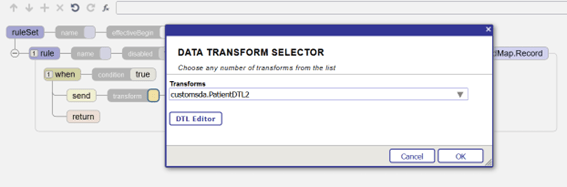
22. Do a double-click on the target component and set Configuration Items to PatientSDAOperation, then click the OK button:

23. Do a double-click on the transform component and set Transforms to customsda.PatientDTL2, after that click OK:
24. Now, you have your Rule definitions ready:
25. Click the Save button and Go to the Interoperability menu:

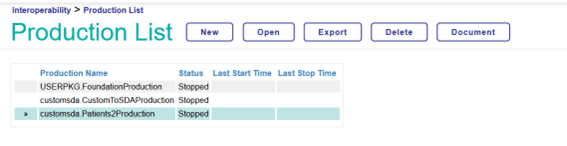
26. Go to Interoperability > List > Productions:
27. Select Patients2Production and click the Open button:
28. We will run our new Production! Click the Start button:

29. Select PatentProcess and Go to the Messages tab to see the results (messages):
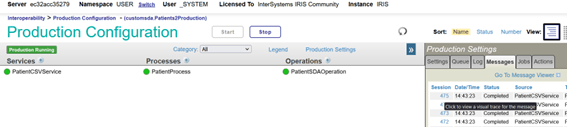
30. Click on a message to see a Sequence Diagram with the transformation results:
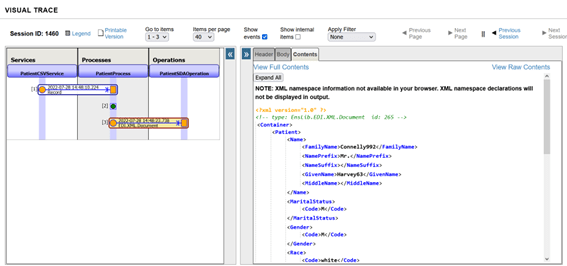
As you can see, it is an easy and fully visual drag-and-drop process, which transforms custom messages to SDA or other formats. Learn more about it by checking these links:
1. Building Basic FHIR Integrations with InterSystems IRIS for Health: https://learning.intersystems.com/course/view.php?id=1959&ssoPass=1
2. Learn HealthShare for Developers and System Integrators: https://learning.intersystems.com/course/view.php?id=26&ssoPass=1
3. Building Business Integrations with InterSystems IRIS: https://learning.intersystems.com/course/view.php?id=1437&ssoPass=1
4. Building Basic HL7 Integrations with InterSystems: https://learning.intersystems.com/course/view.php?id=1350&ssoPass=1

Top comments (0)