This article is a continuation of Deploying InterSystems IRIS solution on GKE Using GitHub Actions, in which, with the help of GitHub Actions pipeline, our zpm-registry was deployed in a Google Kubernetes cluster created by Terraform. In order not to repeat, we’ll take as a starting point that:
- You’ve forked the repository Github Actions + GKE + zpm example and allow Actions in your fork. Its root directory will be referenced as <root_repo_dir> throughout the article.
- You’ve replaced the placeholders in the Terraform file.
- You’ve created all the secrets (in the GitHub Actions Secrets page) mentioned in the only table in Deploying InterSystems IRIS solution on GKE Using GitHub Actions.
- All code samples will be stored in the GitHub-GKE-TLS repository to simplify copying and pasting.
Assuming all the above, let’s continue.
Getting Started
Last time we made our connection to zpm-registry like this:
curl -XGET -u _system:SYS 104.199.6.32:52773/registry/packages/-/all
The absence of a protocol before the IP address means that we’re using HTTP and, therefore, traffic is unencrypted and Infamous Eve can catch our password.
To protect against Eve eavesdropping, we need to encrypt the traffic, which means using HTTPS. Can we do this?
104.199.6.32:52773/registry/packages → https://104.199.6.32:52773/registry/packages
Generally speaking, yes. You can obtain the certificate for an IP address. But this solution has drawbacks. Read Using an IP Address in an SSL Certificate and SSL for IP Address for more details. In short, you need a static IP address and there are no free certificate providers with that ability. The benefit is also questionable.
As for free providers in general, fortunately, they do exist, as you’ll find in 9 Best Free SSL Certificate Sources. One of the leaders is Let’s Encrypt, but it issues certificates only for domain names, although there are plans to add IP Addresses in Certificates.
So, to encrypt the traffic, you first need to get a domain name. If you already have a domain name, you can skip the next section.
Getting a Domain Name
Buy a domain name from a domain registrar. There are quite a few. Prices depend on the domain name and level of service. For development purposes, you can take, for example, a domain with the suffix .dev, which will probably be inexpensive.
We won’t get into the domain registration process here, there’s nothing complicated about it. Note that from here on we’ll assume the registered domain name is example.com. Substitute your own domain.
At the end of the domain registration process, you’ll have a domain name and domain zone. They are not the same thing. See the note Definition - Domains vs. Zones and this small video, DNS Zones, to understand the difference.
Briefly, if you imagine the domain as an organization, the zone can be thought of as a department in this organization. Our domain is example.com and we’ll call the zone the same: example.com. (In a small organization you can have just one department.) Each DNS zone should have special servers that know about the IP addresses and domain names inside its zone. These links are called resource records (RR). They can be of different types (see DNS Record types). The most widely used is the A-type.
The special servers, called name servers, are provided by the domain registrar. For example, my registrar gave me the following two name servers:
ns39.domaincontrol.com
ns40.domaincontrol.com
You’ll need to create a resource record (server domain name = IP address), for instance:
zpm.example.com = 104.199.6.32
You do this by creating an A-type record in the zone example.com. After you save this record, other DNS servers all around the world will eventually know about this update and you’ll be able to refer to your zpm-registry by name: zpm.example.com:52773/registry/.
Domains and Kubernetes
As you might remember, the zpm service IP address was created during our Kubernetes Service (Load Balancer type) deployment. If you’ve played with zpm-registry, removed it, and then decided to deploy zpm-registry again, you’re likely to get another IP address. If that’s the case, you should again go to the DNS registrar web console and set a new IP address for zpm.example.com.
There’s another way to do this. During your Kubernetes deployment, you can deploy a helper tool, called External DNS, that can retrieve a newly created IP address from Kubernetes Services or from Ingress and create the corresponding DNS record. The tool doesn’t support all registrars, but it does support Google Cloud DNS, which can be responsible for DNS zones, providing name servers, and storing your resource records.
To use Google Cloud DNS, we need to transfer responsibility to it for our DNS zone example.com in the registrar web console. To do this, replace the name servers provided by domain registrar with the ones Google Cloud DNS provides. We will need to create the example.com zone in the Google console and copy/paste the name servers provided by Google. See details below.
Let’s see how to add External DNS and create our Google Cloud DNS in the code. However, to save space, I’ll include only parts of the code here. As I noted earlier, you’ll find the complete samples in GitHub GKE TLS repository.
Adding External DNS
To deploy this application to the GKE, we’ll use the power of Helm. You’ll find both the article An Introduction to Helm, the Package Manager for Kubernetes and the official documentation helpful.
Add these lines as the last job in the "kubernetes-deploy" stage in the pipeline file. Also add several new variables in the "env" section:
$ cat <root_repo_dir>/.github/workflows/workflow.yaml
...
env:
...
  DNS_ZONE: example.com
  HELM_VERSION: 3.1.1
  EXTERNAL_DNS_CHART_VERSION: 2.20.6
...
jobs:
...
  kubernetes-deploy:
...
  steps:
...
    - name: Install External DNS
      run: |
        wget -q https://get.helm.sh/helm-v${HELM_VERSION}-linux-amd64.tar.gz
        tar -zxvf helm-v${HELM_VERSION}-linux-amd64.tar.gz
  cd linux-amd64
        ./helm version
        ./helm repo add bitnami https://charts.bitnami.com/bitnami
        gcloud container clusters get-credentials ${GKE_CLUSTER} --zone ${GKE_ZONE} --project ${PROJECT_ID}
        echo ${GOOGLE_CREDENTIALS} > ./credentials.json
        kubectl create secret generic external-dns --from-file=./credentials.json --dry-run -o yaml | kubectl apply -f -
        ./helm upgrade external-dns bitnami/external-dns \
          --install \
          --atomic \
          --version=${EXTERNAL_DNS_CHART_VERSION} \
          --set provider=google \
          --set google.project=${PROJECT_ID} \
          --set google.serviceAccountSecret=external-dns \
          --set registry=txt \
          --set txtOwnerId=k8s \
          --set policy=sync \
          --set domainFilters={${DNS_ZONE}} \
          --set rbac.create=true
You can read more about parameters set by --set in the External DNS chart documentation. For now, just add these lines and let’s proceed.
Creating Cloud DNS
First, add a new file under the <root_repo_dir>/terraform/ directory. Remember to use your domain zone:
$ cat <root_repo_dir>/terraform/clouddns.tf
resource "google_dns_managed_zone" "my-zone" {
  name = "zpm-zone"
  dns_name = "example.com."
  description = "My DNS zone"
}
Also be sure that the user on whose behalf Terraform works has at least the following roles (note the DNS Administrator and Kubernetes Engine Admin roles):

If you run the GitHub Actions pipeline, these will be created.
With External DNS and Cloud DNS ready (though virtually at the moment), we can now consider how to expose our zpm-service in a way different from the load balancer service type.
Kubernetes
Our zpm-service is now exposed using a regular Kubernetes service load balancer. See the file <root_repo_dir>/k8s/service.yaml. You can read more about Kubernetes Services in Exposing applications using services. What’s important for us is that load balancer services don’t have the ability to set the domain name, and the actual Google Load Balancers created by those Kubernetes Services resources work on the TCP/UDP level of the OSI. This level knows nothing about HTTP and certificates. So we need to replace the Google network load balancer with an HTTP load balancer. We can create such a load balancer using the Kubernetes Ingress resource instead of the Kubernetes Service.
At this point, it would probably be a good idea for you to read Kubernetes NodePort vs LoadBalancer vs Ingress? When should I use what?.
Now let’s continue. What does Ingress usage mean in the code? Go to the <root_repo_dir>/k8s/ directory and make the following changes. The Service should be of type NodePort:
$ cat /k8s/service.yaml
apiVersion: v1
kind: Service
metadata:
  name: zpm-registry
  namespace: iris
spec:
  selector:
    app: zpm-registry
  ports:
  - protocol: TCP
    port: 52773
    targetPort: 52773
  type: NodePort
And you need to add the Ingress manifest:
$ cat <root_repo_dir>/k8s/ingress.yaml
apiVersion: extensions/v1beta1
kind: Ingress
metadata:
  annotations:
    kubernetes.io/ingress.class: gce
    networking.gke.io/managed-certificates: zpm-registry-certificate
    external-dns.alpha.kubernetes.io/hostname: zpm.example.com
  name: zpm-registry
  namespace: iris
spec:
  rules:
  - host: zpm.example.com
    http:
      paths:
      - backend:
          serviceName: zpm-registry
          servicePort: 52773
        path: /*
Also, add the line marked in bold into the workflow file:
$ cat /.github/workflows/workflow.yaml
...
- name: Apply Kubernetes manifests
  working-directory: ./k8s/
...
    kubectl apply -f service.yaml
    kubectl apply -f ingress.yaml
If you deploy this manifest, the Google Cloud controller will create an external HTTP load balancer, which will listen for traffic to the host zpm.example.com and send this traffic to all Kubernetes nodes on the port that’s opened during Kubernetes NodePort Service deployment. This port is arbitrary, but you don’t need to worry about it — it’s completely automated.
We can define a more detailed configuration of Ingress using annotations:
annotations:
  kubernetes.io/ingress.class: gce
  networking.gke.io/managed-certificates: zpm-registry-certificate
  external-dns.alpha.kubernetes.io/hostname: zpm.example.com
The first line says we’re using the "gce" Ingress controller. This entity creates an HTTP load balancer according to settings in the Ingress resource.
The second line is the one that relates to certificates. We’ll return to this setting later.
The third line sets the external DNS that should bind the specified hostname (zpm.example.com) to the IP address of the HTTP load balancer.
If you did deploy this manifest, you’d see (after 10 minutes or so) that an Ingress has been created, but not everything else worked:
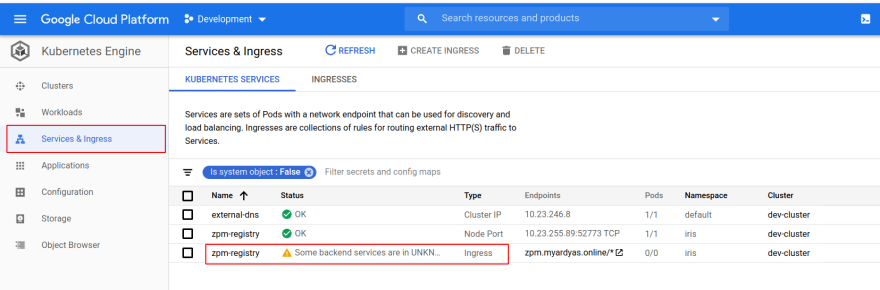

What are those "Backend services," one of which seems to be bad?
See their names, like "k8s-be-31407-..." and "k8s-be-31445-..."? These are ports opened on our single Kubernetes node. Your ports are likely to have different numbers.
31407 is a port that’s opened for health checks, which the HTTP load balancer constantly sends to be sure that node is alive.
You can take a look at those health check results by connecting to Kubernetes and proxying Node Port 31407:
$ gcloud container clusters get-credentials <CLUSTER_NAME> --zone <LOCATION> --project <PROJECT_ID>
$ kubectl proxy &
$ curl localhost:8001/healthz
ok
$ fg
^Ctrl+C
Another port, 31445, is a NodePort opened for our zpm-registry service:
$ kubectl -n iris get svc
NAME          TYPE  CLUSTER-IP   EXTERNAL-IP PORT(S)      AGE
zpm-registry  NodePort 10.23.255.89       52773:31445/TCP 24m
And the default health checks the HTTP load balancer sends a report that this service is down. Is it really?
What are those Health checks in more detail? Click on the Backend service name. Scroll down a little to see the Health check name:

Click the Health check name to see details:

We should replace the Health check "/" path with a path understandable by IRIS, like "/csp/sys/UtilHome.csp":
$ curl -I localhost:52773/csp/sys/UtilHome.csp
Handling connection for 52773
HTTP/1.1 200 OK
So, how can we set that new path in the Health check. The answer with readiness/liveness probes as they’re used, if present, in place of the default "/" path.
So, let’s add those probes to the Kubernetes StatefulSet manifest:
$ cat /k8s/statefulset.tpl
...
containers:
- image: DOCKER_REPO_NAME:DOCKER_IMAGE_TAG
...
  ports:
  - containerPort: 52773
    name: web
  readinessProbe:
    httpGet:
      path: /csp/sys/UtilHome.csp
      port: 52773
    initialDelaySeconds: 10
    periodSeconds: 10
  livenessProbe:
    httpGet:
      path: /csp/sys/UtilHome.csp
      port: 52773
    periodSeconds: 10
  volumeMounts:
  - mountPath: /opt/zpm/REGISTRY-DATA
    name: zpm-registry-volume
  - mountPath: /mount-helper
    name: mount-helper
So far, we’ve made several changes just to open a door for the main event: the certificate. Let’s get it and run all this finally.
Getting the Certificate
I highly recommended you watch these videos that describe different ways to obtain SSL/TLS certificates for Kubernetes:
- Create a Kubernetes TLS Ingress from scratch in Minikube
- Automatically Provision TLS Certificates in K8s with cert-manager
- Use cert-manager with Let's Encrypt® Certificates Tutorial: Automatic Browser-Trusted HTTPS
- Super easy new way to add HTTPS to Kubernetes apps with ManagedCertificates on GKE
In short, there are several ways to get a certificate: openssl self-signed, manual certbot by Let’s Encrypt, automated cert-manager connected to Let’s Encrypt and, finally, the native Google approach, Managed Certificates, which is our choice for its simplicity.
Let’s add it:
$ cat <root_repo-dir>/k8s/managed-certificate.yaml
apiVersion: networking.gke.io/v1beta1
kind: ManagedCertificate
metadata:
  name: zpm-registry-certificate
  namespace: iris
spec:
  domains:
  - zpm.example.com
Add the bolded line to the deployment pipeline:
$ cat /.github/workflows/workflow.yaml
...
- name: Apply Kubernetes manifests
  working-directory: ./k8s/
  run: |
    gcloud container clusters get-credentials ${GKE_CLUSTER} --zone ${GKE_ZONE} --project ${PROJECT_ID}
    kubectl apply -f namespace.yaml
    kubectl apply -f managed-certificate.yaml
    kubectl apply -f service.yaml
...
Enabling it in Ingress was done before as the Ingress annotation, remember?
$ cat /k8s/ingress.yaml
...
annotations:
  kubernetes.io/ingress.class: gce
  networking.gke.io/managed-certificates: zpm-registry-certificate
...
So now we’re ready to push all those changes to the repository:
$ git add .github/ terraform/ k8s/
$ git commit -m "Add TLS to GKE deploy"
$ git push
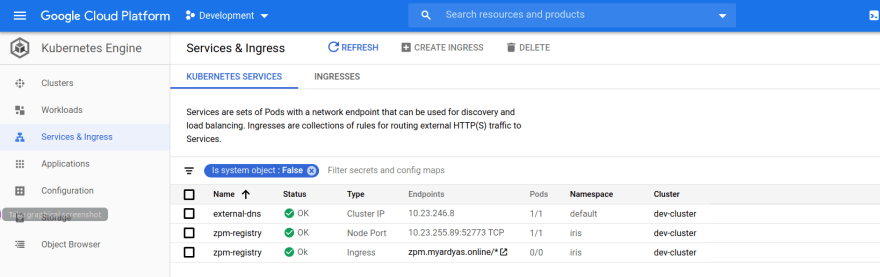
After 15 minutes or so (cluster provisioning should be done), you should see a "green" Ingress:
Then you should set at least two name servers provided by Google in your domain name registrars console (if you use another registrar than Google Domains):

We won’t describe this process as it’s specific to each registrar and usually well-described in the registrar’s documentation.
Google already knows about the new resource record created automatically by ExternalDNS:
$ dig +short @ns-cloud-b1.googledomains.com. zpm.example.com
34.102.202.2
But it will take some time until this record is propagated all around the world. Eventually, however, you’ll receive:
$ dig +short zpm.example.com
34.102.202.2
It’s a good idea to check the certificate status:
$ gcloud container clusters get-credentials <CLUSTER_NAME> --zone <LOCATION> --project <PROJECT_ID>
$ kubectl -n iris get managedcertificate zpm-registry-certificate -ojson | jq '.status'
{
  "certificateName": "mcrt-158f20bb-cdd3-451d-8cb1-4a172244c14f",
  "certificateStatus": "Provisioning",
  "domainStatus": [
    {
      "domain": "zpm.example.com",
      "status": "Provisioning"
    }
  ]
}
You can read about the various status meanings on the Google-managed SSL certificate status page. Note that you might have to wait an hour or so for the initial certificate provisioning.
You might encounter the domainStatus "FailedNotVisible." If so, check that you’ve really added Google name servers in your DNS registrar console.
You should wait until both certificateStatus and domainStatus become available, and you may even have to wait a little longer, as stated in Google-manages SSL certificate status. Finally, however, you should be able to call zpm-registry with HTTPS:
curl -XGET -u _system:SYS https://zpm.example.com/registry/packages/-/all
Conclusion
Google does a great job creating all required Google resources based on Kubernetes resources.
In addition, Google Managed Certificates is a cool feature that greatly simplifies obtaining a certificate.
As always, don’t forget to remove Google resources (GKE, CloudDNS) when you no longer need them as they cost money.


Top comments (0)