
Introduction
If you are a person who even in the wildest of dreams wants to be a software developer, then Git is the first thing I would recommend you to learn. Git is a version control system, and GitHub is one of the different tools available to do it.
Technical terms aside, Have you ever collaborated with different people for working on the same code, and then every time you make a change, you compress it and send the zip file to the other and use it? Such a painful way of informing changes to others right, Professionals reading this would really wonder, but not gonna lie, this is how 80% of my university students exchanged code in their freshmen year. If you have ever faced any similar issues in your coding life, then you are in the right place to improvise yourself.
If you are a conventional person who wants to all kinds of version control systems and their use cases, then you can read this article(Version Control Systems) and come back to this article, Or if you are the kind of person who just wants to go work instead of reading pages of theory, then you can continue reading the current article.
Prerequisite
All the best❤️ for your new venture, I am sure this would definitely change the way you manage your code among teams after finishing this course. First of all, before starting go to git-it repository and download the entire repository, then run the .exe file to open a small application through which you would learn to use GitHub.
You would have the following challenges to complete and learn git through those challenges.

Image Credits: git-it
How to Approach:
I have divided the course challenges into 5 days for the sake of simplicity and to avoid overkill. It is up to you to complete however much you would like to do. I would suggest you to go ahead with one day at a time for 5 days, but if you think you are faster, then you can obviously finish it in one sitting💯💯.
Day 1:
Get Git:
- Git is free open-source software (the source code is public) written by Linus Torvalds who also wrote the Linux operating system's kernel.
- I recommend installing Git by installing the GitHub desktop app
- This is the best way to install git bash on your computer, especially if you are a beginner. And also, don’t forget to select “add git bash in Windows Explorer Integration”
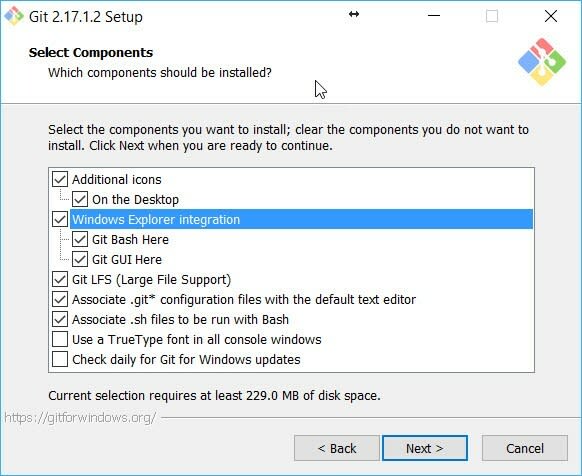
Image Credits: git-it
Now open git from the start menu.
Steps:
1) You can Set your name using:
git config --global user.name "Your Name"
2) Now set your email:
git config --global user.email "youremail@example.com"
Repository:
You can imagine it as a project folder with all the relevant files inside of it. Sometimes they're called "repos" in short.
You tell Git what your project is, and Git will start tracking all the changes to that folder. This makes it a Git repository: A folder of items being tracked by Git. Git tracks when files are added, subtracted, or even a single letter in a single file
You will use Command Line Interface (CLI) to work on Git since that is the most efficient way to get things done once you master it. The first part of the command lets your computer know you're talking to Git. The parts following that are the commands and the different options you want Git to act on.
Navigate to your preferred folder and right-click (select more options), then chose open with git bash.
Steps:
1) First, make a new folder:
Tip: mkdir stands for make directory
mkdir hello-world
2) Then go into that folder:
Tip: cd stands for change directory
cd hello-world
3) Finally, tell Git to initialize (start tracking) the folder you are now in:
git init
The last command should return something starting with "Initialized empty Git repository". This is the way of telling git that this is my project folder and to take care of all the changes here. Git will create a hidden folder and use that to track all the changes in this ‘hello-world” folder.
Day 2:
Commits:
Commits are core to using Git. They are the moments in which you save and describe the work you've done, using commit messages.
Simply put, a commit is a point of history in your folder, every commit will have an id attached to it, which you can use to revert to that point of history in your folder, more on this later.
Navigate to your hello world folder, right-click (select more options), then chose open with git bash.
Steps:
1) Create a new file using notepad and save it as readme.txt in your hello world folder.
2) You can check the status of the folder using:
git status
Git should tell you that a file has been added.
3) Then add these files to the stage(only after this, we can commit any of our changes) using the following command:
git add readme.txt
Why add a command? In real-time, so many files are changed in our repository. But we might not want all of them to be saved in our commit. We would want only a few file changes to be saved in history. So using this add command, we can add all the files which we would like to save in our commit.
4) Finally, commit those changes to the repository's history with a short (m) message describing the updates.
git commit -m "Created readme"
whatever is followed after -m is your commit message. It is always advised to put meaningful commit messages. Not “advasdma”. Trust me good commit messages save you tonnes of time if ever your application goes wrong somewhere.
5) Now add another line to 'readme.txt' and save the file again.
In the terminal, you can view the difference between the file now and how it was at your last commit.
Tell Git to show you the diff:
git diff

Image Credits: git-it
Githubbingggg:
The repository you've created so far is just on your computer, which is handy but makes it pretty hard to share and work on with others. No worries, that's what GitHub is for!
GitHub acts as the central repository for you and everyone else to share. You push your changes to it and pull down changes from others.
Steps:
1) Create a GitHub Account
Visit github.com and sign up for a free account. High five, welcome!
Remote:
When you put something on GitHub that copy lives on one of GitHub's servers. This makes it a remote repository because it is not on your computer, but on a server, "remote" and somewhere else. By pushing your local (on your computer) changes to it, you keep it up to date.

Image Credits: git-it
Steps to create a remote Repo:
• Go to github.com, log in, and click the '+' in the top right and then click 'New repository'.
• Give it a name that matches your local repository's name, 'hello-world', and a short description.
• Make it public. This means it'll be listed on your public profile.
• Don't initialize with a README because we already have a file, locally, named 'readme.txt'. This is a helper option from GitHub if you hadn't already made it.
• Leave '.gitignore' and 'license' set to 'none'. We won't use them in this tutorial.
• Click create repository!
Note:
- A readme explains what the project is, how to use it, and oftentimes, how to contribute (though sometimes there is an extra file, 'CONTRIBUTING.md', for those details).
- A .gitignore is a list of files that Git should not track, for instance, files with passwords!
- A license file is the type of license you put on your project. This lets others know how they can use it. Information on the types is here: choosealicense.com.
Now, at the top you'll see 'Quick Setup', make sure the 'HTTPS' button is selected and copy the address—this is the address of your repository on GitHub's servers.
Back in your terminal, and inside of the 'hello-world' folder that you initialized as a Git repository in the earlier challenge, you want to tell Git to remember the address of the remote version on GitHub's servers. You can have multiple remotes, so each requires a name. The primary remote is typically named origin.
To add a remote named 'origin' to your repository:
git remote add origin <URLFROMGITHUB>
Note for Windows users:
If you have GitHub Desktop on your computer, a remote named 'origin' is automatically created in your local repository. In that case, you'll just need to tell it what URL to associate with 'origin'. Use this command instead of the 'add' one above:
git remote set-url origin <URLFROMGITHUB>
Next, you want to push (send) everything you've done locally to your remote repository on GitHub.
Git has a branching system so that you can work on different parts of a project at different times. We'll learn more about that later, but by default, the first branch is named 'master'. When you push (and later pull) from a project, you tell Git the branch name you want and the name of the remote that it lives on.
Push:
Next, you want to push (send) everything you've done locally to your remote repository on GitHub. Git has a branching system so that you can work on different parts of a project at different times. We'll learn more about that later, but by default, the first branch is named 'master'. When you push (and later pull) from a project, you tell Git the branch name you want and the name of the remote that it lives on.
In this case, we'll send our branch named 'master' to our remote on GitHub named 'origin'.
git push origin master

Image Credits: git-it
Day 3:
Forks:
So far, we have seen how to use git to manage your repo. Now we will see a fork which is interacting with other people’s repo.
When you fork a repository, you're creating a copy of it on your GitHub account. Your forked copy begins its life as a remote repository—it exists just on your GitHub account, not on your computer. Forks are used for creating your own version of a project or contributing back your changes (such as bug fixes or new features) to the original project.

Image Credits: git-it
Clone Your Fork Locally
Now, in the terminal, you'll clone the repository onto your computer.
Back out of your 'hello-world' folder:
Tip: the two dots mean to step out of a directory one level
cd ..
Now, clone your fork:
git clone <URLFROMGITHUB>
here
git clone https://github.com/Indira-kumar/patchwork.git or
git clone https://github.com/jlord/patchwork.git
Go into the folder it created for your local copy of the fork (in this case, named 'patchwork').
cd <FOLDERNAME>
Type git remote -v to see that the address to the fork is already set up.
Connect to the Original Repository
You can name this remote connection anything you want, but typically people use the name 'upstream'; let's use that for this.
git remote add upstream https://github.com/jlord/patchwork.git
To be sure you have the correct remotes set up, type git remote -v to list out the addresses you have stored. You should have an 'origin' remote with your fork's address and then an 'upstream' remote with the address to the original, the URL noted above in this step.
Branches:
It's common practice when working on a project or with others on a project to create a branch to keep your working changes in. This way you can do your work while the main, commonly named 'master', branch stays stable. You can even create a branch for a branch.
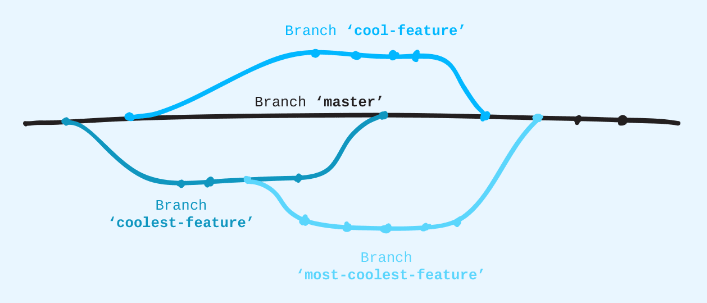
Image Credits: git-it
When you create a branch, Git copies everything from the current branch you're on and places it in the branch you've requested be made.
Branches are case-sensitive so name your branch exactly the way your GitHub name appears.
git branch <BRANCHNAME>
To go into that branch and work on it you checkout a branch. Go to your new branch:
git checkout <BRANCHNAME>
Now make changes as you wish in your local repository and then while pushing you get to choose which remote and which branch you want to push to.
git push origin <BRANCHNAME>

Image Credits: git-it
Day 4:
Collaborators are other GitHub users who are permitted to make edits to a repository owned by someone else.
Contributor, this describes another GitHub user who has made contributions, through a Fork and Pull Request, to a project.
The URL should look like this, but with your username.
github.com/YOURUSERNAME/patchwork/settings/collaboration
Here in your repository right now, you can add reporobot as a collaborator.
Pulling from a Remote:
If you're working on something with someone else, you need to stay up to date with the latest changes. So, you'll want to pull in any changes that may have been pushed to the central GitHub repository.

Image Credits: git-it
Use the following command to make changes to the local code:
git pull <REMOTENAME> <BRANCHNAME>
Day 5:
Pull Requests:
when you make changes and improvements to a project you've forked, you'll want to send those changes to the maintainer of the original and request that they pull those changes into the original so that everyone can benefit from the updates—that's a pull request.
https://opensource.com/article/19/7/create-pull-request-github
Merge Locally:
First, move into the branch you want to merge into—in this case, the branch 'gh-pages'.
git checkout gh-pages
Now tell Git what branch you want to merge in—in this case, your feature branch that begins with "add-".
git merge <BRANCHNAME>
Tidy up by deleting your feature branch. Now that it has been merged you don't really need it around.
git branch -d <BRANCHNAME>
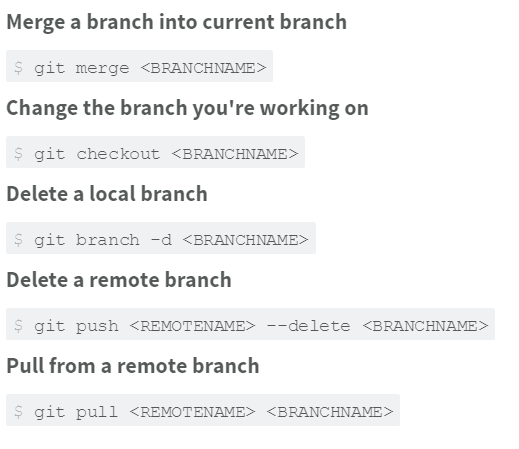
Image Credits: git-it
Note:
git rm - -cached <FILENAME>
To remove the files from the stage (from the track)
Git merge tool
To manage merge conflicts, and merge hassle-free (winmerge is popular)
Git stash
When you are working on a particular branch (branch A), you are not yet done with changes made, so you don’t want to commit your changes, but you have to switch to another branch (branch B) for some change. Then to keep to changes in branch A without committing you would use “git stash”.
Then now you can switch to branch B, and make your changes and commits, and when you come back to branch A for working, you can do “git stash apply” to bring back those unsaved changes
Here is a video for an in-depth definition.
Congratulations on completing the basic GitHub course, now you can go for more advanced topics like rebase, force push etc. in this course
References:
- Learn Git in 20 mins
- Git-it project - This course is based on this software. Credits to jlord for such amazing content.
- CS50 GitHub
Thank You So much for your time!! Happy Coding❤️


Top comments (0)