React Native is one of the popular hybrid mobile development framework using javascript.
Here expo is used to create the app itself.
- To create the project
# installing expo cli
$ npm install --global expo-cli
# initializing the project
$ npm init project-name
- Stripe, according to Wikipedia
Stripe primarily offers payment processing software and application programming interfaces for e-commerce websites and mobile applications.
- Before everything, we need to be a part of stripe. Let's create an account in stripe at Register Stripe
- After creating the account, copy the publishable key given in the dashboard section of test data.
- Now let's install the expo payment module.
$ expo install expo-payments-stripe
- Importing and usage of the module.
import { PaymentsStripe as Stripe } from "expo-payments-stripe";

// initialize it in useEffect or componentDidMount
Stripe.setOptionsAsync({
   publishableKey: "YOUR_COPIED_KEY",
   androidPayMode: 'test', // [optional] used to set wallet environment (AndroidPay)
   merchantId: 'your_merchant_id', // [optional] used for payments with ApplePay
});
Creating the Card Component 💳
- Create a file
CardForm.js, and paste the content below.
import React, { PureComponent } from "react";
import {View, Text, StyleSheet, Alert } from "react-native";
import CardButton from "./CardButton";

export default class CardForm extends PureComponent {
    state = {
      loading: false,
      token: null
    }

    render() {
      return (
        <View style={styles.container}>
          <CardButton
            text="Card Details"
            loading={this.state.loading}
            onPress={this.handleCardDetails}
          />
          <View style={styles.token}>
            { token &&
              <View style={{ display:'flex', flexDirection: 'column', alignItems: 'center', justifyContent: 'center', padding: 5 }}>
                <Text style={styles.tokenLabel}>Token: {this.state.token?.tokenId}</Text>
                 <CardButton
                  text="Make Payment"
                  onPress={this.handlePayment}
                 />
              </View>
            }
          </View>
        </View>
      )
    }
}
- Define the styles for the component.
const styles = StyleSheet.create({
   container: {
     flex: 1,
     justifyContent: 'center',
     alignItems: 'center'
   },
   tokenLabel: {
     textAlign: 'center',
     color: '#111',
     marginBottom: 5,
     padding: 5
   }
});
- Let's create the button component used in the above
CardForm.jscreate a file calledCardButton.js.
import React, { PureComponent } from 'react'
import {
  View,
  Text,
  TouchableHighlight,
  ActivityIndicator,
  Platform,
  StyleSheet,
} from 'react-native'
import PropTypes from 'prop-types'

export default class CardButton extends PureComponent {
  static propTypes = {
    text: PropTypes.string.isRequired,
    disabledText: PropTypes.string,
    loading: PropTypes.bool,
    disabled: PropTypes.bool,
    style: PropTypes.any,
    onPress: PropTypes.func.isRequired,
  }

handlePress = (event) => {
    const { loading, disabled, onPress } = this.props

    if (loading || disabled) {
      return
    }

    if (onPress) {
      onPress(event)
    }
  }


  render() {
    const { text, disabledText, loading, disabled, style, ...rest } = this.props

    return (
       <TouchableHighlight
        {...rest}
        style={[styles.button, style]}
        underlayColor="rgba(0,0,0,0.5)"
        onPress={this.handlePress}>
        <View>
          {loading &&
            <ActivityIndicator
              animating
              size="small"
            />
          }
          {!loading && !disabled &&
            <Text>
              {text}
            </Text>
          }
          {!loading && disabled &&
            <Text>
              {disabledText || text}
            </Text>
           }
        </View>
      </TouchableHighlight>
    );
  }
}
- Defining the styles for CardButton.
  const styles = StyleSheet.create({
   button: {
    padding: 8,
    margin: 10,
    height: Platform.OS === 'ios' ? 35 : 40,
    minWidth: 160,
    overflow: 'hidden',
    borderWidth: 1,
    borderRadius: 4,
    backgroundColor: 'white',
    alignItems: 'center',
   }
})
Defining Functions in CardForm.js ⚡
- let us define the method
handleCardDetails(). - Here we receive a token from stripe that help us to make a payment using our server.
   const handleCardDetails = async () => {
     try {
       this.setState({ loading: true });
       const cardOptions = {
         requiredBillingAddressFields: 'full',
            prefilledInformation: {
              billingAddress: {
                name: 'Test Name',
                line1: 'Test Line 1',
                line2: '4',
                city: 'Test City',
                state: 'Test State',
                country: 'Test Country',
                postalCode: '31217'
              }
           }
       };
       // GETS YOUR TOKEN FROM STRIPE FOR PAYMENT PROCESS
       const token = await.Stripe.paymentRequestWithCardFormAsync(cardOptions);
       this.setState({ loading: false, token });
     } catch(error) this.setState({ loading: false });
   }
- Before we define the method for
makePayment(), we have to create a server that makes the payment using the generated token.
- Create a folder called
serverin project root directory.
- Inside the
serverfolder, creating a nodejs server.
# initializing a node project
$ npm init -y
# installing required dependencies
$ npm install express stripe cors --save
- express: it is used to create a http server that makes a request from our app to the stripe server.
- stripe: it provides convenient access to the Stripe API from applications written in server-side JavaScript.
cors: it is used to handle the CORS policy problem between our projects.
Create a file called
index.jsin the server directory.
const path = require('path')
const express = require('express')
const stripe = require('stripe')('YOUR_SECRET_KEY_FROM_STRIPE_DASHBOARD')
const cors = require('cors')

const app = express()
app.use(cors())

app.post('/api/payments/mobile/create', async (req, res) => {
    const total = req.query.total;
    const token = req.query.token;

    console.log(`Payment Request Recieved for the amount : ${total} >>> token: ${token}`)

    stripe.charges.create({
        amount: total,
        currency: 'inr',
        source: token
    }).then(charge => {
        res.status(200).send(charge);
    }).catch(e => console.log(e));

})

app.listen(4000);
- Do not forget to start the node server using the command:
node index.js
Defining the method makePayment() in react component CardForm.js.
- Let us use
axiosa popular tool to make http requests. - Install axios to your react project.
$ npm install axios --save
- import axios and use the module to make a request for payment.
   const makePayment = async () => {
      this.setState({ loading: true });
      axios({
        method: "POST",
        url: `http://192.168.1.10:4000/api/payments/mobile/create?total=AMOUNT_TO_PAY&token=${this.state.token.tokenId}}`
      }).then(response => {
          // YEY! PAYMENT DONE
          // CHECKOUT YOUR STRIPE DASHBOARD FOR PAYMENTS MADE
      }).catch(error => this.setState({ loading: false, token: null }));
   }
- Make sure you don't use localhost in the place of the http url inside axios due to the usage of expo we have to define our system local ipaddress.
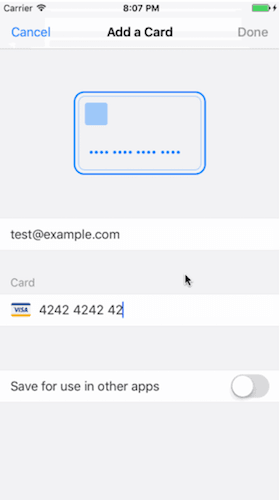
- Do not forget to test the stripe payment using 42 repeatedly for all card information.
Yey! We have completed the stripe integration with react native expo. Where you can start using to make payment as real just by changing the test keys with real keys 🔥.


Top comments (7)
Hello! In Android perfect work! But in iOS don't work.
Did you ever get iOS to work?
Could you mention what error you exactly experience in IOS?
Hello, great tutorial, but something weird happened after installing expo-payments-stripe package, my expo server went down and every time I try to start it i get this error:
Cannot destructure property 'scheme' of 'undefined' as it is undefined.
Thank for sharing such knowledge
Hello! Do you have a link this project in github? I try build and not success. Thanks
Okay ill give you a link which is similar to this try that out!
github.com/imprakashraghu/amazon-m...